Northcutt, Curtis G., Lu Jiang, and Isaac L. Chuang. “Confident learning: Estimating uncertainty in dataset labels.” arXiv preprint arXiv:1911.00068 (2019).
论文:https://arxiv.org/abs/1911.00068
代码:https://github.com/cgnorthcutt/cleanlab
关键词: “Confident learning” ,“estimate noise” , “train with confidenc” , “cleanlab”

标注数据存在错误怎么办?MIT&Google提出用置信学习找出错误标注(附开源实现)
Cleanlab中文文档教程
什么是Confident learning (CL)?
pruning noisy data, counting to estimate noise, and ranking examples to train with confidence
评估noise,并进行统计过滤,使用confidence score进行训练。
model-centric or data-centric?
classification noise process (CNP)
Introduction
Confident learning主要分为以下分支:
- Prune, to search for label errors,如[1] [2] 通过loss - reweighting避免noise label在训练迭代中负面影响
- Count, to train on clean data, avoiding error-propagation in learned model weights from reweighting the loss 训练在clean data上面
- Rank which examples to use during training, to allow learning with unnormalized probabilities or decision boundary distances
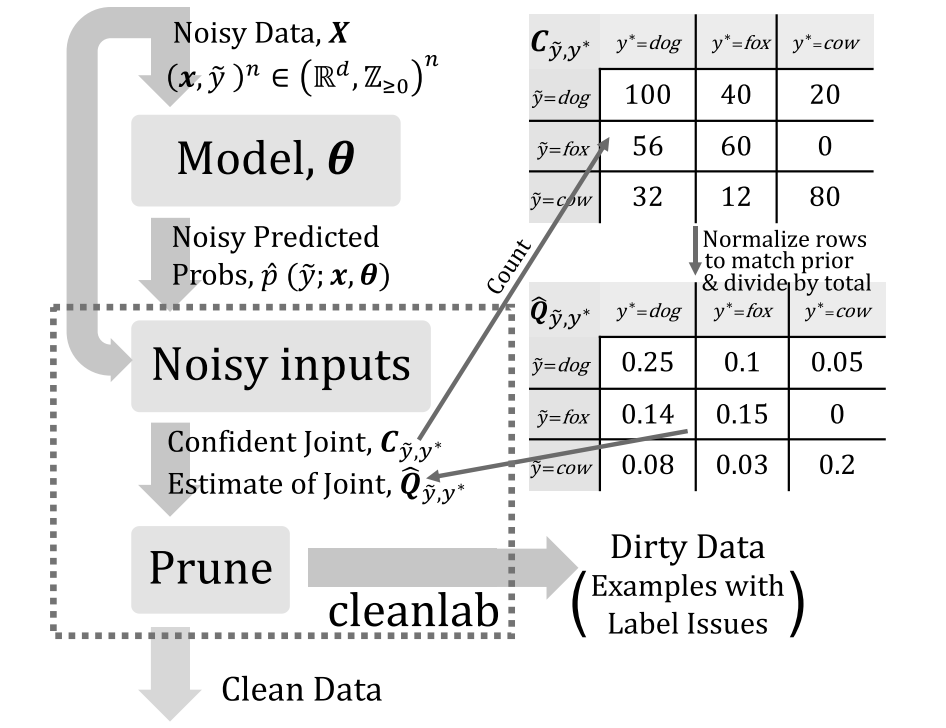
上图是一个传统的Confident learning。
Three key contributions
- 证明了CL 可以精确的评估noisy和true lable的联合分布,通过label errors的精确识别
- 提供了CL在三个tasks上的表现: (a) label noise estimation, (b) label error finding (c) learning with noisy labels,提升resnet在imagenet上的精度,和总结介绍了最近7中sota的方法
- 我们将cleanlab1作为标准Python包进行开源,以重现所有的结果
Framework
 表示the set of
  examples
 对应noise label
Assumptions
基于a class conditional classification noise process (CNP)[3],
 表示对于
表示对于 类被错误的labled为
 类,对于每一个
 ,都有对于的
 ,一共有
,一共有 个概率。
个概率。
Notation
先贴一个Notation
**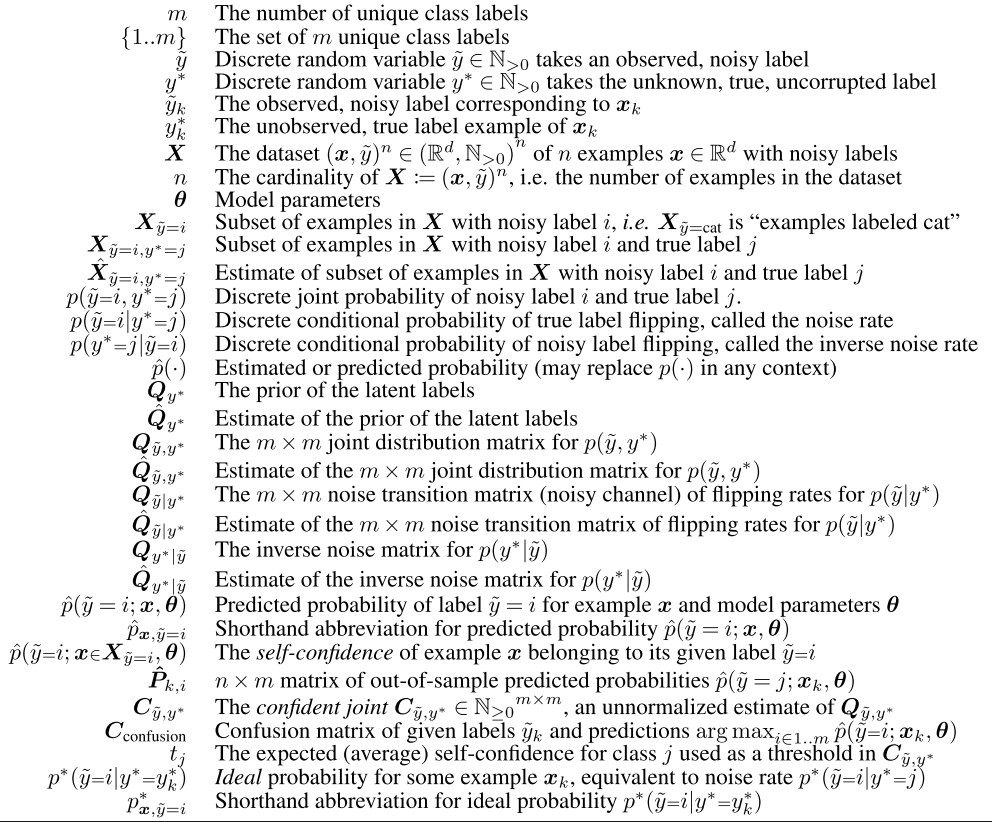
 表示错误label为cat的sample,
Sparsity表示在混淆矩阵非对角线概率中是稀疏的,比如在imagenet中 有更高的概率被mislabele为
 ,但是不太会被标为
Self-Confidence指的是example  belongs to its given label
  的概率,用公式表示为
如果low self-confidence过于低可能就是一个label error.
CL Methods
Confident learning 评估在noisy和(true) latent labels之间的联合分布
The main procedure consists of three steps:
(1)、评估m×m joint distribution matrix  去描述class-conditional label noise
(2)、filter out noisy examples
(3)、使用re-weighting examples by class weights 去训练网络。
下面基于这三个step对一些方式进行分析,主要用到两个input:
- predicted probabilities:

- array of noisy labels:

Count: Label Noise Characterization
通过 进行Counts。举个例子
 表示有十个 examples are labeled 3 but should be labeled 1。
Confusion matrix 
 是一个confusion matrix对于given labels
  和预测
和预测 。在每个class概率分布不同的情况下会失效。即是下面这种情况:
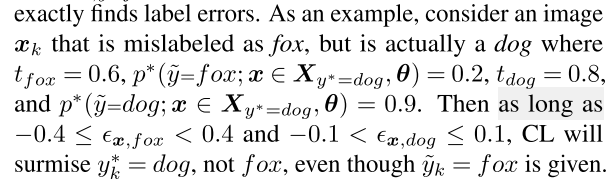
The confident joint 
计算计数矩阵  (类似于混淆矩阵),如图1中的
 意味着,人工标记为dog但实际为fox的样本为40个。具体的操作流程如图2所示:
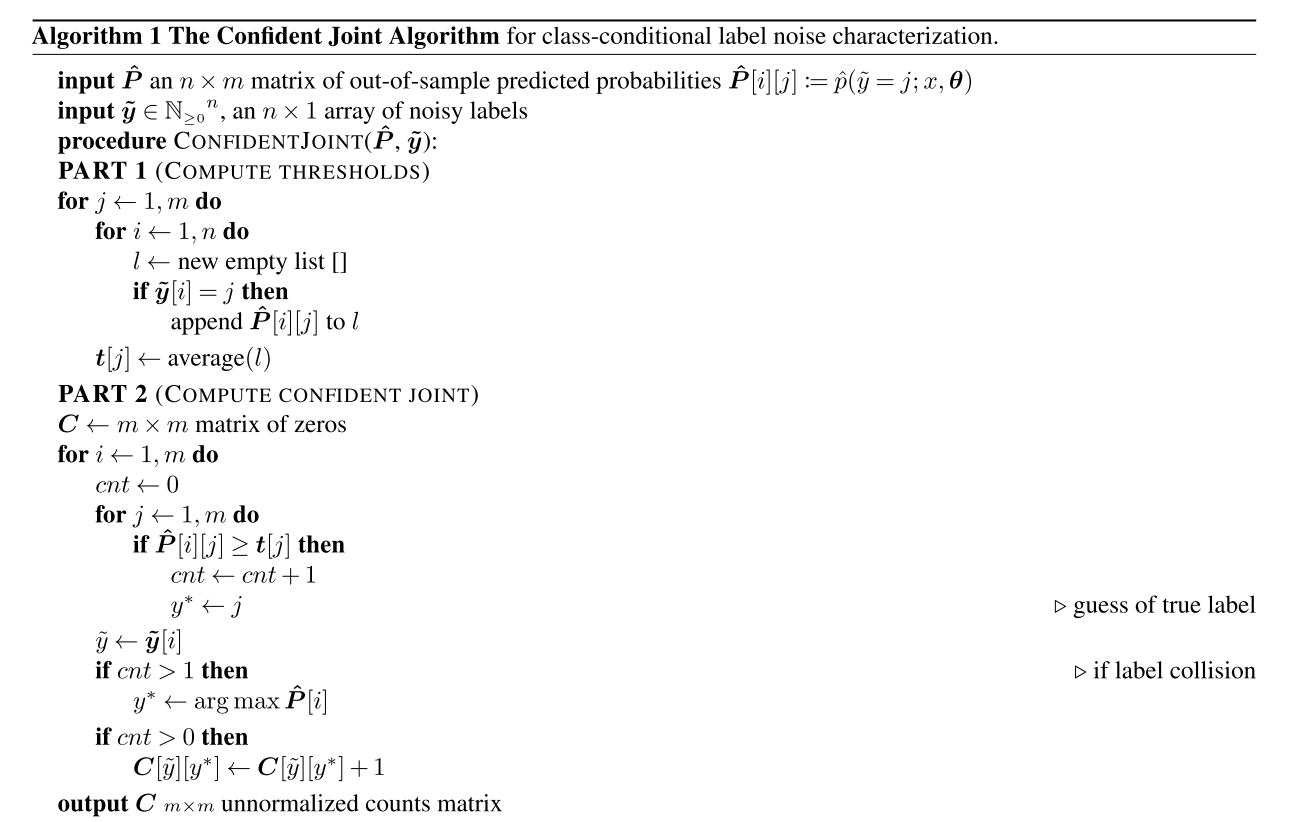
Estimate the joint 
给定一个 ,我们可以计算
 如下:
如下: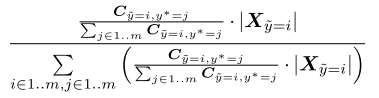
Count:估计噪声标签和真实标签的联合分布
我们定义噪声标签为  ,即经过初始标注(也许是人工标注)、但可能存在错误的样本;定义真实标签为
  ,但事实上我们并不会获得真实标签,通常可通过交叉验证对真实标签进行估计。此外,定义样本总数为
  ,类别总数为
  。
。
为了估计联合分布,共需要4步:
- step 1 : 交叉验证:
- 首先需要通过对数据集集进行交叉验证计算第
 样本在第
样本在第  个类别下的概率
  ;
; - 然后计算每个人工标定类别
 下的平均概率
  作为置信度阈值;
 - 最后对于样本
 ,其真实标签
  为
为  个类别中的最大概率
  ,并且
,并且  ;
;
- 首先需要通过对数据集集进行交叉验证计算第
- step 2: 计算计数矩阵
 (类似于混淆矩阵),如图1中的
 意味着,人工标记为dog但实际为fox的样本为40个。具体的操作流程如图2所示:
 - step 3 : 标定计数矩阵:目的就是为了让计数总和与人工标记的样本总数相同。计算公式如下面所示,其中
 为人工标记标签
  的样本总个数:

- step 4 : 估计噪声标签
 和真实标签
和真实标签 的联合分布
的联合分布 ,可通过下式求得:

Rank and Prune: Data Cleaning
Two approaches are:
(1)、use the off-diagonals of ,混淆矩阵
,混淆矩阵
- Method: .用混淆矩阵的非对角线去过滤noise label
(2)、 评估label error的数量使用predicted probability去rank然后remove error。
在得到噪声标签和真实标签的联合分布  ,论文共提出了5种方法过滤错误样本。
- Method 1:
 ,选取
,选取  的样本进行过滤,即选取
  最大概率对应的下标
  与人工标签不一致的样本。
 - Method 2:
 ,选取构造计数矩阵
  过程中、进入非对角单元的样本进行过滤。
 - Method 3: Prune by Class (PBC) ,即对于人工标记的每一个类别
 ,选取
,选取  个样本过滤,并按照最低概率
  排序。
排序。 - Method 4: Prune by Noise Rate (PBNR) ,对于计数矩阵
 的非对角单元,选取
  个样本进行过滤,并按照最大间隔
  排序。
排序。 - Method 5: C+NR,同时采用Method 3和Method 4.
上述这些过滤样本的方法在cleanlab也有提供,我们只要提供2个输入、1行code即可clean错误样本:
import cleanlab# 输入# s:噪声标签# psx: n x m 的预测概率概率,通过交叉验证获得# Method 3:Prune by Class (PBC)baseline_cl_pbc = cleanlab.pruning.get_noise_indices(s, psx, prune_method='prune_by_class',n_jobs=1)# Method 4:Prune by Noise Rate (PBNR)baseline_cl_pbnr = cleanlab.pruning.get_noise_indices(s, psx, prune_method='prune_by_noise_rate',n_jobs=1)# Method 5:C+NRbaseline_cl_both = cleanlab.pruning.get_noise_indices(s, psx, prune_method='both',n_jobs=1)
Theory
Noiseless Predicted Probabilities
Lemma 1 (Ideal Thresholds)
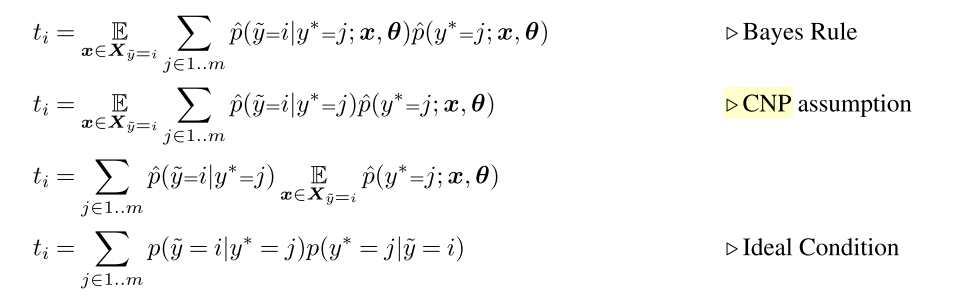
Using
New to cleanlab? Start with:
- Visualizing confident learning
- A simple example of learning with noisy labels on the multiclass Iris dataset.
The main procedure is simple:
- Compute cross-validated predicted probabilities.
- Use
cleanlabto find the label errors in CIFAR-10. - Remove errors and train on cleaned data via Co-Teaching.
import matplotlib.pyplot as plt#折线图x = [0,0.1,0.2,0.3,0.4,0.5,0.6,0.7,0.8,0.9,1.0]#点的横坐标pre = [0,1,0.99,0.98,0.96,0.94,0.91,0.86,0.81,0.75,0.71]#线1的纵坐标recal = [0,0.06,0.14,0.24,0.35,0.46,0.58,0.69,0.81,0.90,0.96]#线2的纵坐标plt.figure(figsize=(10,8))plt.plot(x,pre,'s-',color = 'r',label="ATT-RLSTM")#s-:方形plt.plot(x,recal,'o-',color = 'g',label="CNN-RLSTM")#o-:圆形plt.xlabel("fraction noise(%)")#横坐标名字# plt.ylabel("noise rate")#纵坐标名字plt.legend(loc = "best")#图例plt.show()import matplotlib.pyplot as plt#折线图x = [0,0.1,0.2,0.3,0.4,0.5,0.6,0.7,0.8,0.9,1.0]#点的横坐标noiserate = [0.361,0.346,0.326,0.299,0.27,0.2352,0.1963,0.1552,0.1076,0.0613,0.0306]#线1的纵坐标plt.figure(figsize=(10,8))plt.plot(x,noiserate,'s-',color = 'r')#s-:方形plt.xlabel("fraction noise(%)")#横坐标名字plt.ylabel("noise rate(%)")#纵坐标名字plt.show()import matplotlib.pyplot as plt#折线图x = [0,0.1,0.2,0.3,0.4,0.5,0.6,0.7,0.8,0.9,1.0]#点的横坐标noiserate = [50000,48940,47441,45601,43530,41180,38508,35509,32031,28389,25741]#线1的纵坐标plt.figure(figsize=(10,8))plt.plot(x,noiserate,'s-',color = 'r')#s-:方形plt.xlabel("fraction noise(%)")#横坐标名字plt.ylabel("training sample")#纵坐标名字plt.show()
交叉验证
对训练集通过交叉验证来找出一些可能存在错误标注的样本
为什么要进行交叉验证?
将原始数据分为3个数据集合,我们就大大减少了可用于模型训练的样本数量, 并且得到的结果依赖于集合对(训练,验证)的随机选择。
在所有CV方法中, 最基本的方法被称之为,k-折交叉验证 :
- 将 k−1 份训练集子集作为 training data (训练集)训练模型;
- 将剩余的 1 份训练集子集作为验证集用于模型验证(也就是利用该数据子集计算模型的性能指标,例如准确率)。
sklearn—KFold and StratifiedKFold
KFold划分数据集的原理:根据n_split直接进行划分
StratifiedKFold划分数据集的原理:划分后的训练集和验证集中类别分布尽量和原数据集一样 ```StratifiedKFold: 抽样后的训练集和验证集的样本分类比例和原有的数据集尽量是一样的
对(X, Y1)进行抽样
Y1中有5个类别,比例为1:1:1:1:1
所以,每个KFold的样本数必须为 1x+1x+1x+1x+1*x=5x个样本
stratifiedKFolds = StratifiedKFold(n_splits=2, shuffle=False) for (trn_idx, val_idx) in stratifiedKFolds.split(X, Y2): print((trn_idx, val_idx)) print((len(trn_idx), len(val_idx)))
Out: (array([10, 11, 12, 13, 14, 15, 16, 17, 18, 19]), array([0, 1, 2, 3, 4, 5, 6, 7, 8, 9])) (10, 10) (array([0, 1, 2, 3, 4, 5, 6, 7, 8, 9]), array([10, 11, 12, 13, 14, 15, 16, 17, 18, 19])) (10, 10)
<a name="IfrL3"></a>
## Get started with easy, quick examples
<a name="m9Tz9"></a>
### Use `cleanlab` with any model (Tensorflow, caffe2, PyTorch, etc.)
`cleanlab` package可以服务任何model,包括PyTorch, Tensorflow, caffe2, scikit-learn, mxnet等等。<br />如果使用scikit-learn classifier, cleanlab就能直接使用out-of-the-box,如果使用其他的框架例如pytorch、tensorflow,也只需要编写我们的classifer去继承`sklearn.base.BaseEstimator`这个类。
```python
from sklearn.base import BaseEstimator
class YourFavoriteModel(BaseEstimator): # Inherits sklearn base classifier
    def __init__(self, ):
        pass
    def fit(self, X, y, sample_weight=None):
        pass
    def predict(self, X):
        pass
    def predict_proba(self, X):
        pass
    def score(self, X, y, sample_weight=None):
        pass

# Now you can use your model with `cleanlab`. Here's one example:
from cleanlab.classification import LearningWithNoisyLabels
lnl = LearningWithNoisyLabels(clf=YourFavoriteModel())
lnl.fit(train_data, train_labels_with_errors)
这里有一个pytorch MINIST cnn class例子
复现Cifar10和imagenet效果
[1] Chen, P., Liao, B. B., Chen, G., and Zhang, S. Understand- ing and utilizing deep neural networks trained with noisy labels. In International Conference on Machine Learning (ICML), 2019.
[2] Patrini, G., Rozza, A., Krishna Menon, A., Nock, R., and Qu, L. Making deep neural networks robust to label noise: A loss correction approach. In Conference on Computer Vision and Pattern Recognition (CVPR), 2017.
[3] Angluin, D. and Laird, P. Learning from noisy examples. Machine Learning, 2(4):343–370, 1988.
[4] Han, B., Yao, Q., Yu, X., Niu, G., Xu, M., Hu, W., Tsang, I., and Sugiyama, M. Co-teaching: Robust training of deep neural networks with extremely noisy labels. In Conference on Neural Information Processing Systems (NeurIPS), 2018.

若有收获,就点个赞吧
0 人点赞
