- low range of the sensor (this will be blue on the screen)
- high range of the sensor (this will be red on the screen)
- how many color values we can have
- initialize the sensor
- pylint: disable=invalid-slice-index
- pylint: enable=invalid-slice-index
- sensor is an 8x8 grid so lets do a square
- the list of colors we can choose from
- create the array of colors
- some utility functions
- let the sensor initialize
- read the pixels
- perform interpolation
- draw everything
The Raspberry Pi also has an i2c interface, and even better has processing capability to interpolate and filter the sensor output. By adding processing power, you can ‘turn’ the 8x8 output into what appears to be a higher-resolution display.
We’re using a PiTFT 2.8” and a Pi Cobbler but the code can be adapted to output to the HDMI display - we’re using pygame to draw to the framebuffer.
You can use any Raspberry Pi computer, from Pi A+ to Pi 3 or even a Pi Zero, but we happen to have a Pi 3 on our desk set up already so we’re using that.
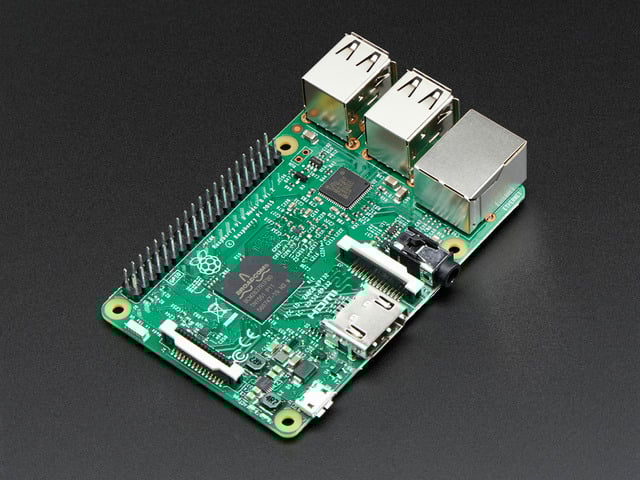
Did you really think the Raspberry Pi would stop getting better? At this point, we sound like a broken record, extolling on the new Pi’s myriad improvements like we’re…

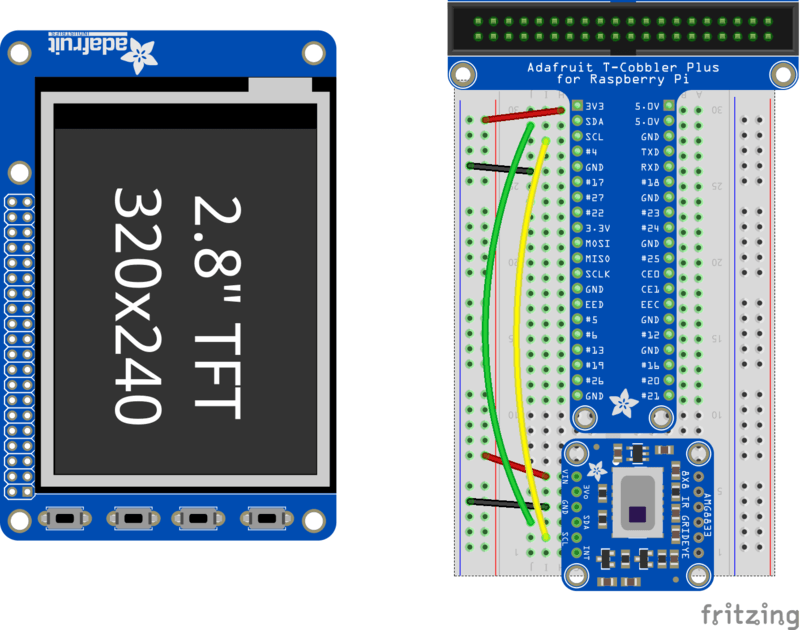
Is this not the cutest little display for the Raspberry Pi? It features a 2.8” display with 320x240 16-bit color pixels and a resistive touch overlay. The plate uses the high…
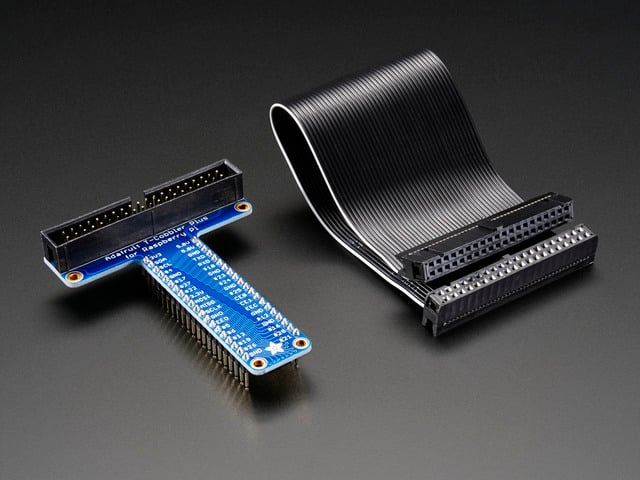
This is the assembled version of the Pi T-Cobbler Plus. It only works with the Raspberry Pi Model Zero, A+, B+, Pi 2, Pi 3 & Pi 4! (Any Pi with 2x20…
If you have not done so already, the first thing you will need to do is setup your PiTFT. Instructions on how to do so can be found in this guide.
Finally, install both pygame and scipy. Pygame lets us draw easily to a screen using python, we’ll use that to make the display work. Scipy is a powerful scientific/data processing library that we can use to magically turn the 8x8 = 64 pixel array into something that looks more like a 32x32 = 1024 pixel array. Wow, isn’t digital signal processing cool?
- sudo apt-get install -y python-scipy python-pygame
- sudo pip3 install colour
With the Pi powered off, we can wire up the sensor to the Pi Cobbler like this:
- Connect Vin to the 3V or 5V power supply (either is fine)
- Connect GND to the ground pin on the Cobbler
- Connect SDA to SDA on the Cobbler
- Connect SCL to SCL on the Cobbler
You can also use direct wires, we happen to have a Cobbler ready. remember you can plug the cobbler into the bottom of the PiTFT to get access to all the pins!
Now you should be able to verify that the sensor is wired up correctly by asking the Pi to detect what addresses it can see on the I2C bus:
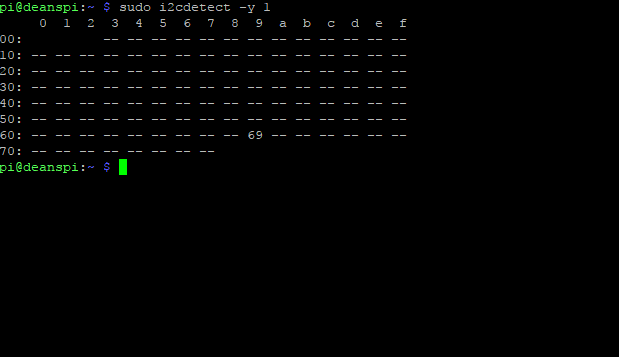
It should show up under it’s default address (0x69). If you don’t see 0x69, check your wiring, did you install I2C support, etc?
At long last, we are finally ready to run our example code
“””This example is for Raspberry Pi (Linux) only!
It will not work on microcontrollers running CircuitPython!”””
import os
import math
import time
import busio
import board
import numpy as np
import pygame
from scipy.interpolate import griddata
from colour import Color
import adafruit_amg88xx
i2c_bus = busio.I2C(board.SCL, board.SDA)
low range of the sensor (this will be blue on the screen)
MINTEMP = 26.
high range of the sensor (this will be red on the screen)
MAXTEMP = 32.
how many color values we can have
COLORDEPTH = 1024
os.putenv(‘SDL_FBDEV’, ‘/dev/fb1’)
pygame.init()
initialize the sensor
sensor = adafruit_amg88xx.AMG88XX(i2c_bus)
pylint: disable=invalid-slice-index
points = [(math.floor(ix / 8), (ix % 8)) for ix in range(0, 64)]
grid_x, grid_y = np.mgrid[0:7:32j, 0:7:32j]
pylint: enable=invalid-slice-index
sensor is an 8x8 grid so lets do a square
height = 240
width = 240
the list of colors we can choose from
blue = Color(“indigo”)
colors = list(blue.range_to(Color(“red”), COLORDEPTH))
create the array of colors
colors = [(int(c.red 255), int(c.green 255), int(c.blue * 255)) for c in colors]
displayPixelWidth = width / 30
displayPixelHeight = height / 30
lcd = pygame.display.set_mode((width, height))
lcd.fill((255, 0, 0))
pygame.display.update()
pygame.mouse.set_visible(False)
lcd.fill((0, 0, 0))
pygame.display.update()
some utility functions
def constrain(val, min_val, max_val):
return min(max_val, max(min_val, val))
def map_value(x, in_min, in_max, out_min, out_max):
return (x - in_min) * (out_max - out_min) / (in_max - in_min) + out_min
let the sensor initialize
time.sleep(.1)
while True:
read the pixels
pixels = []
for row in sensor.pixels:
pixels = pixels + row
pixels = [map_value(p, MINTEMP, MAXTEMP, 0, COLORDEPTH - 1) for p in pixels]
perform interpolation
bicubic = griddata(points, pixels, (grid_x, grid_y), method=’cubic’)
draw everything
for ix, row in enumerate(bicubic):
for jx, pixel in enumerate(row):
pygame.draw.rect(lcd, colors[constrain(int(pixel), 0, COLORDEPTH- 1)],
(displayPixelHeight ix, displayPixelWidth jx,
displayPixelHeight, displayPixelWidth))
pygame.display.update()
If you have everything installed and wired up correctly, you should see a nice thermal camera image. Cool tones (blue and purple) are cooler temperatures, and warmer tones (yellow, red) are warmer temperatures.
If your image seems to be flipped on the screen, try changing the orientation of the AMG8833 breakout on the breadboard.
If you’re interested int he details, and want to know more about how we made 64 pixels look like many more, it’s called bicubic interpolation (hat tip to OSHpark for the idea!)
This guide was first published on Jun 28, 2017. It was last updated on Jun 28, 2017.
This page (Raspberry Pi Thermal Camera) was last updated on Nov 07, 2020.

若有收获,就点个赞吧
0 人点赞
