Smart Gates - Hackster.io

Hi! Please confirm your email address by clicking the link in the email we sent you. Haven’t received it? Resend confirmation email
×
1
Notifications
ProjectsProjectsNewsContestsEventsVideosWorkshopsLaunch
×
Embed the widget on your own site
Add the following snippet to your HTML:
[
Identify Cars Using Raspberry Pi
Read up about this project on “Smart Gates”)
Smart Gates
35 6,724
35

Published June 30, 2017 © GPL3+
Smart Gates
Identify Cars Using Raspberry Pi
BeginnerWork in progress1 hour6,746
[
](https://www.hackster.io/workshops/ultra96)
Our Turbocharge Python w/ Ultra96 PYNQ course is now available. Buy it now!
Things used in this project
Hardware components

×
1
Relay (generic)
1 Relay for 1 gate
×
2
IP CAMERA
×
1
Software apps and online services
ALPR
Story
Description
The principle of operation:
The car drives up to the gates.
Camera reads the car plate numbers.
Checks the read number with the database; if it finds one, then it opens the gate and lets the car pass.
Each car at the gates is photographed, then a photo is sent to the Telegram application with the car plate number and its status.
Telegram bot has the ability to open and close the gates, take a current photo and add an unknown car to the database.
It’s done with OpenCV + Python + Bash + Telegram Bot.
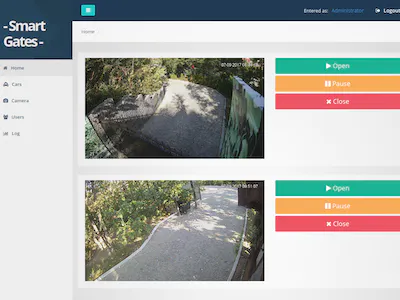
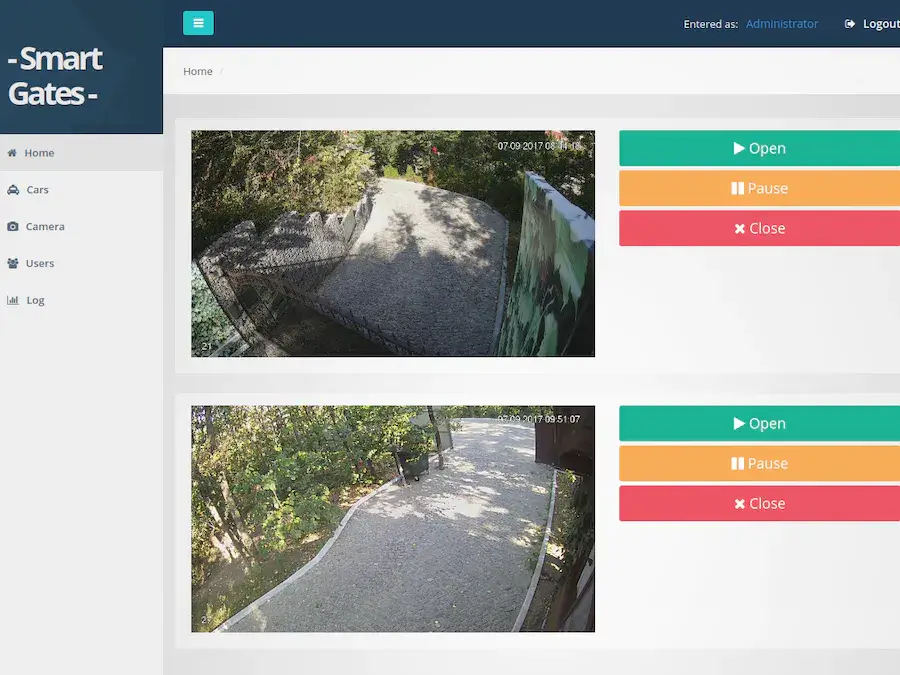
* I’m working now on web-interface which will have the ability to:
Open/pause/close the gates
Add/Remove/Edit/Block cars
Add/Remove/Edit/Block ip cameras
Set Gpio number for the relay
Set ip camera’s zoom
Enable/disable auto open for gates
Add/Remove/Edit/Block users, set status and privileges
Log for car recognition where you can preview, search cars by date/number and export log in excel format
Preparation
For this you will need an RPI3 with the Ubuntu Mate installed. You can get it here: https://ubuntu-mate.org/download/
Installing ALPR library
The easiest way to install
sudo apt-get update && sudo apt-get install -y openalpr openalpr-daemon openalpr-utils libopenalpr-dev
Install ImageMagick
sudo apt-get install imagemagick
Installing dependencies for Telegram bot
sudo apt-get install libreadline-dev libconfig-dev libssl-dev lua5.2 liblua5.2-dev libevent-dev libjansson-dev libpython-dev makeapt-get updateapt-get -y install python-pippip install pytelegrambotapipip install json
Installing Telegram-cli
Check this link to install and configure telegram-cli in ubuntu.
Relay connection
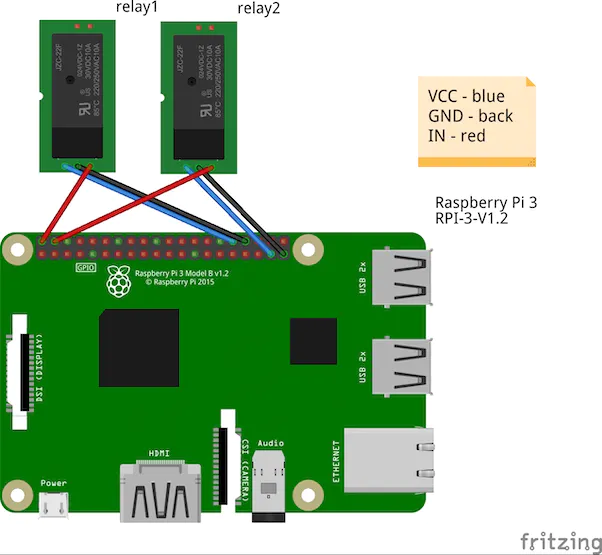
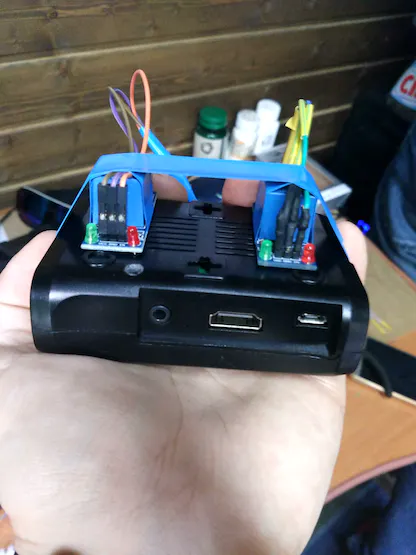
- Connect relay to RPI 3. In my case I used GPIO23 pin for 1st relay and GPIO26 for the second one.
You can test the relay with shell script, just create a simple sh script and run it:
nano open.shchmod +x open.shsh open.sh
Paste the code below and run it.
Script code for relay 1:
#!/bin/bashecho 23 > /sys/class/gpio/exportecho out > /sys/class/gpio/gpio23/directionecho 0 > /sys/class/gpio/gpio23/valueping -c 2 localhostecho 23 > /sys/class/gpio/exportecho out > /sys/class/gpio/gpio23/directionecho 1 > /sys/class/gpio/gpio23/value
Script code for relay 2:
#!/bin/bashecho 26 > /sys/class/gpio/exportecho out > /sys/class/gpio/gpio26/directionecho 0 > /sys/class/gpio/gpio26/valueping -c 2 localhostecho 26 > /sys/class/gpio/exportecho out > /sys/class/gpio/gpio26/directionecho 1 > /sys/class/gpio/gpio26/value
Connect relays to gates

Telegram message-send script
- Create .sh script with the following code:
#!/bin/bash
to=$1
msg=$2
tgpath=/home/user/tg
cd ${tgpath}
(sleep1; echo “dialog_list”;sleep 1; echo “msg $to $msg”;) | ${tgpath}/bin/telegram-cli -k -W tg-server.pub
Telegram photo-send script
- Create .sh script with the following code:
#!/bin/bash
to=$1
msg=$2
tgpath=/home/user/tg
cd ${tgpath}
(sleep 1; echo “dialog_list”;sleep 1; echo “send_photo $to $msg”;) | ${tgpath}/bin/telegram-cli -k -W tg-server.pub
Create 2 files for the main recognition script:
touch log.txttouch numbers.txt
In the numbers.txt - add all the known car plates numbers.
Order of the numbers.txt should be as follows:
YZO169
RFS961
RFS123
ILAI123
RFS872
Car plate recognition script
1st it connects to ip-camera and downloads a snapshot.
then it renames the snapshot.cgi to .jpg file
Next step is converting(zooming) the image. This step you should configure by yourself. In my case i used “crop 45%” because my camera was placed to high over the gates. So i needed to zoom the photo so the script could recognize the car plate.
Rest i hope is clear.
#! /bin/bash
wget -q http://login:password@ipadress/cgi-bin/snapshot.cgi -O /home/user/Downloads/autocheck/snapshot.cgi
mv /home/user/Downloads/autocheck/snapshot.cgi /home/user/Downloads/autocheck/snapshot.jpg
convert /home/user/Downloads/autocheck/snapshot.jpg -gravity Center -crop 45%! /home/user/Downloads/autocheck/output.jpg
FILENAME=$(alpr -c eu -d -n 1 /home/user/Downloads/autocheck/output.jpg |awk ‘{print%20%0Aif%20grep%20-Fxq%20%22#card=math&code=2%7D%27%20%7C%20awk%20%27FNR%3E%3D2%20%26%26%20FNR%3C%3D4%27%29%20%0Aif%20grep%20-Fxq%20%22)FILENAME” /home/user/Downloads/autocheck/numbers.txt
then
echo CAR FOUND!, opening the gates! | while IFS= read -r line; do echo “$FILENAME, $(date) $line”; done >>/home/user/Downloads/autocheck/log.txt
sh /home/user/Downloads/autocheck/relay-control/open.sh 2> /dev/null
sh /home/user/Downloads/autocheck/tg.sh xGates “Car Found! Welcome” > log.out 2> /dev/null
sh /home/user/Downloads/autocheck/tg.sh xGates FILENAME” ]; #if not empty
then
echo Unregistered car is at the gates! | while IFS= read -r line; do echo “$FILENAME, $(date) $line”; done >>/home/user/Downloads/autocheck/log.txt
sh /home/user/Downloads/autocheck/relay-control/open.sh 2> /dev/null
sh /home/user/Downloads/autocheck/tg.sh xGates “Unregistered car is at the gates!” > log.out 2> /dev/null
sh /home/user/Downloads/autocheck/tg.sh xGates $FILENAME > log.out 2> /dev/null
sh /home/user/Downloads/autocheck/tgphoto.sh xGates /home/user/Downloads/autocheck/output.jpg > log.out 2> /dev/null
sleep 20
sh /home/user/Downloads/autocheck/relay-control/open.sh 2> /dev/null
else
2> /dev/null
fi
sleep 1
exec bash “$0”
Telegram bot and script
Open Telegram app, search for @BotFather and start the chat. Send /newbot command and follow the instructions. After completing the initial steps, you’ll get your TOKEN
import config
import telebot
import os
import time
import requests
import subprocess
import simplejson
import sys
from telegram import InlineKeyboardButton, InlineKeyboardMarkup
from telebot import types
bot = telebot.TeleBot(config.token)
@bot.message_handler(content_types=[“text”])
def any_msg(message):
keyboard = types.InlineKeyboardMarkup()
callback_button1 = types.InlineKeyboardButton(text=”Gate-1”, callback_data=”open”)
callback_button2 = types.InlineKeyboardButton(text=”Gate-2”, callback_data=”open2”)
callback_button3 = types.InlineKeyboardButton(text=”Photo”, callback_data=”photo”)
callback_button3 = types.InlineKeyboardButton(text=”Add car”, callback_data=”add”)
keyboard.add(callback_button1,callback_button2,callback_button3)
bot.send_message(message.chat.id, “Welcome to the xGates”, reply_markup=keyboard)
@bot.callback_query_handler(func=lambda call: True)
def callback_inline(call):
if call.message:
if call.data == “open”:
os.system(“cat /dev/null”)
if call.message:
if call.data == “open2”:
os.system(“cat /dev/null”)
if call.message:
if call.data == “photo”:
os.system(“sh /home/user/Downloads/autocheck/tgphoto.sh xGates /home/user/Downloads/autocheck/output.jpg > log.out 2> /dev/null”)
if call.message:
if call.data == “close”:
os.system(“cat /dev/null”)
if call.message:
if call.data == “add”:
os.system(“cat /dev/null”)
def run(self):
while True:
self.updates()
time.sleep(1)
if name == ‘main‘:
bot.polling(none_stop=True)
- Create in the same directory config.py and paste there your TOKEN which you got from @Botfather.
-- coding: utf-8 --
token = ‘TOKEN’
Run it
Check all the paths in scripts and run.
sh check.shpython bot.py
*I hope that I did not miss anything.
If you have any questions - do not hesitate to ask!
Schematics
Relay connection
Relay connection

Credits
Evghenii
1 project • 30 followers
Go Simple
Comments
Please confirm your email before commenting. Haven’t received a confirmation email? Resend. Contact us at help@hackster.io for help.
FransR
3 years ago
- Report
Looks good Evghenii! But please tell me; why do you need 2 relays? Could you tell some more about how you connected these?
- Thank;)
Evghenii
3 years ago
- Report
Hi FransR, i used 2 relays because i got 2 gates.
There was two buttons to open them, i connected these two relay to the buttons output.
- Thank;)
Alin D
3 years ago
- Report
This project is awesome. One question though: gate will close by itself? If yes, after how many seconds. Which line of code I can find those settings?
- Thank;)
Evghenii
3 years ago
- Report
Hi Alin D, thank you. Yes, gate will close after 20 sec, there’s line “sleep 20” before closing.
- Thank;)
Kyaw Thiha
3 years ago
- Report
Hi @Evghenii. This project is really cool.
but there are errors in my condition.
1.I install Respbrrian OS on my Pi and do i need to install Ubuntu mate,
2.when i install ALPR itś conditon is Abort,
3.there is an error also when i install open cv on respbrrian os when i reeach
¨make -j4” cmd.i also use “make -j1” also for one core and it’s doesn’t work.
- Thank;)
Evghenii
3 years ago
- Report
replied
- Thank;)
shonky2
2 years ago
- Report
Hi @Evghenii Great Project! Have you made any updates since you posted this? Were you able to get around to the web interface items that you outlined?
- Thank;)
Adli Carter
a year ago
- Report
Does this project works on pi camera? How do you link the video with rasp pi?
- Thank;)
Evghenii
a year ago
- Report
Yes, but you should change a bit script to capture form RPI camera
- Thank;)
lorikk
a year ago
- Report
@Evghenii nice project man, one question have u managed to finish the web-interface?
- Thank;)
Akhilll
a year ago
- Report
Great project! Can we do this project on raspbian os?
- Thank;)
Evghenii
a year ago
- Report
Yes you can, it’s just easier to install opencv on Ubuntu
- Thank;)
Akhilll
a year ago
- Report
Is ImageMagick an opencv? Because i cannot find opencv commands…
Thanks much
- Thank;)
Evghenii
a year ago
- Report
No , imageMagic is for cropping the image
- Thank;)
Akhilll
a year ago
- Report
Could you tell me Where did we use Opencv and for what??
- Thank;)
Aaron Powell
a year ago
- Report
I’m just about to do this with my electric gates I hope you can help if I get stuck..
- Thank;)
Yukta Vaidya
7 months ago
- Report
Can I get the proper connection diagram of the whole system… including the connection of relay and gate?
- Thank;)
[
](https://www.hackster.io/workshops/ultra96)
Our Turbocharge Python w/ Ultra96 PYNQ course is now available. Buy it now!
Related channels and tags
_CuCVB1D7zU.png?auto=compress%2Cformat&w=40&h=40&fit=fillmax&bg=fff#alt=)
_u6uE9YVmAP.png?auto=compress%2Cformat&w=40&h=40&fit=fillmax&bg=fff#alt=)
_srbmPC1FSZ.png?auto=compress%2Cformat&w=40&h=40&fit=fillmax&bg=fff#alt=)
Related projects
[
](/swink/smart-intercom-1a4d9b)Smart Intercom
[

](/hackershack/smart-security-camera-90d7bd)Smart Security Camera
[
](/SeeedStudio/face-recognization-smart-lock-with-lte-pi-hat-abcec9)Face Recognization Smart Lock with LTE Pi HAT
[

](/berrybutton/berrt-smart-button-for-smart-home-or-iot-51c743)Berrt: Smart Button for Smart Home or IoT
[

](/adylinn/diy-smart-assistant-speaker-lamp-google-home-or-alexa-34e44e)DIY Smart Assistant Speaker/Lamp (Google Home or Alexa)
Similar projects you might like
[
A smart fridge that keeps track of the stuff in it and prints your shopping list!
](/ajv/smart-fridge-4a50b5)
Team AJV
136.3K
[
Make a DIY Time Clock to monitor your employee’s arrivals and transform your workplace in a Smart Office for less than $40!
](/naran-inc/diy-iot-time-clock-for-smart-office-dc2da4)
DIY IoT Time Clock for Smart Office
72.8K
[
Smart home system using MediaTek Linkit, Xbee, Arduino, Orange PI and Azure
](/iddi/home-smart-home-ab15ed)
23289K
[
Smart Garden is a plant environmental monitoring system.
](/patelDeep/smart-garden-cda82f)
9044K
[
Build a smart mirror that will give you useful information while getting ready in the morning
](/SrivishnuTech/make-your-own-smart-mirror-for-under-80-using-raspberry-pi-a87460)
Make Your Own Smart Mirror for Under $80 Using Raspberry Pi
13532K
[
Make a smart doorbell that notifies you when someone is at the door w/ snapshot and let you open the door remotely, all for less than $40!
](/naran-inc/diy-smart-home-doorbell-for-less-than-40-7edc77)
DIY Smart Home Doorbell For Less Than $40!
5117K
[
Smart Home automation made easy and accessible for anyone, for little budget and no skills needed with Prota OS on Raspberry Pi
](/naran-inc/diy-smart-home-automation-for-everyone-55ab90)
DIY Smart Home Automation for Everyone
2614K
[
Android app to build a thermostat and control your home heating with an old Android device, a couple of ESP32, a relay and a DHT sensor.
](/roquecampos/wifi-smart-thermostat-with-esp32-and-android-b894b7)
Wifi Smart Thermostat with ESP32 and Android
247.3K
35
Welcome to Hackster!Be sure to follow us to stay up to date with the latest news & projects.


