Deep Learning with Raspberry Pi Explored (Part 2) - Hackster.io

Hi! Please confirm your email address by clicking the link in the email we sent you. Haven’t received it? Resend confirmation email
![]()
×
1
Notifications

ProjectsProjectsNewsContestsEventsVideosWorkshopsLaunch
×
Embed the widget on your own site
Add the following snippet to your HTML:
[

Read about deep learning XNOR networks on a Raspberry Pi 3 B+ with nice FPS.
Read up about this project on “Deep Learning with Raspberry Pi Explored (Part 2)”)
Deep Learning with Raspberry Pi Explored (Part 2)
12 4,011
12

Published June 10, 2019
Deep Learning with Raspberry Pi Explored (Part 2)
Read about deep learning XNOR networks on a Raspberry Pi 3 B+ with nice FPS.
IntermediateProtip4,172

[
](https://www.hackster.io/workshops/particle-101)
Access the virtual, hands-on Particle 101 Workshop today for just $19.99!
Things used in this project
Hardware components

×
1
Story
Last time I investigated deep learning networks on a Raspberry Pi. They didn’t perform very well. The main reason is that deep learning networks are very resource hungry. They need a lot of memory to store their weights and a lot of computer power.
Is there nothing we can do? Yes, there are some challenging ideas about running deep learning networks with a good FPS, even on a Raspberry.
Let’s go back to the basic, a neural node. They are at the very heart of any network.

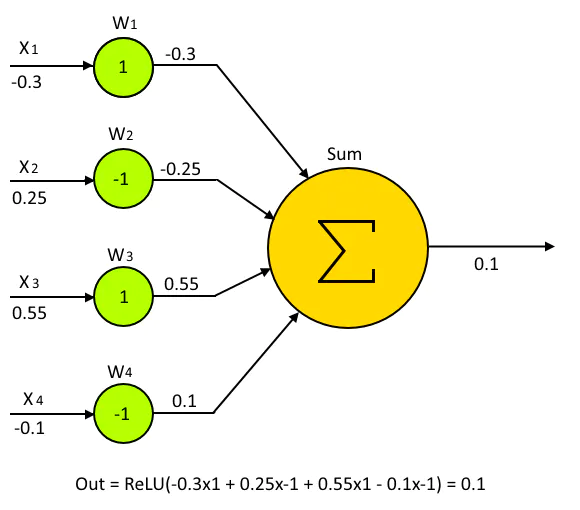
Real-valued neural node
The output is the sum of all the inputs multiplied with all their corresponding weights. The ReLU is a so-called activation function. Even a relatively small and simple network as AlexNet has 60 million weights, consuming 0.5 Gbyte of memory. It needs roughly 727 MFLOPS to calculate the outcome of a single frame. No match for our Raspberry.
Strategies to improve the performance are based upon the idea to decrease the memory load. As a result, the calculation load will usually drop too.
The most simple method is replacing all double precision real numbers for 8-bit integers. TensorFlow Lite uses this technique for instance. The memory load of AlexNet becomes now 60 Mbyte which can be allocated in a Raspberry. At the same time, the network execution time is reduced by a factor of two, because multiplying floating points takes twice as much time as integers. However, the computational burden still stays substantial.
The second method is pruning. All inputs with negligible influence on the output are deleted. As expected, the more weights are pruned, the greater the overall error becomes. Below a graph.
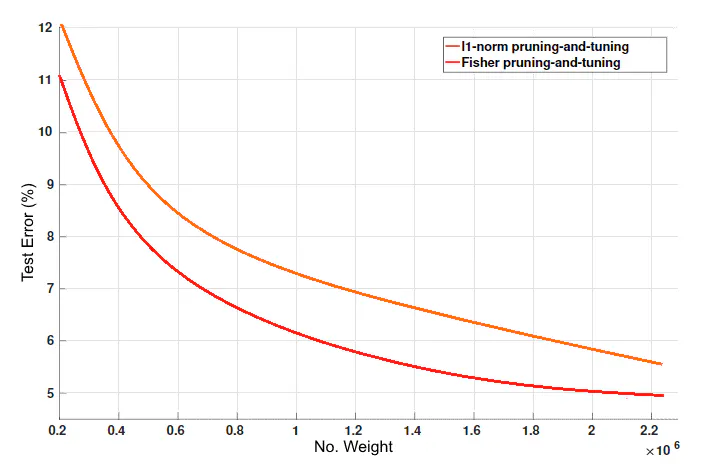
Pruning the weights
The big problem with pruning is software implementation. All input-weight calculations are coded in for-loops. Now, the loop becomes gaped, open places where the input is pruned. In one way or another, this generates always conditional jumps, slowing down the execution. Not to speak about GPU acceleration. The architecture of the GPU is matrix optimized, badly capable of branching. Also not the solution for a Raspberry.
There are many other similar techniques, all trying to reduce the number of weights. Some better than others. However, they all are not capable of reducing the execution time significantly because they all use time-consuming multiplications.
A complete other approach is the replacement of the weights by a single bit, giving you a binary neural network (BNN). Below a picture of such an element.
Binary neural node
Now only the sign of the weight is used. If the initial weight was greater than 0 it becomes +1, otherwise -1. Looking at the calculation, all multiplications are now replaced by adds and subs. And these are far less time-consuming.
A logic step further is also the replacement of all inputs with a single bit. It seems at first glance a very radical method with dubious results. However, it appears to perform reasonably well with just a little less accuracy.
The multiplications are now replaced by simple logic XNOR operator. Below the truth table of an XNOR.
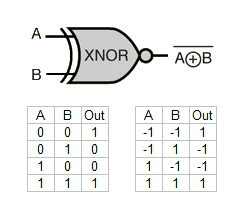
XNOR operation
When the -1 are represented by zeros in the software, the multiplication works correctly. Hence the name of the network, an XNOR network.
A simple XOR on the 64-bit Raspberry gives you now 64 multiplications in a single instruction. That speeds things up!
Below an overview of the three types.

Overview neural types
The XNOR operation between an input and its weights results in a binary number. The sum of all 1’s in this number forms the output. In the end, some threshold is applied to get the new binary input for the next layer.
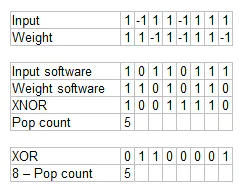
XNOR multiplications at work
This XNOR technique is very promising. It gives good results with nice FPS even on a Raspberry Pi.
Much more information about this topic and initial software can be found here: https://qengineering.eu/deep-learning-with-fpga-aka-bnn.html
See also part 1 on Hackster.io: https://www.hackster.io/tinus-treuzel/deep-learning-with-raspberry-pi-explored-5fa573
This time the picture above is the Rainbow flat in Hong Kong (22° 20’ 6’’ N, 114° 12’ 24’’ E). It just looks like a floorplan of an FPGA with its LUTs and L2 cache in the middle.
Enjoy!
Credits

Tinus Treuzel
3 projects • 14 followers
First µP was the 8080 back in the 80’s. Now many years later I’m an expert on embedded vision, FPGAs, VHDL, C++, Math, Deep learning etc.
Comments
Please confirm your email before commenting. Haven’t received a confirmation email? Resend. Contact us at help@hackster.io for help.

user515604
3 months ago
- Report
Many Thanks, very useful article.
- Thank;)
[

](https://www.hackster.io/workshops/particle-101)
Access the virtual, hands-on Particle 101 Workshop today for just $19.99!
Related channels and tags
_vutq7N84wr.png?auto=compress%2Cformat&w=40&h=40&fit=fillmax&bg=fff#alt=)
_srbmPC1FSZ.png?auto=compress%2Cformat&w=40&h=40&fit=fillmax&bg=fff#alt=)

Related projects
[

](/tinus-treuzel/deep-learning-with-raspberry-pi-explored-5fa573)Deep Learning with Raspberry Pi Explored
[
](/arun-gandhi/object-detection-using-deep-learning-on-a-raspberry-pi-32f94c)Object Detection Using Deep Learning on a Raspberry Pi
[

](/absoluteAbu/object-detection-raspberry-pi-machine-learning-50b194)Object Detection | Raspberry Pi | Machine Learning
[

](/idreams/control-gpio-and-pi-camera-using-raspberry-pi-telegram-app-3a776a)Control GPIO and Pi Camera using Raspberry Pi + Telegram App
[
](/sushree-subhasmita-jena/live-cam-with-raspberry-pi-e9f43d)Live Cam with Raspberry Pi
Similar projects you might like
[
Stream your Pi Cam outside your home network without port forwarding. This tutorial is beginner friendly.
](/fabolandry/raspberry-pi-ip-cam-aws-and-hls-streaming-b449e7)
Raspberry Pi IP Cam AWS and HLS Streaming
294.9K
[
Use a Raspberry Pi to make your “dumb” car smarter!
](/tinkernut/raspberry-pi-smart-car-8641ca)
9449K
[

Implement camera image recognition using deep learning on Raspberry Pi Zero W and VisionBonnet (from Google AIY Vision Kit).
](/yoshihiro-ochi/raspberry-pi-zero-w-visionbonnet-image-classification-d30d85)
Raspberry Pi Zero W + VisionBonnet | Image Classification
92.1K
[

Walkthrough of setting up a Raspberry Pi 3b+ for using a Tensorflow model to do image classification from PiCam captures.
](/Ladvien/install-tensorflow-and-opencv-on-raspberry-pi-f9ed2f)
Install Tensorflow and OpenCV on Raspberry Pi
111.5K
[
A basic guide teaching you how to set up a dual cooling fan and thermal tape on your Raspberry Pi for increased cooling and performance.
](/infoelectorials/pi-project-001-raspberry-pi-dual-fan-thermal-tape-setup-f064ca)
Pi Project 001: Raspberry Pi Dual Fan & Thermal Tape Setup
4993
[
A camera that describes your pictures to you instead of just showing them.
](/cchannon/raspberry-pi-smart-camera-a8c786)
4810K
[
This project shows how to build a professional looking Access Point with a Raspberry Pi.
](/pi-supply/raspberry-pi-access-point-with-papirus-and-pi-poe-226576)
Raspberry Pi Access Point With PaPiRus And Pi PoE
153.7K
[
An HTML5 and NodeJS photobooth with live preview and custom borders.
](/raymond-jones/raspberry-pi-photobooth-html5-and-nodejs-476ea1)
Raspberry Pi PhotoBooth - HTML5 and NodeJS
232.5K
12
Welcome to Hackster!Be sure to follow us to stay up to date with the latest news & projects.

若有收获,就点个赞吧
0 人点赞
