In this guide, I will take you through from start to finish on how to set up your very own Raspberry Pi time-lapse setup.
We make use of the Raspberry Pi camera in this guide. You’re able to pick this cool camera at any good electronic store that sells the Raspberry Pi.
I will take you through everything you need to know to get it all set up and ready to go. The process is pretty easy, and you will learn how to set up cron jobs and more.
This tutorial is also an excellent way to learn more about the Raspberry Pi camera and the things that you can do with it. The time lapse that you end up producing is pretty cool and so easy to set up.
Equipment
The equipment you will need in this tutorial is listed below.
SD Card (8GB+ Recommended) or Micro SD Card if you’re using a Raspberry Pi B+, 2 or 3
Video on setting up the Time-Lapse Machine
If you’re not much of a reading person then check out the excellent video on how to do the Raspberry Pi time-lapse, I have made it just for you.
It goes through step by step everything you need to do to get your Pi taking photos, so you’re able to use these in a time-lapse video.
Video not showing? Support us by disabling your adblocker.
Installing the Camera
Probably the most important step is to connect the Raspberry Pi camera correctly to your Pi. It is pretty straightforward but for anyone new to this kind of stuff will find this section helpful.
Hardware
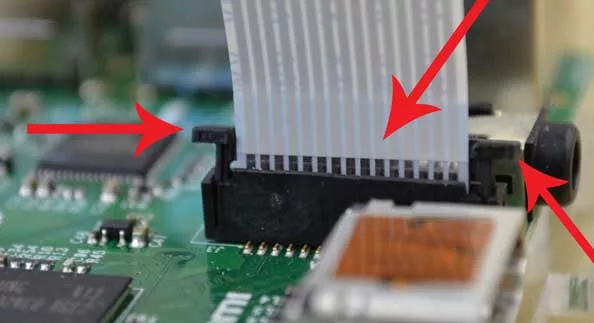
To install the camera, you will need to go to the ribbon cable attachment and press gently with two fingers on either side of the connector and pull up. This technique will open the attachment, now insert the cable with the metal leads facing away from Ethernet port. Once lined up and in gently press the connector back down and the cable will now be locked in place.
Software
To start this Raspberry Pi time lapse project you will need a copy of Raspbian installed. If you had followed my guide on installing NOOBS, you would have turned on the Raspberry Pi camera functionality.
If you haven’t, then you can turn it on by going into the terminal and writing the following line.
sudo raspi-config
After this select enable camera and select yes. You will then need to reboot the Raspberry Pi.
Testing the Camera
1. If your Pi is off now is the time to turn it on.
2. Go to the terminal screen and enter the following command.
raspistill -o cam.jpg
3. If you now type ls you will be able to see the image file now exists. (cam.jpg). Open this image in the file browser or from your machine if you’re using SSH.
4. If the image is upside down, then your camera is not positioned the correct way. You can either fix the camera up or just simply flip the image by using the following command.
raspistill -hf -vf -o cam2.jpg
5. You can now confirm that the image is now facing up the correct position.
Write a Script
It is now time to write a script that will take a picture and stamp the file name with the date and time. If you would prefer not to write a script, then you can download the script I have already made here camera.sh
The script is straightforward but remember you will need to add -hf -vf flags if your camera is currently upside down.
Make the directory and call it timelapse by entering the following command:
mkdir timelapse
Move into this folder by entering the following command:
cd ./timelapse
Now we need to create a bash script called camera.sh using a text editor such as nano. You can do this by entering the following:
sudo nano camera.sh
In this file copy & paste the following bash script:
#!/bin/bashDATE=$(date +"%Y-%m-%d_%H%M")raspistill -o /home/pi/timelapse/$DATE.jpg
Test the script by running the following line:
sh camera.sh
If it fails to run, look at the error message and try to debug the code as well as cross-checking with mine above.
If it doesn’t fail, then we are onto the next stage, setting up a schedule for the Pi to run.
Schedule the Script to take Pictures
The script above is now complete, and while you can make further adjustments to it, we will keep it basic for this guide.
Next, we will need to schedule the script to run so we can run this over x amount of time allowing us to capture hundreds or thousands worth of pictures.
Let’s open the cron table for editing by entering the following.
sudo crontab –e
If you have never used cron, it will prompt you to select a text editor. (Choose nano as I find this the easiest to quickly learn)
Once in, scroll down to the bottom where you will find some helpful column headers that look like below. These are your guide for setting a cron job.
# m h dom mon dow command
To schedule the timelapse to go off every minute add the following line. You can change this to whatever you would prefer.
* * * * * sh /home/pi/timelapse/camera.sh 2>&1
Once done, exit and save (ctrl x and press y and enter to save).
You should then get the following message.
crontab: installing new crontab
If you type in watch ls in our new timelapse folder, it should now start to fill up with images you can use in making a time lapse.
You’re able to shut down and move this to wherever you would like, and it will start retaking photos when you reboot the Pi.
If you ever need to edit or remove the cron job just follow the same steps and edit or delete the line that we added.
Now, this method just saves the pictures directly to the Pi, and you can set it up to save to a USB stick, network drive and other places to store data.
To get your data off the Pi simply insert a USB into the Raspberry Pi and using the GUI (Graphical User Interface) copy and paste the files onto the USB stick.
If you want to make a time-lapse out of your images, take a look at my guide 5 Easy Steps To Turn Time Lapse Images To Video.
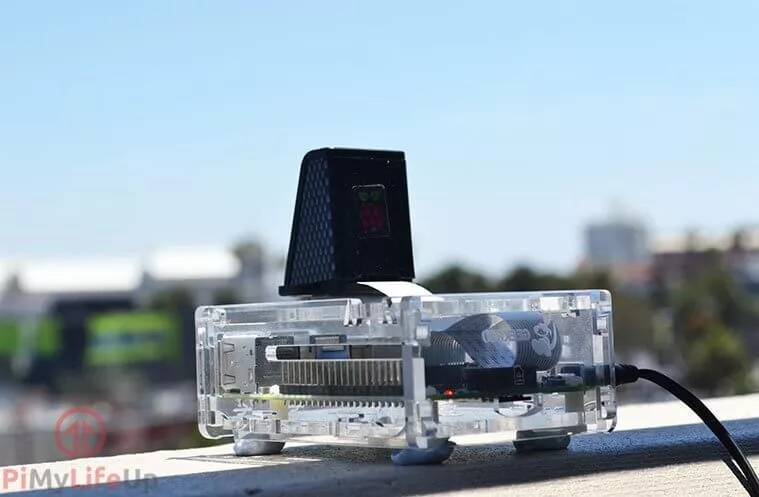
Deploying your Raspberry Pi Time-Lapse
One of the most amazing things about the Pi is how portable it is and energy efficient. If you have a battery pack you will be able to your run Pi for a few hours, and the best thing is you can place it anywhere you would like.
Once you have done setting up the Raspberry Pi camera and the cron job then you can just disconnect and place anywhere you would like. You don’t need to have a screen connected to the Pi for it to work.
There you have it your very own Raspberry Pi time-lapse that you’re able to take some pretty awesome photos now and then transform it into a fantastic time lapse.


若有收获,就点个赞吧
0 人点赞
