Real-Time system that allow to pass only authorized/invited people, using Face-Recognition or NFC cards.
IntermediateWork in progress2 hours17,108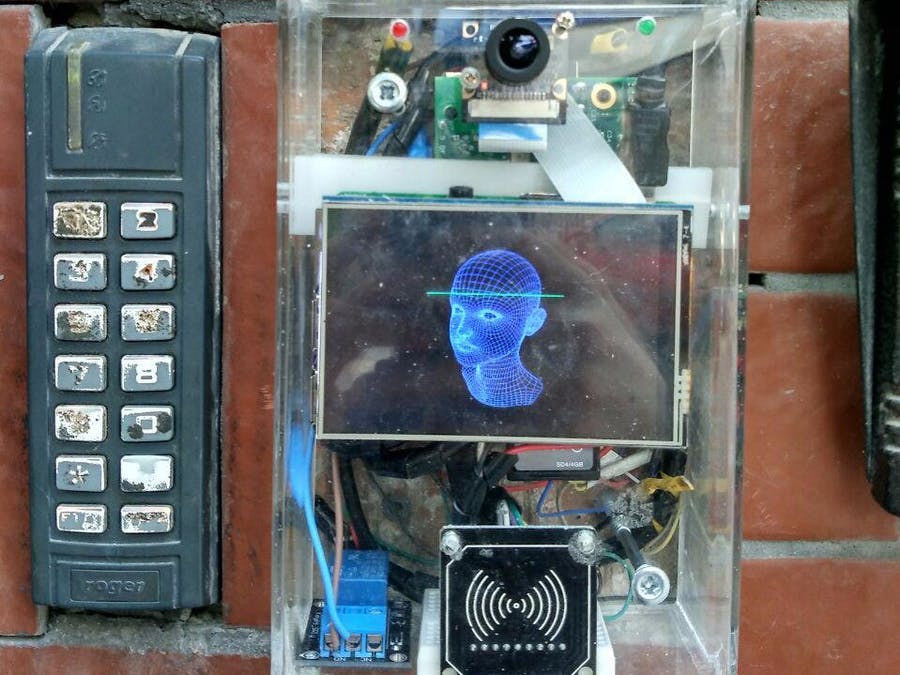
Things used in this project
| Hardware components | |||||
|---|---|---|---|---|---|
 |
Raspberry Pi 3 Model B | ||||
| —- | |||||
| × | 1 | | |
|  | | Raspberry Pi 1 Model B+ |
| —- |
| |
| | Raspberry Pi 1 Model B+ |
| —- |
| |
| × | 1 | | | | | | RPI LCD 3.5 inch | | —- | | |
| × | 1 | | | | | | RFID reader/writer module MFRC522 | | —- | | |
| × | 1 | | | | | | Relay SRD-05VDC-SL-C | | —- | | |
| × | 1 | | |
|  | | Raspberry Pi Camera Module |
| —- |
| |
| | Raspberry Pi Camera Module |
| —- |
| |
| × | 1 | | |
|  | | LED (generic) |
| —- |
| |
| | LED (generic) |
| —- |
| |
| × | 2 | | | | | | wifi usb dongle | | —- | | |
| × | 1 | | |
Story
work demonstration
Testing push-button
The principle of operation:
- Person approaches to the intercom
- Looks at the camera
- The system compare his face with authorized people
- If it finds it, then the door opens and a person can enter
- There is also another way to pass;
- The person with the pass card place it to the RFID location and the door opens if it finds the code of this card in its database
This project is still in progress. I hope the final version will be more beautiful.
*Gonna get rid of RPi 1 and NFC in favor of fingerprint scanner connected to RPi3. Updates are coming…
Preparation
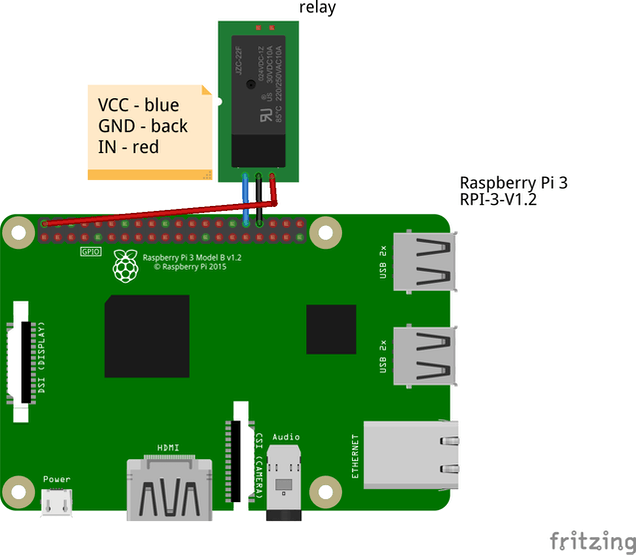
Relay connection
- Connect relay to RPI 3. In my case I used GPIO12 pin for data, 5v for power and you can choose any GND.
You can test the relay with shell script, just create a simple sh script:
nano open.shchmod +x open.shsh open.sh
Paste the code below and run it.
Script code:
#!/bin/bashecho 12 > /sys/class/gpio/exportecho out > /sys/class/gpio/gpio12/directionecho 0 > /sys/class/gpio/gpio12/valueping -c 1 localhostecho 12 > /sys/class/gpio/exportecho out > /sys/class/gpio/gpio12/directionecho 1 > /sys/class/gpio/gpio12/value
Camera connection
- Connect camera module and enable it in raspi-config:
Open the raspi-config tool from the Terminal:
sudo raspi-config
Select Enable camera and hit Enter , then go to Finish and you’ll be prompted to reboot.
To test that the system is installed and working, try the following command:
raspistill -v -o test.jpg
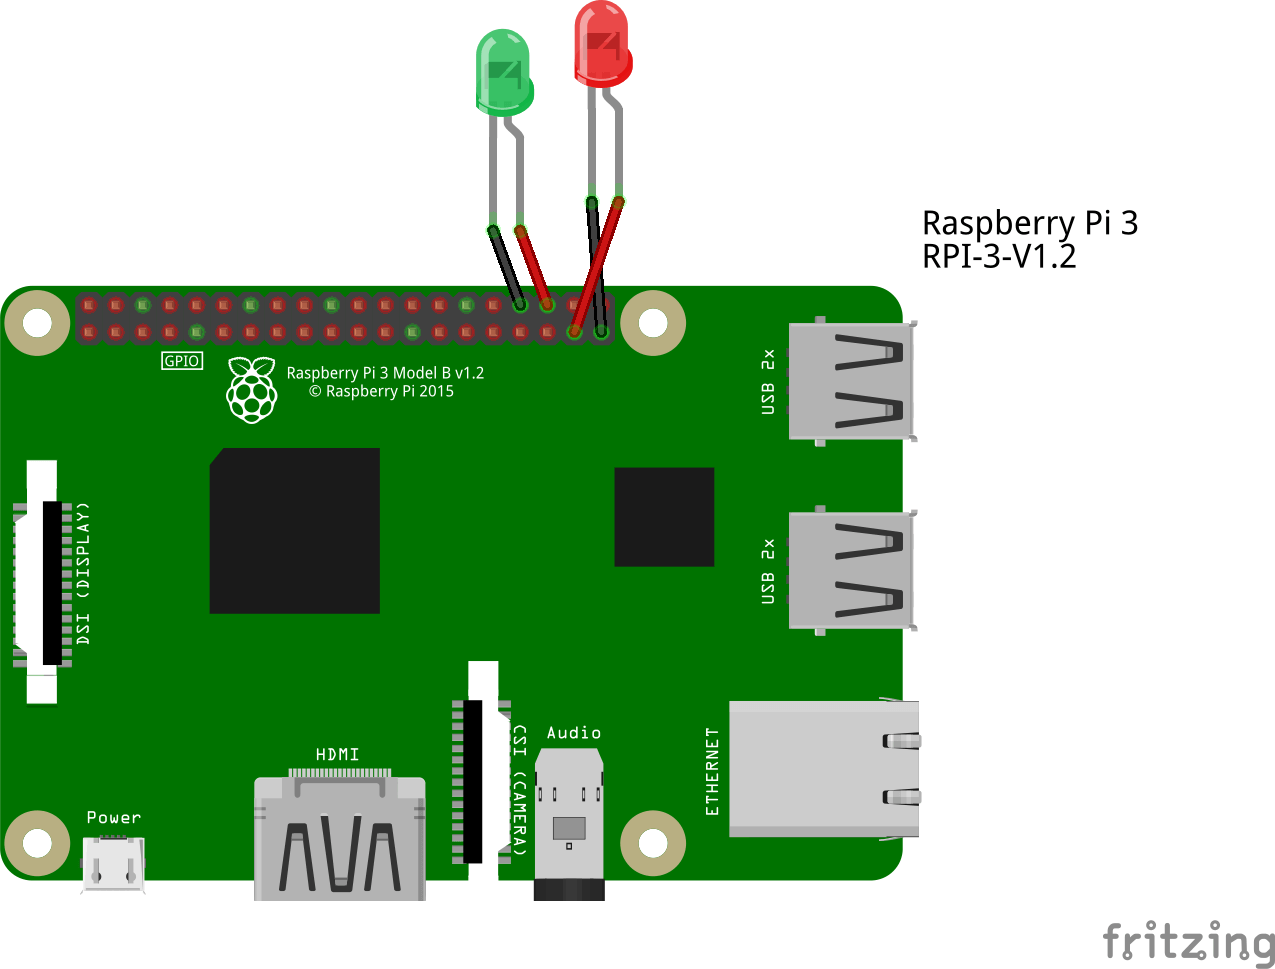
LED Connection
Connect your LED to any GPIO you want + GND. In my case I used GPIO16 for the green LED and GPIO26 for red. When you are done, test it:
Create 2 simple python scripts for the green and red LEDs with the following content:
Green led.py
from gpiozero import LEDfrom time import sleepled = LED(16)while True:led.on()sleep(3)led.off()led.cleanup()
Red led2.py
from gpiozero import LEDfrom time import sleepled = LED(26)while True:led.on()sleep(3)led.off()led.cleanup()

And then test it. If the LEDs are glowing, then everything works good.python led.pypython led2.py
Face Recognition Script
Install this module from pypi using
pip3(orpip2for Python 2):pip3 install face_recognition
Create directory “pic” and “unknown” in Documents for example and place there some face pics of people you know. In my case it’s (“/home/pi/Documents/pic/“) and (“/home/pi/Documents/unknown/“).
Create a python script with following code:import face_recognitionimport picameraimport numpy as npimport oscamera = picamera.PiCamera()camera.resolution = (320, 240)output = np.empty((240, 320, 3), dtype=np.uint8)print("Loading known face image(s)")ep_image = face_recognition.load_image_file("/home/pi/Documents/pic/ep.jpg")ep_face_encoding = face_recognition.face_encodings(ep_image)[0]vl_image = face_recognition.load_image_file("/home/pi/Documents/pic/vl.jpg")vl_face_encoding = face_recognition.face_encodings(vl_image)[0]face_locations = []face_encodings = []while True:print("Capturing image.")camera.capture(output, format="rgb")face_locations = face_recognition.face_locations(output)print("Found {} faces in image.".format(len(face_locations)))face_encodings = face_recognition.face_encodings(output, face_locations)for face_encoding in face_encodings:match = face_recognition.compare_faces([ep_face_encoding,vl_face_encoding], face_encoding)name = "<Unknown Person>"os.system("python /home/pi/led2.py &")import timedate_string = time.strftime("%Y-%m-%d-%H:%M:%S")camera.capture("/home/pi/Documents/unknown/image-" + date_string + ".jpg")
Test it.
python facerec.py
RFID Connection
Pins:
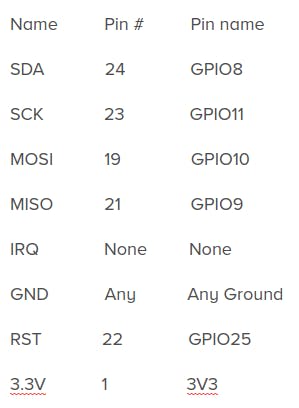
We need this to connect our RFID module to Raspberry Pi 1.Preparation:
$ sudo nano /etc/modprobe.d/raspi-blacklist.conf#blacklist spi-bcm2708$ sudo apt-get install python-dev$ git clone https://github.com/lthiery/SPI-Py.git$ cd SPI-Py$ sudo python setup.py install
read.py: When the script finds authorized card, it opens the user picture on the remote RPI 3 (runs LED scripts), then it opens the door.
import MFRC522import signalimport oscontinue_reading = TrueMIFAREReader = MFRC522.MFRC522()cardA = [46,44,187,26,163]cardB = [176,203,130,124,133]cardC = [20,38,121,207,132]def end_read(signal, frame):global continue_readingcontinue_reading = Falseprint "Ctrl+C captured, ending read."MIFAREReader.GPIO_CLEEN()signal.signal(signal.SIGINT, end_read)while continue_reading:(status,TagType) = MIFAREReader.MFRC522_Request(MIFAREReader.PICC_REQIDL)if status == MIFAREReader.MI_OK:print "Card detected"(status,backData) = MIFAREReader.MFRC522_Anticoll()if status == MIFAREReader.MI_OK:print "Card read UID: "+str(backData[0])+","+str(backData[1])+","+str(backData[2])+","+str(backData[3])+","+str(backData[4])if backData == cardA:print "Evghenii"os.system("sshpass -p *password* ssh root@10.0.0.60 fbi -T 1 -d /dev/fb1 -noverbose /home/pi/Documents/pic/ep.jpg")os.system("sshpass -p *password* ssh root@10.0.0.60 /home/pi/Documents/open.sh 2>/dev/null")# os.system("sshpass -p *password* ssh root@10.0.0.60 sleep 2")os.system("sshpass -p *password* ssh root@10.0.0.60 killall fbi")elif backData == cardB:print "Vlad"os.system("sshpass -p *password* ssh root@10.0.0.60 fbi -T 1 -d /dev/fb1 -noverbose /home/pi/Documents/pic/vl.jpg")os.system("sshpass -p *password* ssh root@10.0.0.60 /home/pi/Documents/open.sh 2>/dev/null")# os.system("sshpass -p *password* ssh root@10.0.0.60 sleep 2")os.system("sshpass -p *password* ssh root@10.0.0.60 killall fbi")elif backData == cardC:print "is Card C"else:print "wrong Card"os.system("sshpass -p *password* ssh root@10.0.0.60 /home/pi/led2.py 2>/dev/null")
Using this example:
$ git clone https://github.com/rasplay/MFRC522-python.git$ cd MFRC522-python$ sudo python read.py
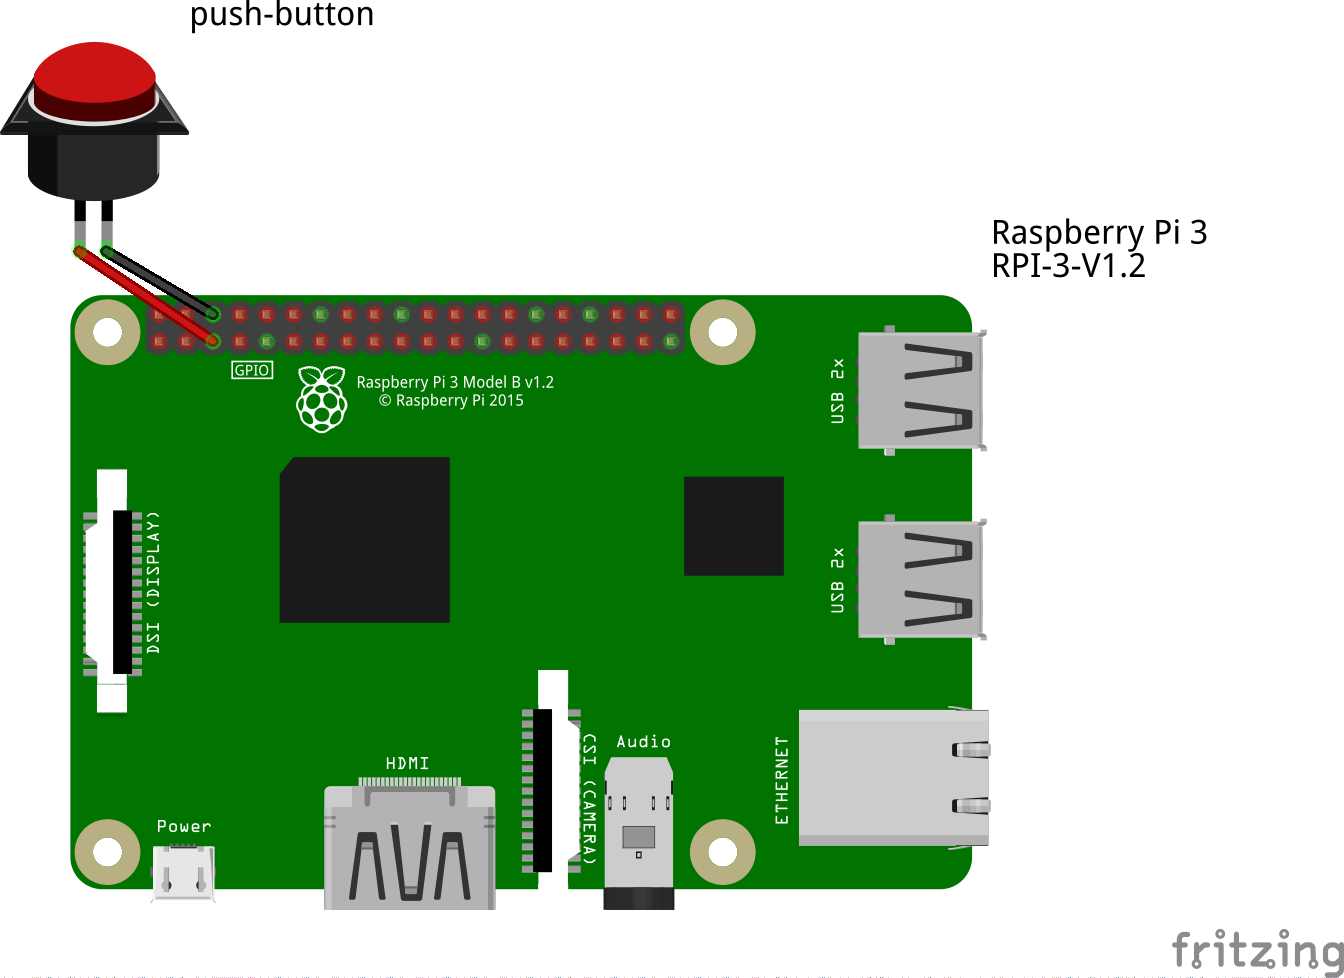
Button + Telegram
#!/usr/bin/pythonimport RPi.GPIO as GPIOfrom subprocess import callfrom datetime import datetimeimport timeimport osshutdownPin = 29shutdownMinSeconds = 5# button debounce time in secondsdebounceSeconds = 0.01GPIO.setmode(GPIO.BOARD)GPIO.setup(shutdownPin, GPIO.IN, pull_up_down=GPIO.PUD_UP)buttonPressedTime = Nonedef buttonStateChanged(pin):global buttonPressedTimeif not (GPIO.input(pin)):# button is downif buttonPressedTime is None:buttonPressedTime = datetime.now()else:# button is upif buttonPressedTime is not None:elapsed = (datetime.now() - buttonPressedTime).total_seconds()buttonPressedTime = Noneif elapsed >= shutdownMinSeconds:call(['shutdown', '-r', 'now'], shell=True)elif elapsed >= debounceSeconds:os.system("bash /home/pi/timed.sh")# subscribe to button pressesGPIO.add_event_detect(shutdownPin, GPIO.BOTH, callback=buttonStateChanged)while True:# sleep to reduce unnecessary CPU usagetime.sleep(5)
action.sh
#!/bin/bashsshpass -p password ssh epogonii@ipadress -p1337 notify-send -i /usr/share/icons/gnome/32x32/actions/ring2.png Smart-Intercom Guest_at_the_doorDISPLAY=:0.0 XAUTHORITY=/home/pi/.Xauthority /usr/bin/feh --hide-pointer -x -q -D 5 -B black -F /home/pi/doorway.png &sh /home/pi/Documents/open.sh > log.out 2> /dev/nullDISPLAY=:0.0 XAUTHORITY=/home/pi/.Xauthority xdotool key "x"sh /home/pi/tgphoto.sh FaceRec /var/www/html/last.jpg > log.out 2> /dev/null

Added pushbutton to Smart Intercom. It sends you last photo to telegram bot and sends notification to Ubuntu Desktop PC.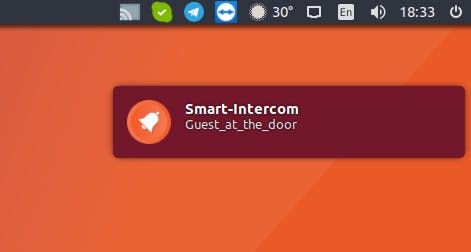
Adding timing to push-button
In order to disable entrance in specific hours via push-button, i made the following bash script:
#!/bin/bashH=$(date +%H)if (( 7 <= 10#$H && 10#$H < 19 )); thenecho between 7AM and 19PMsh /home/pi/action.shelseecho errorsh /home/pi/error.shfi
action.sh - opens the door between 7 am and 19 pm
error.sh - displays restriction image between 19 pm and 7 am error.sh script#!/bin/bashDISPLAY=:0.0 XAUTHORITY=/home/pi/.Xauthority /usr/bin/feh --hide-pointer -x -q -D 5 -B black -F /home/pi/error.png &ping -c 4 localhost 2>/dev/nullDISPLAY=:0.0 XAUTHORITY=/home/pi/.Xauthority xdotool key "x"
P.S to run this script you will need to install xdotool
sudo apt install xdotoolSchematics
Led connection
relay connection
Push-button connection


若有收获,就点个赞吧
0 人点赞
