- Start using Python
- Convert blocks to Python
- Move a sprite
- Position and coordinates
- Appearances
- Play sounds
- play(sound_effect_name)
- play_until_done(sound_effect_name)
- stop_sound()
- play_drum(instrument_number, beats)
- rest(beats)
- play_note(note_number, beats)
- set_inst(instrument_number)
- set_sfx(sound_effect_name, value)
- change_sfx_by(sound_effect_name, value)
- clear_sfx()
- volume
- set_tempo(beats_per_minute) | change_tempo_by(beats_per_minute)
- Turtle Graphics
- Events
- Global variables
- Sprite cloning and process control
- Basic inputs and outputs
- Sprite status detection
By using Python with Sprites, you may:
- Learn Python based on your previous Scratch knowledge
- Write large programs (like algorithms) easily
- Use complex data structures like dictionaries to do things that are not easy with Scratch
On mBlock 5, you can use Python to do almost whatever you can do by using Scratch.
You can control the movement and appearance of your sprite. You can also draw pictures.
Using broadcasting and sprite variables, you can enable a sprite to interact with another through Python code.
Start using Python
Start using Python by switching the programming mode from “Blocks” to “Python”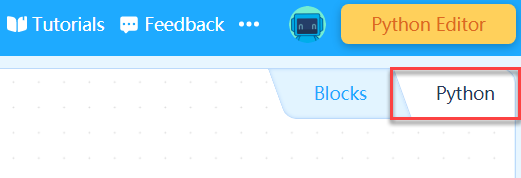
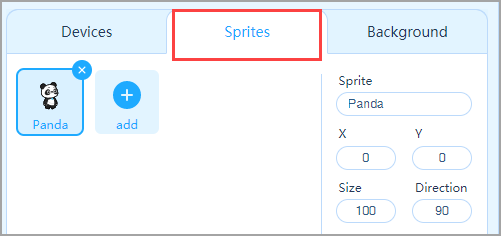
:::info Note: Make sure you have selected a sprite. :::
This is an example of the Python code written for a sprite.
from mblock import *sprite.pencolor('red')sprite.pendown()for i in range(5):sprite.forward(200)sprite.right(144)
When the code is complete, click Run to run your Python code.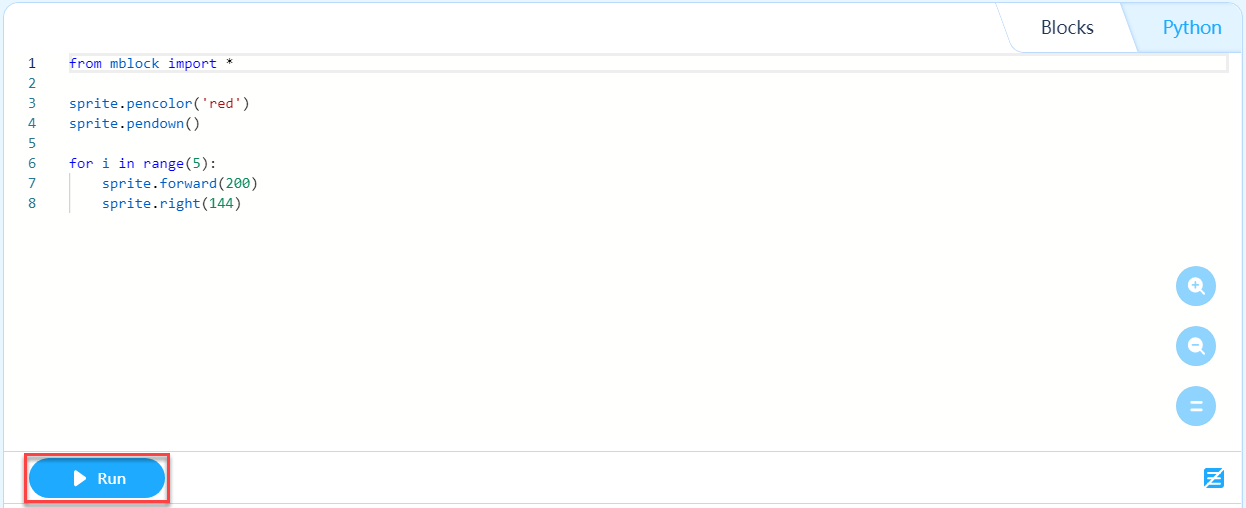
Convert blocks to Python
In the Scripts area, click  to covert blocks to Python. The following is an example:
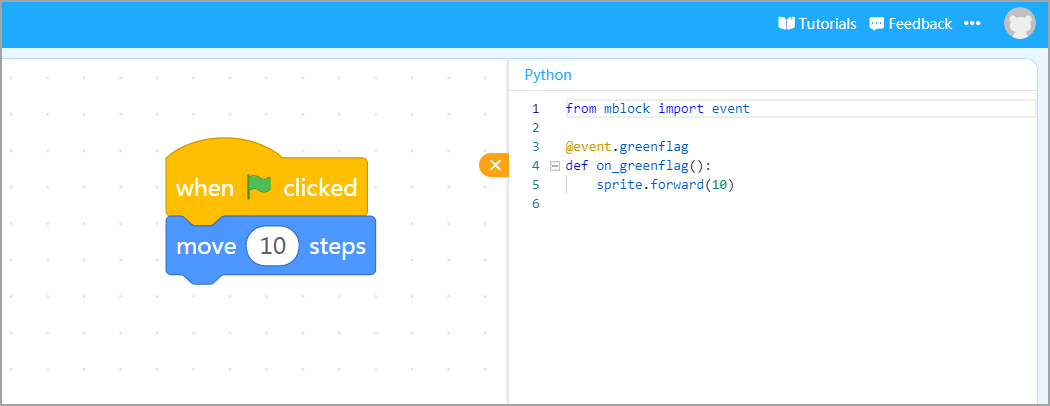
Move a sprite
forward(distance,[time])
Moves the sprite forward the specified distance in the specified period of time in the direction it faces
You can set the distance and time.
sprite.forward(50,1)
backward(distance,[time])
Moves the sprite backward for the specified distance in the specified period of time in the direction it faces
You can set the distance and time.
sprite.backward(50,1)
right(degrees)
Turns the sprite right the specified degrees
sprite.right(90)
left(degrees)
Turns the sprite left the specified degrees
sprite.left(90)
direction
Obtains the direction the sprite faces
sprite.direction = 90 # sets the sprite to face the 90-degree direction
sprite.direction = sprite.direction + 10 # rotates the sprite clockwise 10 degrees
print(sprite.direction) # reports the direction the sprite faces, which is 100 degrees now
towards(sprite_name)
Makes the sprite to face another sprite
The value of sprite_name is a character string.
sprite.towards("Panda")
sprite.towards('mouse') # makes the sprite face the mouse pointer
bounce()
Makes the sprite bounce when it touches the edge of the stage
while True:
    sprite.forward(50)
    sprite.bounce()
rotation_mode(mode)
Sets the rotation mode of the sprite
The value of mode is boolean or character string and can be one of the following:
- left-right: The sprite turns only left or right.
- all-around or True: The sprite can face any direction.
- none or False: The sprite can’t rotate.
sprite.rotation_mode('all-around')
Position and coordinates
goto(x, y,[speed]) | goto(place,[speed])
Moves the sprite to the specified position (x, y) at the specified speed
x and y are numbers. You may use the following character strings to define the position:
- random: moves the sprite to a random position on the stage
- mouse: moves the sprite to the position of the mouse pointer. You can set the speed.
sprite.goto(20, 40, 2)
sprite.goto(30, 60)
sprite.x # =30
sprite.setpos(0,0)
sprite.y # =0
sprite.goto("random", 3) # Moves the sprite to a random position at the speed of 3
sprite.goto("random") # Moves the sprite to a random position
sprite.goto("mouse") # Moves the sprite to the position of the mouse pointer
glide(x, y, duration=5) | glide(location, duration=5)
Makes the sprite glide to the specified position in the specified period of time
You may also use the following string to indicate the position:
- random: random position on the stage
- mouse: position of the mouse pointer
sprite.glide(30, 60, 5) # Tell the sprite to move to (30, 60) in 5 seconds
sprite.glide("random", 2) # move to a random location in 2 seconds
sprite.glide("mouse", 2) # move to the pointer in 2 seconds
coordinate of the sprite: x, y
Obtains or sets the coordinate(s) of the sprite on the stage
sprite.x # reports the x-coordinate of the sprite
sprite.y # reports the y-coordinate of the sprite
sprite.x = 50 # sets the x-coordinate of the sprite to 50
sprite.y = 60 # sets the y-coordinate to 60
sprite.y = sprite.y + 10 # increases the y-coordinate by 10, which means moving the sprite up 10
print(sprite.x) # prints the x-coordinate of the sprite (50 in this example)
print(sprite.y) # prints the y-coordinate of the sprite (70 in this example)
Appearances
say(text, duration=0)
Makes the sprite say the specified text
If you set the duration, the text box disappears in the duration; and if you don’t set the duration, the text box doesn’t disappear.
sprite.say("nice to meet you", 5)
sprite.say("hello world")
think(text, duration=0)
Makes the sprite think about the specified text
If you set the duration, the text box disappears in the duration; and if you don’t set the duration, the text box doesn’t disappear.
sprite.think("nice to meet you", 5)
sprite.think("hello world")
hide()
Hides the sprite
sprite.hide()
show()
Shows the sprite
sprite.show()
set_costume(costume_name)
Changes the costume of the sprite
The value of costume_name you set must have been created or added in the project, otherwise nothing happens when this API is executed.
sprite.set_costume("Panda1")
next_costume()
Changes the costume of the sprite to the next one.
sprite.next_costume()
set_backdrop(background_name)
Sets the backdrop of the stage
The value of background_name you set must have been created or added in the project, otherwise nothing happens when this API is executed.
sprite.set_backdrop("Party")
next_backdrop()
Changes the backdrop to the next one
sprite.next_costume()
set_effect(effect, value)
Sets the effect strength to the specified value
You can set one of following effects:
- color
- fisheye
- whirl
- pixelate
- mosaic
- brightness
- ghost
sprite.set_effect("color", 10) # sets the color value to 10
change_effect_by(effect, value)
Changes the effect strength by the specified amount
You can set one of following effects:
- color
- fisheye
- whirl
- pixelate
- mosaic
- brightness
- ghost
sprite.change_effect_by("color", 10) # increases the color effect by 10
clear_effect()
Removes all the sprite effects
sprite.clear_effect()
size
Sets or obtains the size proportion of the sprite
The value 100 indicates the original size (100%) of the sprite.
sprite.size = 200 # enlarges the sprite to its 200%
sprite.size = sprite.size + - 50 # shrinks the sprite by 50%
print(sprite.size) # prints the proportional size of the sprite, 150 in this exmaple
Play sounds
play(sound_effect_name)
Plays a sound
The sound you set must have been provided in the project, otherwise nothing happens when this API is executed.
sprite.play("meow") # plays the "meow" sound
play_until_done(sound_effect_name)
Plays a sound and waits the playing to end before executing the next statement(s)
The sound you set must have been provided in the project, otherwise nothing happens when this API is executed.
sprite.play_until_done("meow") # plays the "meow" sound
stop_sound()
Stops all the sounds
sprite.stop_sound()
play_drum(instrument_number, beats)
Plays the specified sound
instrument_number: number of the sound to be played, ranging from 1 to 18
The following table describes the sounds and their numbers.
| Number | Sound |
|---|---|
| 1 | Snare drum |
| 2 | Bass drum |
| 3 | Side stick |
| 4 | Crash cymbal |
| 5 | Open hi-hat |
| 6 | Closed hi-hat |
| 7 | Tambourine |
| 8 | Hand clap |
| 9 | Claves |
| 10 | Wood block |
| 11 | Cowbell |
| 12 | Triangle |
| 13 | Bongo |
| 14 | Conga |
| 15 | Cabasa |
| 16 | Guiro |
| 17 | Vibraslap |
| 18 | Cuica |
beats**: duration a sound is to be played
sprite.play_drum(1, 0.25)
rest(beats)
Stops playing the sound for the specified beats
sprite.rest(0.5)
play_note(note_number, beats)
Plays a music note
note_number: an MIDI number. The greater the number, the higher the pitch.
beats: duration a note is to be played
sprite.play_note(60, 0.25) # plays a "C" note in the third level for 0.25 beats
set_inst(instrument_number)
Sets the instrument to be simulated
instrument_number: number of the instrument to be simulated, ranging from 1 to 21
The following table describes the instruments and their numbers.
| Number | Sound |
|---|---|
| 1 | Piano |
| 2 | Electric piano |
| 3 | Organ |
| 4 | Guitar |
| 5 | Electric guitar |
| 6 | Bass |
| 7 | Pizzicato |
| 8 | Cello |
| 9 | Trombone |
| 10 | Clarinet |
| 11 | Saxophone |
| 12 | Flute |
| 13 | Wooden flute |
| 14 | Bassoon |
| 15 | Choir |
| 16 | Vibraphone |
| 17 | Music box |
| 18 | Steel drum |
| 19 | Marimba |
| 20 | Synth lead |
| 21 | Synth pad |
sprite.set_inst(1) # sets the musical instrument to piano
set_sfx(sound_effect_name, value)
Sets the specified sound effect to the specified strength
sprite.set_sfx('PITCH', 10) # sets the strength of the sound effect to 10
change_sfx_by(sound_effect_name, value)
Changes the strength of the specified sound effect
sprite.change_sfx_by('PITCH', 10) # changes the strength of the sound effect by 10
clear_sfx()
Removes all the sound effects
sprite.clear_sfx() # removes all the sound effects
volume
Obtains or changes the volume of sounds
Value range of the volume: 1–100
sprite.volume = 50 # set the volume to 50
sprite.volume = sprite.volume + 10 # change the volume by 10%
print(sprite.volume) # 60
set_tempo(beats_per_minute) | change_tempo_by(beats_per_minute)
Sets or changes the beat-per-minute (bpm) of music notes or sound effects
sprite.set_tempo(60)
sprite.change_tempo_by(20)
Turtle Graphics
pendown()
Puts the pen down
After the pen is put down, the sprite draws a line when it moves.
sprite.pendown()
penup()
Lifts the pen up
After the pen is lifted up, the sprite no longer draws lines when it moves.
sprite.penup()
stamp()
Leaves an image of the sprite in the position, like using a stamp
sprite.stamp()
pencolor(color) | pencolor(red, green, blue)
Sets the color of the pen
The color can be set to:
- One of the follow strings: “red”, “orange”, “yellow”, “green”, “cyan”, “blue”, “purple”, “black”, “white”, “grey”
- Hex code starting with “#”, like “#FF0000”
- A combination of RGB
- RGB values
sprite.pencolor("red")
sprite.pencolor("#FF0000")
sprite.pencolor(255, 0, 0) # All these statements set the color to red.
pencolor_effect(effect_name, value)
Sets the specified color effect of the pen
effect_name: The value can be one of the following:
- “hue”
- “saturation”
- “brightness”
- “transparency”
value: 0–100
sprite.pencolor_effect("hue", 60)
change_pencolor_effect_by(effect_name, value)
Changes specified color effect of the pen
effect_name: The value can be one of the following:
- “color”
- “saturation”
- “brightness”
- “transparency”
value: 0–100
sprite.change_pencolor_effect_by("hue", 10)
change_pencolor_shade_by(value)
Changes the shade effect of the pen color
sprite.change_pencolor_shade_by(10)
clear()
Removes all the drawings from the canvas
sprite.clear()
pensize(pen_size)
Sets the size of the pen
sprite.pensize(1)
change_pensize_by(value)
Changes the size of the pen by the specified amount
sprite.change_pensize_by(1) # increases the pen size by 1
Events
You can write keyboard- or mouse-based events in Python, so that you can use the keyboard or mouse to interact with the stage.
Add a mark (decorator) before a function, as shown in the following:
from mblock import *
@event.greenflag # The following function is executed when the green flag is clicked.
def on_green_flag(): # You can set your own function name.
    print("green flag clicked") # Write here the code that is to be executed when the green flag is clicked.
@greenflag
Executes the subsequent statement when you click the green flag
@event.greenflag
def on_green_flag():
    print("The green flag is clicked!")
@keypressed(key_name)
Executes the subsequent statement when you press the specified key
key_name: The value can be one of the following:
“a”, “A”, “1”, “enter”, “space”, “backspace”.
@event.keypressed("space")
def on_space_key():
    print("The space key is pressed!")
@clicked
Executes the subsequent statement when you click the sprite
@event.clicked
def on_clicked():
    print("the sprite is clicked")
@backdrop_change(backdrop_name)
Executes the subsequent statement when the backdrop is changed to the specified one
@event.backdrop_change("Party")
def on_backdrop_change():
    print("The backdrop is switched to Party.")
@greater_than(parameter_name, value)
Executes the subsequent statement when the value of the specified parameter is greater than the specified value
parameter_name: The value can be one of the following:
- “TIMER”: count value of the timer
- “VOLUME” (not implemented yet): volume of the microphone
@event.greater_than("timer", 10)
def on_greater_than():
    print("10 seconds has passed")
broadcast(event_name)
Broadcasts a message within mBlock 5
sprite.broadcast("game_start")
@received(event_name)
Executes the subsequent statement when the specified message is received
@event.received("game_start")
def when_game_start():
    print("the game has been started")
Global variables
With global variables, you can program a sprite to interact with other sprites whether they are programmed with blocks or Python statements.
You can even enable a sprite to interact with robots or other devices through Python programming.
set_variable(variable_name, value)
Sets the value of the specified variable
The variable must have been provided or created in the block editor, or nothing happens (other than generating a warning message on the console).
sprite.set_variable("score", 50)
get_variable(variable_name)
Obtains the value of the specified variable
If the variable you specified doesn’t exist, None is returned.
print(sprite.get_variable("score"))
Sprite cloning and process control
clone(sprite_name=None)
Clones the specified sprite and returns the cloned sprite
If a Sprite name is not provided, the sprite itself is cloned.
sprite.clone() # Clones the current sprite
sprite.clone("Panda") # Clone the sprite named Panda
delete_clone()
Deletes the sprite after it is cloned
sprite.delete_clone()
stop_all() / stop_this() / stop_other()
Stops all scripts/(not implemented yet) stops the scripts for this sprite/(not implemented yet) stops the scripts for other sprites
sprite.stop_all() # stops all the scripts on the stage
Basic inputs and outputs
print(content)
Prints the specified content on the console at the bottom of the Python editor
This API is used for debugging.
print("hello world")
input(prompt)
Prompts a user to input a text on the stage
name = sprite.input("What's your name?")
sprite.say("Hello, " + name)
Sprite status detection
touching(sprite_name)
Determines whether the sprite is touching another sprite, the mouse pointer, or the edge of the stage
The returned result is True of False.
print(sprite.touching("Panda")) # True if the sprite is touching the "Panda" sprite
print(sprite.touching_mouse()) # True if the sprite is touching the mouse pointer
print(sprite.touching_edge()) # True if the sprite is touching the edge of the stagew
touching_color(color) | touching_color(red, green, blue) | touching_color(sprite_color, screen_color)
Determines whether the sprite is touching the specified color
The color can be one of the following:
- Hex code starting with “#”, like “#FF0000”
- A combination of RGB
- RGB values
The returned result is True or False.
print(sprite.touching_color("#ff0000")) # Determines whether the sprite is touching the red color
print(sprite.touching_color(255, 0, 0)) # Same as the above
color = (255, 0, 0)
print(sprite.touching_color(color)) # Same as the above
print(sprite.touching_color("#ff0000", "#00ff00")) # Determines whether the red part of the sprite is touching the green part of the stage
distance_to(sprite_name)
Obtains the distance between the sprite and another sprite or the mouse pointer
sprite.distance_to('_mouse_') # obtains the distance between the sprite and the mouse pointer
sprite.distance_to('Accordion3')
is_keypressed(key_name)
Determines whether the specified key is pressed (returns True or False)
The returned result is True or False.
Examples of key names: “a”, “A”, “1”, “enter”, “space”, “backspace”
print(sprite.is_keypressed("space")) # When the space key is pressed, return True.
is_mousedown
Determines whether the main key of the mouse is pressed
The returned result is True or False.
print(sprite.is_mousedown()) # When you press the mouse, True is returned
Sprite status information
You can also obtain the following information about a sprite:
- mousex: x-coordinate of the mouse pointer on the stage
- mousey: y-coordinate of the mouse pointer on the stage
- loudness: loudness of the microphone
- timer: count value of the timer
- current(unit): component of the time, where the “unit” could be: year | month | date | day_of_week | hour | minute | second
- days_since_2000: days passed since 2000
print("%d, %d" % (sprite.mousex, sprite.mousey)) # prints the coordinates of the mouse pointer
print(sprite.loudness) # prints the current loudness
print(sprite.timer) # prints the count value of the timer, in seconds
print("%d-%d-%d %d:%d:%d" % (sprite.current('year'), sprite.current('month'), sprite.current('date'), sprite.current('hour'), sprite.current('minute'), sprite.current('second')))
print("day of week: ", sprite.current('day_of_week')) # prints the current day of the week
print("days since 2000", sprite.days_since_2000)
reset_timer()
Resets the timer
sprite.reset_timer()
print(sprite.timer) # output zero, since the timer has been reset.

若有收获,就点个赞吧
0 人点赞
