jupyter
https://www.jianshu.com/p/17dabbc5936e(python 3.7)
mlTF: numpy tensorflow
ipython jupyter
opencv:https://www.pianshen.com/article/39091554701/
hello jupyter
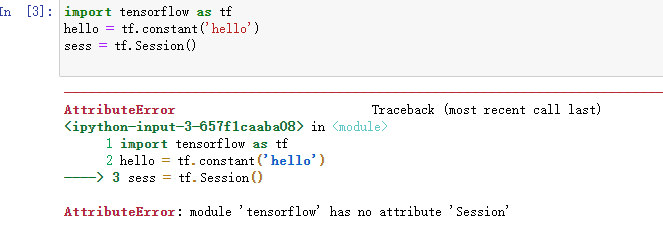
https://blog.csdn.net/sinat_36502563/article/details/102302392
4.图片的几何变换
4.1图片的缩放
det. 是 determiner 的缩写,
1.调用API:
resize
2.算法:
2.1最近邻域插值法
原理
代码实现
2.2双线性插值法
原理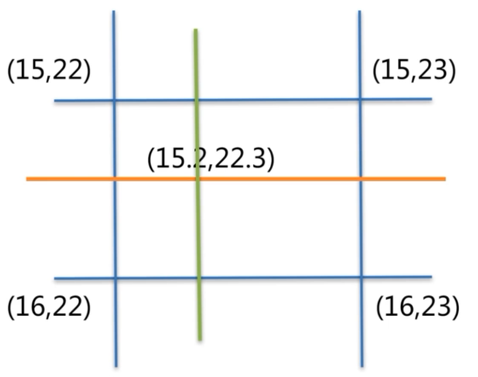
4.2图片移位
任务:读入一张图片,分别用api和原理实现图片位移
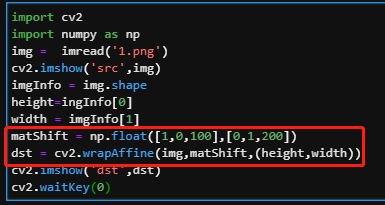 warpAffine
api算法分析
矩阵拆分、矩阵计算
#向左移动import cv2import numpy as npimg= cv2.imread('1.png',1)cv2.imshow('src',img)imgInfo = img.shapeheight = imgInfo[0]width = imgInfo[1]dst = np.zeros(img.shape,np.uint8)for i in range(0,height):for j in range(0,width-100):dst[i,j+100] = img[i,j]cv2.imshow('image',dst)cv2.waitKey(0)
4.3图片镜像
import cv2import numpyimg = imread('i.png')imgInfo = img.shapeheight = imgInfo[0]width = imgInfo[1]# deep说明图片颜色的组成,RGBdeep = imgInfo[2]newImgInfo = (height*2,width,deep)dst = np.zeros(newImgInfo,np,uint8)# 显示原图+镜像图片for i in range(0,height):for j in range(0,width):dst[i,j]= img[i,j]#x不变 y=2*h-y-1dst[height*2-i-1,j]=img[i,j]# 画中间的那一条红线for i in range(0,width):dst[height,i]=(0,0,255)#BGRcv2.imshow('dst',dst)cv2.waitKey(0)
小总结
for i,j就是原图片你想展现在新图片的部分
dst计算新图片相对于原图片的坐标
4.4图片缩放
用图片移位学的公式(api)将图片缩一半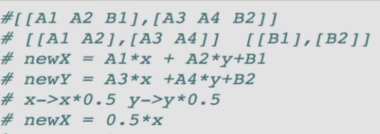
import cv2import numpy as npimg = cv2.imread('1.png',1)imgInfo = img.shapeheight = imgInfo[0]width = imgInfo[1]matSacle = np.float32([[0.5,0,0],[0,0.5,0]])dst = cv2.warpAffine(img,matScle,int(width/2),int(height/2))cv2.imshow('dst',dst)cv2.waitKey(0)
4.5图片的仿射变换
import cv2import numpy as npimg= cv2.imread('i.png')imgInfo = img.shapeheight = imgInfo[0]width = imgInfo[1]#src 3->dst 3(左上角 左下角 右上角)matSrc = np.float32([[0,0],[0,height-1],[width-1,0]])matDst = np.float32([[50,50],[300,height-200],[width-300],100])#矩阵组合matAffine = cv2.getAffineTransform(matSrc,matDst) # mat 第1参数src 第2参数dstdst = cv2.warpAffine(img,matAffine,(width,height))cv2.imshow('dst',dst)cv2.waitKey(0)
4.6图片旋转
#mat 1 center 2 angle 3 sc#为什么要有缩放的系数(sc):不然旋转超出范围了matRotate = cv2.getRotationMatrix2D((height*0.5,width*0.5),45,0.5)dst = cv2.warpAffine(img,matRotate,(height,width))
5图片特效
5.1灰度处理(最重要,基础,实时性)
1。imread
import cv2#0代表灰度图片 1代表彩色图片img0 = cv2.imread('1.png',0)img1 = cv2.imread('1.png',1)print(img0.shape)print(img1.shape)cv2.imshow('src',img0)
2.cvtColor
import cv2img = cv2.imread('1.png')#颜色空间的转换 1data 2BGR graydst = cv2.cvtColor(img,cv2.COLOR_BGR2GRAY)cv2.imshow('dst',dst)
3.gray = (r+b+g)/3
import cv2import numpy as npimg= cv2.imread('i.png')imgInfo = img.shapeheight = imgInfo[0]width = imgInfo[1]#RGB R=G=B =gray (R+G+B)/3dst = np.zeros((height,width,3),np.uint8)for i in range(0,height):for j in range(0,width):(b,g,r) = img[i,j]#uint8 进行相加计算可能会溢出,所以要转intgray = (int(b)+int(g)+int(r))/3dst[i,j] = np.uint8(gray)cv2.imshow('dst',dst)cv2.waitKey(0)
4.gray = r0.299+g0.587+b*0.114
import cv2import numpy as npimg= cv2.imread('i.png')imgInfo = img.shapeheight = imgInfo[0]width = imgInfo[1]#RGB R=G=B =gray (R+G+B)/3dst = np.zeros((height,width,3),np.uint8)for i in range(0,height):for j in range(0,width):(b,g,r) = img[i,j]#uint8 进行相加计算可能会溢出,所以要转intgray = int(b)*0.114+int(g)*0.587+int(r)*0.299dst[i,j] = np.uint8(gray)cv2.imshow('dst',dst)cv2.waitKey(0)
4.算法优化(实时性)
定点-》浮点 +-/ >>
浮点运算转为定点运算(4再/4,即左移两位再右移两位)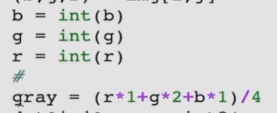
定点运算转为移位运算
5.2颜色反转
6机器学习
6.1视频与图片的分解和合成
视频的分解
1 load 2 info 3 parse(解码) 4 imshow 5 imwrite
import cv2cap = cv2.VideoCapture('1.mp4')isOpened = cap.isOpendedprint(isOpened)fps = cap.get(cv2.CAP_PROP_FPS)width = int(cap.get(cv2.CAP_PROP_FRAME_WIDTH))height = int(cap.get(cv2.CAP_PROP_FRAME_HEIGHT))print(fps,width,height)i = 0while(isOpened):if i ==10:breakelse:i = i+1(flag,frame) = cap.read()#读取每一张flag framefileName = 'image'+str(i)+'jpg'print(fileName)if flag == True:cv2.imwrite(fileName,frame,[cv2.IMWRITE_JPEG_QUALITY,100]print('end!')
图片的合成
videoWrite = cv2.VideoWriter(‘2.mp4’,-1,5,size)—>size
接着循环遍历图片加到视频里
import cv2img = cv2.imread('image1.jpg')imgInfo = img.shapesize = (imgInfo[1],imgInfo[0])print(size)videoWrite = cv2.VideoWriter('2.mp4',-1,5,size)for i in range(1,11):fileName = 'image'+str(i)+'.jpg'img = cv2.imread(fileName)videoWrite.write(img)print('end!')
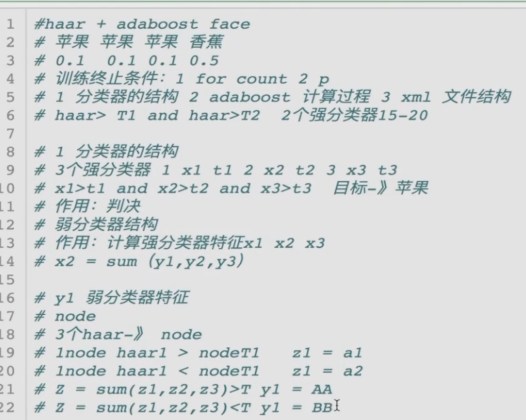
6.2Haar特征+adaboost分类器
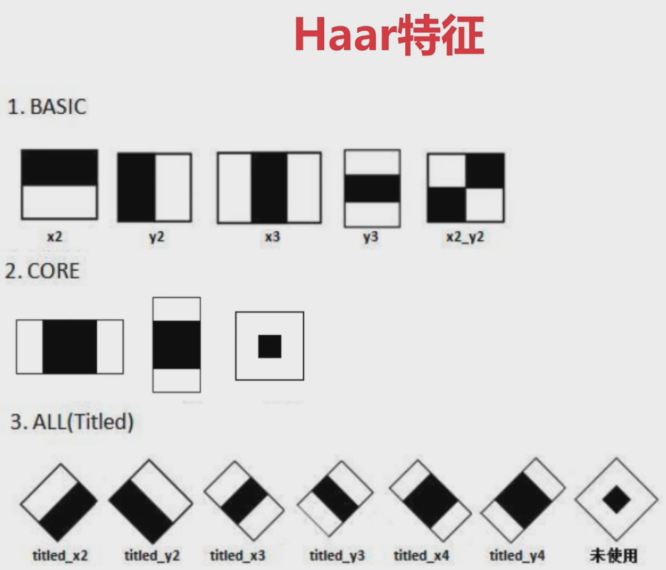
Haar特征
原理
Haar特征的计算量
快速计算的方法
计算特征->要计算矩形方框中的像素->有快速计算的方法: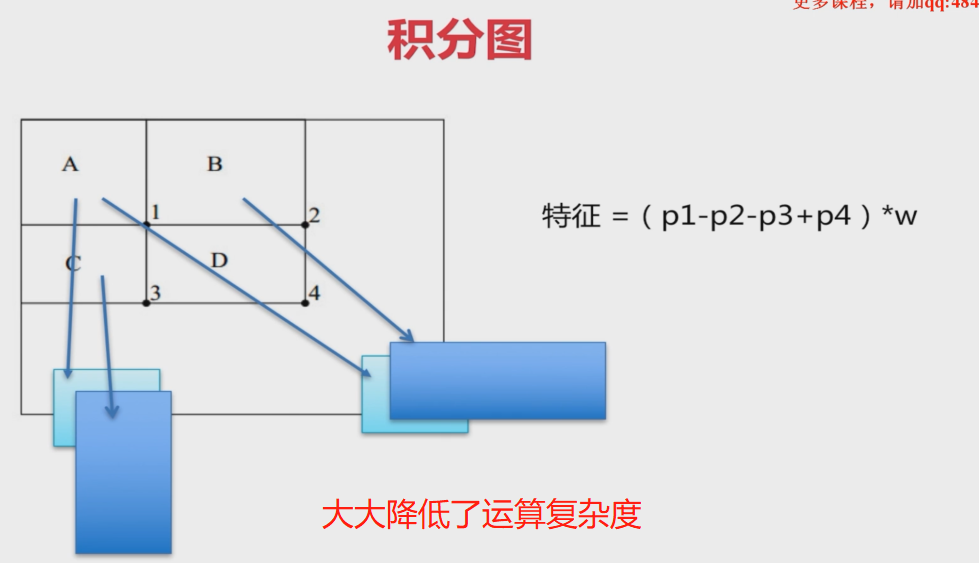

结论:一个任意的方框,都可以由它相邻的ABCD四个矩形通过加减运算得来
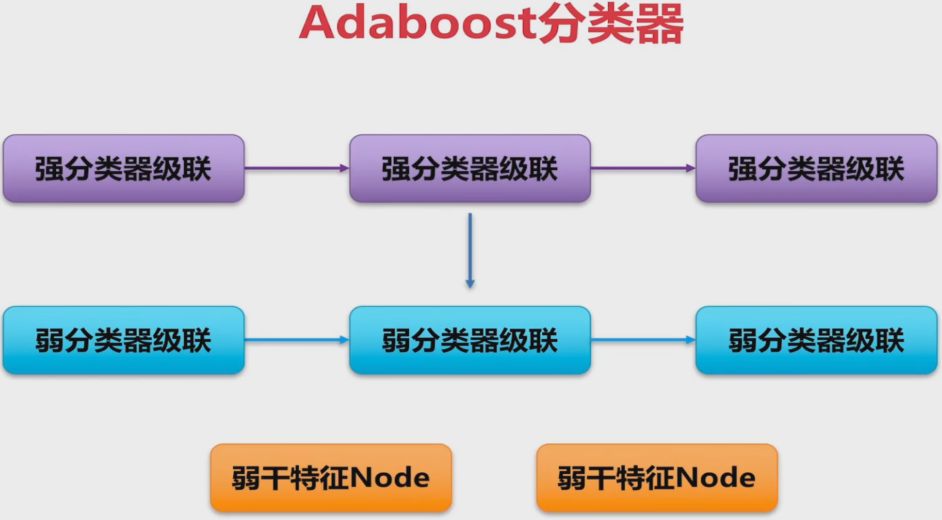
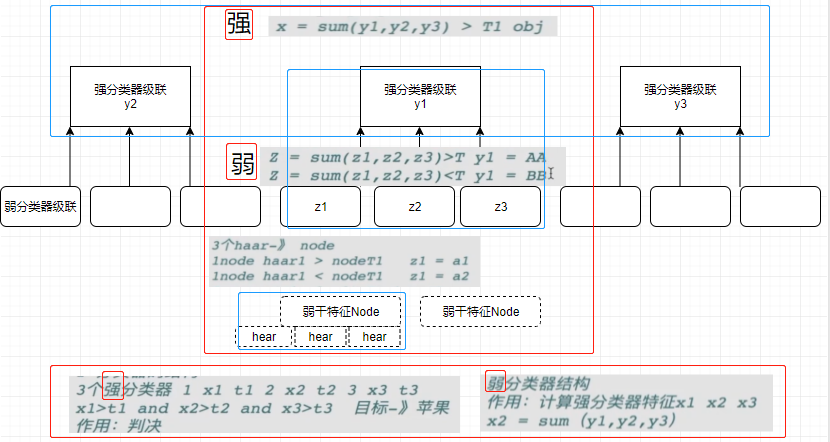
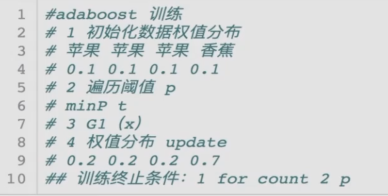
adaboost分类器
原理
adaboost分类器的训练
Haar_adaboost人脸识别
import cv2import numpy as npface_xml = cv2.CascadeClassifier('haarcascade_frontalface_default.xml')eye_xml = cv2.CascadeClassifier('haarcascade_eye.xml')img = cv2.imread('face.png')cv2.imshow('src',img)gray = cv2.cvtColor(img,cv2.COLOR_BGR2GRAY)# detect faces 1 (gray)data 2 scale 3 5(目标大小,人脸最小不能小于5个像素)faces = face_xml.detectMultiScale(gray,1.3,5)print('faces=',len(faces))#draw给人脸画方框for (x,y,w,h) in faces:cv2.rectangle(img,(x,y),(x+w,y+h),(0,0,255),2)#最后一个参数:线条宽度#detect eyesroi_face = gray[y:y+h,x:x+w]roi_color = img[y:y+h,x:x+w]eyes = eye_xml.detectMultiScale(roi_face)print('eyes=',len(eyes))#draw 给眼睛画方框for (e_x,e_y,e_w,e_h) in eyes:cv2.rectangle( roi_color,(e_x,e_y),(e_x+e_w,e_y+e_h),(0,0,255),2)cv2.imshow('dst',img)cv2.waitKey(0)
6.3Hog特征+SVM
SVM(分类、监督学习)
小案例(给出身高体重,判断男or女)
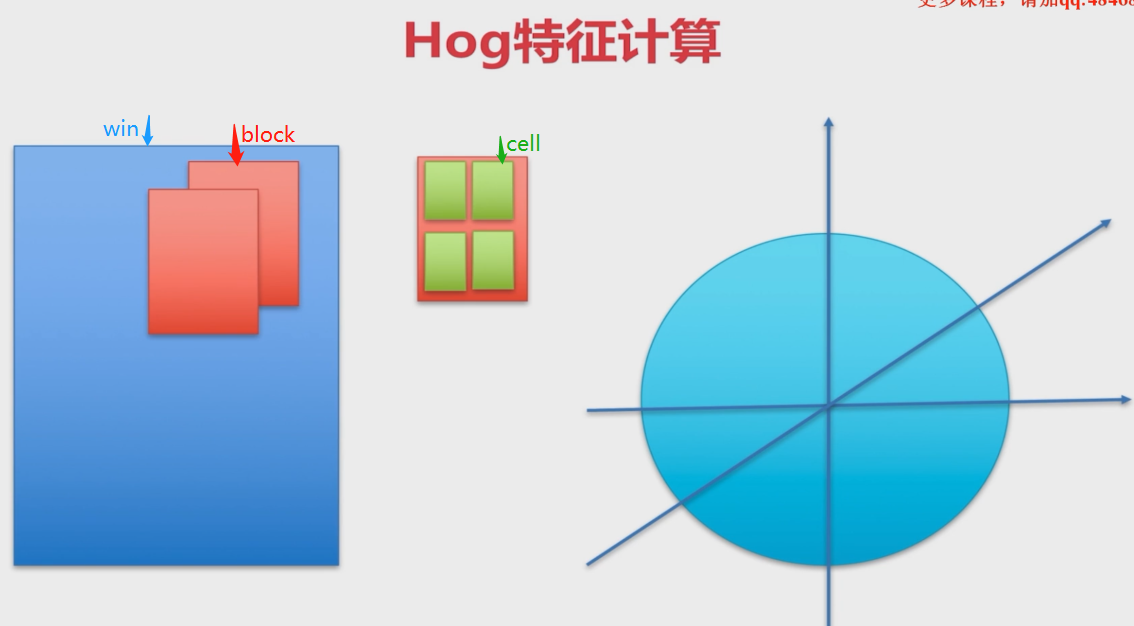
Hog特征
Hog_SVM小狮子的识别
数字识别的案例
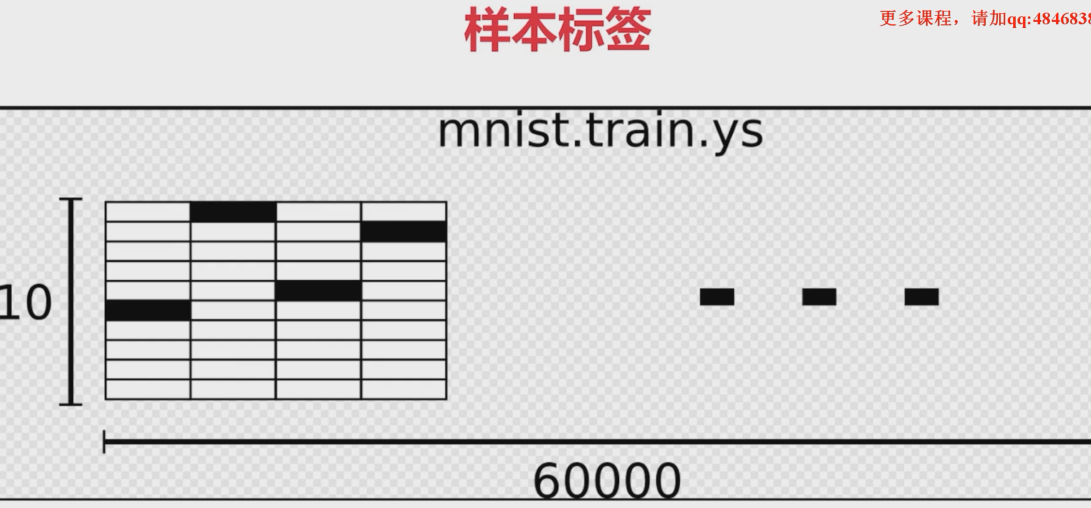
样本准备http://yann.lecun.com/exdb/mnist/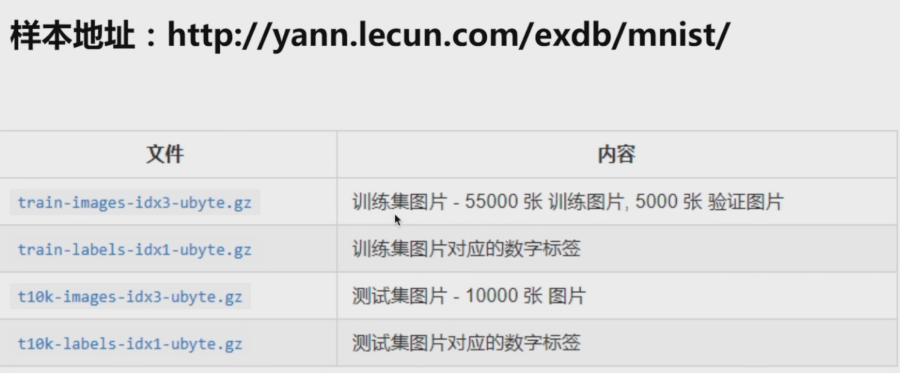
knn最近邻域法
1.Load Data
#本质:knn test 样本K个 max10 8个1 -》1import tensorflow as tfimport numpy as npimport randomfrom tensorflow.examples.tutorials.mnist import input_data# 1.load data 1 fileName 2 one_hot: 1 0000mnist = input_data.read_data_sets('MNIST_data',one_hot=True)# 2.属性设置trainNum = 55000testNum = 10000trainSize = 500testSize = 5#在trainSize中找到4个与testSize最像的图片k=4#data分解#获取范围在 0-trainNum 中的 trainSize个随机值 (replace不可重复)trainIndex = np.random.choice(trainNum,trainSize,replace = False)#训练图片的下标(随机选取)testIndex = np.random.choice(testNum,testSize,replace = False)trainData = mnist.train.images[trainIndex]#训练图片trainLabel = mnist.train.labels[trainIndex]#训练标签testData = mnist.test.images[testIndex]#测试图片testLabel = mnist.test.labels[testIndex]#测试标签print('trainData.shape=',trainData.shape)#(500, 784) 一共500张训练图片,大小(宽*高)28*28 =784(一张图片784像素)print('trainLabel.shape=',trainLabel.shape)#(500, 10)print('testData.shape=',testData.shape)#(5, 784)print('testLabel.shape=',testLabel.shape)#(5, 10)print('testLabel=',testLabel)#tf inputtrainDataInput = tf.placeholder(shape=[None,784],dtype= tf.float32)trainLabelInput = tf.placeholder(shape=[None,10],dtype = tf.float32)testDataInput = tf.placeholder(shape=[None,784],dtype= tf.float32)testLabelInput = tf.placeholder(shape=[None,10],dtype = tf.float32)
2.knn test train distance
3.knn 对每一个测试图片,在500个训练图中,挑选k个(4个)最近(最像)的图片
4.用label对应找出k个(4个)最近(最像)的图片 对应的数字值
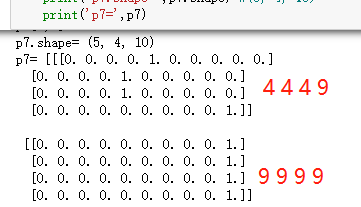
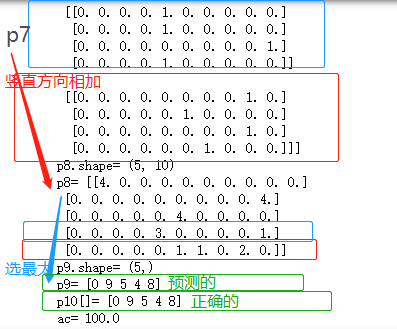
#knn distance#增加维度 5*784(2D) 变为5*1*784(3D)#原因:5张测试784 分别与500张训练784 相减 即 5 500 784(3D) 5*500*784f1 = tf.expand_dims(testDataInput,1)#维度扩展f2 = tf.subtract(trainDataInput,f1)f3 = tf.reduce_sum(tf.abs(f2),reduction_indices=2)#完成数据的累加 多维指定784的维数相加#选取最接近的4张f4 = tf.negative(f3)#取反功能f5,f6 = tf.nn.top_k(f4,k=4)#选取f4最大的4个值 取反 即 f3最小的4个值#由index获取具体图片内的数字值 f6 index -> trainLabelInputf7 = tf.gather(trainLabelInput,f6)#竖直方向的累加f8 = tf.reduce_sum(f7,reduction_indices =1 )#选取在某一个最大的值,获得下标index#f9 ->test5 image ->5numf9= tf.argmax(f8,dimension=1)with tf.Session() as sess:p1 = sess.run(f1,feed_dict={testDataInput:testData[0:5]})print('p1.shape=',p1.shape)# (5, 1, 784)p2 = sess.run(f2,feed_dict={trainDataInput:trainData,testDataInput:testData[0:5]})print('p2.shape=',p2.shape)#(5, 500, 784)p3 = sess.run(f3,feed_dict={trainDataInput:trainData,testDataInput:testData[0:5]})print('p3.shape=',p3.shape)#(5, 500)print('p3[0,0]=',p3[0,0])#p3[0,0]= 114.79216p4 = sess.run(f4,feed_dict={trainDataInput:trainData,testDataInput:testData[0:5]})print('p4.shape=',p4.shape)print('p4[0,0]=',p4[0,0])#p4[0,0]= -114.79216p5,p6 = sess.run((f5,f6),feed_dict={trainDataInput:trainData,testDataInput:testData[0:5]})print('p5.shape=',p5.shape)#(5, 4) 每张测试图片(5张)分别对应4张最近训练图片print('p6.shape=',p6.shape)#(5, 4)print('p5[0,0]=',p5[0,0]) # -45.580387print('p6[0,0]=',p6[0,0])# 196 (p6是下标index、)p7 = sess.run(f7,feed_dict={trainDataInput:trainData,testDataInput:testData[0:5],trainLabelInput:trainLabel})print('p7.shape=',p7.shape) #(5, 4, 10)print('p7=',p7)p8 = sess.run(f8,feed_dict={trainDataInput:trainData,testDataInput:testData[0:5],trainLabelInput:trainLabel})print('p8.shape=',p8.shape) # (5, 10)print('p8=',p8)p9 = sess.run(f9,feed_dict={trainDataInput:trainData,testDataInput:testData[0:5],trainLabelInput:trainLabel})print('p9.shape=',p9.shape) # (5, )print('p9=',p9)
5.检测概率统计
p10 = np.argmax(testLabel[0:5],axis = 1)print('p10[]=',p10)j = 0for i in range(0,5):if p10[i] == p9[i]:j = j + 1print('ac=',j*100/5)






 \
\
