参考来源:
CSDN:PyTorch:view() 与 reshape() 区别详解
总之,两者都是用来重塑 tensor 的 shape 的。view 只适合对满足连续性条件(contiguous)的 tensor 进行操作,而 reshape 同时还可以对不满足连续性条件的 tensor 进行操作,具有更好的鲁棒性。view 能干的 reshape 都能干,如果 view 不能干就可以用 reshape 来处理。别看目录挺多,但内容很细呀~其实原理并不难啦~我们开始吧~
一、PyTorch 中 tensor 的存储方式
想要深入理解 view 与 reshape 的区别,首先要理解一些有关 PyTorch 张量存储的底层原理,比如 tensor 的头信息区(Tensor)和存储区 (Storage)以及 tensor 的步长 Stride 。不用慌,这部分的原理其实很简单的(^-^)!
1. PyTorch 张量存储的底层原理
tensor 数据采用头信息区(Tensor)和存储区 (Storage)分开存储的形式,如图 1 所示。变量名以及其存储的数据是分为两个区域分别存储的。比如,我们定义并初始化一个 tensor ,tensor 名为 A ,A 的形状 size 、步长 stride 、数据的索引等信息都存储在头信息区,而A所存储的真实数据则存储在存储区。另外,如果我们对 A 进行截取、转置或修改等操作后赋值给 B,则 B的数据共享 A 的存储区,存储区的数据数量没变,变化的只是 **B** 的头信息区对数据的索引方式。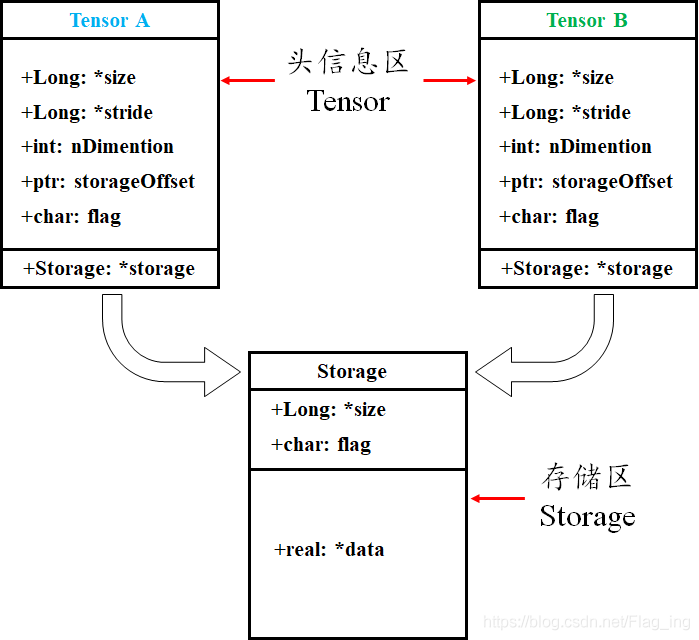
图 1 Torch中Tensor的存储结构
举个例子:
import torcha = torch.arange(5) # 初始化张量 a 为 [0, 1, 2, 3, 4]b = a[2:] # 截取张量a的部分值并赋值给b,b其实只是改变了a对数据的索引方式print('a:', a)print('b:', b)print('ptr of storage of a:', a.storage().data_ptr()) # 打印a的存储区地址print('ptr of storage of b:', b.storage().data_ptr()) # 打印b的存储区地址,可以发现两者是共用存储区print('==================================================================')b[1] = 0 # 修改b中索引为1,即a中索引为3的数据为0print('a:', a)print('b:', b)print('ptr of storage of a:', a.storage().data_ptr()) # 打印a的存储区地址,可以发现a的相应位置的值也跟着改变,说明两者是共用存储区print('ptr of storage of b:', b.storage().data_ptr()) # 打印b的存储区地址"""运行结果:a: tensor([0, 1, 2, 3, 4])b: tensor([2, 3, 4])ptr of storage of a: 1555200634944ptr of storage of b: 1555200634944==================================================================a: tensor([0, 1, 2, 0, 4])b: tensor([2, 0, 4])ptr of storage of a: 1555200634944ptr of storage of b: 1555200634944"""
2. PyTorch 张量的步长(stride)属性
torch 的 tensor 也是有步长属性的,说起 stride 属性是不是很耳熟?是的,卷积神经网络中卷积核对特征图的卷积操作也是有 stride 属性的,但这两个 stride 可完全不是一个意思哦。tensor 的步长可以理解为从索引中的一个维度跨到下一个维度中间的跨度。为方便理解,就直接用图 1 说明了,您细细品(^-^):
图 2 对张量的 stride 属性的理解
举个例子:
import torcha = torch.arange(6).reshape(2, 3) # 初始化张量 ab = torch.arange(6).view(3, 2) # 初始化张量 bprint('a:', a)print('stride of a:', a.stride()) # 打印a的strideprint('b:', b)print('stride of b:', b.stride()) # 打印b的stride"""运行结果:a: tensor([[0, 1, 2],[3, 4, 5]])stride of a: (3, 1)b: tensor([[0, 1],[2, 3],[4, 5]])stride of b: (2, 1)"""
二、对“视图(view)”字眼的理解
视图是数据的一个别称或引用,通过该别称或引用亦便可访问、操作原有数据,但原有数据不会产生拷贝。如果我们对视图进行修改,它会影响到原始数据,物理内存在同一位置,这样避免了重新创建张量的高内存开销。由上面介绍的 PyTorch 的张量存储方式可以理解为:对张量的大部分操作就是视图操作!
与之对应的概念就是副本。副本是一个数据的完整的拷贝,如果我们对副本进行修改,它不会影响到原始数据,物理内存不在同一位置。
有关视图与副本,在NumPy中也有着重要的应用。可参考这里。
三、view() 和 reshape() 的比较
1. 对 torch.Tensor.view() 的理解
定义:
view(*shape) → Tensor
作用:类似于 reshape ,将 tensor 转换为指定的 shape,原始的 data 不改变。返回的 tensor 与原始的 tensor 共享存储区。返回的 tensor 的 size 和 stride 必须与原始的 tensor 兼容。每个新的 tensor 的维度必须是原始维度的子空间,或满足以下连续条件:
式 1 张量连续性条件
否则需要先使用 **contiguous()** 方法将原始 **tensor** 转换为满足连续条件的 **tensor** ,然后就可以使用 **view **方法进行 shape 变换了。或者直接使用 reshape 方法进行维度变换,但这种方法变换后的 tensor 就不是与原始 tensor 共享内存了,而是被重新开辟了一个空间。
如何理解 tensor 是否满足连续条件呐?下面通过一系列例子来慢慢理解下:
首先,我们初始化一个张量 a ,并查看其 stride、storage 等属性:
import torcha = torch.arange(9).reshape(3, 3) # 初始化张量aprint('struct of a:\n', a)print('size of a:', a.size()) # 查看a的shapeprint('stride of a:', a.stride()) # 查看a的stride"""运行结果:struct of a:tensor([[0, 1, 2],[3, 4, 5],[6, 7, 8]])size of a: torch.Size([3, 3])stride of a: (3, 1) # 注:满足连续性条件"""
把上面的结果带入式 1 ,可以发现满足 tensor 连续性条件。
我们再看进一步处理——对 a 进行转置后的结果:
import torcha = torch.arange(9).reshape(3, 3) # 初始化张量ab = a.permute(1, 0) # 对a进行转置print('struct of b:\n', b)print('size of b:', b.size()) # 查看b的shapeprint('stride of b:', b.stride()) # 查看b的stride"""运行结果:struct of b:tensor([[0, 3, 6],[1, 4, 7],[2, 5, 8]])size of b: torch.Size([3, 3])stride of b: (1, 3) # 注:此时不满足连续性条件"""
将 a 转置后再看最后的输出结果,带入到式 1 中,是不是发现等式不成立了?所以此时就不满足 tensor 连续的条件了。这是为什么那?我们接着往下看:
首先,输出 a 和 b 的存储区来看一下有没有什么不同:
import torcha = torch.arange(9).reshape(3, 3) # 初始化张量aprint('ptr of storage of a: ', a.storage().data_ptr()) # 查看a的storage区的地址print('storage of a: \n', a.storage()) # 查看a的storage区的数据存放形式b = a.permute(1, 0) # 转置print('ptr of storage of b: ', b.storage().data_ptr()) # 查看b的storage区的地址print('storage of b: \n', b.storage()) # 查看b的storage区的数据存放形式"""运行结果:ptr of storage of a: 1991123536192storage of a:012345678[torch.LongStorage of size 9]ptr of storage of b: 1991123536192storage of b:012345678[torch.LongStorage of size 9]"""
由结果可以看出,张量 a、b 仍然共用存储区,并且存储区数据存放的顺序没有变化,这也充分说明了 b 与 a 共用存储区,b 只是改变了数据的索引方式。那么为什么 b 就不符合连续性条件了呐(T-T)?其实原因很简单,我们结合图 3 来解释下: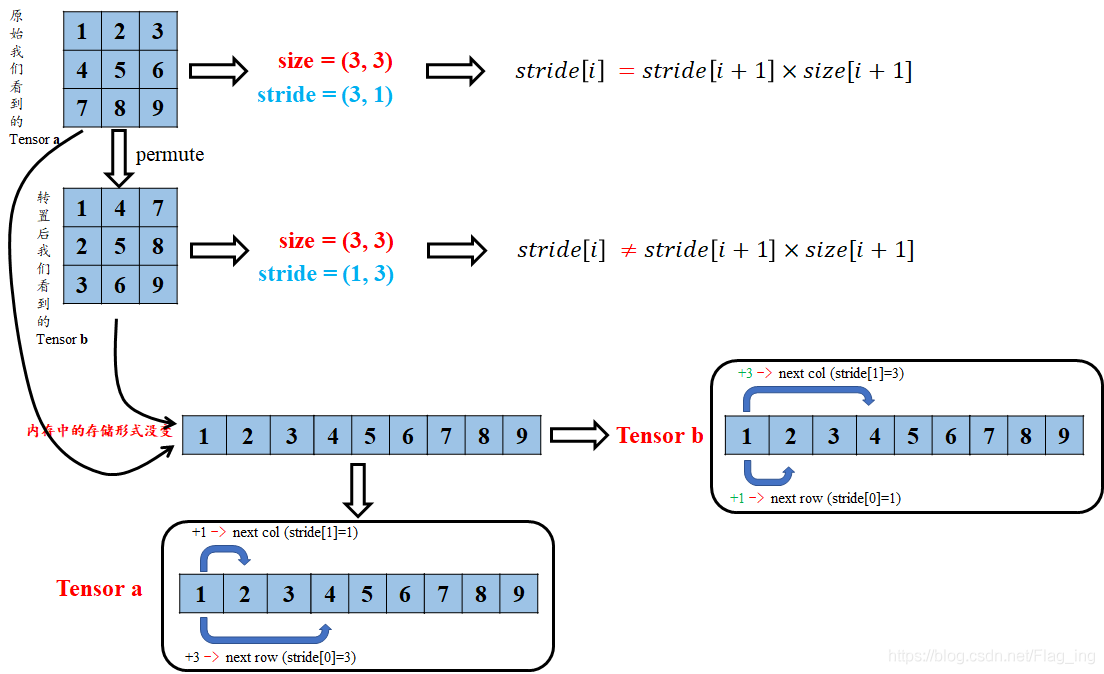
图 3 对张量连续性条件的理解
转置后的 tensor 只是对 storage 区数据索引方式的重映射,但原始的存放方式并没有变化.因此,这时再看 tensor b 的 stride,从 b 第一行的元素 1 到第二行的元素 2,显然在索引方式上已经不是原来 +1 了,而是变成了新的 +3 了,你在仔细琢磨琢磨是不是这样的(^-^)。所以这时候就不能用 view 来对 b 进行 shape 的改变了,不然就报错咯,不信你看下面;
import torcha = torch.arange(9).reshape(3, 3) # 初始化张量aprint(a.view(9))print('============================================')b = a.permute(1, 0) # 转置print(b.view(9))"""运行结果:tensor([0, 1, 2, 3, 4, 5, 6, 7, 8])============================================Traceback (most recent call last):File "此处打码", line 14, in <module>print(b.view(9))RuntimeError: view size is not compatible with input tensor's size and stride (at least one dimension spans across two contiguous subspaces). Use .reshape(...) instead."""
但是嘛,上有政策下有对策,这种情况下,直接用 view 不行,那我就先用 **contiguous()** 方法将原始 tensor 转换为满足连续条件的 tensor ,在使用 view 进行 shape 变换,值得注意的是,这样的原理是 **contiguous()** 方法开辟了一个新的存储区给 **b** ,并改变了 **b** 原始存储区数据的存放顺序!同样的例子:
import torcha = torch.arange(9).reshape(3, 3) # 初始化张量aprint('storage of a:\n', a.storage()) # 查看a的strideprint('+++++++++++++++++++++++++++++++++++++++++++++++++')b = a.permute(1, 0).contiguous() # 转置,并转换为符合连续性条件的tensorprint('size of b:', b.size()) # 查看b的shapeprint('stride of b:', b.stride()) # 查看b的strideprint('viewd b:\n', b.view(9)) # 对b进行view操作,并打印结果print('+++++++++++++++++++++++++++++++++++++++++++++++++')print('storage of a:\n', a.storage()) # 查看a的存储空间print('storage of b:\n', b.storage()) # 查看b的存储空间print('+++++++++++++++++++++++++++++++++++++++++++++++++')print('ptr of a:\n', a.storage().data_ptr()) # 查看a的存储空间地址print('ptr of b:\n', b.storage().data_ptr()) # 查看b的存储空间地址"""运行结果:storage of a:012345678[torch.LongStorage of size 9]+++++++++++++++++++++++++++++++++++++++++++++++++size of b: torch.Size([3, 3])stride of b: (3, 1)viewd b:tensor([0, 3, 6, 1, 4, 7, 2, 5, 8])+++++++++++++++++++++++++++++++++++++++++++++++++storage of a:012345678[torch.LongStorage of size 9]storage of b:036147258[torch.LongStorage of size 9]+++++++++++++++++++++++++++++++++++++++++++++++++ptr of a:1977605185728ptr of b:1977605183936"""
由上述结果可以看出,张量 a 与 b 已经是两个存在于不同存储区的张量了。也印证了 **contiguous()** 方法开辟了一个新的存储区给 **b** ,并改变了 **b** 原始存储区数据的存放顺序。
2. 对 torch.reshape() 的理解
定义:
torch.reshape(input, shape) → Tensor
作用:与 view 方法类似,将输入 tensor 转换为新的 shape 格式。
但是 reshape 方法更强大,可以认为 **a.reshape = a.view() + a.contiguous().view()** 。
即:在满足 tensor 连续性条件时,**a.reshape()** 返回的结果与 **a.view()** 相同,否则返回的结果与**a.contiguous().view()** 相同。
不信你就看人家官方的解释嘛,您在细细品:

3. view() 和 reshape() 的用法
**reshape()** 可以 **torch.reshape()**, 还可以 **torch.Tensor.reshape()** ;**view()** 只能 **torch.Tensor.view()** 。
# -*-coding:utf-8-*-"""view() 和 reshape() 的用法"""import torcha = torch.arange(3 * 2 * 2).reshape((3, 2, 2))print('a:')print(a, '\n')b = a.reshape((3, 2 * 2))print("'a.reshape((3, 2 * 2)):'")print(b, '\n')c = a.view((3, 2 * 2))print("'a.view((3, 2 * 2)):'")print(c, '\n')d = torch.reshape(a, (3, 2 * 2))print("'torch.reshape(a,(3, 2 * 2)):'")print(d, '\n')e = torch.view(a, (3, 2 * 2))print("'torch.view(a, (3, 2 * 2)):'")print(e)
输出: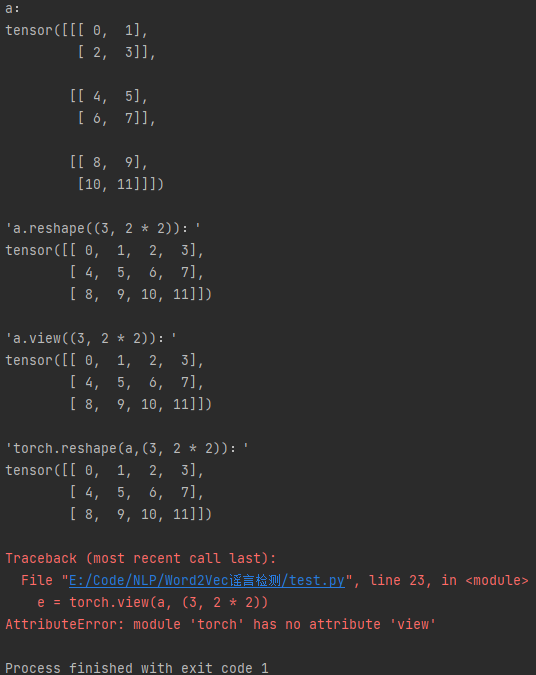
a:tensor([[[ 0, 1],[ 2, 3]],[[ 4, 5],[ 6, 7]],[[ 8, 9],[10, 11]]])'a.reshape((3, 2 * 2)):'tensor([[ 0, 1, 2, 3],[ 4, 5, 6, 7],[ 8, 9, 10, 11]])'a.view((3, 2 * 2)):'tensor([[ 0, 1, 2, 3],[ 4, 5, 6, 7],[ 8, 9, 10, 11]])'torch.reshape(a,(3, 2 * 2)):'tensor([[ 0, 1, 2, 3],[ 4, 5, 6, 7],[ 8, 9, 10, 11]])Traceback (most recent call last):File "E:/Code/NLP/Word2Vec谣言检测/test.py", line 23, in <module>e = torch.view(a, (3, 2 * 2))AttributeError: module 'torch' has no attribute 'view'Process finished with exit code 1
四、总结
torch 的 view() 与 reshape() 方法都可以用来重塑 tensor 的 shape ,区别就是使用的条件不一样。view() 方法只适用于满足连续性条件的 tensor ,并且该操作不会开辟新的内存空间,只是产生了对原存储空间的一个新别称和引用,返回值是视图。而 reshape() 方法的返回值既可以是视图,也可以是副本,当满足连续性条件时返回 view ,否则返回副本[ 此时等价于先调用 **contiguous()** 方法在使用 **view()** ]。因此当不确能否使用 view 时,可以使用 reshape 。如果只是想简单地重塑一个 tensor 的 shape ,那么就是用 reshape ,但是如果需要考虑内存的开销而且要确保重塑后的 tensor 与之前的 tensor 共享存储空间,那就使用 view() 。

若有收获,就点个赞吧
0 人点赞
