操作系统启动的第一条指令?
我们以 X86作为例子:
我们的电脑启动时需要先加载操作系统,那么操作系统如何加载?如何知道操作系统源代码位于何处?
首先在操作系统中如何找到源码地址,那么应该时依靠指针 IP 地址,那么 IP =?
- X86 PC 在刚开机时 CPU 处于
实模式(PS: 和保护模式对应,实模式的寻址 CS:IPCS 左移4伪+IP和保护模式不一样) - 开机时, CS=0xFFFF IP=0x0000 (PS: 自动设置)
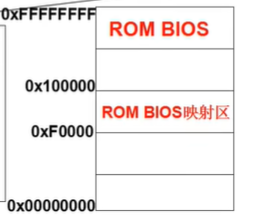
- 寻址 0xFFFF (ROM BIOS 映射区)
- 检查 RAM 键盘 显示器 软硬磁盘
- 将磁盘 0 磁道 0 扇区 读入 0x7c00 处 (PS: 0 磁道 0 扇区操作系统的引导扇区)
- 设置 CS=0x7c0 IP=0x0000
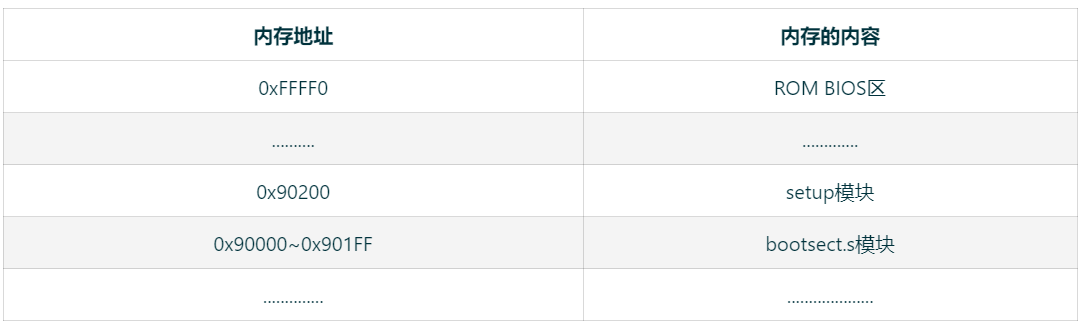
BIOS —> bootsect.s —> stetup.s —> system OS
引导扇区代码 : bootsect.s
!! SYS_SIZE is the number of clicks (16 bytes) to be loaded.! 0x3000 is 0x30000 bytes = 196kB, more than enough for current! versions of linux!SYSSIZE = 0x3000!! bootsect.s (C) 1991 Linus Torvalds!! bootsect.s is loaded at 0x7c00 by the bios-startup routines, and moves! iself out of the way to address 0x90000, and jumps there.!! It then loads 'setup' directly after itself (0x90200), and the system! at 0x10000, using BIOS interrupts.!! NOTE! currently system is at most 8*65536 bytes long. This should be no! problem, even in the future. I want to keep it simple. This 512 kB! kernel size should be enough, especially as this doesn't contain the! buffer cache as in minix!! The loader has been made as simple as possible, and continuos! read errors will result in a unbreakable loop. Reboot by hand. It! loads pretty fast by getting whole sectors at a time whenever possible..globl begtext, begdata, begbss, endtext, enddata, endbss.textbegtext:.databegdata:.bssbegbss:.textSETUPLEN = 4 ! nr of setup-sectorsBOOTSEG = 0x07c0 ! original address of boot-sectorINITSEG = 0x9000 ! we move boot here - out of the waySETUPSEG = 0x9020 ! setup starts hereSYSSEG = 0x1000 ! system loaded at 0x10000 (65536).ENDSEG = SYSSEG + SYSSIZE ! where to stop loading! ROOT_DEV: 0x000 - same type of floppy as boot.! 0x301 - first partition on first drive etcROOT_DEV = 0x306entry startstart:mov ax,#BOOTSEGmov ds,axmov ax,#INITSEGmov es,axmov cx,#256sub si,sisub di,direpmovwjmpi go,INITSEGgo: mov ax,csmov ds,axmov es,ax! put stack at 0x9ff00.mov ss,axmov sp,#0xFF00 ! arbitrary value >>512! load the setup-sectors directly after the bootblock.! Note that 'es' is already set up.load_setup:mov dx,#0x0000 ! drive 0, head 0mov cx,#0x0002 ! sector 2, track 0mov bx,#0x0200 ! address = 512, in INITSEGmov ax,#0x0200+SETUPLEN ! service 2, nr of sectorsint 0x13 ! read itjnc ok_load_setup ! ok - continuemov dx,#0x0000mov ax,#0x0000 ! reset the disketteint 0x13j load_setupok_load_setup:! Get disk drive parameters, specifically nr of sectors/trackmov dl,#0x00mov ax,#0x0800 ! AH=8 is get drive parametersint 0x13mov ch,#0x00seg csmov sectors,cxmov ax,#INITSEGmov es,ax! Print some inane messagemov ah,#0x03 ! read cursor posxor bh,bhint 0x10mov cx,#24mov bx,#0x0007 ! page 0, attribute 7 (normal)mov bp,#msg1mov ax,#0x1301 ! write string, move cursorint 0x10! ok, we've written the message, now! we want to load the system (at 0x10000)mov ax,#SYSSEGmov es,ax ! segment of 0x010000call read_itcall kill_motor! After that we check which root-device to use. If the device is! defined (!= 0), nothing is done and the given device is used.! Otherwise, either /dev/PS0 (2,28) or /dev/at0 (2,8), depending! on the number of sectors that the BIOS reports currently.seg csmov ax,root_devcmp ax,#0jne root_definedseg csmov bx,sectorsmov ax,#0x0208 ! /dev/ps0 - 1.2Mbcmp bx,#15je root_definedmov ax,#0x021c ! /dev/PS0 - 1.44Mbcmp bx,#18je root_definedundef_root:jmp undef_rootroot_defined:seg csmov root_dev,ax! after that (everyting loaded), we jump to! the setup-routine loaded directly after! the bootblock:jmpi 0,SETUPSEG! This routine loads the system at address 0x10000, making sure! no 64kB boundaries are crossed. We try to load it as fast as! possible, loading whole tracks whenever we can.!! in: es - starting address segment (normally 0x1000)!sread: .word 1+SETUPLEN ! sectors read of current trackhead: .word 0 ! current headtrack: .word 0 ! current trackread_it:mov ax,estest ax,#0x0fffdie: jne die ! es must be at 64kB boundaryxor bx,bx ! bx is starting address within segmentrp_read:mov ax,escmp ax,#ENDSEG ! have we loaded all yet?jb ok1_readretok1_read:seg csmov ax,sectorssub ax,sreadmov cx,axshl cx,#9add cx,bxjnc ok2_readje ok2_readxor ax,axsub ax,bxshr ax,#9ok2_read:call read_trackmov cx,axadd ax,sreadseg cscmp ax,sectorsjne ok3_readmov ax,#1sub ax,headjne ok4_readinc trackok4_read:mov head,axxor ax,axok3_read:mov sread,axshl cx,#9add bx,cxjnc rp_readmov ax,esadd ax,#0x1000mov es,axxor bx,bxjmp rp_readread_track:push axpush bxpush cxpush dxmov dx,trackmov cx,sreadinc cxmov ch,dlmov dx,headmov dh,dlmov dl,#0and dx,#0x0100mov ah,#2int 0x13jc bad_rtpop dxpop cxpop bxpop axretbad_rt: mov ax,#0mov dx,#0int 0x13pop dxpop cxpop bxpop axjmp read_track/** This procedure turns off the floppy drive motor, so* that we enter the kernel in a known state, and* don't have to worry about it later.*/kill_motor:push dxmov dx,#0x3f2mov al,#0outbpop dxretsectors:.word 0msg1:.byte 13,10.ascii "Loading system ...".byte 13,10,13,10.org 508root_dev:.word ROOT_DEVboot_flag:.word 0xAA55.textendtext:.dataenddata:.bssendbss:
我们对其中主要代码分析
.globl begtext, begdata, begbss, endtext, enddata, endbss.text // 文本段begtext:.data // 数据段begdata:.bss // 未初始化段begbss:.textSETUPLEN = 4 // 设置扇区数BOOTSEG = 0x07c0 // boot-sector 的段地址,实模式下,左移4位为0x07c00INITSEG = 0x9000 // 我们把bootsect移动到这里SETUPSEG = 0x9020 // 开始加载SYSSEG = 0x1000 // 系统加载 0x10000 (65536).ENDSEG = SYSSEG + SYSSIZE // 停止加载的地址entry start // 程序入口start:mov ax,#BOOTSEGmov ds,ax // ds = 0x07c0mov ax,#INITSEGmov es,ax // es = 0x9000mov cx,#256 // cx = 256sub si,si // si = 0sub di,di // di = 0rep // 重复 后面的指令,是个前缀, 根据 ecx 判断重复次数即: 重复 movw 指令256 次movw // mov 指令是移动的意思, movw 是移动 2 字,最终效果是移动 512 字节 (注解1)jmpi go,INITSEG // 跳转指令 cs = INITSEG = 0x9000
- 注解1 : movw 执行后会将 0x07c0:0x0000 处的 256 个字移动到 0x9000:0x0000 (PS : 这个的 256 个字 (512 byte) 恰好就是引导扇区的大小)
- 那么问题来了,我们为什么要移动 bootsect.s 代码?
go:mov ax,csmov ds,axmov es,ax // es = 0x9000mov ss,axmov sp,#0xFF00load_setup: // 载入 setup 模块mov dx,#0x0000mov cx,#0x0002 // cl = 2mov bx,#0x0200 // bx = 0x0200 (对应十进制 512)mov ax,#0x0200+SETUPLEN // al = 4 (读取四个扇区)int 0x13 // (注解1)jnc ok_load_setup ! ok - continuemov dx,#0x0000mov ax,#0x0000 // 复位int 0x13j load_setup // 重读
- 注解1 : 0x13 是 BIOS 读磁盘扇区的中断: ah=0x02, al=扇区数量 (SETUPLEN = 4 ) ,
ch=柱面号 cl=开始扇区 dh=磁头号 dl=驱动器号 es:bx=内存地址- 为什么从第二个扇区开始读? 因为 boot 扇区占据了第一个扇区
- 读取到哪里呢?
读取到 es:bx 的位置, 即 0x9000:0x0200 , 因为 boot 扇区的代码是在 0x9000 处的并且大小是 512 字节,所以我们应该将 setup 扇区的代码放置于 boot 扇区代码之上

内存示意图:
读入 setup 模块后,就需要显示开机画满并读 system模块
ok_load_setup: // 载入 setup 模块mov dl,#0x00mov ax,#0x0800 // ah = 8int 0x13mov ch,#0x00seg csmov sectors,cxmov ax,#INITSEGmov es,axmov ah,#0x03xor bh,bhint 0x10 // ah 功能号为3,表示读取光标位置mov cx,#24mov bx,#0x0007 // 7 是显示属性mov bp,#msg1 // 要显示的内容在内存中的位置(见下)mov ax,#0x1301 ! write string, move cursorint 0x10 // 显示字符mov ax,#SYSSEGmov es,ax ! segment of 0x010000call read_it // 读入 system 模块// 中间省略内容jmpi 0,SETUPSEG // 转入 0x9020:0x0000 执行 setup.s
msg1:.byte 13,10.ascii "Loading system ..." // 要显示的内容,开机 logo.byte 13,10,13,10
setup.s
setup 将完成 OS 启动前的配置
INITSEG = 0x9000 ! bootsect.s 的段地址SYSSEG = 0x1000 ! system loaded at 0x10000SETUPSEG = 0x9020 ! 本程序的段地址0x90000 光标位置0x90002 扩展内存数0x9000c 显卡参数0x901FC 根设备号
start:mov ax,#INITSEG // INITSEG 在setup.s里的第17行 定义为0x9000mov ds,ax // ds = 0x9000mov ah,#0x03xor bh,bhint 0x10 // 10号中断的3号功能 读光标位置mov [0],dx // 取出光标位置 放到0x9000处// 获取物理内存的大小mov ah,#0x88int 0x15 // 中断mov [2],ax // 获取扩展内存大小,并放到0x9000处 (注解1)// 还会有读取显卡参数 设备号操作cli ; 不允许中断mov ax,#0x0000clddo_move:mov es,ax // es = 0add ax,#0x1000cmp ax,#0x9000jz end_movemov ds,ax // ds = 1000sub di,disub si,simov cx,#0x8000 // cx = 32768rep // 重复指令,将system模块挪到0地址处!(注解2)movswjmp do_move
之后,system模块就会一直在0地址处。而system之后的内存,我们就可以用于运行我们自己的程序了,例如浏览器,Word等。 现在我们的操作系统已经加载到内存中, 现在我们就需要执行我们的操作系统代码,这一步称为: 进入保护模式, 将我们的控制权交给操作系统 在上面我们提高我们要进入保护模式,那么什么叫保护模式,我们又为什么要进入保护模式? > 早期计算机只支持1M的内存,这指的是早期的寻址方式,只支持1M。早期使用的是段基址 + 偏移地址这样的方式寻址的,这种方式不能满足 4G内存的寻址,因此,我们要切换到一个新的寻址模式。因此CPU接下来会从16位寻址模式(也叫实模式)切换到32位寻址模式(也叫保护模式)。 > 那么CPU是怎么切换寻址模式呢?根据一个寄存器:CR0 。 如果这个寄存器的最后一位是0,CPU就会用16位模式;如果是1,就用保护模式(其实就是换一条电路去寻址)。
- 注解1: 早期计算机中,地址总线只有20位,因此只能寻址1M以内的内存;而如今的计算机,都是8G,16G内存起步的,那么通常把1M以后的这些内存就叫扩展内存
- 为什么要读取内存大小: 操作系统,就是帮我们管理硬件的,而内存就是一个重要的硬件。要管理好内存,首先得知道内存的多大。
- 注解2 : 将 1000:0000 处代码复制到 0000:0000 处, 然后在 bootsect.s 中 1000:0000 处的代码就是 system 模块,因此这条指令的作用就是将 system 模块移动到 0 地址处
- 那么我们就可以回到之前的一个问题:为什么bootsect.s 会将自己从 0x7c00处挪到9000处?因为要给system模块腾出空间。system模块很长,会覆盖到0x7c00处,如果正在执行的代码被覆盖了,肯定是不行的。同时,当时的system模块不会太大,不会覆盖到0x90000处的bootsect和setup模块 (当时system模块不会超过0x80000字节(即512kb),Linux0.11内核只有14000行左右,大概325KB大小)。操作系统诞生之初,功能还比较简单,代码也不会太多。
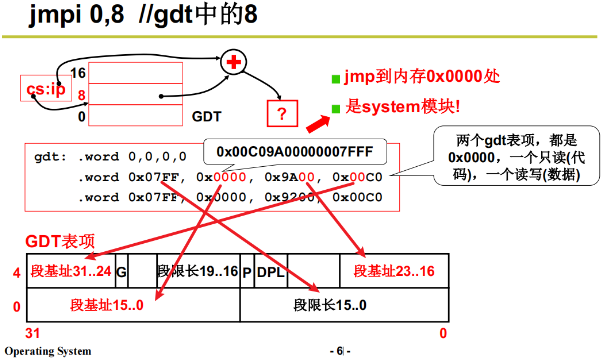
那么 32 寻址模式如何寻址? 这就要提到一个非常著名概念叫 GDT(全局描述表Global Descriptor Table),GDT表里面存放的才是基址。 当然这也是硬件帮我们实现的寻址方式(因为硬件快)。如何用GDT寻址? 在16位模式下,代码寻址是用CS:IP 实现的,而在32位模式下,CS不再左移4位产生一个地址,而是用作选择子,换句话说就是CS的内容是GDT表的下标,对应的GDT表项的内容,才是段基址。 因此,32位寻址模式是这样工作的:首先根据CS取出GDT表的内容作为基址,IP还是作为偏移地址,因此来产生一个新的地址,示意图:
mov ax,#0x0001lmsw ax // 将ax的值赋给CR0寄存器,然后接下来的指令,就是用32位寻址模式了。jmpi 0,8 // 跳转到 0 地址处(原因见下) ip=0 cs=8

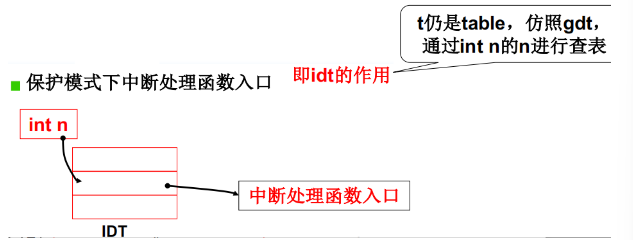
那么问题又出现了, GDT 表内容是什么?
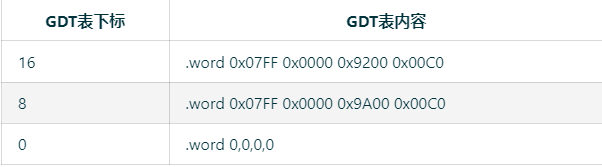
在 setup 中也定义了 GDT 表以及 IDT 表:
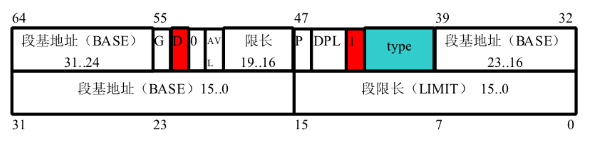
我们可以看到有很多 word 指令,一个word就是16位,而GDT表一个表项占8字节(64位),因此每4个word就是 一个GDT的表项(其中,第一个表项为空不使用) 每个表项的组成如下:
idt_48: // 保护模式中断函数表.word 0 ! idt limit=0.word 0,0 ! idt base=0Lgdt_48:.word 0x800 ! gdt limit=2048, 256 GDT entries.word 512+gdt,0x9 ! gdt base = 0X9xxxxgdt: .word 0,0,0,0.word 0x07FF 0x0000 0x9A00 0x00C0.word 0x07FF 0x0000 0x9200 0x00C0
现在我们回到问题处 **jmpi 0,8**为什么跳转到 0 地址处?
由于 cs=8 所以我们查看这个对应小标内容:
而这几个word是如何存放到GDT表的呢?
.word 0x07FF 0x0000 0x9A00 0x00C0
.word 0x07FF 0x0000 0x9A00 0x00C0在内存中,从高地址到 低地址极速 0x00C0 9A00 0000 07FF用二进制展开来就是0x00C0: 0000 0000 1100 00000x9A00: 1001 1010 0000 00000x0000: 0000 0000 0000 00000x07FF: 0000 0111 1111 1111
:::success
- 因为操作系统就是管理硬件的,因此首先得知道硬件的情况:读了一些硬件参数并存到内存里
- 把system挪到0地址处,将来操作系统运行的时候,system模块会一直存在那里
- 然后启动了保护模式(通过修改CR0寄存器),最后运用应用了32位的汇编指令JMPI 0, 8 跳到了0地址处去执行
- 0地址就是system模块,因此后面就是操作系统运行起来了
:::
System 模块
:::success System 模块的第一部分代码是: head.s
:::
system 由许多文件编译而成,为什么是 head.s ? (Linux/Makefile)
我们通常会将操作系统编译后的样子称为 Image 将 Image读入内存后, 就会启动操作系统.
那么 head.s 做了什么?
1. 初始化 GDT IDT
之前的setup.s 里建立的GDT只是临时用于跳转而已,现在操作系统是真正的开始工作了,所以还要再次建立这个表 (PS 这里出现了 32 位汇编)
startup_32:movl $0x10,%eaxmov %ax,%dsmov %ax,%esmov %ax,%fsmov %ax,%gs ; 指向gdt的0x10项(数据段)lss _stack_start,%esp ; 设置系统栈call setup_idt ; 初始化 IDT表call setup_gdt ; 初始化 GDT表
:::success 为什么 head.s 汇编和前面不一样,在这里使用了三种汇编 ?
- as86 汇编: 产生 16 位代码的 Intel 8086 汇编
:::
mov ds, ax, ; ax → ds, 目标操作数在前
:::success
- GNU as 汇编: 产生 32 位代码,使用 AT&T 系统 V语法
:::
movl var, %eax ; (var) → eaxmovb -4(%ebp), %al ; 取出一字节
:::success
- 内嵌汇编: gcc 编译 x.c 产生中间结果汇编文件 x.s
:::
__asm__(“汇编语句”: 输出: 输入: 破坏部分描述);//例如__asm__(“movb%%fs:%2, %%al” //%2表示addr,:”=a”(_res) //a表示使用eax,并编号%0:”0”(seg),”m”(*(addr)) //0或空表示使用与相应输出一样的寄存器 m表示使用内存);
2. main.c
当head.s 执行完后,接下来就是执行 main.c 代码了。如何从汇编 跳去执行 C语言的main函数呢?怎么做到的? 我们知道,汇编执行子程序的话,可以通过跳转指令; C语言执行函数(子程序)的话,用的是调用函数的语句,例如调用方法b(假设需要传参),就用 b(int a, int b) 即可。但其实, C语言最后还是会翻译成汇编,然后才被CPU执行。而传参,可以靠栈来实现。 因此,本段汇编代码的一开始几条压栈语句,就是传参给CPU;然后将main函数的地址压到栈中;当setup_paging执行ret后,就回执行函数main了!(执行ret指令后,会将栈里的内容取出作为下一个要执行的代码的地址)
after_page_tables:pushl $0 // 往栈中压入数据pushl $0pushl $0pushl $L6 ; return address for main, if it decides to.pushl $_main // 在栈中压入 main 函数, main 函数是 C 代码入口处jmp setup_pagingL6: jmp L6 ; main应该永远不会回到这里,但以防万一,我们知道会发生什么。setup_paging:; …………这里省略一些设置页表代码……ret
那么我们现在提出一个疑问 main 函数返回怎么样?
- 如果写过 c 语言 main 函数返回就意味着程序结束对应操作系统就是死机
- 如果意外返回呢? 我们看下面一段代码
L6: jmp L6这就形成了死循环
3. main.c
进行一些初始化
首先,为什么main函数的参数是void? 其实三个参数分别是envp,argv,argc,但目前版本的main没有使用,且我们在head.s 里可以看到,在push main函数之前,都压栈了3个0,所以这里是没有问题的 其次,我们可以看到,有很多的函数,并且都是带init字眼的,这些就是初始化内存,中断,时钟,硬盘,显示器等(Linux0.11不支持鼠标) 每一个都可以说很久很久,我们这里简单说说
void main(void){// ........省略部分代码 ........mem_init(main_memory_start,memory_end);trap_init();blk_dev_init();chr_dev_init();tty_init();time_init();sched_init();buffer_init(buffer_memory_end);hd_init();floppy_init();sti();move_to_user_mode();if (!fork()) {init();}// ........省略部分代码 ........}
mem_init(),其他的都类似
mem_init()
mem_init()顾名思义就是初始化内存的。前面我们提到操作系统就是管理硬件的,内存是一个重要的硬件,因此本函数就是初始化一些数据结构用来保存内存的信息,例如哪些被使用了,哪些是空闲的。
我们先看看参数,start_mem, end_mem是main函数里传参的,而main函数是这样调用的:
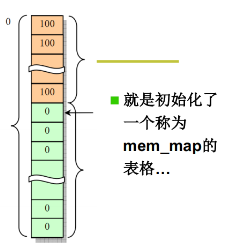
#define USED 100#define PAGING_PAGES (PAGING_MEMORY>>12)static unsigned char mem_map [ PAGING_PAGES ] = {0,};void mem_init(long start_mem, long end_mem){int i;HIGH_MEMORY = end_mem;for (i=0 ; i<PAGING_PAGES ; i++)mem_map[i] = USED;i = MAP_NR(start_mem);end_mem -= start_mem;end_mem >>= 12;while (end_mem-->0)mem_map[i++]=0;}
其实内存的大小,在setup.s 里就已经存储到了 0x90000处,通过main函数里读取,然后传个
static long main_memory_start = 0;static long memory_end = 0;//..........省略部分代码memory_end = (1<<20) + (EXT_MEM_K<<10);memory_end &= 0xfffff000;//..........省略部分代码mem_init(main_memory_start,memory_end);
mem_init函数。
接下来<font style="color:rgb(0, 50, 60);"> </font>mem_init里做什么呢?首先有一个全局变量 <font style="color:rgb(0, 50, 60);">mem_map</font>,里面的值如果是0,表明内存没有被使用,如果是100,表明是已经被使用了。
所以在<font style="color:rgb(0, 50, 60);"> </font>mem_init首先将 0地址处(也就是自己system模块)的代码标记为已使用;然后将剩余的内存表明为未使用
总结
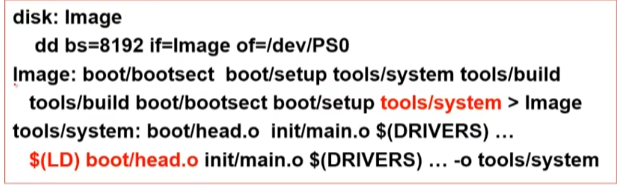
1. make file
操作系统在磁盘里的逻辑示意图: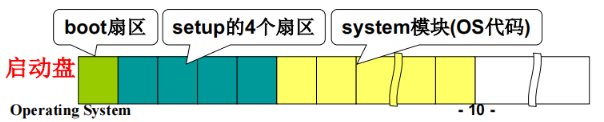 第一个部分存放bootsect.s,第二个部分存放setup模块,第三个部分存放system模块。这个顺序是不能变的,如果有一点点差错,都会死机。那么,操作系统是如何从源代码,编译成我们想要的样子呢?这就得提到make file。
最后操作系统镜像Image,是依赖于bootsect的,还依赖于setup,system,还有很多工具类(tools),最后将这些代码链接起来,生成镜像,然后就可以运行这个镜像了。
Image: boot/bootsect boot/setup tools/system tools/buildtools/build boot/bootsect boot/setup tools/system $(ROOT_DEV) > Image
小结
- bootsect将操作系统从磁盘读进来,
- 而setup获得了一些参数,启动了保护模式,
- head初始化了GDT和IDT表,初始化了一些页表,然后跳到mian
- mian里又是很多int初始化函数,比如初始化内存,中断,时钟,硬盘,显示器

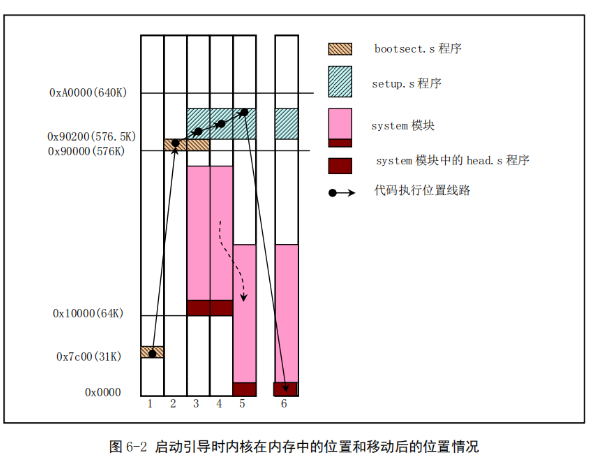
关于在启动过程中几个程序或模块在内存中的动态位置:

若有收获,就点个赞吧
0 人点赞
