- 解决 nodejs 17: digital envelope routines::unsupported
- 解决的问题
- Vue 新语法
- 组合式 API
- teleport
- Fragments
- Emits Component Option
- 自定义渲染器 custom renderer
- Global API 改为应用程序实例调用
- Global and internal APIs 重构为可做摇树优化
- 渲染函数API修改
- 函数式组件仅能通过简单函数方式创建,functional选项废弃
- 组件 data 选项应该总是声明为函数
- 自定义组件白名单
- 特性强制策略变更
- 自定义指令API和组件保持一致
- transition 类名变更
- 组件watch选项和实例方法$watch不再支持点分隔符字符串路径
- Vue 2.x中应用程序根容器的
outerHTML会被根组件的模板替换 (或被编译为template),Vue 3.x现在使用根容器的innerHTML取代 - $on, $off and $once 移除
- Filters移除
- Inline templates attributes移除
- style 标签
- 参考
解决 nodejs 17: digital envelope routines::unsupported
"scripts": {"serve": "set NODE_OPTIONS=--openssl-legacy-provider & vue-cli-service serve","build": "set NODE_OPTIONS=--openssl-legacy-provider & vue-cli-service build","lint": "set NODE_OPTIONS=--openssl-legacy-provider & vue-cli-service lint"},
解决的问题
为什么选择 CompositionAPI
Vue2 的局限性
- 组件逻辑膨胀导致的可读性变差
- 无法跨组件重用代码
- Vue2 对 TS 的支持有限
Vue3 的好处:
- 更好的Typescript支持
- 在复杂功能组件中可以实现根据特性组织代码 - 代码内聚性👍 比如: 排序和搜索逻辑内聚
- 组件间代码复用
重构后的响应式机制带来了哪些改变?
对数组的全面监听
Vue 2.x 对数组只实现了 push,pop,shift,unshift,splice,sort,reverse 这七个方法的监听,以前通过数组下标改变值的时候,是不能触发视图更新的。这不是因为 Object.defineProperty 造成的,而是为了减少性能损耗导致的。
const arr = ["2019","云","栖","音","乐","节"];arr.forEach((val,index)=>{Object.defineProperty(arr,index,{set(newVal){console.log("赋值");},get(){console.log("取值");return val;}})})let index = arr[1]; //取值arr[0] = "2050"; //赋值
在 Vue 2.x 中对数组的修改,框架会使用Object.defineProperty 加上 getter 和 setter 。由于数组的骚操作比较多,比如:arr.length=0,可以瞬间清空一个数组;arr[100]=1 又可以瞬间将一个数组的长度变为 100(其他位置用空元素填充),等等骚操作。我们要穷举每一种数组变化的可能,这样势必就会带来性能开销问题。
const arr = ["2019","云","栖","音","乐","节"];let ProxyArray = newProxy(arr,{get:function(target, name, value, receiver) {console.log("取值")returnReflect.get(target,name);},set: function(target, name, value, receiver) {console.log("赋值")Reflect.set(target,name, value, receiver);;}})const index = ProxyArray[0]; //取值ProxyArray[0]="2050" //赋值
惰性监听
Vue3.0 把创建响应式对象从组件实例初始化中抽离了出来,通过暴露 API 的方式将响应式对象创建的权利交给开发者,开发者可以自由的决定何时何地创建响应式对象。
- 提高了组件实例初始化速度:Vue3.0 以前组件实例在初始化的时候会将 data 整个对象变为可观察对象,通过递归的方式给每个 Key 使用 Object.defineProperty 加上 getter 和 settter,如果是数组就重写代理数组对象的七个方法。而在 Vue3.0 中,将可响应式对象创建的权利交给了开发者,开发者可以通过暴露的 reactive, compted, effect 方法自定义自己需要响应式能力的数据,实例在初始化时不需要再去递归 data 对象了,从而降低了组件实例化的时间。
- 降低了运行内存的使用:Vue3.0 以前生成响应式对象会对对象进行深度遍历,同时为每个 Key 生成一个 def 对象用来保存 Key 的所有依赖项,当 Key 对应的 Value 变化的时候通知依赖项进行 update。但如果这些依赖项在页面整个生命周期内不需要更新的时候,这时 def 对象收集的依赖项不仅没用而且还会占用内存,如果可以在初始化 data 的时候忽略掉这些不会变化的值就好了。Vue3.0 通过暴露的 reactive 方法,开发者可以选择性的创建可观察对象,达到减少依赖项的保存,降低了运行内存的使用。
Map、Set、WeakSet、WeakMap 的监听
let map = newMap([['name','wangyangyang']])let mapProxy = newProxy(map, {get(target, key, receiver) {var value = Reflect.get(...arguments)console.log("取值:",...arguments)returntypeof value == 'function' ? value.bind(target) : value}})mapProxy.get("name")
Vue 新语法
组合式 API
<template><h1>{{ msg }}</h1><p>Hello vite</p><p>{{ counter }}</p><p>{{ doubleCounter }}</p><p>{{ msg1 }}</p><p ref="desc"></p></template><script>import {computed,reactive,onMounted,onUnmounted,ref,toRefs,watch,} from "vue";export default {name: "HelloWorld",props: {msg: String,},setup() {const { counter, doubleCounter } = useCounter();const msg1 = ref("some message");const desc = ref(null);watch(counter, (val, oldVal) => {const p = desc.value;p.textContent = `${oldVal} to ${val}`;});return { counter, doubleCounter, msg1, desc };},};function useCounter() {const data = reactive({counter: 1,doubleCounter: computed(() => data.counter * 2),});let timer;onMounted(() => {timer = setInterval(() => {data.counter++;}, 1000);});onUnmounted(() => {clearInterval(timer);});return toRefs(data);}</script>
teleport
传送门组件提供一种简洁的方式可以指定它里面内容的父元素。
<template><button @click="modalOpen = true">弹出一个全屏模态窗口</button><teleport to="body"><div v-if="modalOpen" class="modal"><div>这是一个模态窗口!我的父元素是"body"!<button @click="modalOpen = false">Close</button></div></div></teleport></template><script>export default {data() {return {modalOpen: true}},};</script><style scoped>.modal {position: absolute;top: 0; right: 0; bottom: 0; left: 0;background-color: rgba(0,0,0,.5);display: flex;flex-direction: column;align-items: center;justify-content: center;}.modal div {display: flex;flex-direction: column;align-items: center;justify-content: center;background-color: white;width: 300px;height: 300px;padding: 5px;}</style>
Fragments
vue3中组件可以拥有多个根。
<template><header>...</header><main v-bind="$attrs">...</main><footer>...</footer></template>
Emits Component Option
vue3中组件发送的自定义事件需要定义在emits选项中:
- 原生事件会触发两次,比如
click - 更好的指示组件工作方式
- 对象形式事件校验
<template><div @click="$emit('click')"><h3>自定义事件</h3></div></template><script>export default {emits: ['click']}</script>
自定义渲染器 custom renderer
Vue3.0中支持 自定义渲染器 (Renderer):这个 API 可以用来自定义渲染逻辑。比如下面的案例我们可以把数据渲染到canvas上。
首先创建一个组件描述要渲染的数据,我们想要渲染一个叫做piechart的组件,我们不需要单独声明该组件,因为我们只是想把它携带的数据绘制到canvas上。创建 CanvasApp.vue
<template><piechart @click="handleClick" :data="state.data" :x="200" :y="200" :r="200"></piechart></template><script>import { reactive, ref } from "vue";export default {setup() {const state = reactive({data: [{ name: "大专", count: 200, color: "brown" },{ name: "本科", count: 300, color: "yellow" },{ name: "硕士", count: 100, color: "pink" },{ name: "博士", count: 50, color: "skyblue" }]});function handleClick() {state.data.push({ name: "其他", count: 30, color: "orange" });}return {state,handleClick};}};</script>
下面我们创建自定义渲染器,main.js
import { createApp, createRenderer } from 'vue'import CanvasApp from './CanvasApp.vue'const nodeOps = {insert: (child, parent, anchor) => {// 我们重写了insert逻辑,因为在我们canvasApp中不存在实际dom插入操作// 这里面只需要将元素之间的父子关系保存一下即可child.parent = parent;if (!parent.childs) {parent.childs = [child]} else {parent.childs.push(child);}// 只有canvas有nodeType,这里就是开始绘制内容到canvasif (parent.nodeType == 1) {draw(child);// 如果子元素上附加了事件,我们给canvas添加监听器if (child.onClick) {ctx.canvas.addEventListener('click', () => {child.onClick();setTimeout(() => {draw(child)}, 0);})}}},remove: child => {},createElement: (tag, isSVG, is) => {// 创建元素时由于没有需要创建的dom元素,只需返回当前元素数据对象return {tag}},createText: text => {},createComment: text => {},setText: (node, text) => {},setElementText: (el, text) => {},parentNode: node => {},nextSibling: node => {},querySelector: selector => {},setScopeId(el, id) {},cloneNode(el) {},insertStaticContent(content, parent, anchor, isSVG) {},patchProp(el, key, prevValue, nextValue) {el[key] = nextValue;},};// 创建一个渲染器let renderer = createRenderer(nodeOps);// 保存画布和其上下文let ctx;let canvas;// 扩展mount,首先创建一个画布元素function createCanvasApp(App) {const app = renderer.createApp(App);const mount = app.mountapp.mount = mount(selector) {canvas = document.createElement('canvas');canvas.width = window.innerWidth;canvas.height = window.innerHeight;document.querySelector(selector).appendChild(canvas);ctx = canvas.getContext('2d');mount(canvas);}return app}createCanvasApp(CanvasApp).mount('#demo')
编写绘制逻辑
const draw = (el,noClear) => {if (!noClear) {ctx.clearRect(0, 0, canvas.width, canvas.height)}if (el.tag == 'piechart') {let { data, r, x, y } = el;let total = data.reduce((memo, current) => memo + current.count, 0);let start = 0,end = 0;data.forEach(item => {end += item.count / total * 360;drawPieChart(start, end, item.color, x, y, r);drawPieChartText(item.name, (start + end) / 2, x, y, r);start = end;});}el.childs && el.childs.forEach(child => draw(child,true));}const d2a = (n) => {return n * Math.PI / 180;}const drawPieChart = (start, end, color, cx, cy, r) => {let x = cx + Math.cos(d2a(start)) * r;let y = cy + Math.sin(d2a(start)) * r;ctx.beginPath();ctx.moveTo(cx, cy);ctx.lineTo(x, y);ctx.arc(cx, cy, r, d2a(start), d2a(end), false);ctx.fillStyle = color;ctx.fill();ctx.stroke();ctx.closePath();}const drawPieChartText = (val, position, cx, cy, r) => {ctx.beginPath();let x = cx + Math.cos(d2a(position)) * r/1.25 - 20;let y = cy + Math.sin(d2a(position)) * r/1.25;ctx.fillStyle = '#000';ctx.font = '20px 微软雅黑';ctx.fillText(val,x,y);ctx.closePath();}
Global API 改为应用程序实例调用
vue2中有很多全局api可以改变vue的行为,比如Vue.component等。这导致一些问题:
- vue2没有app概念,new Vue()得到的根实例被作为app,这样的话所有创建的根实例是共享相同的全局配置,这在测试时会污染其他测试用例,导致测试变得困难。
- 全局配置也导致没有办法在单页面创建不同全局配置的多个app实例。
vue3中使用createApp返回app实例,由它暴露一系列全局api
import { createApp } from 'vue'const app = createApp({}).component('comp', { render: () => h('div', 'i am comp') }).mount('#app')
列举如下:
| 2.x Global API | 3.x Instance API (app) |
|---|---|
| Vue.config | app.config |
| Vue.config.productionTip | removed (see below) |
| Vue.config.ignoredElements | app.config.isCustomElement (see below) |
| Vue.component | app.component |
| Vue.directive | app.directive |
| Vue.mixin | app.mixin |
| Vue.use | app.use (see below) |
| Vue.filter | removed |
Global and internal APIs 重构为可做摇树优化
vue2中不少global-api是作为静态函数直接挂在构造函数上的,例如Vue.nextTick(),如果我们从未在代码中用过它们,就会形成所谓的dead code,这类global-api造成的dead code无法使用webpack的tree-shaking排除掉。
例如,vue2中会这样写:
import Vue from 'vue'Vue.nextTick(() => { // something something DOM-related})
vue3中做了相应的变化,将它们抽取成为独立函数,这样打包工具的摇树优化可以将这些dead code排除掉。
import { nextTick } from 'vue'nextTick(() => {// something something DOM-related})
受影响 API:
Vue.nextTickVue.observable(replaced byVue.reactive)Vue.versionVue.compile(only in full builds)Vue.set(only in compat builds)Vue.delete(only in compat builds)
**model** 选项和**v-bind**的**sync** 修饰符被移除,统一为v-model 参数形式
<div id="app"><h3>{{data}}</h3><comp v-model="data"></comp></div>app.component('comp', {template: `<div @click="$emit('update:modelValue', 'new value')">i am comp, {{modelValue}}</div>`,props: ['modelValue'],})
渲染函数API修改
渲染函数变得更简单好用了,修改主要有以下几点:
不再传入h函数,需要我们手动导入;拍平的props结构。scopedSlots删掉了,统一到slots
import {h} from 'vue'render() {const emit = this.$emitconst onclick = this.onclickreturn h('div', [h('div', {onClick() {emit('update:modelValue', 'new value')}},`i am comp, ${this.modelValue}`),h('button', {onClick(){onclick()}},'buty it!')])},
函数式组件仅能通过简单函数方式创建,functional选项废弃
函数式组件变化较大,主要有以下几点:
- 性能提升在vue3中可忽略不计,所以vue3中推荐使用状态组件
- 函数时组件仅能通过纯函数形式声明,接收
props和context两个参数 - SFC中
<template>不能添加functional特性声明函数是组件 { functional: true }组件选项移除
声明一个函数式组件,Functional.js
import { h } from 'vue'const Heading = (props, context) => {return h(`h${props.level}`, context.attrs, context.slots)}Heading.props = ['level']export default Heading
移除functional选项,这里以element中divider为例说明
异步组件要求使用**defineAsyncComponent** 方法创建
由于vue3中函数式组件必须定义为纯函数,异步组件定义时有如下变化:
- 必须明确使用
defineAsyncComponent包裹 component选项重命名为loader- Loader 函数不在接收
resolveandreject且必须返回一个Promise
定义一个异步组件
import { defineAsyncComponent } from 'vue'// 不带配置的异步组件const asyncPage = defineAsyncComponent(() => import('./NextPage.vue'))
带配置的异步组件,loader 选项是以前的 component
import ErrorComponent from './components/ErrorComponent.vue'import LoadingComponent from './components/LoadingComponent.vue'// 待配置的异步组件const asyncPageWithOptions = defineAsyncComponent({loader: () => import('./NextPage.vue'),delay: 200,timeout: 3000,errorComponent: ErrorComponent,loadingComponent: LoadingComponent})
组件 data 选项应该总是声明为函数
vue3 中 data 选项统一为函数形式,返回响应式数据。
createApp({data() {return {apiKey: 'a1b2c3'}}}).mount('#app')
自定义组件白名单
vue3中自定义元素检测发生在模板编译时,如果要添加一些vue之外的自定义元素,需要在编译器选项中设置isCustomElement 选项。
使用构建工具时,模板都会用vue-loader预编译,设置它提供的 compilerOptions 即可。
vue.config.js
rules: [{test: /\.vue$/,use: 'vue-loader',options: {compilerOptions: {isCustomElement: tag => tag === 'plastic-button'}}}// ...]
如果是采用的运行时编译版本的vue,可通过全局配置 isCustomElement
module.exports = {vueCompilerOptions: {isCustomElement: tag => tag === 'piechart'}}
我们演示项目使用vite,在vite.config.js中配置 vueCompilerOptions 即可:
const app = Vue.createApp({})app.config.isCustomElement = tag => tag === 'plastic-button'
**is** 属性仅限于用在 **component** 标签上
<component is="comp"></component><table><tr v-is="'blog-post-row'"></tr></table><div id="app"><table><tr v-is="'row'" v-for="item in items" :data="item"></tr></table></div><script src="https://cdn.bootcdn.net/ajax/libs/vue/3.0.0-rc.9/vue.global.js"></script><script>Vue.createApp({data() {return {items: ["aaa", "bbb"],};},}).component("row", {props: ["data"],template: "<tr><td>{{this.data}}</td></tr>",}).mount("#app");</script>
**$scopedSlots** 属性被移除,都用**$slots**代替
- 插槽均以函数形式暴露
- $scopedSlots移除
函数形式访问插槽内容,MyLink.vue
<script>import {h} from 'vue'export default {props: {to: {type: String,required: true,},},render() {return h("a", { href: this.to }, this.$slots.default());},};</script>
迁移时,注意修改$slots.xx为$slots.xx(),这里以element中uploader为例说明
特性强制策略变更
底层api变化,不影响多数开发者
https://v3.vuejs.org/guide/migration/attribute-coercion.html#overview
自定义指令API和组件保持一致
vue3中指令api和组件保持一致,具体表现在:
- bind → beforeMount
- inserted → mounted
- beforeUpdate: new! 元素自身更新前调用, 和组件生命周期钩子很像
- update → removed! 和updated基本相同,因此被移除之,使用updated代替。
- componentUpdated → updated
- beforeUnmount new! 和组件生命周期钩子相似, 元素将要被移除之前调用。
- unbind → unmounted
写一个指令实验一下
const app = Vue.createApp({})app.directive('highlight', {beforeMount(el, binding, vnode) {el.style.background = binding.value}})<p v-highlight="yellow">Highlight this text bright yellow</p>
transition 类名变更
v-enter→v-enter-fromv-leave→v-leave-from
Vue2中过度流程图:图中两个起始类名发生变化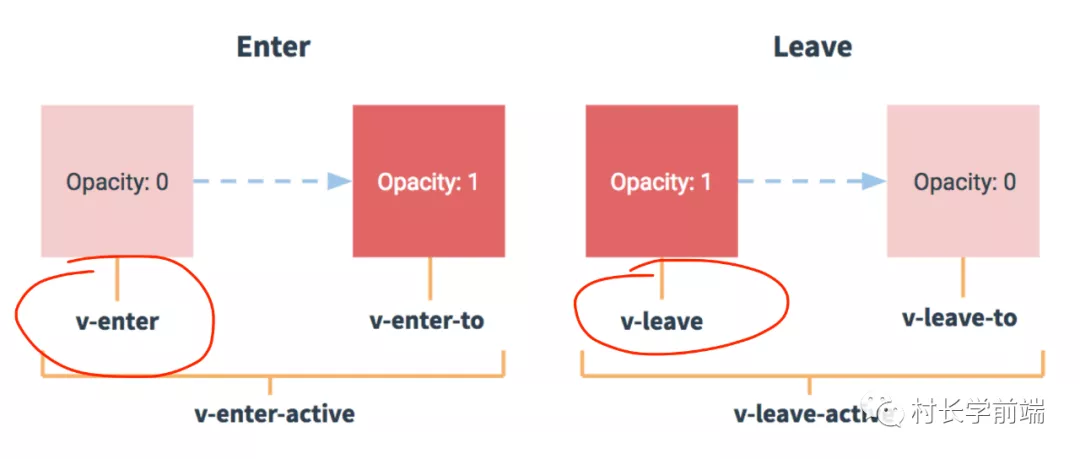
试验一下,TransitionTest.vue
<template><div id="demo"><button @click="show = !show">Toggle</button><transition name="fade"><p v-if="show">hello</p></transition></div></template><script>export default {data() {return {show: true,};},};</script><style scoped>.fade-enter-active,.fade-leave-active {transition: opacity 0.5s ease;}.fade-enter-from,.fade-leave-to {opacity: 0;}</style>
组件watch选项和实例方法$watch不再支持点分隔符字符串路径
以 . 分割的表达式不再被 watch 和 $watch 支持,可以使用计算函数作为 $watch 参数实现。
this.$watch(() => this.foo.bar, (v1, v2) => {console.log(this.foo.bar)})
Vue 2.x中应用程序根容器的 outerHTML 会被根组件的模板替换 (或被编译为template),Vue 3.x现在使用根容器的 innerHTML 取代
**keyCode** 作为 **v-on** 修饰符被移除
<!-- keyCode方式不再被支持 --><input v-on:keyup.13="submit" /><!-- 只能使用alias方式 --><input v-on:keyup.enter="submit" />
$on, $off and $once 移除
上述3个方法被认为不应该由vue提供,因此被移除了,可以使用其他三方库实现。
<script src="https://unpkg.com/mitt/dist/mitt.umd.js"></script>// 创建emitterconst emitter = mitt()// 发送事件emitter.emit('foo', 'foooooooo')// 监听事件emitter.on('foo', msg => console.log(msg))
Filters移除
vue3中移除了过滤器,请调用方法或者计算属性代替。
Inline templates attributes移除
vue2中提供inline-template特性可提供自定义组件内部内容作为其模板
<my-component inline-template><div><p>These are compiled as the component's own template.</p><p>Not parent's transclusion content.</p></div></my-component><script type="text/html" id="my-comp-template"><div>{{ hello }}</div></script>const MyComp = {template: '#my-comp-template'// ...}
style 标签
style 标签的特殊属性,可以通过 v-bind 函数来使用 JavaScript 中的变量去渲染样式,如果这个变量是响应式数据,就可以很方便地实现样式的切换。
参考
【1】Vue.js 3 文档
【2】重头来过的 Vue 3 带来了什么
【3】带你了解 vue-next(Vue 3.0)之 小试牛刀
【4】带你了解 vue-next(Vue 3.0)之 初入茅庐
【5】拿下vue3你要做好这些准备
【6】Vue3.0光速上手[视频]
【7】尝鲜Vue3之一:浏览器中如何断点调试Vue3 源码
【8】尝鲜Vue3之二:最重要的变化CompositionApi
【9】尝鲜Vue3之三:CompositionAPI小结和包装对象
【10】尝鲜Vue3之四:如何运行Jest单元测试
【11】尝鲜Vue3之五:源码结构
【12】尝鲜Vue3之六:响应式原理的革新 - Vue2、Vue3实现对比
【13】[Vue3官方教程]🎄万字笔记 | 同步导学视频
【14】[Vue官方教程笔记]- 尤雨溪手写mini-vue
【15】茶余饭后聊聊 Vue3.0 响应式数据那些事儿

若有收获,就点个赞吧
0 人点赞
