概念
什么是前端单元测试
为检测特定的目标是否符合标准而采用专用的工具或者方法进行验证,并最终得出特定的结果。
前端单元测试不是:
- 需要访问数据库的测试不是单元测试
- 需要访问网络的测试不是单元测试
- 需要访问文件系统的测试不是单元测试
单元测试的意义
Jest
优点
- 一站式的解决方案,学习成本更低,上手更快。使用 Jest ,需要一个测试框架(mocha),一个测试运行器(karma),一个断言库(chai),需要一个用来做 spies/stubs/mocks 的工具(sinon 以及 sinon-chai 插件),还需要一个用于测试的浏览器环境(可以是 Chrome 浏览器,也可以用 PhantomJS)。 而使用 Jest 后,只要安装它,全都搞定了。
- 全面的官方文档,易于学习和使用。Jest 的官方文档很完善,对着文档很快就能上手。而在之前,我需要学习好几个插件的用法,至少得知道 mocha 用处和原理、karma 的配置和命令、chai 的各种断言方法…,这增加了学习成本。
- 更直观明确的测试信息提示。
- 方便的命令行工具。
缺点
JSDOM 的一些局限性:因为 Jest 是基于 JSDOM 的,JSDOM 毕竟不是真实的浏览器环境,它在测试过程中其实并不真正的“渲染”组件。这会导致一些问题,例如,如果组件代码中有一些根据实际渲染后的属性值进行计算(比如元素的 clientWidth)就可能出问题,因为 JSDOM 中这些参数通常默认是 0。
安装
使用 yarn 安装 Jest
yarn add --dev jest
或 npm
npm install --save-dev jest
实例
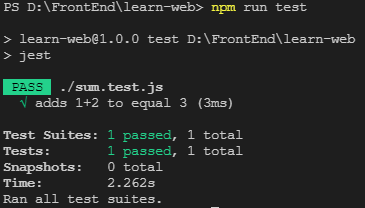
// sum.jsfunction sum(a, b){return a + b;}module.exports = sum;// sum.test.jsconst sum = require('./sum');test('adds 1+2 to equal 3', () => {expect(sum(1, 2)).toBe(3);});// package.json"scripts": {"test": "jest"},
结果
匹配器(Matchers)
数字
toBe 用于 Object.is 测试确切的相等性。如果要检查对象的值,请 toEqual 改用:
test('object assignment', () => {const data = {one: 1};data['two'] = 2;expect(data).toEqual({one: 1, two: 2});});
toEqual 递归检查对象或数组的每个字段,必须匹配对象所有的属性才能匹配。
对于比较浮点数相等,使用toBeCloseTo而不是toEqual,因为你不希望测试取决于一个小小的舍入误差。
test('两个浮点数字相加', () => {const value = 0.1 + 0.2;//expect(value).toBe(0.3); 这句会报错,因为浮点数有舍入误差expect(value).toBeCloseTo(0.3); // 这句可以运行});
字符串
test('there is no I in team', () => {expect('team').not.toMatch(/I/);});test('but there is a "stop" in Christoph', () => {expect('Christoph').toMatch(/stop/);});
toBe 和 toMatch 都可以用于字符串的匹配,区别在于 toBe 匹配的字符必须完全一致,而 toMatch 匹配字符的字串即可。
数组
const shoppingList = ['diapers','beer'];test('购物清单里有啤酒', () => {expect(shoppingList).toContain('beer');});
其它
如果你想要测试的特定函数抛出一个错误,在它调用时,使用 toThrow 。
function compileAndroidCode() {throw new Error('you are using the wrong JDK');}test('compiling android goes as expected', () => {expect(compileAndroidCode).toThrow();expect(compileAndroidCode).toThrow(Error);// You can also use the exact error message or a regexpexpect(compileAndroidCode).toThrow('you are using the wrong JDK');expect(compileAndroidCode).toThrow(/JDK/);});
测试异步代码
回调
函数 done 会等回调函数执行结束后执行测试。如果 done() 永远不会调用,这个测试将失败。
test('the data is peanut butter', done => {function callback(data) {expect(data).toBe('peanut butter');done();}fetchData(callback);function fetchData(c){setTimeout(() => {c('peanut butter');}, 1000);}});
Promise
如果您的代码使用 Promise,还有一个更简单的方法来处理异步测试。只需要从您的测试返回一个 Promise,Jest 会等待这一 Promise 来解决。如果承诺被拒绝,则测试将自动失败。
test('the data is peanut butter', () => {return fetchData(1).then(data => {expect(data).toBe('peanut butter');});});function fetchData(data) {return new Promise((resolve, reject) => {if (data) {resolve('peanut butter');} else {reject('error');}})}
如果你想要 Promise 被拒绝,使用 .catch 方法。 请确保添加 expect.assertions 来验证一定数量的断言被调用。 否则一个fulfilled态的 Promise 不会让测试失败
test('the data is peanut butter', () => {return fetchData(0).catch(e => expect(e).toBe('error'));});function fetchData(data) {return new Promise((resolve, reject) => {if (data) {resolve('peanut butter');} else {reject('error');}})}
.resolves/.rejects
您也可以 .resolves 在 expect 语句中使用匹配器,Jest 将等待该 promise。如果承诺被拒绝,则测试将自动失败。
test('the data is peanut butter', () => {return expect(fetchData(1)).resolves.toBe('peanut butter');});function fetchData(data) {return new Promise((resolve, reject) => {if (data) {resolve('peanut butter');} else {reject('error');}})}
确保返回断言 - 如果省略此 return 语句,则测试将在返回的 promise 返回之前完成 fetchData,then() 有机会执行回调。
如果你想要 Promise 被拒绝,使用 .catch 方法。它 .resolves 参照工程匹配器。如果 Promise 被拒绝,则测试将自动失败。
test('the data is peanut butter', () => {return expect(fetchData(0)).rejects.toBe('error');});function fetchData(data) {return new Promise((resolve, reject) => {if (data) {resolve('peanut butter');} else {reject('error');}})}
Async/Await
或者,您可以在测试中使用 async 和 await。 若要编写 async 测试,只要在函数前面使用 async 关键字传递到 test。 例如,可以用来测试相同的 fetchData 方案
test('the data is peanut butter', async () => {expect.assertions(1);const data = await fetchData(1);expect(data).toBe('peanut butter');});test('the fetch fails with an error', async () => {expect.assertions(1);try {await fetchData(0);} catch (e) {expect(e).toBe('error');}});function fetchData(data) {return new Promise((resolve, reject) => {if (data) {resolve('peanut butter');} else {reject('error');}})}
钩子函数
一次性设置
在某些情况下,你只需要在文件的开头做一次设置。当这种设置是异步行为时,可能非常恼人,你不太可能一行就解决它。Jest提供 beforeAll 和 afterAll 处理这种情况。
例如,如果 initializeCityDatabase 和 clearCityDatabase 都返回了promise,城市数据库可以在测试中重用,我们就能把我们的测试代码改成这样:
beforeAll(() => {return initializeCityDatabase();});afterAll(() => {return clearCityDatabase();});test('city database has Vienna', () => {expect(isCity('Vienna')).toBeTruthy();});test('city database has San Juan', () => {expect(isCity('San Juan')).toBeTruthy();});
作用域
默认情况下,before 和 after 的块可以应用到文件中的每个测试。此外可以通过 describe 块来将测试分组。当 before 和 after 的块在 describe 块内部时,则其只适用于该 describe 块内的测试。
例如,假设我们不仅仅是一个城市数据库,还有一个食品数据库。我们可以为不同的测试做不同的设置:
// Applies to all tests in this filebeforeEach(() => {return initializeCityDatabase();});test('city database has Vienna', () => {expect(isCity('Vienna')).toBeTruthy();});test('city database has San Juan', () => {expect(isCity('San Juan')).toBeTruthy();});describe('matching cities to foods', () => {// Applies only to tests in this describe blockbeforeEach(() => {return initializeFoodDatabase();});test('Vienna <3 sausage', () => {expect(isValidCityFoodPair('Vienna', 'Wiener Schnitzel')).toBe(true);});test('San Juan <3 plantains', () => {expect(isValidCityFoodPair('San Juan', 'Mofongo')).toBe(true);});});
请注意,顶级在块内部 beforeEach 之前执行。它可能有助于说明所有钩子的执行顺序。 beforeEach``describe
beforeAll(() => console.log('1 - beforeAll'));afterAll(() => console.log('1 - afterAll'));beforeEach(() => console.log('1 - beforeEach'));afterEach(() => console.log('1 - afterEach'));test('', () => console.log('1 - test'));describe('Scoped / Nested block', () => {beforeAll(() => console.log('2 - beforeAll'));afterAll(() => console.log('2 - afterAll'));beforeEach(() => console.log('2 - beforeEach'));afterEach(() => console.log('2 - afterEach'));test('', () => console.log('2 - test'));});// 1 - beforeAll// 1 - beforeEach// 1 - test// 1 - afterEach// 2 - beforeAll// 1 - beforeEach// 2 - beforeEach// 2 - test// 2 - afterEach// 1 - afterEach// 2 - afterAll// 1 - afterAll
mock
使用 mock 函数
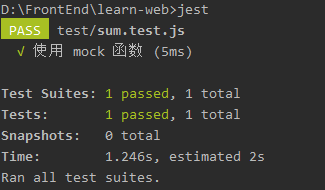
// test/forEach.test.jsconst forEach = require('../forEach');test('使用 mock 函数', () => {const mockCallback = jest.fn(x => 42 + x);forEach([0, 1], mockCallback);// mock函数被调用两次expect(mockCallback.mock.calls.length).toBe(2);// 第一次调用函数的第一个参数是0expect(mockCallback.mock.calls[0][0]).toBe(0);// 第二个函数调用的第一个参数是1expect(mockCallback.mock.calls[1][0]).toBe(1);// 第一次调用函数的返回值是42expect(mockCallback.mock.results[0].value).toBe(42);});// forEach.jsfunction forEach(items, callback) {for (let index = 0; index < items.length; index++) {callback(items[index]);}}module.exports = forEach;
快照测试
它的工作原理与普通的单元测试稍有不同。第一次运行测试时,将传递给测试的输出保存到“快照文件”中,而不是执行一些代码并将输出与开发人员提供的值进行比较。然后在将来运行测试时,将输出与快照文件进行比较。如果输出与文件匹配,则测试通过,如果输出与文件不同,则测试失败,Jest将打印一个差异。
快照测试的过程与普通测试略有不同。大多数快照测试看起来都很简单 来自Jest存储库的这个示例:
// Link.react.js// Copyright 2004-present Facebook. All Rights Reserved.import React from 'react';const STATUS = {NORMAL: 'normal',HOVERED: 'hovered',};export default class Link extends React.Component {constructor() {super();this._onMouseEnter = this._onMouseEnter.bind(this);this._onMouseLeave = this._onMouseLeave.bind(this);this.state = {class: STATUS.NORMAL,};}_onMouseEnter() {this.setState({class: STATUS.HOVERED});}_onMouseLeave() {this.setState({class: STATUS.NORMAL});}render() {return (<aclassName={this.state.class}href={this.props.page || '#'}onMouseEnter={this._onMouseEnter}onMouseLeave={this._onMouseLeave}>{this.props.children}</a>);}}// Link.react-test.js (partial)// Copyright 2004-present Facebook. All Rights Reserved./* eslint-disable no-unused-vars */'use strict'import React from 'react';import Link from '../Link.react';import renderer from 'react-test-renderer';it('renders correctly', () => {const tree = renderer.create(<Link page="http://www.facebook.com">Facebook</Link>).toJSON();expect(tree).toMatchSnapshot();});
第一次运行测试时,会生成一个快照文件。在这种情况下,运行上一个测试会生成一个如下所示的快照文件:
// Link.react-test.js.snap (partial)exports[`test renders correctly 1`] = `<aclassName="normal"href="http://www.facebook.com"onMouseEnter={[Function bound _onMouseEnter]}onMouseLeave={[Function bound _onMouseLeave]}></a>`;
这为我们期望UI的外观提供了基线。快照在 __tests__ 目录中的文件夹中生成,以便可以将其检入源代码管理中。
下次运行测试时,如果没有任何更改,则测试通过。但是,如果我们改变某些东西(假设我们添加了一个类),那么测试就会失败并向我们展示差异。
// updated link render methodrender() {return (<aclassName={`link-item ${this.state.class}`}href={this.props.page || '#'}onMouseEnter={this._onMouseEnter}onMouseLeave={this._onMouseLeave}>{this.props.children}</a>);}
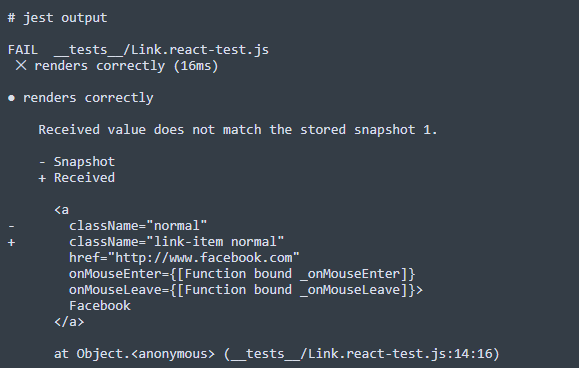
然后,我们可以选择通过运行 jest -u 更新快照来接受此更改,或者更新我们的代码以修复回归。如果我们更新快照文件,测试将再次开始传递。
参考
【1】浅谈前端单元测试
【2】Facebook | Jest 官方文档
【3】testing-with-jest-snapshots-first-impressions
【4】为vue的项目添加单元测试

若有收获,就点个赞吧
0 人点赞
