1.el-upload
1.1基本配置
<el-uploadclass="upload-demo"accept="image/jpeg, image/jpg, image/png"// 可上传类型ref="myUpload"//类似id名,可用this.$refs.myUpload获取refs对象action="http://api.qx121.net/api/Rikaze/UploadFile"//图片上传地址:on-preview="handlePreview"//图片预览:before-upload="beforeAvatarUpload"//上传之前:on-remove="handleRemove"//删除之前:on-success="handleSucess"//成功后:file-list="fileList"//储存上传的imglist-type="picture"//上传预览分割:auto-upload="false"//是否自动上传:on-change="imgBroadcastChange"//发生改变的钩子v-model="form.fmsrc"//数据绑定><el-button size="small" type="primary">上传图片</el-button><div slot="tip" class="el-upload__tip">支持上传image/jpeg,image/jpg,image/png文件,且不超过500kb</div></el-upload>
export default {name: 'Wtable',components: {quillEditor},data() {return {form: {btitle: '',lxtypename: '特色产品',fmsrc: '',description: ''},//上传fileList: [] //这个是上传图片的信息};},methods: {saveEdit(form) {console.log('表单提交', this.form);this.$refs.myUpload.submit(); //上传图片this.editVisible = false;},handleRemove(file, fileList) {},handlePreview(file) {},handleSucess(response, file, fileList) {// 上传成功console.log(response, file, fileList);//图片上传成功后提交form表单},beforeAvatarUpload(file) {},// 上传列表发生变化imgBroadcastChange(file, fileList) {}}}
1.2限制上传
复制代码<template><div class="select_invoice"><el-uploadclass="upload-demo":multiple="true":action="uploadPath":data="uploadData"accept="bmg,.png,.jpg,.jpeg":before-upload="beforeUpload":on-success="handleSuccess":on-error="hanldeError"multiple:limit="20"><el-button size="small" type="primary">添加图片</el-button></el-upload></div></template>复制代码压缩的方法放在before-upload中,这个方法可以接受一个promise,提一下,最好下载新版本的element-UI,以前的旧版本可能不支持返回promisejs复制代码<script>// 引入image-conversionimport imageConversion from 'image-conversion'methods: {// 第一种,不考虑图片长宽,只考虑图片大小的情况,图片超过4M就压缩beforeUpload (file) {return new Promise((resolve, reject) => {let isLt2M = file.size / 1024 / 1024 < 4 // 判定图片大小是否小于4MBif (isLt2M) {resolve(file)}console.log(file)// 压缩到400KB,这里的400就是要压缩的大小,可自定义imageConversion.compressAccurately(file, 400).then(res => {// console.log(res)resolve(res)})})},//第二种,图片大小超过4M,长度超过2000就压缩beforeUpload2 (file) {// 图片不大于4m,宽度不大于2000return new Promise((resolve, reject) => {let _URL = window.URL || window.webkitURLlet isLt2M = file.size / 1024 / 1024 > 4 // 判定图片大小是否小于4MB// 这里需要计算出图片的长宽let img = new Image()img.onload = function () {file.width = img.width // 获取到width放在了file属性上file.height = img.height // 获取到height放在了file属性上let valid = img.width > 2000 // 图片宽度大于2000// console.log(11, file)// 这里我只判断了图片的宽度,compressAccurately有多个参数时传入对象if (valid || isLt2M) {imageConversion.compressAccurately(file, {size: 400,width: 2000}).then(res => {// console.log(33, res)resolve(res)})} else resolve(file)}// 需要把图片赋值img.src = _URL.createObjectURL(file)})},}</script>复制代码这样就实现了图片的自动压缩功能,这个组件还有一些其他功能,使用的时候如果有其他需求,可以看下文档https://github.com/WangYuLue/image-conversion
1.3图片回显
2.el-pagination
分页的两种方式。前端分页,后端分页。两种方式各有个的优缺点吧。
2.1前端分页
前端分页:后台只需将数据返回,不需要做过多处理,前端一次请求拿到所有数据后做分页处理。但数据量不能太大,因为前端是先一次性加载所有数据,然后在做分页处理。在数据量多的情况下,加载相对应的会变慢。所有在前端做分页时要先考虑一下后期的数据量。
<template><div class="app"><!-- 将获取到的数据进行计算 --><el-table :data="tableData.slice((currentPage-1)*PageSize,currentPage*PageSize)" style="width: 100%"><el-table-column prop="date" label="日期" width="180"></el-table-column><el-table-column prop="name" label="姓名" width="180"></el-table-column><el-table-column prop="address" label="地址"></el-table-column></el-table><div class="tabListPage"><el-pagination @size-change="handleSizeChange"@current-change="handleCurrentChange":current-page="currentPage":page-sizes="pageSizes":page-size="PageSize" layout="total, sizes, prev, pager, next, jumper":total="totalCount"></el-pagination></div></div></template><script>export default {data(){return {// 总数据tableData:[],// 默认显示第几页currentPage:1,// 总条数,根据接口获取数据长度(注意:这里不能为空)totalCount:1,// 个数选择器(可修改)pageSizes:[1,2,3,4],// 默认每页显示的条数(可修改)PageSize:1,}},methods:{getData(){// 这里使用axios,使用时请提前引入axios.post(url,{orgCode:1},{emulateJSON: true},{headers:{"Content-Type": "application/x-www-form-urlencoded;charset=utf-8",}}).then(reponse=>{console.log(reponse)// 将数据赋值给tableDatathis.tableData=data.data.body// 将数据的长度赋值给totalCountthis.totalCount=data.data.body.length})},// 分页// 每页显示的条数handleSizeChange(val) {// 改变每页显示的条数this.PageSize=val// 注意:在改变每页显示的条数时,要将页码显示到第一页this.currentPage=1},// 显示第几页handleCurrentChange(val) {// 改变默认的页数this.currentPage=val},},created:function(){this.getData()}}</script>
2.2后端分页
后端分页:因为是后端分页,前端在每点击一次分页时,便向后台请求一次数据。其实就是避免前端一次性从数据库获取大量数据
<template><div class="app"><el-table :data="tableData" style="width: 100%"><el-table-column prop="date" label="日期" width="180"></el-table-column><el-table-column prop="name" label="姓名" width="180"></el-table-column><el-table-column prop="address" label="地址"></el-table-column></el-table><div class="tabListPage"><el-pagination @size-change="handleSizeChange"@current-change="handleCurrentChange":current-page="currentPage":page-sizes="pageSizes":page-size="PageSize" layout="total, sizes, prev, pager, next, jumper":total="totalCount"></el-pagination></div></div></template><script>export default {data(){return {// 总数据tableData:[],// 默认显示第几页currentPage:1,// 总条数,根据接口获取数据长度(注意:这里不能为空)totalCount:1,// 个数选择器(可修改)pageSizes:[1,2,3,4],// 默认每页显示的条数(可修改)PageSize:1,}},methods:{// 将页码,及每页显示的条数以参数传递提交给后台getData(n1,n2){// 这里使用axios,使用时请提前引入axios.post(url,{orgCode:1,// 每页显示的条数PageSize:n1,// 显示第几页currentPage:n2,},{emulateJSON: true},{headers:{"Content-Type": "application/x-www-form-urlencoded;charset=utf-8",}}).then(reponse=>{console.log(reponse)// 将数据赋值给tableDatathis.tableData=data.data.body// 将数据的长度赋值给totalCountthis.totalCount=data.data.body.length})},// 分页// 每页显示的条数handleSizeChange(val) {// 改变每页显示的条数this.PageSize=val// 点击每页显示的条数时,显示第一页this.getData(val,1)// 注意:在改变每页显示的条数时,要将页码显示到第一页this.currentPage=1},// 显示第几页handleCurrentChange(val) {// 改变默认的页数this.currentPage=val// 切换页码时,要获取每页显示的条数this.getData(this.PageSize,(val)*(this.pageSize))},},created:function(){this.getData(this.PageSize,this.currentPage)}}</script>
3.el-input
3.1的密码显隐
- 使用


<el-form-item label="密码" prop="password"><el-inputv-model="LoginformData.password"maxlength="16"placeholder="密码"prefix-icon="el-icon-lock"show-passwordclearable></el-input></el-form-item>
- 问题
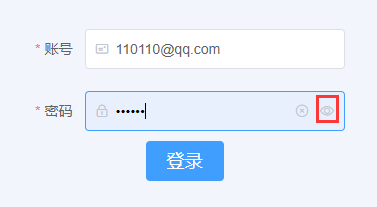
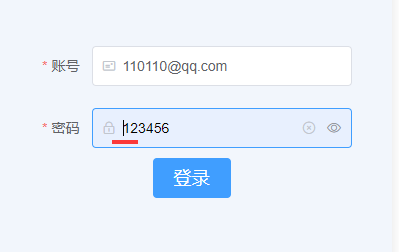
- 眼睛点击前后状态一样
- 眼睛点击后鼠标光标跑到内容最前面
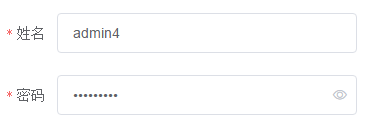
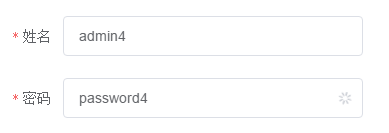
- 解决办法,自己写显示隐藏


<el-form-item label="密码" prop="password"><el-input :type="passw" v-model="adduser.password" style="width: 300px;" ><%-- input中加图标必须要有slot="suffix"属性,不然无法显示图标 --%><i slot="suffix" :class="icon" @click="showPass"></i></el-input></el-form-item>
<script type="text/javascript">var app = new Vue({el:"#app",data:{users:[],total:100,pageSize:5,pageNum:1,//用于显示或隐藏添加修改表单add:false,//用于改变Input类型passw:"password",//用于更换Input中的图标icon:"el-input__icon el-icon-view",adduser:{id:null,name:null,password:null,dept_id:null},},methods:{//密码的隐藏和显示showPass(){//点击图标是密码隐藏或显示if( this.passw=="text"){this.passw="password";//更换图标this.icon="el-input__icon el-icon-view";}else {this.passw="text";this.icon="el-input__icon el-icon-loading";};}},})</script>
3.2有时input无法输入
原因,
其实已经输入,但是由于嵌套太深数据没更新出来
解决办法
```javascript
- 缺点可能会造成验证失效<a name="tA6Rq"></a>## 4.el-form<a name="S7UHM"></a>### 4.1表单清空- 方法一```javascripthandleReset(formName) {console.log('清空表单');this.$refs[formName].resetFields();this.form = this.$options.data().form;},
- 方法二
重置表单数据,使用的地方特别多,我们封装为全局方法
//重置表单,formRef为表单的ref值,excludeFields为要排除重新初始化值得属性Vue.prototype.$reset = function (formRef, ...excludeFields) {this.$refs[formRef].resetFields();let obj1 = this.$data;let obj2 = this.$options.data.call(this);if (!excludeFields || excludeFields.length === 0) {excludeFields = ["ruleValidate"];}for (let attrName in obj1) {if (excludeFields && excludeFields.includes(attrName)) {continue;}obj1[attrName] = obj2[attrName];}};
使用
<template><el-dialogv-el-drag-dialog:close-on-click-modal="false":visible.sync="dialogVisible":title="model.id === 0 ? '新增车辆' : '编辑车辆'"class="car-edit"width="450px"top="5vh"@close="$reset('form')">//关闭后调用封装的表单清空方法<el-form ref="form":model="model":rules="ruleValidate"class="formFillWidth"label-width="50px"><el-form-item label="车牌" prop="carCard"><el-input v-model="model.carCard" placeholder="请输入"/></el-form-item><el-form-item label="司机" prop="driver"><el-input v-model="model.driver" placeholder="请输入"/></el-form-item><el-form-item label="备注" prop="remark"><el-input v-model="model.remark" placeholder="请输入"/></el-form-item></el-form><span slot="footer"><el-button @click="dialogVisible = false">取消</el-button><el-button :loading="submitLoading" type="primary" @click="handleSubmit">保存</el-button></span></el-dialog></template>复制代码
- 如果验证报错
data () {return {dialogVisible: false,submitLoading: false,model: {id: 0,carCard: "",driver: "",remark: "",},ruleValidate: {carCard: {required: true, message: "不能为空", trigger: "blur"},},};},
5.el-checkbox
5.1 实现全选
<el-checkbox v-model="checkAll" @change="handleCheckAllChange">全选</el-checkbox><el-checkbox-group v-model="checkedList"><el-checkbox :class="'type-item' + index" v-for="(item, index) in types" :label="item.value" :key="item.val" @change="handleCheckedCitiesChange">{{ item.label }}</el-checkbox></el-checkbox-group><script>export default {data() {return {checkedList: [],checkAll: false,types:[{label: '区域站',value: 1},{label: '国家站',value: 2}]};},methods: {handleCheckAllChange(val) {console.log('全选', val);this.checkAll = val;if (val) this.checkedList = [1, 2, 3, 4, 5, 6];else this.checkedList = [];},handleCheckedCitiesChange(val) {console.log('单选', this.checkedList);}},created() {},mounted() {}};
5.2单选互斥
<el-checkbox-group v-model="checkRangeList" @change="handleCheckedRange"><el-checkbox label="5公里">5公里</el-checkbox><el-checkbox label="10公里">10公里</el-checkbox><el-checkbox label="20公里">20公里</el-checkbox></el-checkbox-group><script>export default {data() {return {checkRangeList: [],checkStationsList: []};},methods: {handleCheckedRange(val) {if (this.checkRangeList.length > 1) {this.checkRangeList.splice(0, 1);}console.log(this.checkRangeList);},},};</script>
6.el-radio
6.1 可取消
<el-radio-group v-model="radio2"><el-radio @click.native.prevent="clickitem(3)" :label="3"> 备选项</el-radio><el-radio @click.native.prevent="clickitem(6)" :label="6"> 备选项</el-radio><el-radio @click.native.prevent="clickitem(9)" :label="9"> 备选项</el-radio></el-radio-group>clickitem (e) {e === this.radio2 ? this.radio2 = '' : this.radio2 = e},
7.el-dialog
7.1可拖拽
- 创建自定义指令 ```javascript // directives.js import Vue from ‘vue’;
// v-dialogDrag: 弹窗拖拽 Vue.directive(‘dialogDrag’, { bind(el, binding, vnode, oldVnode) { // 获取拖拽内容头部 const dialogHeaderEl = el.querySelector(‘.el-dialog__header’); // 获取拖拽内容整体 这个rrc-dialog是我自己封装的组件 如果使用element的组件应写成.el-dialog const dragDom = el.querySelector(‘.rrc-dialog’); dialogHeaderEl.style.cursor = ‘move’;
// 获取原有属性 ie dom元素.currentStyle 火狐谷歌 window.getComputedStyle(dom元素, null);const sty = dragDom.currentStyle || window.getComputedStyle(dragDom, null);// 鼠标按下事件dialogHeaderEl.onmousedown = (e) => {// 鼠标按下,计算当前元素距离可视区的距离 (鼠标点击位置距离可视窗口的距离)const disX = e.clientX - dialogHeaderEl.offsetLeft;const disY = e.clientY - dialogHeaderEl.offsetTop;// 获取到的值带px 正则匹配替换let styL, styT;// 注意在ie中 第一次获取到的值为组件自带50% 移动之后赋值为pxif (sty.left.includes('%')) {styL = +document.body.clientWidth * (+sty.left.replace(/\%/g, '') / 100);styT = +document.body.clientHeight * (+sty.top.replace(/\%/g, '') / 100);} else {styL = +sty.left.replace(/\px/g, '');styT = +sty.top.replace(/\px/g, '');};// 鼠标拖拽事件document.onmousemove = function (e) {// 通过事件委托,计算移动的距离 (开始拖拽至结束拖拽的距离)const l = e.clientX - disX;const t = e.clientY - disY;let finallyL = l + styLlet finallyT = t + styT// 边界值判定 注意clientWidth scrollWidth区别 要减去之前的top left值// dragDom.offsetParent表示弹窗阴影部分if (finallyL < 0) {finallyL = 0} else if (finallyL > dragDom.offsetParent.clientWidth - dragDom.clientWidth - dragDom.offsetParent.offsetLeft) {finallyL = dragDom.offsetParent.clientWidth - dragDom.clientWidth - dragDom.offsetParent.offsetLeft}if (finallyT < 0) {finallyT = 0} else if (finallyT > dragDom.offsetParent.clientHeight - dragDom.clientHeight - dragDom.offsetParent.offsetLeft) (finallyT = dragDom.offsetParent.clientHeight - dragDom.clientHeight - dragDom.offsetParent.offsetLeft)// 移动当前元素dragDom.style.left = `${finallyL}px`;dragDom.style.top = `${finallyT}px`;//将此时的位置传出去//binding.value({x:e.pageX,y:e.pageY})};document.onmouseup = function (e) {document.onmousemove = null;document.onmouseup = null;};}
} })
- 引入```javascript//在main.js中全局引入import './directives'
- 使用
// call.center.detail.vue<el-dialog v-dialogDrag title="呼出结果" :visible.sync="dialogOutVisible">...</el-dialog>
8.el-menu
8.1刷新选中
<el-menu:default-active="defaultActiveIndex"class="el-menu-vertical-demo"@open="handleOpen"@close="handleClose"background-color="#0f1f43"text-color="#fff"active-text-color="#ef4873":default-openeds="['1', '2']"><el-submenu index="1"><template slot="title"><i class="el-icon-location"></i><span>用户</span></template><el-menu-item-group><el-menu-item index="/admin/user"><router-link to="/admin/user">用户管理</router-link></el-menu-item><el-menu-item index="/admin/account"><router-link to="/admin/account">账号管理</router-link></el-menu-item><el-menu-item index="/admin/agent"><router-link to="/admin/agent">三方公司</router-link></el-menu-item></el-menu-item-group></el-submenu><el-submenu index="2"><template slot="title"><i class="el-icon-location"></i><span>房屋</span></template><el-menu-item-group><el-menu-item index="/admin/home"><router-link to="/admin/home">房屋管理</router-link></el-menu-item><el-menu-item index="/admin/image"><router-link to="/admin/image">图片管理</router-link></el-menu-item></el-menu-item-group></el-submenu></el-menu>
export default {data() {return {defaultActiveIndex: ''};},mounted() {this.defaultActiveIndex = window.location.href.replace(new RegExp('#', 'g'), '---').split('---')[1];console.log(this.defaultActiveIndex);},}

