为什么会可以直接运行
需要classloader
java 没有提供标准加载jar文件中的jar
Main-class:自定义的类加载器,加载jar包中jar
Java -jar会后会做什么?
java -jar会去找jar中的manifest文件,在那里面找到真正的启动类;
jar包的打包插件,和打包方法
maven-plugin插件
在spring-boot-tools中,
有五个goal
- repackage
- run
- start
- stop
- build-info
<build><plugins><plugin><groupId>org.springframework.boot</groupId><artifactId>spring-boot-maven-plugin</artifactId></plugin></plugins></build>
生成MANIFEST.MF 把依赖的jar都打包进去了
执行maven clean package 后生成两个文件
-SNAPSHOT.jar -SNAPSHOT.jar.original
打包调用的是:RepackageMojo的execute,依赖repackage方法
private void repackage() throws MojoExecutionException {// maven生成的jar,最终的命名将加上.original后缀Artifact source = getSourceArtifact();// 最终为可执行jar,即fat jarFile target = getTargetFile();// 获取重新打包器,将maven生成的jar重新打包成可执行jarRepackager repackager = getRepackager(source.getFile());// 查找并过滤项目运行时依赖的jarSet<Artifact> artifacts = filterDependencies(this.project.getArtifacts(),getFilters(getAdditionalFilters()));// 将artifacts转换成librariesLibraries libraries = new ArtifactsLibraries(artifacts, this.requiresUnpack,getLog());try {// 获得Spring Boot启动脚本LaunchScript launchScript = getLaunchScript();// 执行重新打包,生成fat jarrepackager.repackage(target, libraries, launchScript);}catch (IOException ex) {throw new MojoExecutionException(ex.getMessage(), ex);}// 将maven生成的jar更新成.original文件updateArtifact(source, target, repackager.getBackupFile());}
jar包的目录结构
spring-boot-learn-0.0.1-SNAPSHOT ├── META-INF │ └── MANIFEST.MF ├── BOOT-INF │ ├── classes │ │ └── 应用程序类 │ └── lib │ └── 第三方依赖jar └── org └── springframework └── boot └── loader └── springboot启动程序
MEAT-INF内容
记录jar包信息,程序入口
Manifest-Version: 1.0 Implementation-Title: spring-learn Implementation-Version: 0.0.1-SNAPSHOT Start-Class: com.tulingxueyuan.Application Spring-Boot-Classes: BOOT-INF/classes/ Spring-Boot-Lib: BOOT-INF/lib/ Build-Jdk-Spec: 1.8 Spring-Boot-Version: 2.1.5.RELEASE Created-By: Maven Archiver 3.4.0 Main-Class: org.springframework.boot.loader.JarLauncher
Archive概念
归档文件:tar/zip格式 jar也是zip格式 一个archive可以是一个jar,也可以是一个文件目录。可以抽象为统一的逻辑层
public interface Archive extends Iterable<Archive.Entry> {// 获取该归档的urlURL getUrl() throws MalformedURLException;// 获取jar!/META-INF/MANIFEST.MF或[ArchiveDir]/META-INF/MANIFEST.MFManifest getManifest() throws IOException;// 获取jar!/BOOT-INF/lib/*.jar或[ArchiveDir]/BOOT-INF/lib/*.jarList<Archive> getNestedArchives(EntryFilter filter) throws IOException;}
org.springframework.boot.loader.archive.Archive ——-org.springframework.boot.loader.archive.ExplodedArchive 用来在文件夹目录下寻找资源 ———org.springframework.boot.loader.archive.JarFileArchive 用来在jar包环境下寻找资源,springboot打包的fatjar
jarFile:对jar包的封装,会解析内部结构,获取jar包中的文件,文件夹,加载封装到Entry,
jarFileArchive内部依赖jar对应的URL
其实就是对应的jar的路径,解析
JarLauncher
jarLauncher类集成结构
加载jar,类的
加载内/boot-inf/lib下的jar 已经class/下的class
主要做的事情
- 构建资源目标,获取资源URL,构建一个classLoader
- 加载MANIFEST.MF文件的start-class资源,执行main方法
```properties
public abstract class ExecutableArchiveLauncher extends Launcher {
private final Archive archive;
public ExecutableArchiveLauncher() {
} }try {// 找到自己所在的jar,并创建Archivethis.archive = createArchive();}catch (Exception ex) {throw new IllegalStateException(ex);}
public abstract class Launcher { protected final Archive createArchive() throws Exception { ProtectionDomain protectionDomain = getClass().getProtectionDomain(); CodeSource codeSource = protectionDomain.getCodeSource(); URI location = (codeSource == null ? null : codeSource.getLocation().toURI()); String path = (location == null ? null : location.getSchemeSpecificPart()); if (path == null) { throw new IllegalStateException(“Unable to determine code source archive”); } File root = new File(path); if (!root.exists()) { throw new IllegalStateException( “Unable to determine code source archive from “ + root); } return (root.isDirectory() ? new ExplodedArchive(root) : new JarFileArchive(root)); } }
<a name="Kg1PR"></a>#### URLStreamHandler:描述资源只用的URL<br />比如,jar,file http 都算是一种资源<br />三个方法1. URL.setURLStreamHandlerFactory设置。该属性是一个静态属性,且只能被设置一次1. URLStreamHandler的子类<br />子类名称规范<br />必须是Handler比如: xx.http.Handler;<a name="k42dk"></a>#### SpringBoot 的jar启动的流程总结1. 打包后生成一个fat jar ;包含所有依赖jar1. jarLanucher 加载/lib下的jar,启动main函数<a name="I5Rmi"></a>#### 资源定义URLlaunchedURLClassLoader,<br />jdk如果知道读取的资源内容- LaunchedURLClassLoader.loadClass- URL.getContent()- URL.openConnection()- Handler.openConnection(URL)<a name="OsGSm"></a>#### IDE目录启动Spring boot项目因为依赖的jar放在了classPath中了,就可以加载的到**总结 **<br />JarLauncher通过加载BOOT-INF/classes目录及BOOT-INF/lib目录下jar文件,实现了fat jar的启动。<br />SpringBoot通过扩展JarFile、JarURLConnection及URLStreamHandler,实现了jar in jar中资源的加载。<br />SpringBoot通过扩展URLClassLoader–LauncherURLClassLoader,实现了jar in jar中class文件的加载。<br />WarLauncher通过加载WEB-INF/classes目录及WEB-INF/lib和WEB-INF/lib-provided目录下的jar文件,实现了war文件的直接启动及web容器中的启动。<a name="Vi8h4"></a># Springboot如何启动Spring容器<a name="mEssI"></a>#### 通过内置Tomcat启动的方式1: 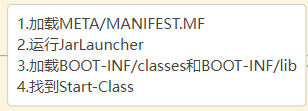<br />2: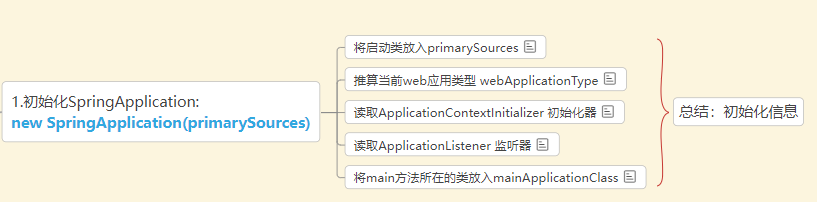3: spring.run方法<br />1:监听器运行 <br />ApplicationStartingEvent <br />ApplicationEnvironmentPreparedEvent2:读环境配置信息<br />3:实例化上下文<br />context = createApplicationContext();- new SpringApplication(primarySources)4:设置上下文<br />5:refresh方法<br />6:发去start事件<br />7:发布ready时间,”ApplicationContextInitializer :扩展点可以实现这个扩展自己的需求<br />ApplicationListener 可以设计解耦> 1.ApplicationStartingEvent在运行开始时发送,但在进行任何处理之前(侦听器和初始化程序的注册除外)发送。 、> 2.在创建上下文之前,将发送ApplicationEnvironmentPreparedEvent。> 3.准备ApplicationContext并调用ApplicationContextInitializers之后,将发送ApplicationContextInitializedEvent。 4.读取完配置类后发送ApplicationPreparedEvent。 5.在刷新上下文之后但在调用任何应用程序和命令行运行程序之前,将发送ApplicationStartedEvent。 6.紧随其后发送带有LivenessState.CORRECT的AvailabilityChangeEvent,以指示该应用程序被视为处于活动状态。 7.在调用任何应用程序和命令行运行程序之后,将发送ApplicationReadyEvent。 8.紧随其后发送ReadabilityState.ACCEPTING_TRAFFIC的AvailabilityChangeEvent,以指示应用程序已准备就绪,可以处理请求。 如果启动时发生异常,则发送ApplicationFailedEvent。<a name="mCrZy"></a>##### run 启动```javapublic ConfigurableApplicationContext run(String... args) {// 用来记录当前springboot启动耗时StopWatch stopWatch = new StopWatch();// 就是记录了启动开始时间stopWatch.start();// 它是任何spring上下文的接口, 所以可以接收任何ApplicationContext实现ConfigurableApplicationContext context = null;Collection<SpringBootExceptionReporter> exceptionReporters = new ArrayList<>();// 开启了Headless模式:configureHeadlessProperty();// 去spring.factroies中读取了SpringApplicationRunListener 的组件, 就是用来发布事件或者运行监听器SpringApplicationRunListeners listeners = getRunListeners(args);// 发布1.ApplicationStartingEvent事件,在运行开始时发送listeners.starting();try {// 根据命令行参数 实例化一个ApplicationArgumentsApplicationArguments applicationArguments = new DefaultApplicationArguments(args);// 预初始化环境: 读取环境变量,读取配置文件信息(基于监听器)ConfigurableEnvironment environment = prepareEnvironment(listeners, applicationArguments);// 忽略beaninfo的beanconfigureIgnoreBeanInfo(environment);// 打印Banner 横幅Banner printedBanner = printBanner(environment);// 根据webApplicationType创建Spring上下文context = createApplicationContext();exceptionReporters = getSpringFactoriesInstances(SpringBootExceptionReporter.class,new Class[] { ConfigurableApplicationContext.class }, context);//预初始化spring上下文prepareContext(context, environment, listeners, applicationArguments, printedBanner);// 加载spring ioc 容器 **相当重要 由于是使用AnnotationConfigServletWebServerApplicationContext 启动的spring容器所以springboot对它做了扩展:// 加载自动配置类:invokeBeanFactoryPostProcessors , 创建servlet容器onRefreshrefreshContext(context);afterRefresh(context, applicationArguments);stopWatch.stop();if (this.logStartupInfo) {new StartupInfoLogger(this.mainApplicationClass).logStarted(getApplicationLog(), stopWatch);}listeners.started(context);callRunners(context, applicationArguments);}catch (Throwable ex) {handleRunFailure(context, ex, exceptionReporters, listeners);throw new IllegalStateException(ex);}try {listeners.running(context);}catch (Throwable ex) {handleRunFailure(context, ex, exceptionReporters, null);throw new IllegalStateException(ex);}return context;}
- prepareEnvironment
private ConfigurableEnvironment prepareEnvironment(SpringApplicationRunListeners listeners,ApplicationArguments applicationArguments) {// 根据webApplicationType 创建Environment 创建就会读取: java环境变量和系统环境变量ConfigurableEnvironment environment = getOrCreateEnvironment();// 将命令行参数读取环境变量中configureEnvironment(environment, applicationArguments.getSourceArgs());// 将@PropertieSource的配置信息 放在第一位, 因为读取配置文件@PropertieSource优先级是最低的ConfigurationPropertySources.attach(environment);// 发布了ApplicationEnvironmentPreparedEvent 的监听器 读取了全局配置文件listeners.environmentPrepared(environment);// 将所有spring.main 开头的配置信息绑定SpringApplicationbindToSpringApplication(environment);if (!this.isCustomEnvironment) {environment = new EnvironmentConverter(getClassLoader()).convertEnvironmentIfNecessary(environment,deduceEnvironmentClass());}//更新PropertySourcesConfigurationPropertySources.attach(environment);return environment;}
外置tomcat启动
启动原理tomcat—-> web.xml—filter servlet listener 3.0+
tomcat启动的时候肯定调用了SpringBootServletInitializer的SpringApplicationBuilder , 就会启动springboot
servlet3.0 规范官方文档: 8.2.4
SPI
service provider interface 服务提供者接口,服务发现机制
通过MATE-inf/services文件查找, 加载自定义类
核心类:
javax.servlet.ServletContainerInitializer
启动时selvet去找ServletContainerInitializer的实现类
创建调用 onStartUp方法
@Overridepublic void onStartup(ServletContext servletContext) throws ServletException {// Logger initialization is deferred in case an ordered// LogServletContextInitializer is being usedthis.logger = LogFactory.getLog(getClass());WebApplicationContext rootApplicationContext = createRootApplicationContext(servletContext);if (rootApplicationContext != null) {servletContext.addListener(new SpringBootContextLoaderListener(rootApplicationContext, servletContext));}else {this.logger.debug("No ContextLoaderListener registered, as createRootApplicationContext() did not "+ "return an application context");}}
SPI 用到的地方,包括JDBC 也用到了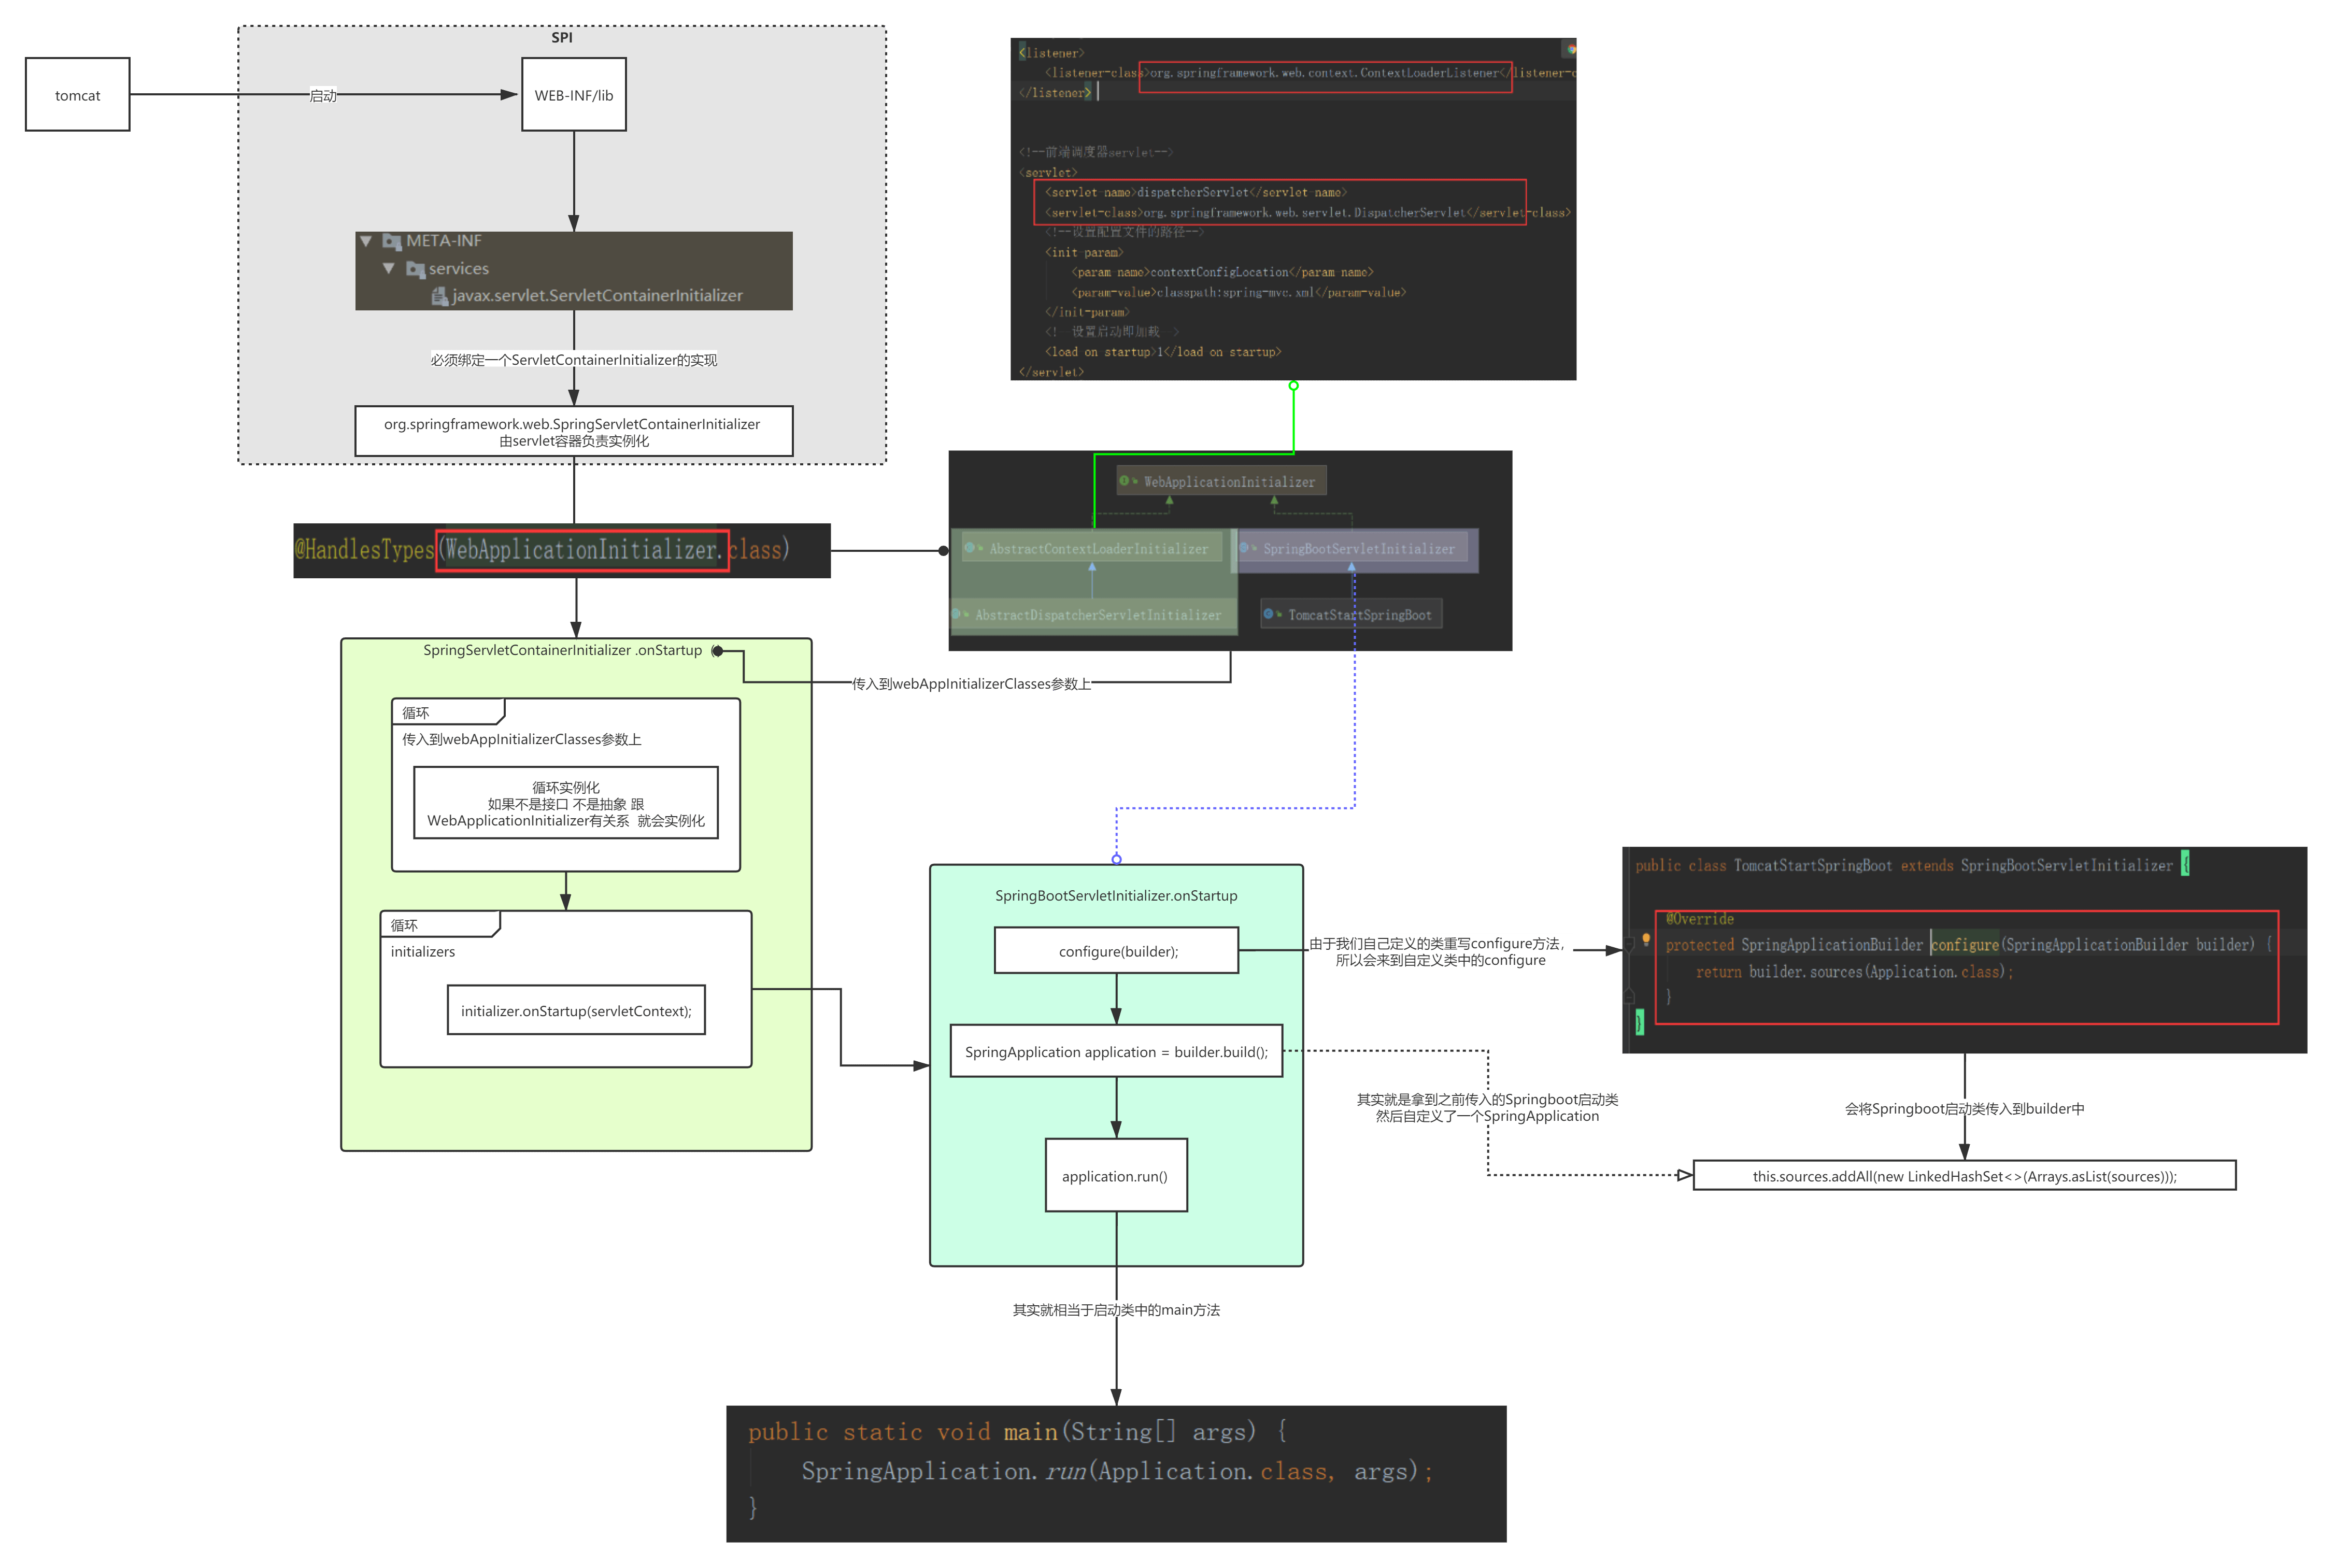

若有收获,就点个赞吧
0 人点赞
