copy from https://www.cnblogs.com/wuyuegb2312/archive/2013/04/09/3008320.html
- 简单工厂模式,替换复杂switch—— 用于生成一次性对象
2. 策略模式,替换复杂switch—— 用于关联固定的过程、handler的bean
3. 代理模式,各种远端调用服务的facade封装而成的client
4. 模版方法模式,serviceTemplate封装固定步骤:参数校验、远端调用、更新、回滚、打日志。本文的例子中没有体现“固定步骤”————-最常用
5. 外观模式,集中管理多个bean并按业务流程组合调用顺序
6. 建造者模式,没有明确这样写但有点味道:用一个对象编排另一个对象的方法调用顺序
7. 观察者模式,消息订阅和监听
8. 状态模式,自己写的状态机有类似的地方,每个状态维护到下一个状态的跳转
9. 适配器模式,和代理模式有点像。不同点是,适配器包装的类的方法和对外的名称、参数不一致。实践中的integration层的client,更像是代理模式+适配器模式+外观模式(不组合不同服务)的混合体。
10. 迭代器模式,Java自带的Iterator接口,不过不常用
11. 单例模式,各种工具类(校验器、填充器)、spring的bean的默认使用方式等。单例本身也分懒汉模式、饿汉模式、双重锁模式、静态内部类单例模式、枚举单例模式等。详细讨论可见:https://www.jianshu.com/p/3bfd916f2bb2,对于双重锁模式的分析可以看:https://blog.csdn.net/chenchaofuck1/article/details/51702129
12. 职责链模式,没有直接用过,JVM的双亲委派应该是类似的
一、简单工厂模式
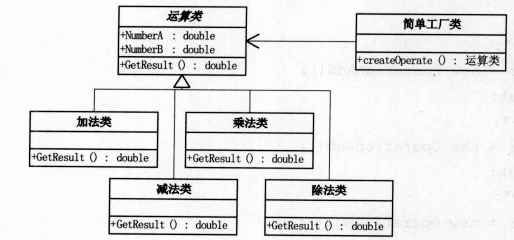
模式特点:工厂根据条件产生不同功能的类。
程序实例:四则运算计算器,根据用户的输入产生相应的运算类,用这个运算类处理具体的运算。
代码特点:C/C++中的switch…case…分支使用字典的方式代替。
使用异常机制对除数为0的情况进行处理。
Good
分析:将各种运算拆分成单独的类,均继承于Operation类,各运算子类重写Operation类中的GetResult()方法。统一通过简单工厂类(OperationFactory类)实例化运算所需的运算子类。
这样设计的优点:
- 易扩展
如果添加新的运算类,只需要
- 新的运算类继承Operation类,并重写GetResult()方法
- 在简单工厂类(OperationFactory类)中添加对应的if语句
无需对其他运算类进行操作。
- 易维护
对某一运算类进行修改,并不涉及其他运算类,很大程度上避免了由于误操作而对其他运算类修改的问题。 - 低耦合
各运算类只公共继承Operation类,不涉及其他运算类。 - 高复用
无论是控制台,还是windows程序,Web程序,均可使用该程序实现计算器功能。
优点:
- 只需要传入一个正确的参数,就可以获取你所需要的对象而无需知道其创建细节。
缺点:
- 工厂一旦需要生产新产品就需要修改工厂类的方法逻辑,违背了开放—封闭原则;
- 如果产品实例种类很多,也导致了工厂内部逻辑复杂,不易维护。
```python
class Operation:
def GetResult(self):
pass
class OperationAdd(Operation): def GetResult(self): return self.op1+self.op2
class OperationSub(Operation): def GetResult(self): return self.op1-self.op2
class OperationMul(Operation): def GetResult(self): return self.op1*self.op2
class OperationDiv(Operation): def GetResult(self): try: result = self.op1/self.op2 return result except: print “error:divided by zero.” return 0
class OperationUndef(Operation): def GetResult(self): print “Undefine operation.” return 0
class OperationFactory:
operation = {}
operation[“+”] = OperationAdd();
operation[“-“] = OperationSub();
operation[“*”] = OperationMul();
operation[“/“] = OperationDiv();
def createOperation(self,ch):
if ch in self.operation:
op = self.operation[ch]
else:
op = OperationUndef()
return op
if name == “main“: op = raw_input(“operator: “) opa = input(“a: “) opb = input(“b: “) factory = OperationFactory() cal = factory.createOperation(op) cal.op1 = opa cal.op2 = opb print cal.GetResult()
<a name="dHF71"></a>#### Not good**分析**:以上这种写法,将加减乘除运算全部放在一个类中实现,虽然实现了计算器的功能,但**增加其他运算或修改某个运算都必须在Operation类中进行修改。** 使得程序**不容易维护、扩展以及复用**,并且**耦合性高**```python作者:西加加先生链接:https://zhuanlan.zhihu.com/p/103324085来源:知乎著作权归作者所有。商业转载请联系作者获得授权,非商业转载请注明出处。class Operation(object):def __init__(self):passdef conver_strNumber(self, strNumber):'''将字符串格式的数字,转化成对应格式的数字:param strNumber::return:'''if '.' not in strNumber:return int(strNumber)else:return float(strNumber)def op(self, strNumberA, strNumberB, strOperate):if strOperate == '+':return self.conver_strNumber(strNumberA) + self.conver_strNumber(strNumberB)elif strOperate == '-':return self.conver_strNumber(strNumberA) - self.conver_strNumber(strNumberB)elif strOperate == '*':return self.conver_strNumber(strNumberA) * self.conver_strNumber(strNumberB)elif strOperate == '/':if strNumberB != '0' and strNumberB != '0.0':return self.conver_strNumber(strNumberA) / self.conver_strNumber(strNumberB)else:return 0else:print('只能做加减乘除运算')if __name__ == '__main__':p = Operation()print(p.op('2.2', '1', '+'))# 输出21.2
二、工厂方法模式

模式特点:定义一个用于创建对象的接口,让子类决定实例化哪一个类。这使得一个类的实例化延迟到其子类。
程序实例:基类雷锋类,派生出学生类和志愿者类,由这两种子类完成“学雷锋”工作。子类的创建由雷锋工厂的对应的子类完成。
代码特点:无
class LeiFeng:
    def Sweep(self):
        print "LeiFeng sweep"

class Student(LeiFeng):
    def Sweep(self):
        print "Student sweep"

class Volenter(LeiFeng):
    def Sweep(self):
        print "Volenter sweep"

class LeiFengFactory:
    def CreateLeiFeng(self):
        temp = LeiFeng()
        return temp

class StudentFactory(LeiFengFactory):
    def CreateLeiFeng(self):
        temp = Student()
        return temp

class VolenterFactory(LeiFengFactory):
    def CreateLeiFeng(self):
        temp = Volenter()
        return temp

if __name__ == "__main__":
    sf = StudentFactory()
    s=sf.CreateLeiFeng()
    s.Sweep()
    sdf = VolenterFactory()
    sd=sdf.CreateLeiFeng()
    sd.Sweep()
工厂方法模式的四个要素:
- 抽象产品类(Product):提供抽象方法供具体产品类实现
- 具体产品类(ConcreteProduct):提供具体的产品
- 抽象工厂类(Factory):提供抽象方法供具体工厂实现
- 具体工厂类(ConcreteFactory):提供具体的工厂
使用步骤:
- 创建抽象工厂类,定义具体工厂的公共接口;
- 创建抽象产品类 ,定义具体产品的公共接口;
- 创建具体产品类(继承抽象产品类) ,定义生产的具体产品;
- 创建具体工厂类(继承抽象工厂类),定义创建对应具体产品实例的方法;
- 外界通过调用具体工厂类的方法,从而创建不同具体产品类的实例
工厂方法模式是对简单工厂模式进一步的解耦。将把原本会因为业务代码而庞大的简单工厂类,拆分成了一个个的工厂类,这样代码就不会都耦合在同一个类里了。
优点:
具体例子:—-创建多个发消息的微信类
背景: 现公司监控系统报警需要对接企业微信公众号, 由于未认证企业微信推送消息的限制, 默认每天推送条数上限为
6000条, 考虑到报警系统多, 规则没有收敛, 接收的人员多, 每天6000条可能不够用, 所以需要创建多个未认证的企业微信账号用于发送报警信息。
# 抽象工厂类
class WeChatFactory(object):
    def create_wechat(self):
        pass
# 具体工厂类A(创建账号A)
class AccountAFactory(WeChatFactory):
    def create_wechat(self):
        return AccountA()
# 具体工厂类B(创建账号B)
class AccountBFactory(WeChatFactory):
    def create_wechat(self):
        return AccountB()
# 抽象产品类(微信账号功能)
class WeChat(object):
    def send_message(self, content):
        pass
    def send_image(self, imageid):
        pass
# 具体产品类A(账号A功能)
class AccountA(WeChat):
    def send_message(self, content):
        print("使用企业微信账号A推送信息: ", content)
    def send_image(self, imageid):
        print("使用企业微信账号A推送图片: ", imageid)
# 具体产品类B(账号B功能)
class AccountB(WeChat):
    def send_message(self, content):
        print("使用企业微信账号B推送信息: ", content)
    def send_image(self, imageid):
        print("使用企业微信账号B推送图片: ", imageid)
if __name__ == "__main__":
    # 实例化账号A
    wechat_factory_a = AccountAFactory()
    # 创建账号A的微信对象
    wechat1 = wechat_factory_a.create_wechat()

    # 使用账号A对象发送信息
    wechat1.send_message(content="haha")
    wechat1.send_image(imageid="hehe.jpg")
    # 实例化账号B
    wechat_factory_b = AccountBFactory()
    # 创建账号B的微信对象
    wechat2 = wechat_factory_b.create_wechat()
    # 使用账号B对象发送信息
    wechat2.send_message(content="heihei")
    wechat2.send_image(imageid="hehe.jpg")
执行结果:
使用企业微信账号A推送信息:  haha
使用企业微信账号A推送图片:  hehe.jpg
使用企业微信账号B推送信息:  heihei
使用企业微信账号B推送图片:  hehe.jpg
如果此时, 两个微信账号都不够用了, 需要增加 第三类账号 (通过这个类,可以创建无数个 第三类型的 账号,用来做第三种事)时, 所有的类都不需要修改, 只需创建新的类即可, 符合开放封闭原则。
class AccountC(WeChat):
    def send_message(self, content):
        print("使用企业微信账号C推送信息: ", content)
    def send_image(self, imageid):
        print("使用企业微信账号C推送图片: ", imageid)


class AccountCFactory(WeChatFactory):
    def create_wechat(self):
        return AccountC()
应用场景
- 当一个类不知道它所需要的对象的类时 在工厂方法模式中,客户端不需要知道具体产品类的类名,只需要知道所对应的工厂即可;
- 当一个类希望通过其子类来指定创建对象时 在工厂方法模式中,对于抽象工厂类只需要提供一个创建产品的接口,而由其子类来确定具体要创建的对象,利用面向对象的多态性和里氏代换原则,在程序运行时,子类对象将覆盖父类对象,从而使得系统更容易扩展。
- 将创建对象的任务委托给多个工厂子类中的某一个,客户端在使用时可以无须关心是哪一个工厂子类创建产品子类,需要时再动态指定,可将具体工厂类的类名存储在配置文件或数据库中。
十一、抽象工厂模式

模式特点:提供一个创建一系列相关或相互依赖对象的接口,而无需指定它们的类。
程序实例:提供对不同的数据库访问的支持。
IUser和IDepartment是两种不同的抽象产品,它们都有Access和SQL Server这两种不同的实现;
IFactory是产生IUser和IDepartment的抽象工厂,根据具体实现(AccessFactory和SqlFactory)产生对应的具体的 对象(CAccessUser与CAccessDepartment,或者CSqlUser与CSqlDepartment)。 ```python class IUser: def GetUser(self):
def InsertUser(self):passpass
class IDepartment: def GetDepartment(self): pass def InsertDepartment(self): pass
class CAccessUser(IUser): def GetUser(self): print “Access GetUser” def InsertUser(self): print “Access InsertUser”
class CAccessDepartment(IDepartment): def GetDepartment(self): print “Access GetDepartment” def InsertDepartment(self): print “Access InsertDepartment”
class CSqlUser(IUser): def GetUser(self): print “Sql GetUser” def InsertUser(self): print “Sql InsertUser”
class CSqlDepartment(IDepartment): def GetDepartment(self): print “Sql GetDepartment” def InsertDepartment(self): print “Sql InsertDepartment”
class IFactory: def CreateUser(self): pass def CreateDepartment(self): pass
class AccessFactory(IFactory): def CreateUser(self): temp=CAccessUser() return temp def CreateDepartment(self): temp = CAccessDepartment() return temp
class SqlFactory(IFactory): def CreateUser(self): temp = CSqlUser() return temp def CreateDepartment(self): temp = CSqlDepartment() return temp
if name == “main“: factory = SqlFactory() user=factory.CreateUser() depart=factory.CreateDepartment() user.GetUser() depart.GetDepartment()
<a name="VTWsk"></a>
## **三、策略模式---多个并行选择**
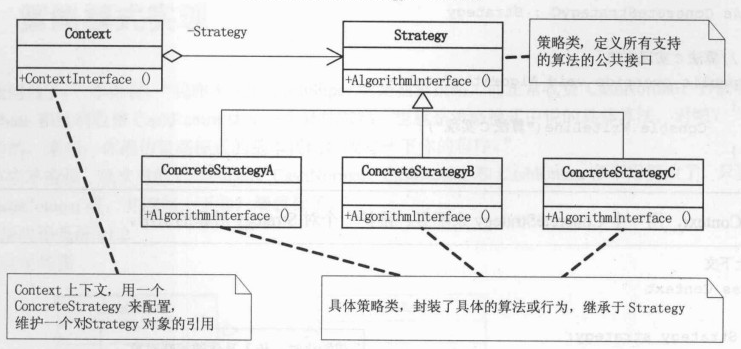<br />模式特点:它定义了算法家族,分别封装起来,让他们之间可以相互替换,此模式让算法的变化不会影响到使用 算法的客户。<br />程序实例:商场收银软件,需要根据不同的销售策略方式进行收费<br />代码特点:不同于同例1,这里使用字典是为了避免关键字不在字典导致bug的陷阱。
示例: 使用Python设计一个控制台收银软件,收银策略包括(正常收银、打八折、满300返100)。要求输入打折策略和总金额,返回实际付款金额。
说明:
- 现金收费对象(CashSuper)<br />为其他三种收银策略的抽象类。
- 正常收费子类(CashNormal)<br />继承于CashSuper类,重写CashSuper类的acceptCash方法。正常收费,返回原价。
- 打折收费子类(CashRebate)<br />继承于CashSuper类,重写CashSuper类的acceptCash方法。用于处理打折策略,初始化传入折扣率,返回打折后的金额。
- 返利收费子类(CashReturn)<br />继承于CashSuper类,重写CashSuper类的acceptCash方法。用于处理返利策略,初始化时传入返利条件和返利金额。返回满减后的金额。
<a name="4hXah"></a>
#### not good -- 简单工厂
```python
作者:西加加先生
链接:https://zhuanlan.zhihu.com/p/103658177
来源:知乎
著作权归作者所有。商业转载请联系作者获得授权,非商业转载请注明出处。
import abc
# 现金收费对象
class CashSuper(metaclass=abc.ABCMeta):
def format_money(self, strNumber):
'''
将字符串格式的金额,转化成float类型,并保留两位小数
:param strNumber:
:return:
'''
return round(float(strNumber), 2)
@abc.abstractmethod
def acceptCash(self, money):
pass
# 正常收费子类
class CashNormal(CashSuper):
def acceptCash(self, money):
return self.format_money(money)
# 打折收费子类
class CashRebate(CashSuper):
def __init__(self, moneyRabate=1):
self.moneyRabate = self.format_money(moneyRabate) # 打折率
def acceptCash(self, money):
return self.format_money(money) * self.moneyRabate
# 返利收费类
class CashReturn(CashSuper):
def __init__(self, moneyCondition, moneyReturn):
self.moneyCondition = self.format_money(moneyCondition)
self.moneyReturn = self.format_money(moneyReturn)
def acceptCash(self, money):
money = self.format_money(money)
if money > self.moneyCondition:
money -= money / self.moneyCondition * self.moneyReturn
return self.format_money(money)说明:现金收费对象(CashSuper)为其他三种收银策略的抽象类。正常收费子类(CashNormal)继承于CashSuper类,重写CashSuper类的acceptCash方法。正常收费,返回原价。打折收费子类(CashRebate)继承于CashSuper类,重写CashSuper类的acceptCash方法。用于处理打折策略,初始化传入折扣率,返回打折后的金额。返利收费子类(CashReturn)继承于CashSuper类,重写CashSuper类的acceptCash方法。用于处理返利策略,初始化时传入返利条件和返利金额。返回满减后的金额。# 现金收费工厂类
class CashFactory(object):
def createCashAccept(self, type):
if type == '正常收费':
cs = CashNormal()
elif type == '满300返100':
cs = CashReturn(300, 100)
elif type == '打八折':
cs = CashRebate(0.8)
return cs
# 客户端
if __name__ == '__main__':
cf = CashFactory()
cs = cf.createCashAccept('满300返100')
print(cs.acceptCash(1000))
# 输出
666.67
good —策略
# CashContext类
class CashContext(object):

    def __init__(self, csuper):
        self.cs = csuper

    def GetResult(self, money):
        return self.cs.acceptCash(money)

# 客户端
if __name__ == '__main__':
    type = '满300返100'       # 收银策略
    if type == '正常收费':
        cc = CashContext(CashNormal())
    elif type == '满300返100':
        cc = CashContext(CashReturn(300, 100))
    elif type == '打八折':
        cc = CashContext(CashRebate(0.8))

    print(cc.GetResult(1000))       # 1000为总金额


# 输出
666.67
better —策略 + 简单工厂
# CashContext类
class CashContext(object):  # 将工厂类对各种子类的初始化合并到策略模式的构造函数中

    def __init__(self, type):
        if type == '正常收费':
            self.cs = CashNormal()
        elif type == '满300返100':
            self.cs = CashReturn(300, 100)
        elif type == '打八折':
            self.cs = CashRebate(0.8)

    def GetResult(self, money):
        return self.cs.acceptCash(money)

# 客户端
if __name__ == '__main__':
    cc = CashContext('满300返100')
    print(cc.GetResult(1000))

# 输出
666.67
对比:
- 简单工厂模式:
将各种收银策略的子类对象在工厂中进行实例化。
客户端需要先创建工厂类;然后再工厂类中传入收银策略,进行初始化对应的策略子类;最后才传入总金额计算。在这过程中,共实例化了两个对象(cf、cs)。
如果添加新的收银策略,需要增加对应的收费子类,并修改工厂中对应部分。无需修改客户端。 - 策略模式:
在CashContext的构造函数中,传入具体的收银策略对象,在GetResult方法中根据具体的收银策略对象调用其算法。
客户端需要对具体收银策略进行判断,生成具体的收银策略对象,然后传入到CashContext中。最后传入总金额计算。
如果添加新的收银策略,需要增加对应的收费子类,并对客户端代码进行修改。 - 策略模式+简单工厂模式:
在CashContext的构造函数中将各种收银策略的子类对象实例化。在GetResult方法中根据具体的收银策略对象调用其算法。
客户端只需要实例化一个CashContext对象,然后直接可以传入总金额计算。
如果添加新的收银策略,需要增加对应的收费子类,并修改CashContext类中对应部分。无需修改客户端。
总结:
- 简单工厂模式用于解决对象的创建问题,策略模式用于封装算法。
- 策略模式简化了单元测试。因为每个算法都有自己的类,可以通过自己的接口进行单独测试。
- 只要在分析过程中听到需要在不同时间应用不同的业务规则,就可以考虑使用策略模式来处里这种变化的可能。
四、装饰模式—-额外的职责
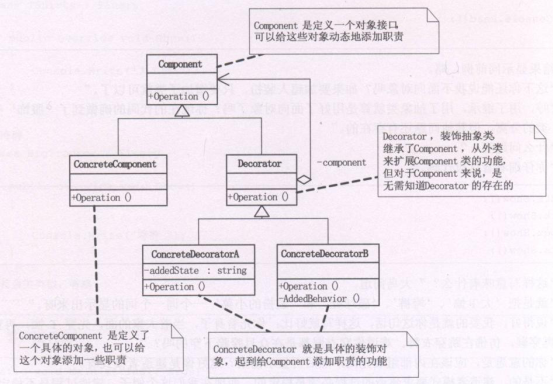
模式特点:动态地给一个对象添加一些额外的职责,就添加功能来说,装饰模式比生成子类更为灵活。
装饰模式基本实现
import abc

class Component(metaclass=abc.ABCMeta): #定义一个对象的接口,可以给这些对象动态地添加职责。
    @abc.abstractmethod
    def Operation(self):
        pass

class ConcreteComponent(Component): # 定义一个具体对象,可以给这个对象添加一些职责。
    def Operation(self):
        print("具体对象的操作")

class Decorator(Component):
    # 抽象装饰类,继承了Component,从外类来扩展Component类的功能,但对于Component来说,无需知道Decorator的存在。
    def __init__(self):
        self._component = Component()
    def SetComponent(self,component):   # 设置Component
        self._component = component
    def Operation(self):                # 重写Operation()实际执行的市Component的Operation()
        if(self._component != None):
            self._component.Operation()

class ConcreteDecoratorA(Decorator): # 具体的装饰对象,起到给Component添加职责的功能。
    def __init__(self):
        self.__addedState = None    # 本类独有的功能,区别于ConcreteDecoratorB
    def Operation(self):
        super(ConcreteDecoratorA,self).Operation()  # 先运行原Component的Operation(),再执行本类功能。
        self.__addedState = "New State"
        print("具体装饰对象A的操作")

class ConcreteDecoratorB(Decorator):    # 具体的装饰对象,起到给Component添加职责的功能。
    def Operation(self):
        super(ConcreteDecoratorB,self).Operation()
        self.AddedBehavior()
        print("具体装饰对象A的操作")
    def AddedBehavior(self):    # 本类独有的功能,区别于ConcreteDecoratorA
        pass

if __name__ == '__main__':
    c = ConcreteComponent()
    d1 = ConcreteDecoratorA()
    d2 = ConcreteDecoratorB()
    d1.SetComponent(c)
    d2.SetComponent(d1)
    d2.Operation()
装饰模式利用SetComponent来对对象进行包装。每个装饰对象的实现就与如何使用这个对象分开了,每个装饰对象只关心自己的功能,不需要关系如何被添加到对象链当中。
当只有一个ConcreteComponent类而没有抽象的Component类,那么Decorator类可以是ConcreteComponent的一个子类。同理,如果只有一个ConcreteDecorator类,那么没必要建立一个单独的Decorator类,而可以把Decorator和ConcreteDecorator的责任和合并成一个类。
not good
class Person(object):
    def __init__(self, name):
        self.__name = name
    def WearTShits(self):
        print("大T恤")
    def WearBigTrouser(self):
        print("垮裤")
    def WearSneakers(self):
        print("破球鞋")
    def Show(self):
        print("装扮的",self.__name)

if __name__ == '__main__':
    xc = Person('小菜')
    print('装扮: ')
    xc.WearTShits()
    xc.WearBigTrouser()
    xc.WearSneakers()
    xc.Show()
此版本,将人物和穿搭封装成了Person类,所有穿搭都是Person类中的方法。如果有新的装扮,则需要对Person类进行修改,违背了开放-封闭原则。
因此需要将人物和穿搭拆分开
from abc import ABCMeta,abstractmethod
class Person(object):
    def __init__(self,name):
        self.__name = name
    def Show(self):
        print("装扮的",self.__name)

class Finery(metaclass=abc.ABCMeta):
    @abstractmethod
    def Show(self):
        pass

class TShits(Finery):
    def Show(self):
        print("大T恤")

class BigTrouser(Finery):
    def Show(self):
        print("垮裤")

class Sneakers(Finery):
    def Show(self):
        print("破球鞋")

if __name__ == '__main__':
    xc = Person('小菜')
    print('装扮:')
    dtx = TShits()
    kk = BigTrouser()
    pqx = Sneakers()
    # 装饰过程
    dtx.Show()
    kk.Show()
    pqx.Show()
此版本,将人物和服饰分别进行封装成Person类和Finery类。Finery类是服饰抽象类,所有具体服饰类都继承于它,如果又新的装扮,则直接添加新的具体服饰类就可以,无需修改Person类和Finery类。但是,在具体使用时,下面的代码显得十分冗余。
dtx.Show()
kk.Show()
pqx.Show()
没有将具体的穿搭过程进行封装,犹如公众场合下换衣服的感觉,没有真正体现出先穿什么再穿什么的流程。
good — 装饰模式
仿照装饰模式的基本实现代码对上面的代码进行修改,
Person类相当于ConcreteComponent类,Finery类相当于Decorator类。因为只有一个ConcreteComponent类而没有抽象的Component类,所以Decorator类可以是ConcreteComponent的一个子类。
修改结果如下:
import abc

# Person类
class Person(metaclass=abc.ABCMeta):
    def __init__(self, name):
        self._name = name
    def Show(self):
        print("装扮的",self.__name)

# 服饰类
class Finery(Person):
    def __init__(self):
        pass
    def Decorate(self, component):
        self._component = component
    def Show(self):
        if self._component is not None:
            self._component.Show()

class TShirts(Finery):
    def __init__(self):
        pass
    def Show(self):
        print('T恤衫')
        self._component.Show()

class BigTrouser(Finery):
    def __init__(self):
        pass
    def Show(self):
        print('垮裤')
        self._component.Show()

if __name__ == '__main__':
    person = Person('小菜')
    dtx = TShirts()
    kk = BigTrouser()
    # 装饰过程
    dtx.Decorate(person)
    kk.Decorate(dtx)
    kk.Show()
此版本从装饰过程中能明显体会到先穿什么再穿什么的流程。这种写法有效地把类中的核心职责和装饰功能分开,而且可以去除相关重复的装饰逻辑。每个装饰对象只需要关注自己的功能,无需关注如何被添加到对象中的。
python中装饰器VS装饰模式
看到这里,你可能会联想到Python自带的装饰器@语法糖,那我们谈一谈Python中的装饰器和设计模式中的装饰模式的联系与区别:
设计模式中的装饰模式:
- 是设计模式的一种。是一种编程思想,与编程语言无关。
- 是在不必改变原类文件和使用继承的情况下,动态地扩展一个对象的功能。它是通过创建一个包装对象,也就是装饰来包裹真实的对象。
Python装饰器:
- 是Python中的高级函数使用上的一种语法糖。
- 是对装饰模式的一个更宽泛的应用,不仅仅能够应用于类,也能应用于函数,类方法和类属性。
总结:
当系统需要新功能且新功能只是为了满足一些再特定情况下才会执行的特殊行为需要。可以采用装饰模式。
在Python有现成的语法糖支持装饰模式。用于常常被用于有切面需求的场景。较为经典的有插入日志、性能測试、事务处理等。
五、代理模式—-modify 被代理人属性,方法
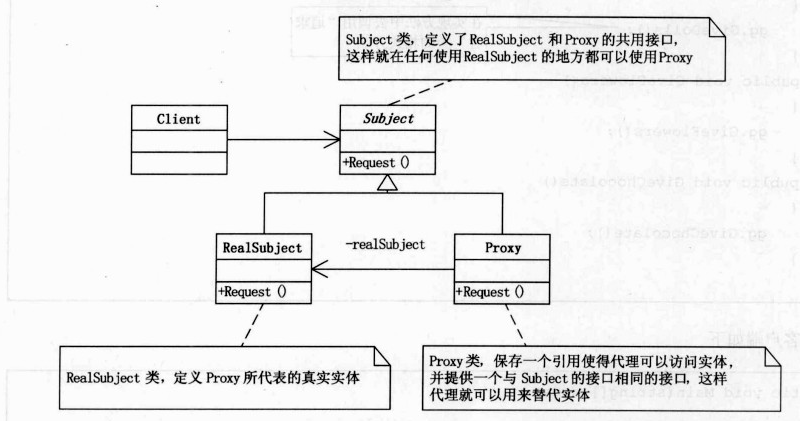
模式特点:为其他对象提供一种代理以控制对这个对象的访问。
在某些情况下,一个对象不适合或者不能直接引用另一个对象,而代理对象可以在客户端和目标对象之间起到中介的作用
代理模式分为:
- 静态代理
- 动态代理
由下面三部分组成:**抽象角色**:通过接口或抽象类声明真实角色实现的业务方法。**代理角色**:实现抽象角色,是真实角色的代理,通过真实角色的业务逻辑方法来实现抽象方法,并可以附加自己的操作。**真实角色**:实现抽象角色,定义真实角色所要实现的业务逻辑,供代理角色调用。
静态代理
在程序运行前,就已经确定代理类和委托类的关系的代理方式,被称为静态代理。
例:小明请律师进行诉讼
诉讼流程可抽象为ILawsuit类,如下:
import abc
class ILawsuit(metaclass=abc.ABCMeta):
    @abc.abstractmethod
    def submit(self):   # 提交申请
        pass
    @abc.abstractmethod
    def burden(self):   # 进行举证
        pass
    @abc.abstractmethod
    def defend(self):   # 开始辩护
        pass
    @abc.abstractmethod
    def finish(self):   # 诉讼完成
        pass
小明为具体诉讼人,可写为Litigant类,如下:
class Litigant(ILawsuit):       # 继承于ILawsuit
    def __init__(self, name):
        self.name = name
    def submit(self):
        print(f'{self.name}申请仲裁!')
    def burden(self):
        print('证据如下:XXXXXX')
    def defend(self):
        print('辩护过程:XXXXXX')
    def finish(self):
        print('诉讼结果如下:XXXXXX')
律师可写为Lawyer类,如下:
class Lawyer(ILawsuit):     # 继承于ILawsuit
    def __init__(self, litigant):
        self.litigant = litigant    # 具体诉讼人
    def submit(self):
        self.litigant.submit()
    def burden(self):
        self.litigant.burden()
    def defend(self):
        self.litigant.defend()
    def finish(self):
        self.litigant.finish()
诉讼过程,可表示为:
if __name__ == '__main__':
    xiaoming = Litigant('小明')
    lawyer = Lawyer(xiaoming)
    lawyer.submit()     # 律师提交诉讼申请
    lawyer.burden()     # 律师进行举证
    lawyer.defend()     # 律师替小明辩护
    lawyer.finish()     # 完成诉讼

# 输出结果
小明申请仲裁!
证据如下:XXXXXX
辩护过程:XXXXXX
诉讼结果如下:XXXXXX
静态代理的优缺点优点:业务类只需要关注业务逻辑本身,保证了业务类的重用性。缺点:代理对象的一个接口只服务于一种类型的对象,如果要代理的方法很多,势必要为每一种方法都进行代理,静态代理在程序规模稍大时就无法胜任了。
动态代理
代理类在程序运行时创建的代理方式被称为 动态代理。
也就是说,这种情况下,代理类并不是在代码中定义的,而是在运行时根据我们在代码中的指示动态生成的。
同样,我们举例说明:
通常我们调用REST API通常可能是这样的:
import urllib
import json
def fetch_resource(resource_id):
    opener = urllib.urlopen('http://remote.server/api/resource/' + resource_id)
    if opener.code != 200:
        raise RuntimeError('invalid return code!')
    content = opener.read()
    try:
        return json.loads(content)
    except ValueError:
        return content
对于每一个REST操作,都会有类似的代码。差别仅在于API的 url 和HTTP method(GET、POST、等)。此时,可以引入一个GetProxy,可以代替我们实现这些繁杂的工作。
import urllib
import json
class GetProxy(object):
    def __getattr__(self, api_path):
        def _rest_fetch(*paras):
            opener = urllib.urlopen('http://remote.server/api/' + api_path + '/' + '/'.join(resource_id))
            if opener.code != 200:
                raise RuntimeError('invalid return code!')
            content = opener.read()
            try:
                return json.loads(content)
            except ValueError:
                return content
        return _rest_fetch
此时,新的调用方式如下:
proxy = GetProxy()
# 调用API
proxy.user(123) # http://remote.server/api/user/123
proxy.resource('switch', 456) # http://remote.server/api/resource/switch/456
可见,通过动态代理,极大简化了调用过程。
相比于静态代理, 动态代理的优势在于可以很方便的对代理类的函数进行统一的处理,而不用修改每个代理类的函数。
六、原型模式

模式特点:如果对象的创建成本比较大,而同一个类的不同对象之间差别不大(大部分字段都相同),在这种情 况下,我们可以利用对已有对象(原型)进行复制(或者叫拷贝、克隆)的方式,来创建新对象,以 达到节省创建时间的目的。这种基于原型来创建对象的方式就叫作原型设计模式,简称原型模式
程序实例:从简历原型,生成新的简历
代码特点:简历类Resume提供的Clone()方法其实并不是真正的Clone,只是为已存在对象增加了一次引用。
Python为对象提供的copy模块中的copy方法和deepcopy方法已经实现了原型模式,但由于例子的层次较浅,二者看不出区别。
应用场景
创建对象包含的申请内存、给成员变量赋值这一过程,本身并不会花费太多时间,对于大部分业务系统来说,这点时间完全是可以忽略的。 但是,如果对象中的数据需要经过复杂的计算才能得到(比如排序、计算哈希值),或者需要从 RPC、网络、数据库、文件系统等非常慢速的 IO 中读取,这种情况下,我们就可以利用原型模式,从其他已有对象中直接拷贝得到,而不用每次在创建新对象的时候,都重复执行这些耗时的操作。
角色
- Prototype(抽象原型类):它是声明克隆方法的接口,是所有具体原型类的公共父类,可以是抽象类也可以是接口,甚至还可以是具体实现类。
- ConcretePrototype(具体原型类):它实现在抽象原型类中声明的克隆方法,在克隆方法中返回自己的一个克隆对象。
- Client(客户类):让一个原型对象克隆自身从而创建一个新的对象,在客户类中只需要直接实例化或通过工厂方法等方式创建一个原型对象,再通过调用该对象的克隆方法即可得到多个相同的对象。由于客户类针对抽象原型类Prototype编程,因此用户可以根据需要选择具体原型类,系统具有较好的可扩展性,增加或更换具体原型类都很方便。
example
通过个人信息类(Information)创建两个实例对象(zhangsan、lifei)。
抽象原型类如下:
class Information:
    """个人信息"""
    def __init__(self):
        self.name = None
        self.age = None
        self.height = None
        self.hobbies = list()
    def run(self):
        """自我介绍方法"""
        print("我叫{}: 年龄:{} 身高:{} 爱好: {}".format(self.name, self.age, self.height, self.hobbies))
具体原型类如下:
class Prototype:
    def __init__(self, obj):
        self.copy_object = obj()
    def clone(self, **attr):
        '''克隆对象'''
        obj = copy.deepcopy(self.copy_object)   # 深克隆
        obj.__dict__.update(attr)
        return obj
客户类
if __name__ == '__main__':
    people = Prototype(Information) # 实例化一个具体原型
    zhangsan = people.clone(name='张山', age="30", height='170cm', hobbies=['音乐', '读书'])
    zhangsan.run()
    lifei = people.clone(name='李飞', age="20", height='190cm', hobbies=['篮球', '羽毛球'])
    lifei.run()
输出结果:
我叫张山: 年龄:30 身高:170cm 爱好: ['音乐', '读书']
我叫李飞: 年龄:20 身高:190cm 爱好: ['篮球', '羽毛球']
也可以换一种写法,写成如下形式:
import copy
class Information:
    """个人信息"""
    def __init__(self):
        self.name = None
        self.age = None
        self.height = None
        self.hobbies = list()
    def run(self):
        """自我介绍方法"""
        print("我叫{}: 年龄:{} 身高:{} 爱好: {}".format(self.name, self.age, self.height, self.hobbies))

if __name__ == '__main__':
    zs = copy.deepcopy(Information())
    zs.name = '张三'
    zs.age = "30"
    zs.height = '170cm'
    zs.hobbies = ['音乐', '读书']
    zs.run()
    lf = copy.copy(Information())
    lf.name = '李飞'
    lf.age = '20'
    lf.height = '190cm'
    lf.hobbies = ['篮球', '羽毛球']
    lf.run()
deepcopy VS copy
深克隆与浅克隆
上面例子中使用的是深克隆(深拷贝)。其实还有浅克隆(浅拷贝)。
浅克隆(浅拷贝):
- 简单来说,在浅克隆中,当对象被复制时只复制它本身和其中包含的值类型的成员变量,而引用类型的成员对象并没有复制。
- 通过
copy.copy()实现。
深克隆(深拷贝):
- 简单来说,在深克隆中,除了对象本身被复制外,对象所包含的所有成员变量也将复制。
- 通过
copy.deepcopy()实现。
浅克隆可能出现以下问题。举例
>>> import copy
>>> a = [1, "2", ['a',None]]
>>> b = copy.copy(a)    # 浅克隆
>>> b
[1, '2', ['a', None]]
>>> c = copy.deepcopy(a)    # 深克隆
>>> c
[1, '2', ['a', None]]
b浅克隆a,c深克隆a。
如果a修改了列表中嵌套的子列表中的内容,则b也会跟着变动,而深克隆的c却不会发生变化。
>>> a[2].append(1)  #
>>> a
[1, '2', ['a', None, 1]]
>>> b               # 可以看出,b也被修改了
[1, '2', ['a', None, 1]]
>>> c
[1, '2', ['a', None]]
这是因为b只是克隆了a[2]指向的内存地址,而**a[2]**是一个列表,列表属于可变类型,因此,当a[2]发生变化时,b也跟着变动。这就是浅克隆的副作用;而c直接完全克隆了a中的值,并不会因为a发生变化而变化。
所以,一般建议使用深克隆
七、模板方法模式—- 最常用

模式特点:模板方法(Template Method)模式的定义如下:定义一个操作中的算法骨架,而将算法的一些步骤 延迟到子类中,使得子类可以不改变该算法结构的情况下重定义该算法的某些特定步骤。它是一种类 行为型模式。是实际开发中常用的设计模式。
程序实例:考试时使用同一种考卷(父类),不同学生上交自己填写的试卷(子类方法的实现)
应用场景
在面向对象程序设计过程中,常常会遇到这种情况:设计一个系统时知道了算法所需的关键步骤,而且确定了这些步骤的执行顺序,但某些步骤的具体实现还未知,或者说某些步骤的实现与具体的环境相关。
例如,去银行办理业务一般要经过以下4个流程:取号、排队、办理具体业务、对银行工作人员进行评分等,其中取号、排队和对银行工作人员进行评分的业务对每个客户是一样的,可以在父类中实现,但是办理具体业务却因人而异,它可能是存款、取款或者转账等,可以延迟到子类中实现。
优缺点
优点:
- 它封装了不变部分,扩展可变部分。它把认为是不变部分的算法封装到父类中实现,而把可变部分算法由子类继承实现,便于子类继续扩展。
- 它在父类中提取了公共的部分代码,便于代码复用。
- 部分方法是由子类实现的,因此子类可以通过扩展方式增加相应的功能,符合开闭原则。
缺点:
- 对每个不同的实现都需要定义一个子类,这会导致类的个数增加,系统更加庞大,设计也更加抽象。
- 父类中的抽象方法由子类实现,子类执行的结果会影响父类的结果,这导致一种反向的控制结构,它提高了代码阅读的难度。
角色
- 抽象类(Abstract Class):负责给出一个算法的轮廓和骨架。它由一个模板方法和若干个基本方法构成。这些方法的定义如下。
- 模板方法:定义了算法的骨架,按某种顺序调用其包含的基本方法。
- 基本方法:是整个算法中的一个步骤,包含以下几种类型。
- 抽象方法:在抽象类中申明,由具体子类实现。
- 具体方法:在抽象类中已经实现,在具体子类中可以继承或重写它。
- 具体子类(Concrete Class):实现抽象类中所定义的抽象方法,它们是一个顶级逻辑的一个组成步骤。
example
用模板方法模式实现出国留学手续设计程序。分析:出国留学手续一般经过以下流程:索取学校资料,提出入学申请,办理因私出国护照、出境卡和公证,申请签证,体检、订机票、准备行装,抵达目标学校等。其中有些业务对各个学校是一样的,但有些业务因学校不同而不同。
抽象类如下:
class StudyAbroad():
    def procedure(self):
        self.LookingForSchool() # 索取学校资料
        self.ApplyForEnrol()  # 入学申请
        self.ApplyForPassport()  # 办理因私出国护照、出境卡和公证
        self.ApplyForVisa()  # 申请签证
        self.ReadyGoAbroad()  # 体检、订机票、准备行装
        self.Arriving()  # 抵达
    def LookingForSchool(self):
        '''索取学校资料'''
        raise ValueError('LookingForSchool方法未实现')
    def ApplyForEnrol(self):
        '''入学申请'''
        raise ValueError('ApplyForEnrol方法未实现')
    def ApplyForPassport(self):
        '''办理因私出国护照、出境卡和公证'''
        print('三.办理因私出国护照、出境卡和公证:')
        print('  1)持录取通知书、本人户口簿或身份证向户口所在地公安机关申请办理因私出国护照和出境卡。')
        print('  2)办理出生公证书,学历、学位和成绩公证,经历证书,亲属关系公证,经济担保公证。')
    def ApplyForVisa(self):
        '''申请签证'''
        print('四.申请签证:')
        print('  1)准备申请国外境签证所需的各种资料,包括个人学历、成绩单、工作经历的证明;个人及家庭收入、资金和财产证明;家庭成员的关系证明等;')
        print('  2)向拟留学国家驻华使(领)馆申请入境签证。申请时需按要求填写有关表格,递交必需的证明材料,缴纳签证。有的国家(比如美国、英国、加拿大等)在申请签证时会要求申请人前往使(领)馆进行面试。')
    def ReadyGoAbroad(self):
        '''体检、订机票、准备行装'''
        print('五.体检、订机票、准备行装:')
        print('  1)进行身体检查、免疫检查和接种传染病疫苗;')
        print('  2)确定机票时间、航班和转机地点。')
    def Arriving(self):
        '''抵达'''
        raise ValueError('Arriving方法未实现')
procedure已经事先约定好了出国留学的流程顺序。流程中有以下几个部分是通用的:
- 办理因私出国护照、出境卡和公证
- 申请签证
- 体检、订机票、准备行装
以下几个部分是不同学校有不同的细节:
- 索取学校资料
- 入学申请
- 抵达
具体子类:美国留学
class StudyInAmerica(StudyAbroad):
    def LookingForSchool(self):
        '''索取学校资料'''
        print('一.索取学校以下资料:')
        print('  1)对留学意向国家的政治、经济、文化背景和教育体制、学术水平进行较为全面的了解;')
        print('  2)全面了解和掌握国外学校的情况,包括历史、学费、学制、专业、师资配备、教学设施、学术地位、学生人数等;')
        print('  3)了解该学校的住宿、交通、医疗保险情况如何;')
    def ApplyForEnrol(self):
        '''入学申请'''
        print('二.入学申请:')
        print('  1)填写报名表;')
        print('  2)将报名表、个人学历证明、最近的学习成绩单、推荐信、个人简历、托福或雅思语言考试成绩单等资料寄往所申请的学校;')
    def Arriving(self):
        '''抵达'''
        print('六.抵达目标学校:')
        print('  1)安排住宿;')
        print('  2)了解校园及周边环境。')
在具体子类中,只需要实现各个地方独有的细节即可。
调用:
if __name__ == '__main__':
    xiaoming = StudyInAmerica()
    xiaoming.procedure()
八、外观模式——内部排列组合

模式特点:为一组调用提供一致的接口。
程序实例:接口将几种调用分别组合成为两组,用户通过接口调用其中的一组。
代码特点:无
class SubSystemOne:
    def MethodOne(self):
        print "SubSysOne"

class SubSystemTwo:
    def MethodTwo(self):
        print "SubSysTwo"

class SubSystemThree:
    def MethodThree(self):
        print "SubSysThree"

class SubSystemFour:
    def MethodFour(self):
        print "SubSysFour"


class Facade:
    def __init__(self):
        self.one = SubSystemOne()
        self.two = SubSystemTwo()
        self.three = SubSystemThree()
        self.four = SubSystemFour()
    def MethodA(self):
        print "MethodA"
        self.one.MethodOne()
        self.two.MethodTwo()
        self.four.MethodFour()
    def MethodB(self):
        print "MethodB"
        self.two.MethodTwo()
        self.three.MethodThree()

if __name__ == "__main__":
    facade = Facade()
    facade.MethodA()
    facade.MethodB()
九、建造者模式
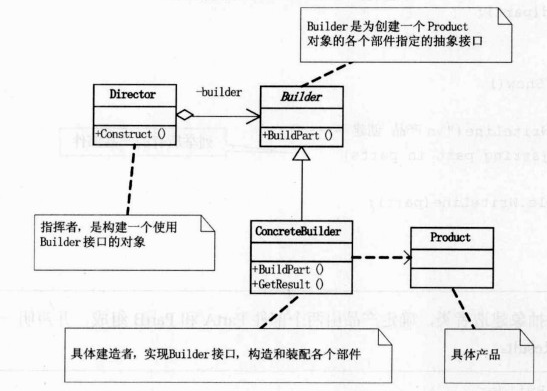
模式特点:将一个复杂对象的构建(Director)与它的表示(Builder)分离,使得同样的构建过程可以创建不同的表示(ConcreteBuilder)。
程序实例:“画”出一个四肢健全(头身手腿)的小人
class Person:
    def CreateHead(self):
        pass
    def CreateHand(self):
        pass
    def CreateBody(self):
        pass
    def CreateFoot(self):
        pass

class ThinPerson(Person):
    def CreateHead(self):
        print "thin head"
    def CreateHand(self):
        print "thin hand"
    def CreateBody(self):
        print "thin body"
    def CreateFoot(self):
        print "thin foot"

class ThickPerson(Person):
    def CreateHead(self):
        print "thick head"
    def CreateHand(self):
        print "thick hand"
    def CreateBody(self):
        print "thick body"
    def CreateFoot(self):
        print "thick foot"

class Director:
    def __init__(self,temp):
        self.p = temp
    def Create(self):
        self.p.CreateHead()
        self.p.CreateBody()
        self.p.CreateHand()
        self.p.CreateFoot()

if __name__ == "__main__":
    p = ThickPerson()
    d = Director(p)
    d.Create()
十、观察者模式——多个对象监听,通知

模式特点:定义了一种一对多的关系,让多个观察对象同时监听一个主题对象,当主题对象状态发生变化时会通知所有观察者。
程序实例:公司里有两种上班时趁老板不在时偷懒的员工:看NBA的和看股票行情的,并且事先让老板秘书当老板出现时通知他们继续做手头上的工作。
class Observer:
    def __init__(self,strname,strsub):
        self.name = strname
        self.sub = strsub
    def Update(self):
        pass

class StockObserver(Observer):
    #no need to rewrite __init__()
    def Update(self):
        print "%s:%s,stop watching Stock and go on work!" %(self.name,self.sub.action)

class NBAObserver(Observer):
    def Update(self):
        print "%s:%s,stop watching NBA and go on work!" %(self.name,self.sub.action)

class SecretaryBase:
    def __init__(self):
        self.observers = []
    def Attach(self,new_observer):
        pass
    def Notify(self):
        pass

class Secretary(SecretaryBase):
    def Attach(self,new_observer):
        self.observers.append(new_observer)
    def Notify(self):
        for p in self.observers:
            p.Update()

if __name__ == "__main__":
    p = Secretary()
    s1 = StockObserver("xh",p)
    s2 = NBAObserver("wyt",p)
    p.Attach(s1);
    p.Attach(s2);
    p.action = "WARNING:BOSS ";
    p.Notify()
十二、状态模式 — 类似 状态机

模式特点:当一个对象的内在状态改变时允许改变其行为,这个对象看起来像是改变了其类。
程序实例:描述一个程序员的工作状态,当需要改变状态时发生改变,不同状态下的方法实现不同
class State:
    def WirteProgram(self):
        pass

class Work:
    def __init__(self):
        self.hour = 9
        self.current = ForenoonState()
    def SetState(self,temp):
        self.current = temp
    def WriteProgram(self):
        self.current.WriteProgram(self)

class NoonState(State):
    def WriteProgram(self,w):
        print "noon working"
        if (w.hour<13):
            print "fun."
        else:
            print "need to rest."

class ForenoonState(State):
    def WriteProgram(self,w):
        if (w.hour<12):
            print "morning working"
            print "energetic"
        else:
            w.SetState(NoonState())
            w.WriteProgram()

if __name__ == "__main__":
    mywork = Work()
    mywork.hour = 9
    mywork.WriteProgram()
    mywork.hour =14
    mywork.WriteProgram()
十三、适配器模式
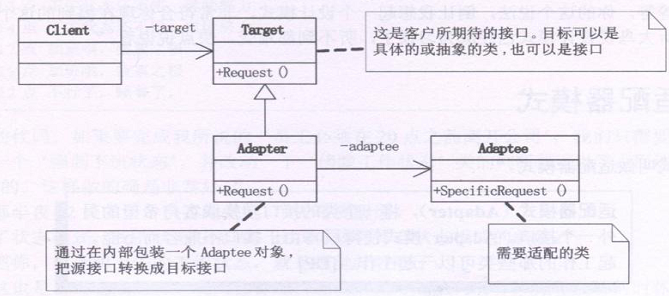
模式特点:将一个类的接口转换成为客户希望的另外一个接口。
程序实例:用户通过适配器使用一个类的方法。
class Target:
    def Request():
        print "common request."

class Adaptee(Target):
    def SpecificRequest(self):
        print "specific request."

class Adapter(Target):
    def __init__(self,ada):
        self.adaptee = ada
    def Request(self):
        self.adaptee.SpecificRequest()

if __name__ == "__main__":
    adaptee = Adaptee()
    adapter = Adapter(adaptee)
    adapter.Request()
十四、备忘录模式—-外部保存,恢复

模式特点:在不破坏封装性的前提下捕获一个对象的内部状态,并在该对象之外保存这个状态,以后可以将对象恢复到这个状态。
程序实例:将Originator对象的状态封装成Memo对象保存在Caretaker内
class Originator:
    def __init__(self):
        self.state = ""
    def Show(self):
        print self.state
    def CreateMemo(self):
        return Memo(self.state)
    def SetMemo(self,memo):
        self.state = memo.state

class Memo:
    state= ""
    def __init__(self,ts):
        self.state = ts

class Caretaker:
    memo = ""

if __name__ == "__main__":
    on = Originator()
    on.state = "on"
    on.Show()
    c = Caretaker()
    c.memo=on.CreateMemo()
    on.state="off"
    on.Show()
    on.SetMemo(c.memo)
    on.Show()
十五、组合模式 —-树形,部分—整体

模式特点:将对象组合成树形结构,以表示“部分-整体”的层次关系。整体和单个组件使用方式具有一致性。
程序实例:公司人员的组织结构(树形)
class Component:
    def __init__(self,strName):
        self.m_strName = strName
    def Add(self,com):
        pass
    def Display(self,nDepth):
        pass

class Leaf(Component):
    def Add(self,com):
        print("leaf can't add")
    def Display(self,nDepth):
        strtemp = ""
        for i in range(nDepth):
            strtemp=strtemp+"-"
        strtemp=strtemp+self.m_strName
        print(strtemp)

class Composite(Component):
    def __init__(self,strName):
        self.m_strName = strName
        self.c = []
    def Add(self,com):
        self.c.append(com)
    def Display(self,nDepth):
        strtemp=""
        for i in range(nDepth):
            strtemp=strtemp+"-"
        strtemp=strtemp+self.m_strName
        print(strtemp)
        for com in self.c:
            com.Display(nDepth+2)

if __name__ == "__main__":
    p = Composite("Wong")
    p.Add(Leaf("Lee"))
    p.Add(Leaf("Zhao"))
    p.Display(1)
"""
-Wong
---Lee
---Zhao
"""
    p1 = Composite("Wu")
    p1.Add(Leaf("San"))
    p.Add(p1)
    p.Display(1);
"""
-Wong
---Lee
---Zhao
---Wu
-----San
"""
十六、迭代器模式—for in

模式特点:提供方法顺序访问一个聚合对象中各元素,而又不暴露该对象的内部表示
说明:这个模式没有写代码实现,原因是使用Python的列表和for … in list就能够完成不同类型对象聚合的迭代功能了。
十七、单例模式

模式特点:保证类仅有一个实例,并提供一个访问它的全局访问点。
说明: 为了实现单例模式费了不少工夫,后来查到一篇博文对此有很详细的介绍,而且实现方式也很丰富,通过对代码的学习可以了解更多Python的用法。以下的代码出自GhostFromHeaven的专栏,地址:http://blog.csdn.net/ghostfromheaven/article/details/7671853。不过正如其作者在Python单例模式终极版所说:
我要问的是,Python真的需要单例模式吗?我指像其他编程语言中的单例模式。 答案是:不需要! 因为,Python有模块(module),最pythonic的单例典范。 模块在在一个应用程序中只有一份,它本身就是单例的,将你所需要的属性和方法,直接暴露在模块中变成模块的全局变量和方法即可!
复制代码
#-*- encoding=utf-8 -*-
print '----------------------方法1--------------------------'
#方法1,实现__new__方法
#并在将一个类的实例绑定到类变量_instance上,
#如果cls._instance为None说明该类还没有实例化过,实例化该类,并返回
#如果cls._instance不为None,直接返回cls._instance
class Singleton(object):
    def __new__(cls, *args, **kw):
        if not hasattr(cls, '_instance'):
            orig = super(Singleton, cls)
            cls._instance = orig.__new__(cls, *args, **kw)
        return cls._instance

class MyClass(Singleton):
    a = 1

one = MyClass()
two = MyClass()

two.a = 3
print one.a
#3
#one和two完全相同,可以用id(), ==, is检测
print id(one)
#29097904
print id(two)
#29097904
print one == two
#True
print one is two
#True

print '----------------------方法2--------------------------'
#方法2,共享属性;所谓单例就是所有引用(实例、对象)拥有相同的状态(属性)和行为(方法)
#同一个类的所有实例天然拥有相同的行为(方法),
#只需要保证同一个类的所有实例具有相同的状态(属性)即可
#所有实例共享属性的最简单最直接的方法就是__dict__属性指向(引用)同一个字典(dict)
#可参看:http://code.activestate.com/recipes/66531/
class Borg(object):
    _state = {}
    def __new__(cls, *args, **kw):
        ob = super(Borg, cls).__new__(cls, *args, **kw)
        ob.__dict__ = cls._state
        return ob

class MyClass2(Borg):
    a = 1

one = MyClass2()
two = MyClass2()

#one和two是两个不同的对象,id, ==, is对比结果可看出
two.a = 3
print one.a
#3
print id(one)
#28873680
print id(two)
#28873712
print one == two
#False
print one is two
#False
#但是one和two具有相同的(同一个__dict__属性),见:
print id(one.__dict__)
#30104000
print id(two.__dict__)
#30104000

print '----------------------方法3--------------------------'
#方法3:本质上是方法1的升级(或者说高级)版
#使用__metaclass__(元类)的高级python用法
class Singleton2(type):
    def __init__(cls, name, bases, dict):
        super(Singleton2, cls).__init__(name, bases, dict)
        cls._instance = None
    def __call__(cls, *args, **kw):
        if cls._instance is None:
            cls._instance = super(Singleton2, cls).__call__(*args, **kw)
        return cls._instance

class MyClass3(object):
    __metaclass__ = Singleton2

one = MyClass3()
two = MyClass3()

two.a = 3
print one.a
#3
print id(one)
#31495472
print id(two)
#31495472
print one == two
#True
print one is two
#True

print '----------------------方法4--------------------------'
#方法4:也是方法1的升级(高级)版本,
#使用装饰器(decorator),
#这是一种更pythonic,更elegant的方法,
#单例类本身根本不知道自己是单例的,因为他本身(自己的代码)并不是单例的
def singleton(cls, *args, **kw):
    instances = {}
    def _singleton():
        if cls not in instances:
            instances[cls] = cls(*args, **kw)
        return instances[cls]
    return _singleton

@singleton
class MyClass4(object):
    a = 1
    def __init__(self, x=0):
        self.x = x

one = MyClass4()
two = MyClass4()

two.a = 3
print one.a
#3
print id(one)
#29660784
print id(two)
#29660784
print one == two
#True
print one is two
#True
one.x = 1
print one.x
#1
print two.x
#1
十八、桥接模式—抽象与实现分离

模式特点:将抽象部分与它的实现部分分离,使它们都可以独立地变化。
程序实例:两种品牌的手机,要求它们都可以运行游戏和通讯录两个软件,而不是为每个品牌的手机都独立编写不同的软件。
class HandsetSoft(object):
    def Run(self):
        pass

class HandsetGame(HandsetSoft):
    def Run(self):
        print("Game")

class HandsetAddressList(HandsetSoft):
    def Run(self):
        print("Address List")

class HandsetBrand(object):
    def __init__(self):
        self.m_soft = None
    def SetHandsetSoft(self,temp):
        self.m_soft= temp
    def Run(self):
        pass

class HandsetBrandM(HandsetBrand):
    def Run(self):
        if not (self.m_soft == None):
            print("BrandM")
            self.m_soft.Run()

class HandsetBrandN(HandsetBrand):
    def Run(self):
        if not (self.m_soft == None):
            print("BrandN")
            self.m_soft.Run()

if __name__ == "__main__":
    brand = HandsetBrandM()
    brand.SetHandsetSoft(HandsetGame())
    brand.Run()
    brand.SetHandsetSoft(HandsetAddressList())
    brand.Run()
十九、命令模式— 请求封装成对象, 参数化客户
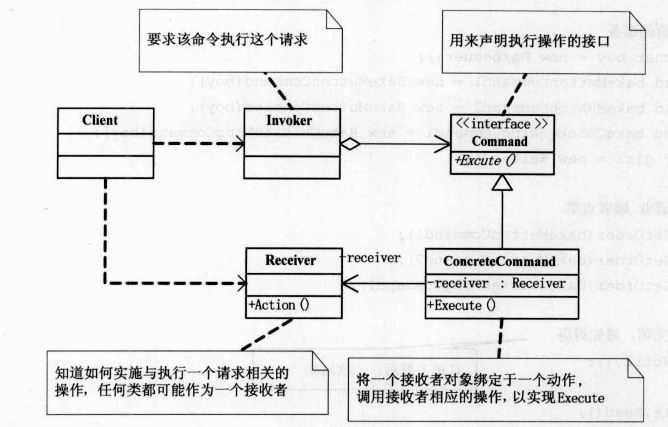
模式特点:将请求封装成对象,从而使可用不同的请求对客户进行参数化;对请求排队或记录请求日志,以及支持可撤消的操作。
程序实例:烧烤店有两种食物,羊肉串和鸡翅。客户向服务员点单,服务员将点好的单告诉大厨,由大厨进行烹饪。
代码特点:注意在遍历列表时不要用注释的方式删除,否则会出现bug。bug示例程序附在后面,我认为这是因为remove打乱了for迭代查询列表的顺序导致的。
class Barbecuer:
    def MakeMutton(self):
        print "Mutton"
    def MakeChickenWing(self):
        print "Chicken Wing"

class Command:
    def __init__(self,temp):
        self.receiver=temp
    def ExecuteCmd(self):
        pass

class BakeMuttonCmd(Command):
    def ExecuteCmd(self):
        self.receiver.MakeMutton()

class ChickenWingCmd(Command):
    def ExecuteCmd(self):
        self.receiver.MakeChickenWing()

class Waiter:
    def __init__(self):
        self.order =[]
    def SetCmd(self,command):
        self.order.append(command)
        print "Add Order"
    def Notify(self):
        for cmd in self.order:
            #self.order.remove(cmd)
            #lead to a bug
            cmd.ExecuteCmd()


if __name__ == "__main__":
    barbecuer=Barbecuer()
    cmd=BakeMuttonCmd(barbecuer)
    cmd2=ChickenWingCmd(barbecuer)
    girl=Waiter()
    girl.SetCmd(cmd)
    girl.SetCmd(cmd2)
    girl.Notify()
在for中remove会导致bug的展示代码:
c=[0,1,2,3]
for i in c:
    print i
    c.remove(i)
#output:
#0
#2
二十、职责链模式
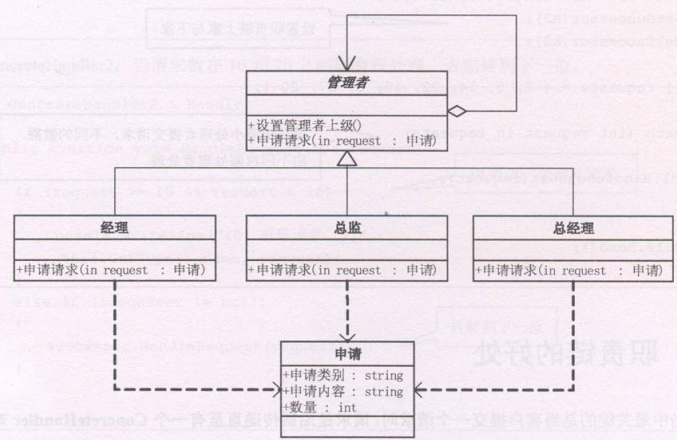
模式特点:使多个对象都有机会处理请求,从而避免发送者和接收者的耦合关系。将对象连成链并沿着这条链传递请求直到被处理。
程序实例:请假和加薪等请求发给上级,如果上级无权决定,那么递交给上级的上级。
class Request:
    def __init__(self,tcontent,tnum):
        self.content = tcontent
        self.num = tnum

class Manager:
    def __init__(self,temp):
        self.name = temp
    def SetSuccessor(self,temp):
        self.manager = temp
    def GetRequest(self,req):
        pass

class CommonManager(Manager):
    def GetRequest(self,req):
        if(req.num>=0 and req.num<10):
            print("%s handled %d request." % (self.name,req.num))
        else:
            self.manager.GetRequest(req)

class MajorDomo(Manager):
    def GetRequest(self,req):
        if(req.num>=10):
            print("%s handled %d request." % (self.name,req.num))

if __name__ == "__main__":
    common = CommonManager("Zhang")
    major = MajorDomo("Lee")
    common.SetSuccessor(major)
    req = Request("rest",33)
    common.GetRequest(req)         ## Lee handled 33 request.
    req2 = Request("salary",3)
    common.GetRequest(req2)        ## Zhang handled 3 request.
二十一、中介者模式
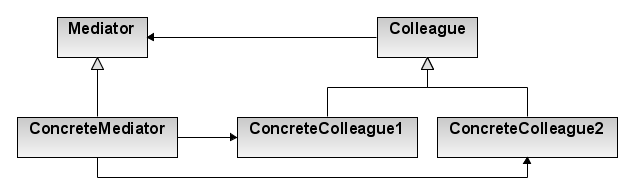
(图源:https://zh.wikipedia.org/zh-hans/%E4%B8%AD%E4%BB%8B%E8%80%85%E6%A8%A1%E5%BC%8F)
**模式特点:用一个对象来封装一系列的对象交互,中介者使各对象不需要显示地相互引用,从而使耦合松散,而且可以独立地改变它们之间的交互。
程序实例:两个对象通过中介者相互通信
class Mediator:
    def Send(self,message,col):
        pass

class Colleague:
    def __init__(self,temp):
        self.mediator = temp

class Colleague1(Colleague):
    def Send(self,message):
        self.mediator.Send(message,self)
    def Notify(self,message):
        print("Colleague1 get a message:%s" % message)

class Colleague2(Colleague):
    def Send(self,message):
        self.mediator.Send(message,self)
    def Notify(self,message):
        print("Colleague2 get a message:%s" % message)

class ConcreteMediator(Mediator):
    def Send(self,message,col):
        if(col==col1):
            col2.Notify(message)
        else:
            col1.Notify(message)

if __name__ == "__main__":
    m =ConcreteMediator()
    col1 = Colleague1(m)
    col2 = Colleague1(m)
    m.col1=col1
    m.col2=col2
    col1.Send("How are you?");
    col2.Send("Fine.");
二十二、享元模式—共享
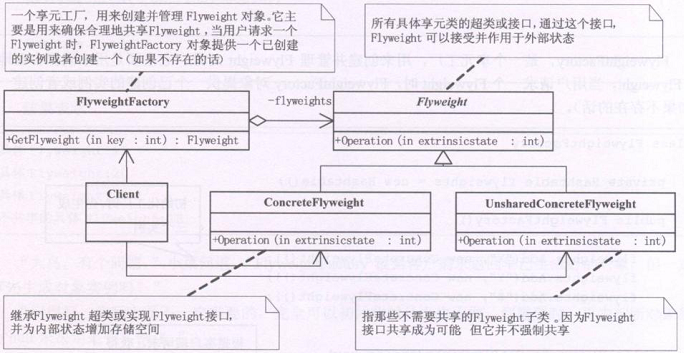
模式特点:运用共享技术有效地支持大量细粒度的对象。
程序实例:一个网站工厂,根据用户请求的类别返回相应类别的网站。如果这种类别的网站已经在服务器上,那 么返回这种网站并加上不同用户的独特的数据;如果没有,那么生成一个。
代码特点:为了展示每种网站的由用户请求的次数,这里为它们建立了一个引用次数的字典。
之所以不用Python的sys模块中的sys.getrefcount()方法统计引用计数是因为有的对象可能在别处被隐 式的引用,从而增加了引用计数
import sys

class WebSite:
    def Use(self):
        pass

class ConcreteWebSite(WebSite):
    def __init__(self,strName):
        self.name = strName
    def Use(self,user):
        print("Website type:%s,user:%s" % (self.name,user))

class UnShareWebSite(WebSite):
    def __init__(self,strName):
        self.name = strName
    def Use(self,user):
        print("UnShare Website type:%s,user:%s" % (self.name, user))

class WebFactory:
    def __init__(self):
        test = ConcreteWebSite("test")
        self.webtype ={"test":test}
        self.count = {"test":0}
    def GetWeb(self,webtype):
        if webtype not in self.webtype:
            temp = ConcreteWebSite(webtype)
            self.webtype[webtype] = temp
            self.count[webtype] =1
        else:
            temp = self.webtype[webtype]
            self.count[webtype] = self.count[webtype]+1
        return temp
    def GetCount(self):
        for key in self.webtype:
            #print "type: %s, count:%d" %(key,sys.getrefcount(self.webtype[key]))
            print("type: %s, count:%d " % (key,self.count[key]))

if __name__ == "__main__":
    f = WebFactory()
    ws=f.GetWeb("blog")
    ws.Use("Lee")        # Website type:blog,user:Lee
    ws2=f.GetWeb("show")
    ws2.Use("Jack")        # Website type:show,user:Jack
    ws3=f.GetWeb("blog")
    ws3.Use("Chen")        # Website type:blog,user:Chen
    ws4=UnShareWebSite("TEST")
    ws4.Use("Mr.Q")        # UnShare Website type:TEST,user:Mr.Q
    print(f.webtype)    # {'test': <__main__.ConcreteWebSite object at 0x7f24a6296438>, 'blog': <__main__.ConcreteWebSite object at 0x7f24a62965c0>, 'show': <__main__.ConcreteWebSite object at 0x7f24a62966d8>}
    f.GetCount()

type: test, count:0
type: blog, count:2
type: show, count:1
二十三、解释器模式
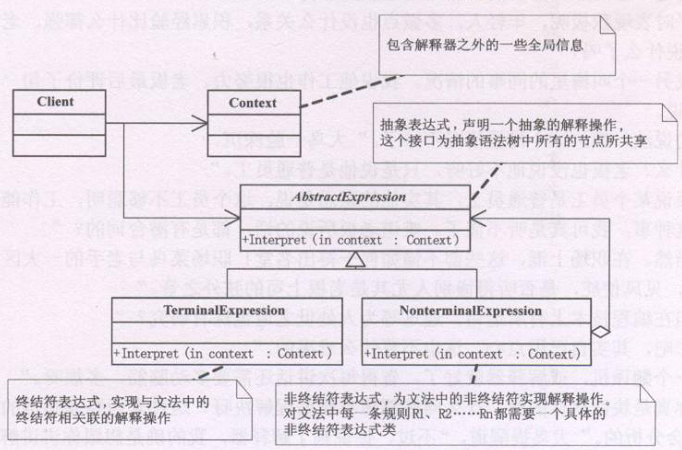
模式特点:给定一个语言,定义它的文法的一种表示,并定义一个解释器,这个解释器使用该表示来解释语言中的句子。
程序实例:(只是模式特点的最简单示范)
class Context:
    def __init__(self):
        self.input=""
        self.output=""

class AbstractExpression:
    def Interpret(self,context):
        pass

class Expression(AbstractExpression):
    def Interpret(self,context):
        print "terminal interpret"

class NonterminalExpression(AbstractExpression):
    def Interpret(self,context):
        print "Nonterminal interpret"

if __name__ == "__main__":
    context= ""
    c = []
    c = c + [Expression()]
    c = c + [NonterminalExpression()]
    c = c + [Expression()]
    c = c + [Expression()]
    for a in c:
        a.Interpret(context)
二十四、访问者模式

模式特点:表示一个作用于某对象结构中的各元素的操作。它使你可以在不改变各元素的类的前提下定义作用于这些元素的新操作。
程序实例:对于男人和女人(接受访问者的元素,ObjectStructure用于穷举这些元素),不同的遭遇(具体的访问者)引发两种对象的不同行为。
# -*- coding: UTF-8 -*-
class Person:
    def Accept(self,visitor):
        pass

class Man(Person):
    def Accept(self,visitor):
        visitor.GetManConclusion(self)

class Woman(Person):
    def Accept(self,visitor):
        visitor.GetWomanConclusion(self)

class Action:
    def GetManConclusion(self,concreteElementA):
        pass
    def GetWomanConclusion(self,concreteElementB):
        pass

class Success(Action):
    def GetManConclusion(self,concreteElementA):
        print("男人成功时,背后有个伟大的女人")
    def GetWomanConclusion(self,concreteElementB):
        print("女人成功时,背后有个不成功的男人")

class Failure(Action):
    def GetManConclusion(self,concreteElementA):
        print("男人失败时,闷头喝酒,谁也不用劝")
    def GetWomanConclusion(self,concreteElementB):
        print("女人失败时,眼泪汪汪,谁也劝不了")


class ObjectStructure:
    def __init__(self):
        self.plist=[]
    def Add(self,p):
        self.plist=self.plist+[p]
    def Display(self,act):
        for p in self.plist:
            p.Accept(act)

if __name__ == "__main__":
    os = ObjectStructure()
    os.Add(Man())
    os.Add(Woman())
    sc = Success()
    os.Display(sc)
    fl = Failure()
    os.Display(fl)

男人成功时,背后有个伟大的女人
女人成功时,背后有个不成功的男人

男人失败时,闷头喝酒,谁也不用劝
女人失败时,眼泪汪汪,谁也劝不了
end

若有收获,就点个赞吧
0 人点赞
