8.1 haddr的covergroup
在之前搭建环境的过程中,我们的cov是继承于subsriber的,subscriber类里面已经声明了uvm_analysis_import,用来接收来自monitor的事物,所以在cov中我们仅需要拿到传输的事物即可,也就是说我们需要实现write方法。
:::danger
【注意】
cov在拿事物的过程中,一定需要注意的是不能直接从mointor中拿事物,必须使用TLM_port来拿这样的一些事务,原因就是不知道monitor在环境中的哪个部分,而且我们的cov有可能从多个monitor中拿取事物,所以必须遵守一定的准则。
:::
:::info
首先确定一下我们需要收集覆盖率的几个内容:
- 对addr进行覆盖率的收集(有一定的划分依据):
- 首先需要确定能够对addr的边界进行覆盖,这个边界的值之前我们在使用的时候已经声明在cfg中了,subscriber也拿到了cfg这个变量,所以可以直接进行使用而不需要我们单独设定值;
- 对于addr进行收集的另外一个关键就是:我们必须确定地址是对齐的,所以可以使用连接运算符来将它们与低两位进行拼接;或者我们可以使用wildcard bins来设置不care的位数;
- 另外是对addr的一个byte的访问:
- 在地址非对齐的测试(ahb_ram_haddr_word_unaligned_test)中我们发现,对地址的访问可能是连续的:也就是00,01,02,03,对于00来说,可能给byte访问,也可能给word和halfword访问,所以它并不典型,我们选取更加典型的01和03来进行地址的收集。
- half_word比较典型的就是使用02进行访问;
- 此外我们还可以对越界的地址进行收集,使用地址的最后一位来进行越界的索引即可;
- 最后我们还需要对合法的地址范围进行收集
:::
``systemverilogifndef AHB_RAM_COV_SV `define AHB_RAM_COV_SV
class ahb_ram_cov extends ahb_ram_subscriber;
`uvm_component_utils(ahb_ram_cov)
// Covergroup definition below // T1 ahb_ram_addr coverrage //
covergroup ahbram_addr_cg with function sample(bit [31:0] addr); option.name = “T1 ahb_ram_addr coverage”; ADDR : coverpoint addr { wildcard bins addr_start = {{cfg.addr_start[31:2], 2’b??}}; wildcard bins addr_end = {{cfg.addr_end[31:2], 2’b??}}; wildcard bins addr_byte_acc_b01 = {{30’h????????, 2’b01}}; wildcard bins addrbyte_acc_b11 = {{30’h????????, 2’b11}}; wildcard bins addrhalf_word_acc_b10 = {{30’h????????, 2’b10}}; wildcard bins addrword_acc_b00 = {{30’h????????, 2’b00}}; bins addr_out_of_range = {{cfg.addr_end + 1, 32’hFFFF_FFFF}}; bins legal_addr = {[cfg.addr_start:cfg.addr_end]}; } endgroup
function new (string name = “ahb_ram_cov”, uvm_component parent); super.new(name, parent); ahb_ram_addr_cg = new(); endfunction
function void build_phase(uvm_phase phase); super.build_phase(phase); endfunction
task do_listen_events(); endtask
virtual function void write(ahb_transaction tr); ahb_ram_addr_cg.sample(tr.addr); endfunction
endclass
`endif // AHB_RAM_COV_SV
<a name="Dek2F"></a>## 【调试及结果】我们在之前的测试中有关于diff_addr的测试,因此在这里我们可以直接对它进行调用<br />> 调试以后发现报错是Null object access:::info1. 首先我们切换到object_uvm_components中观察层次构建到哪一步了:::> 可以看到ahb_master和virt_sqr都已经构建成功了:> virt_sqr下面也有了fifo和tlm端口;但是ahb_master中还没有构建出任何内容,说明可能是在connect_phase中出现了问题。:::info我们在代码中端口连接的地方设置断点,然后restart:::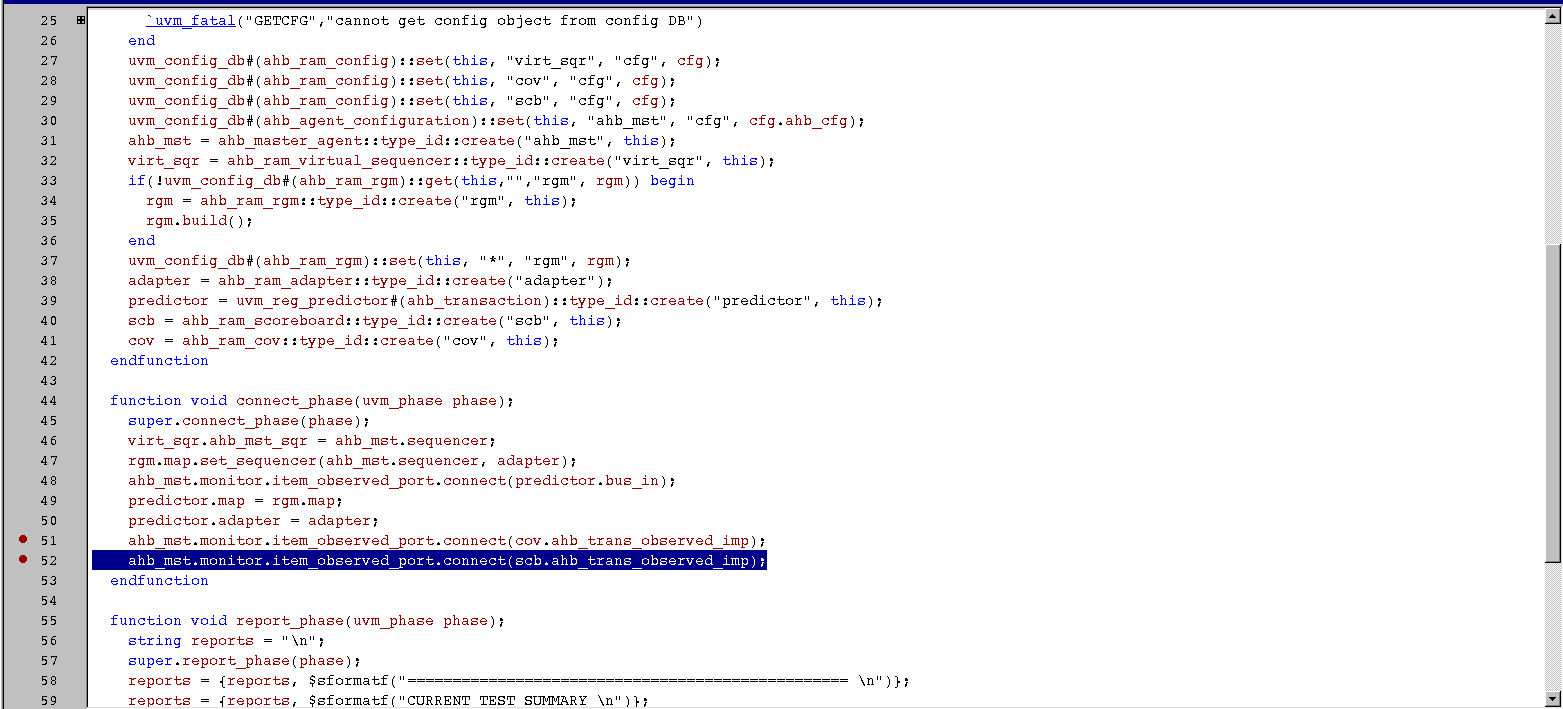> 结果还是报错,那说明在connnect_phase的前一步build_phase的时候句柄就悬空了。:::info2. 我们找到build_phase中的scb和cov,结果发现做cov的时候报错,因此我们进一步找到cov中的new函数的位置:::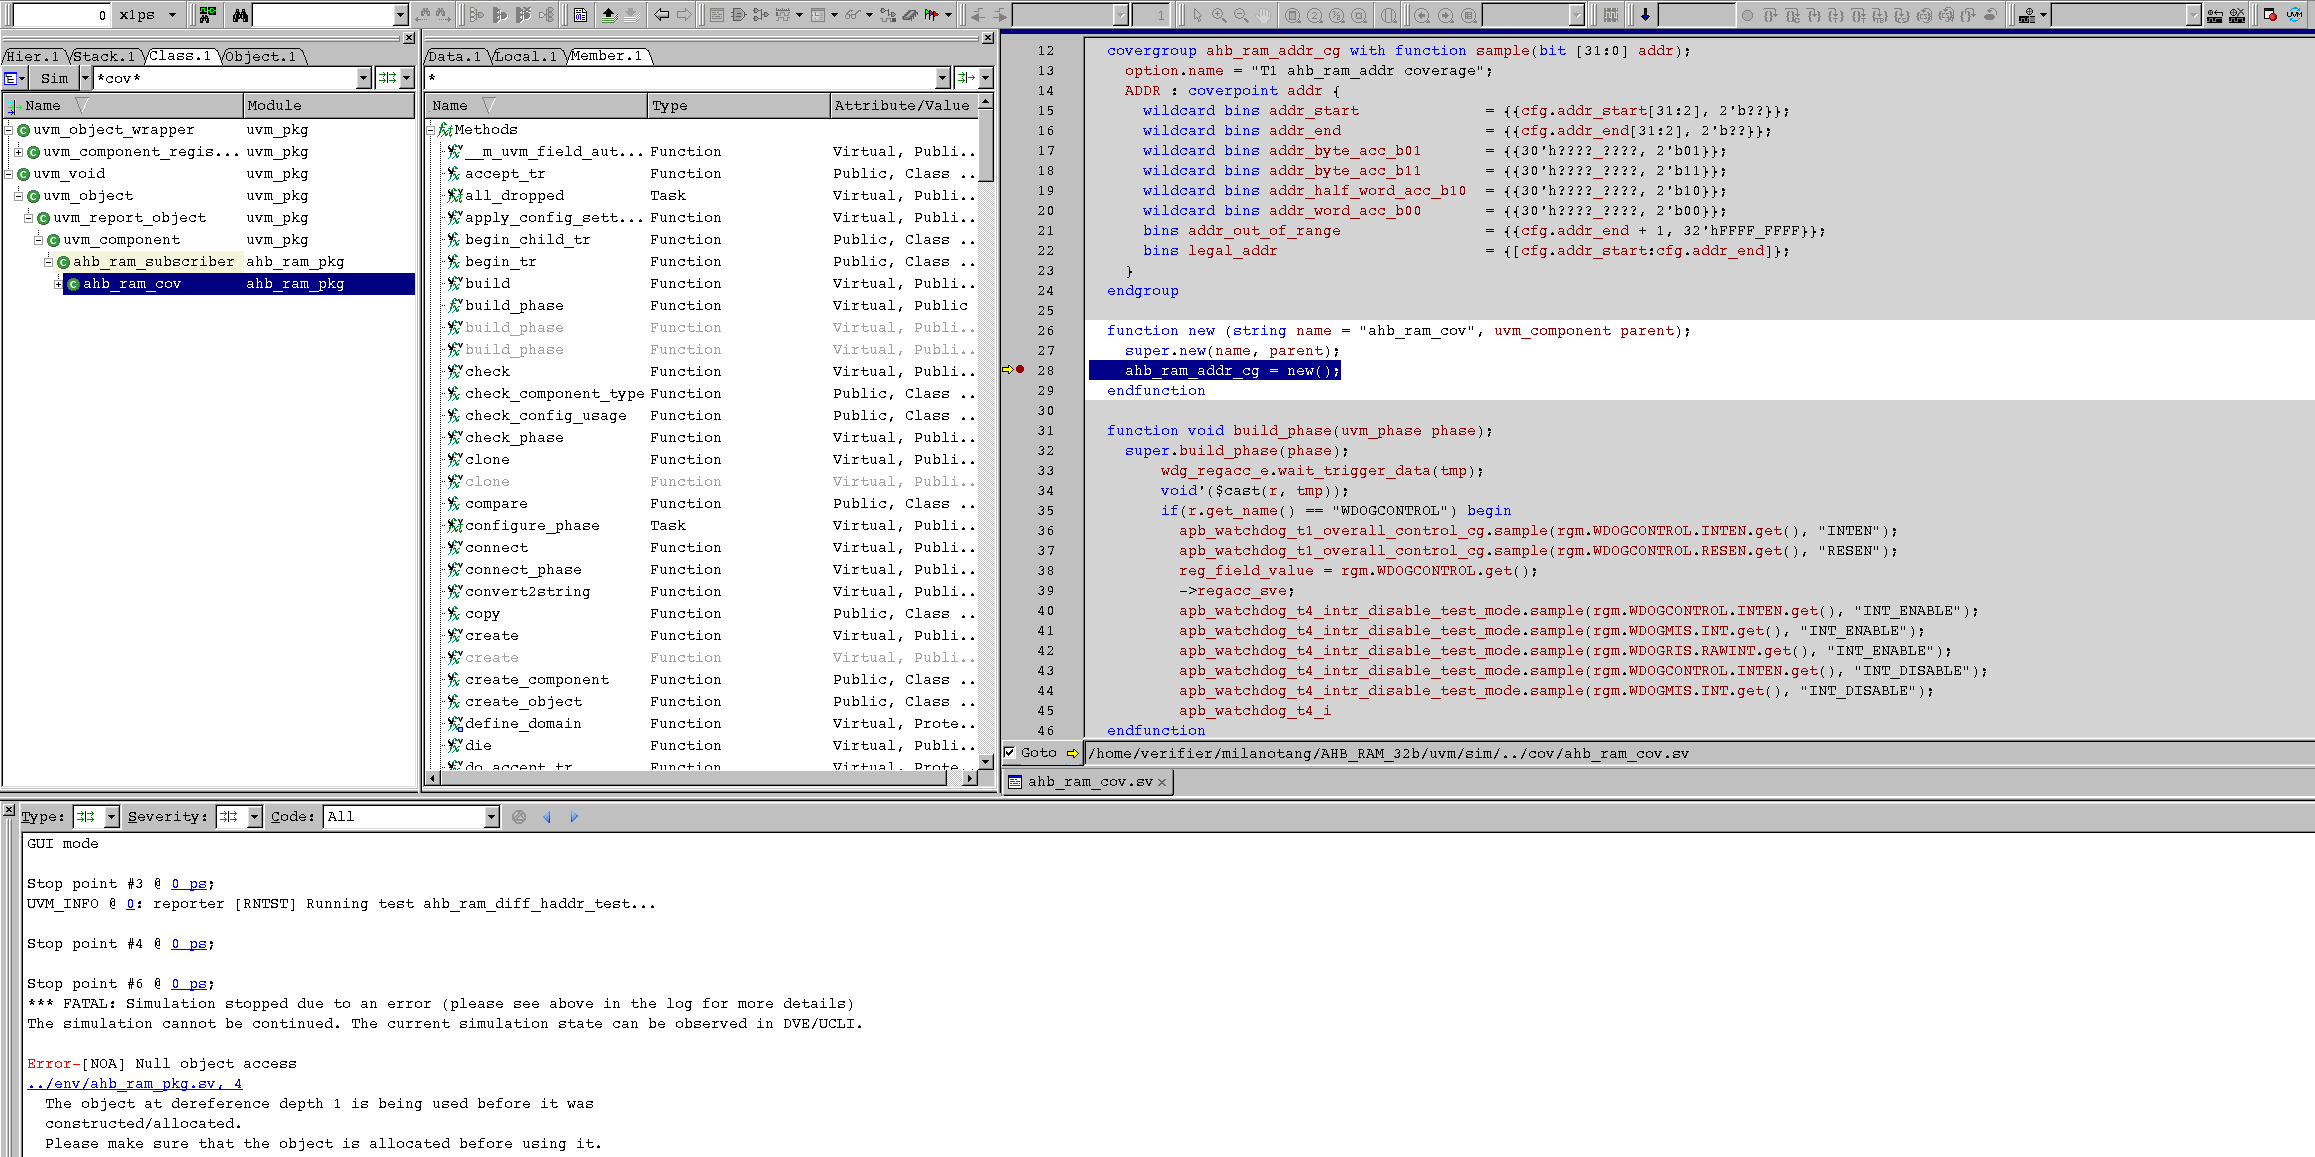> 设置断点,当运行到这一行的时候点击跳出的按钮,结果发现报错> 分析:我们在new函数中对covergroup进行了例化,例化的过程中cov对cfg进行了访问,但是cfg是在父类的build_phase中才得到的:> 在对covergroup进行例化的时候会对bins开辟空间,开辟空间我们需要确认这里面的范围是什么,但是这个时候调用不到cfg,所以句柄悬空了最后导致报错。---:::info解决办法::::对于不能认cfg中的变量,我们的解决方法就是先给它设定一个形参,在采样的时候把实参传进去。```systemverilog`ifndef AHB_RAM_COV_SV`define AHB_RAM_COV_SVclass ahb_ram_cov extends ahb_ram_subscriber;`uvm_component_utils(ahb_ram_cov)// Covergroup definition below// T1 ahb_ram_addr coverrage//covergroup ahb_ram_addr_cg with function sample(bit [31:0] addr, bit [31:0] addr_start, bit [31:0] addr_end);option.name = "T1 ahb_ram_addr coverage";ADDR : coverpoint addr {wildcard bins addr_start = {{addr_start[31:2], 2'b??}};wildcard bins addr_end = {{addr_end[31:2], 2'b??}};wildcard bins addr_byte_acc_b01 = {{30'h????_????, 2'b01}};wildcard bins addr_byte_acc_b11 = {{30'h????_????, 2'b11}};wildcard bins addr_half_word_acc_b10 = {{30'h????_????, 2'b10}};wildcard bins addr_word_acc_b00 = {{30'h????_????, 2'b00}};bins addr_out_of_range = {[addr_end[31:0] + 1 : 32'hFFFF_FFFF]};bins legal_addr = {[addr_start : addr_end]};}endgroupfunction new (string name = "ahb_ram_cov", uvm_component parent);super.new(name, parent);ahb_ram_addr_cg = new();endfunctionfunction void build_phase(uvm_phase phase);super.build_phase(phase);endfunctiontask do_listen_events();endtaskvirtual function void write(ahb_transaction tr);ahb_ram_addr_cg.sample(tr.addr, cfg.addr_start, cfg.addr_end);endfunctionendclass`endif // AHB_RAM_COV_SV

结果仍然是报错,在使用的时候它不认我们声明的变量的范围
:::info
那么我们就只能考虑另外一种办法:
在创建covergroup的时候就将变量作为参数传递进去,之后再考虑动态传递的问题
:::
`ifndef AHB_RAM_COV_SV`define AHB_RAM_COV_SVclass ahb_ram_cov extends ahb_ram_subscriber;`uvm_component_utils(ahb_ram_cov)// Covergroup definition below// T1 ahb_ram_addr coverrage//covergroup ahb_ram_addr_cg(bit [31:0] addr_start, bit [31:0] addr_end) with function sample(bit [31:0] addr);option.name = "T1 ahb_ram_addr coverage";ADDR : coverpoint addr {wildcard bins addr_start = {{addr_start[31:2], 2'b??}};wildcard bins addr_end = {{addr_end[31:2], 2'b??}};wildcard bins addr_byte_acc_b01 = {{30'h????_????, 2'b01}};wildcard bins addr_byte_acc_b11 = {{30'h????_????, 2'b11}};wildcard bins addr_half_word_acc_b10 = {{30'h????_????, 2'b10}};wildcard bins addr_word_acc_b00 = {{30'h????_????, 2'b00}};bins addr_out_of_range = {[addr_end[31:0] + 1 : 32'hFFFF_FFFF]};bins legal_addr = {[addr_start : addr_end]};}endgroupfunction new (string name = "ahb_ram_cov", uvm_component parent);super.new(name, parent);ahb_ram_addr_cg = new(32'h0000, 32'hFFFF);endfunctionfunction void build_phase(uvm_phase phase);super.build_phase(phase);endfunctiontask do_listen_events();endtaskvirtual function void write(ahb_transaction tr);ahb_ram_addr_cg.sample(tr.addr);endfunctionendclass`endif // AHB_RAM_COV_SV
我们在声明covergroup的时候就将参数传递进去,那么在new函数的时候就需要给定一个初始的值。
接下来就是运行测试并观察覆盖率
可以看到ADDR这个组的覆盖率到达了87.5,对于边界地址的hit有510次,但是边界地址应该是只有一次的,这显然是不合理的。
:::info 对coverpoint进行修改:
- 我们将对地址是否按字节、字、半字访问放在一个coverpoint中:
- 需要注意的是对于一个字类型访问而言,按照地址0,4,8,c进行访问,所以0,1,2,3我们都可以看作是开始时候的边界值;
- 同样的,一个地址时候的边界我们可以看作是addr_end-3开始;
:::
``systemverilogifndef AHB_RAM_COV_SV `define AHB_RAM_COV_SV
class ahb_ram_cov extends ahb_ram_subscriber;
`uvm_component_utils(ahb_ram_cov)
// Covergroup definition below // T1 ahb_ram_addr coverrage //
covergroup ahb_ram_addr_cg(bit [31:0] addr_start, bit [31:0] addr_end) with function sample(bit [31:0] addr);
option.name = “T1 ahb_ram_addr coverage”;
ADDR : coverpoint addr {
bins addr_start = {[addr_start : addr_start+3]};
bins addr_end = {[addr_end-3 : addr_end]};
bins addr_out_of_range = {[addr_end+1 : 32’hFFFF_FFFF]};
bins legal_range[16] = {[addr_start : addr_end]};
}
BYTEACC : coverpoint addr[1:0]{
wildcard bins addr_byte_acc_b01 = {2’b01};
wildcard bins addr_byte_acc_b11 = {2’b11};
wildcard bins addr_half_word_acc_b10 = {2’b10};
wildcard bins addr_word_acc_b00 = {2’b00};
}
endgroup
function new (string name = “ahb_ram_cov”, uvm_component parent); super.new(name, parent); ahb_ram_addr_cg = new(32’h0000, 32’hFFFF); endfunction
function void build_phase(uvm_phase phase); super.build_phase(phase); endfunction
task do_listen_events(); endtask
virtual function void write(ahb_transaction tr); ahb_ram_addr_cg.sample(tr.addr); endfunction
endclass
`endif // AHB_RAM_COV_SV
---修改完成以后我们再次进行覆盖率的收集:<br />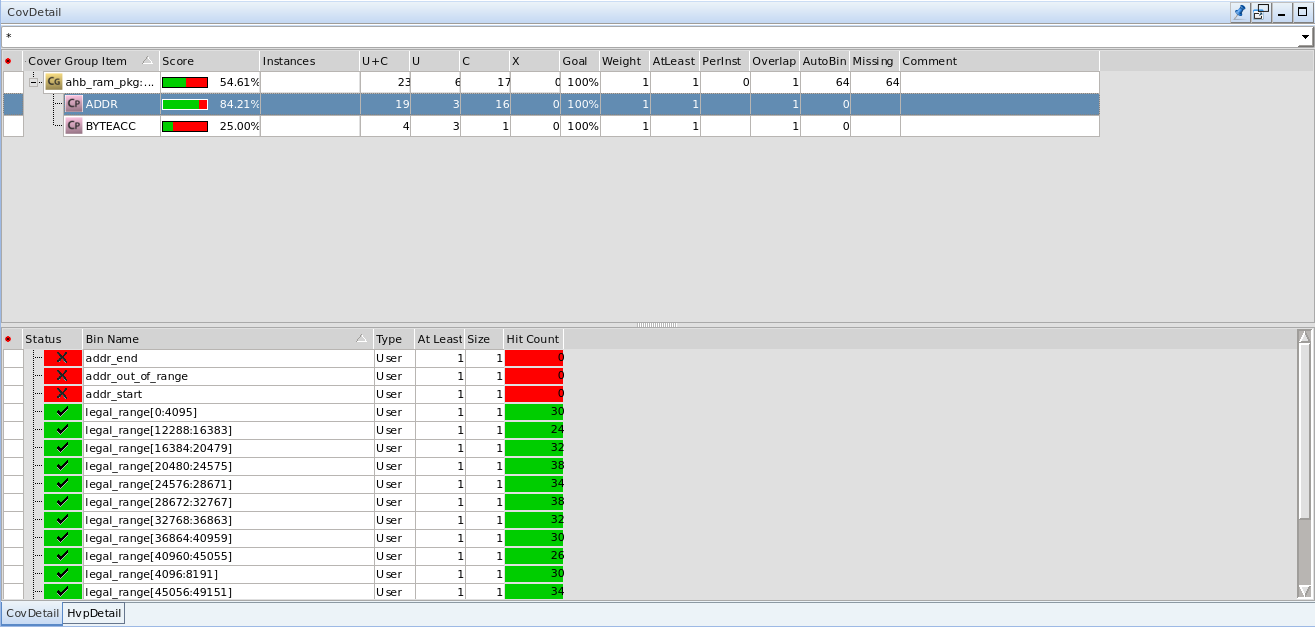> 可以看到在这个covergroup中的覆盖率正常了,没有覆盖到addr_start和addr_end的原因是在seq给定第一个地址的时候默认了最低位是0。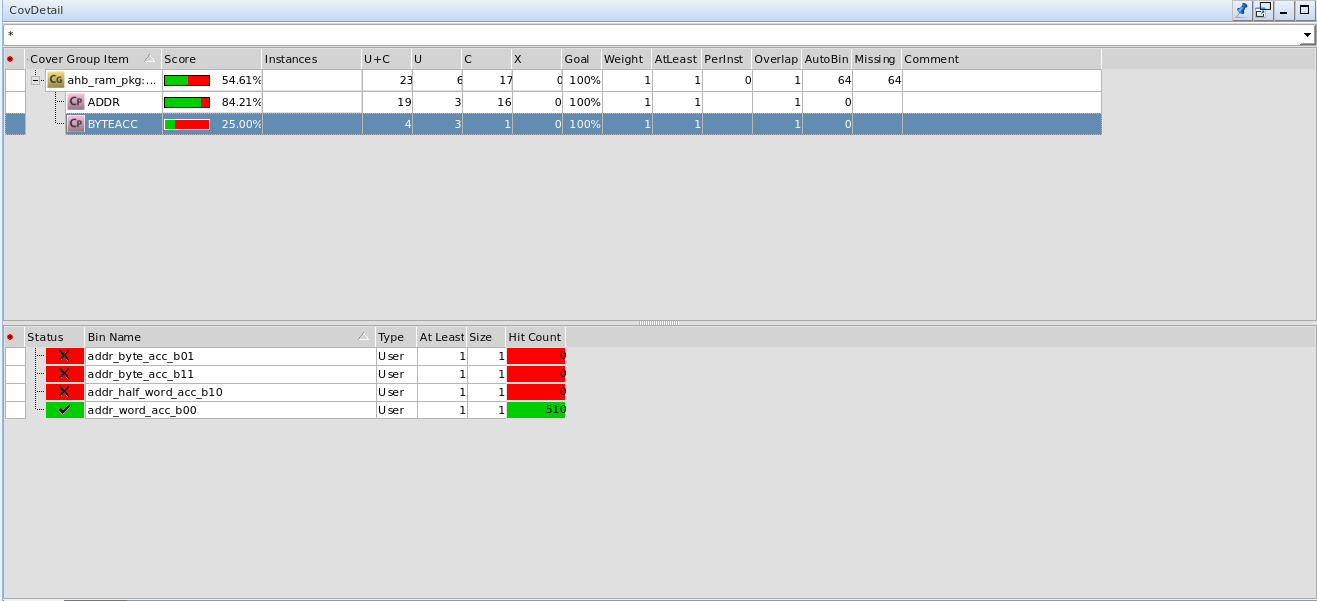> 另外我们可以看到在BYTEACC这个组中我们没有收集到关于半字和其他地址的访问,原因是我们跑的ahb_ram_diff_haddr_test就是字对齐的测试。> 为了解决这个问题,我们需要跑其他几个内存不对齐的测试,然后将他们的覆盖率结果merge。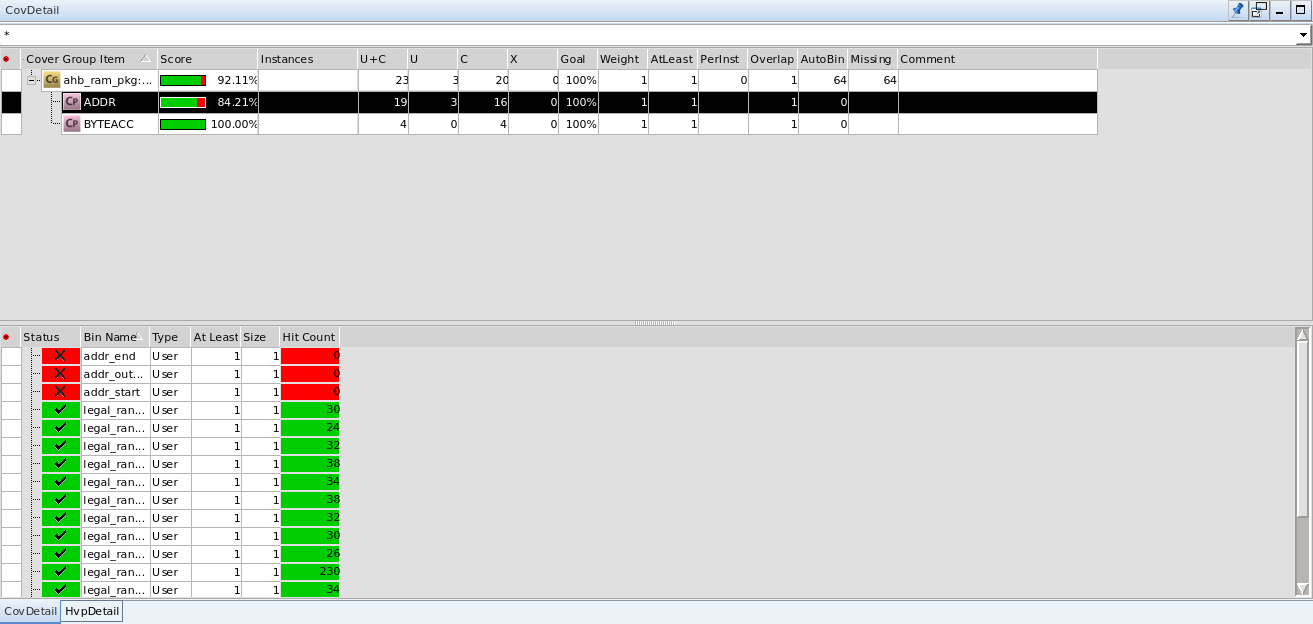<br />我们可以看到,跑了其他测试merge以后,cov提高到了92.11%。<a name="feN2c"></a># 8.2 burst_size 和 burst_type的covergroup```systemverilog`ifndef AHB_RAM_COV_SV`define AHB_RAM_COV_SVclass ahb_ram_cov extends ahb_ram_subscriber;`uvm_component_utils(ahb_ram_cov)// Covergroup definition below// T1 ahb_ram_addr coverrage//covergroup ahb_ram_t1_addr_cg(bit [31:0] addr_start, bit [31:0] addr_end) with function sample(bit [31:0] addr);option.name = "T1 ahb_ram_addr coverage";ADDR : coverpoint addr {bins addr_start = {[addr_start : addr_start+3]};bins addr_end = {[addr_end-3 : addr_end]};bins addr_out_of_range = {[addr_end+1 : 32'hFFFF_FFFF]};bins legal_range[16] = {[addr_start : addr_end]};}BYTEACC : coverpoint addr[1:0]{bins addr_byte_acc_b01 = {2'b01};bins addr_byte_acc_b11 = {2'b11};bins addr_half_word_acc_b10 = {2'b10};bins addr_word_acc_b00 = {2'b00};}endgroupcovergroup ahb_ram_t2_type_size_cg with function sample(burst_size_enum bsize, burst_type_enum btype);BURST_TYPE : coverpoint bsize{bins size_8bit = {BURST_SIZE_8BIT};bins size_16bit = {BURST_SIZE_8BIT};bins size_32bit = {BURST_SIZE_8BIT};bins size_64bit = {BURST_SIZE_8BIT};}BUSY_SIZE : coverpoint btype{bins type_single = {SINGLE};bins type_incr = {INCR};bins type_wrap4 = {WRAP4};bins type_icnr4 = {INCR4};}endgroupfunction new (string name = "ahb_ram_cov", uvm_component parent);super.new(name, parent);ahb_ram_t1_addr_cg = new(32'h0000, 32'hFFFF);ahb_ram_t2_type_size_cg = new();endfunctionfunction void build_phase(uvm_phase phase);super.build_phase(phase);endfunctiontask do_listen_events();endtaskvirtual function void write(ahb_transaction tr);ahb_ram_t1_addr_cg.sample(tr.addr);ahb_ram_t2_type_size_cg.sample(tr.burst_size, tr.burst_type);endfunctionendclass`endif // AHB_RAM_COV_SV
【调试及结果】
同样的,我们声明第二个covergroup,分别运行haddr、hsize和haddr_word_unaligned_test,将测试得到的结果的覆盖率进行merge,最后结果如下:


另外,我们在merge以后就会生成一个report到当前的sim文件夹下,我们输入pwd找到当前文件夹的目录,然后再firefox中可以打开报告。
:::info
覆盖率在以下这个路径中进行查看:urgReport/dashboard.html/groups
:::


