RabbitMQ 有三种模式:单机模式、普通集群模式、镜像集群模式。
一、单机模式
二、普通集群模式(无高可用性)
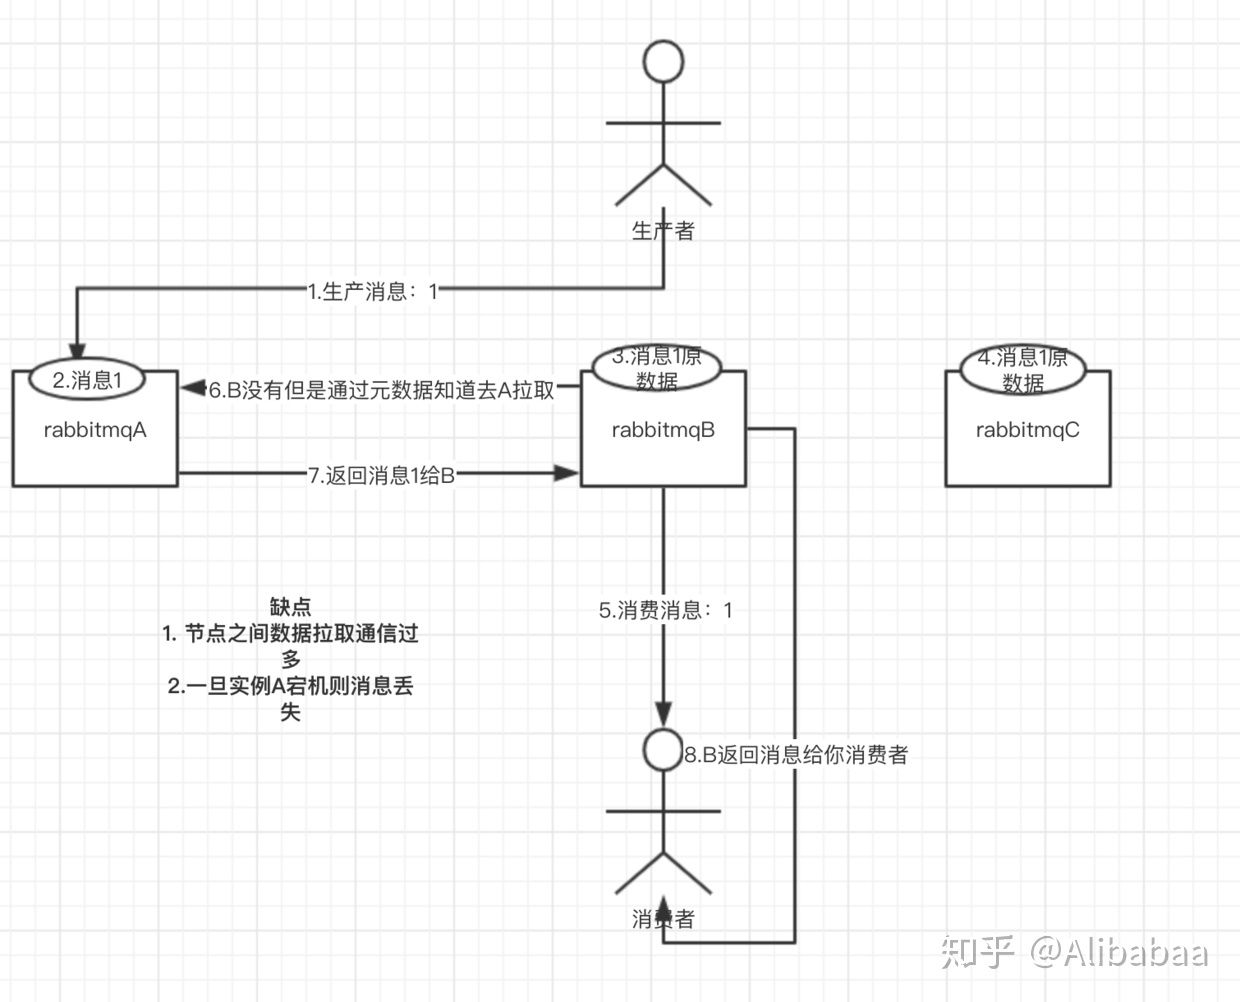
普通集群模式,有服务器ABC,在服务器ABC上分别启动RabbitMQ实例,生产者生产消息1,随机发给某一实例A,实例BC
上记录消息1的原数据信息(比如消息1具体信息在示例A上),消费者消费消息,随机连接某个示例B,消费消息1,实例B根据
原数据发现消息1在实例A上,则实例B去实例A拉取消息返回给消费者。
三、镜像集群模式(高可用性)
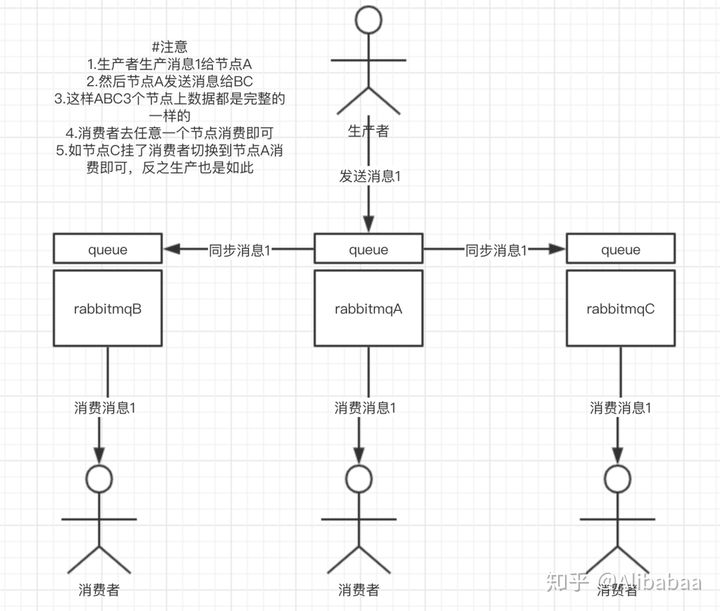
这种模式,才是所谓的 RabbitMQ 的高可用模式。跟普通集群模式不一样的是,在镜像集群模式下,你创建的 queue,无论元数据还是 queue 里的消息都会存在于多个实例上,就是说,每个 RabbitMQ 节点都有这个 queue 的一个完整镜像,包含 queue 的全部数据的意思。然后每次你写消息到 queue 的时候,都会自动把消息同步到多个实例的 queue 上。
好处:你任何一个机器宕机了,没事儿,其它机器(节点)还包含了这个 queue 的完整数据,别的 consumer 都可以到其它节点上去消费数据。
坏处:
第一,这个性能开销也太大了,消息需要同步到所有机器上,导致网络带宽压力和消耗很重!
第二,从它的集群架构图就可以看出,这样玩不是分布式的,没有扩展性可言,如果 queue 数据量很大,大到这个机器上的容量无法容纳了,此时该怎么办呢?没有办法进行分片式储存,所以对于大数据或者高并发的场景,RabbitMQ并非很好的选择,而kafka或者rocketmq会是很不错的选择,它俩可以进行数据分片(队列)、分区存储,数据量大的情况下可以通过增加机器来实现水平扩容,多主节点之间的数据互相独立,高并发能力也能得到很好的提升,单主节点内部又可以配置一个小的主从集群,主节点挂了从节点又可以选举成为主节点顶上去,这样高可用也实现了。
1.1 镜像集群方案的原理
RabbitMQ这款消息队列中间件产品本身是基于Erlang编写,Erlang语言天生具备分布式特性(通
过同步Erlang集群各节点的cookie来实现)。RabbitMQ本身不需要像ActiveMQ、Kafka那样通
过ZooKeeper分别来实现HA方案和保存集群的元数据。
1.2 如下案例中使用多台云服务器进行集群搭建
主要参考官方文档:https://www.rabbitmq.com/clustering.html
首先确保RabbitMQ运行没有问题
1 #修改hostname
2 vim /etc/hostname
3 m1
4 m2
5 #修改hosts集群设备
6 vim /etc/hosts
7 192.168.132.137 m1
8 192.168.132.139 m2
9
10 #开放防火墙 4369/5672/15672/25672端口
11 firewall‐cmd ‐‐zone=public ‐‐add‐port=4369/tcp ‐‐permanent
12 firewall‐cmd ‐‐zone=public ‐‐add‐port=5672/tcp ‐‐permanent13 firewall‐cmd ‐‐zone=public ‐‐add‐port=15672/tcp ‐‐permanent
14 firewall‐cmd ‐‐zone=public ‐‐add‐port=25672/tcp ‐‐permanent
15
16 #重载防火墙
17 firewall‐cmd ‐‐reload
18
19 #重启服务器
20 reboot
21
22 #同步.erlang.coolie
23 find / ‐name *.cookie
24
25 #将文件发送至指定ip的服务器中,发送的过程中需要指定另一台服务器的密码信息
26 scp /var/lib/rabbitmq/.erlang.cookie 192.168.132.134:/var/lib/rabbitmq/
27
28 #两个电脑启动MQ服务
29 rabbit‐server
30
31
32 # 停止应用 通过rabbitmqctl status 可以查看当前rabbitmactl默认操作的节点信息
33 rabbitmqctl stop_app
34
35 # 将当前节点加入到一个集群中 默认磁盘节点被加入的节点只要是集群中的一员,其他节点都能
够马上感受到集群节点的变化
36 rabbitmqctl join_cluster rabbit@m1
37
38 # 重新启动当前节点
39 rabbitmqctl start_app
40
41 #查看集群信息
42 rabbitmqctl cluster_status
1.3 负载均衡-HAProxy
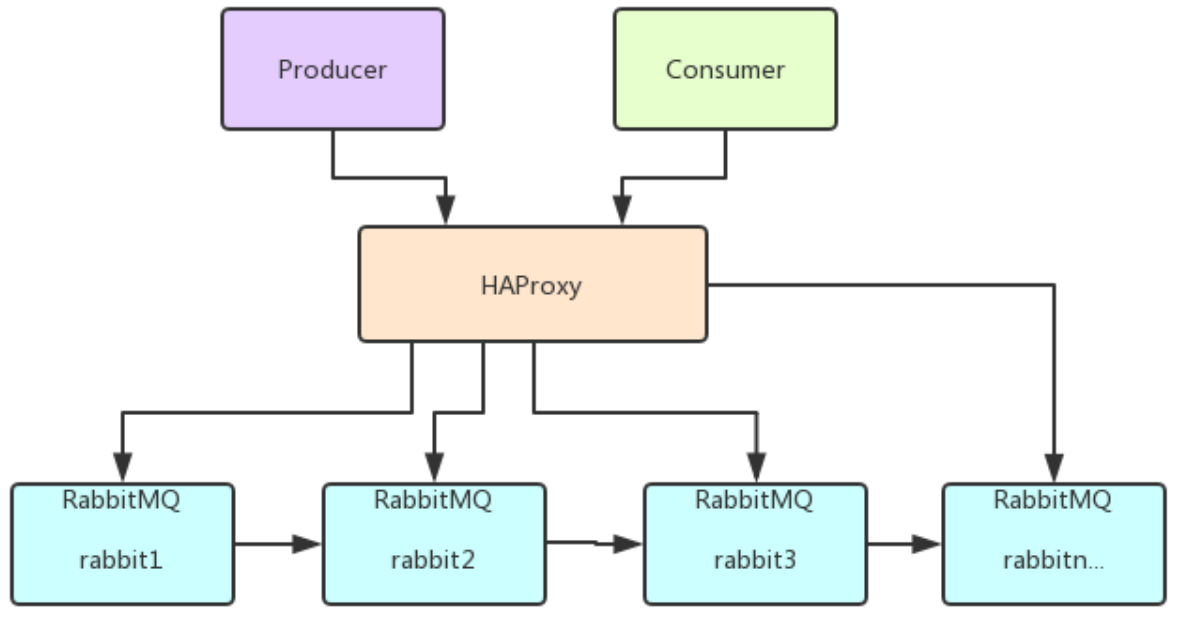
HAProxy提供高可用性、负载均衡以及基于TCP和HTTP应用的代理,支持虚拟主机,它是免费、
快速并且可靠的一种解决方案,包括Twitter,Reddit,StackOverflow,GitHub在内的多家知名
互联网公司在使用。HAProxy实现了一种事件驱动、单一进程模型,此模型支持非常大的并发连
接数。
1.3.1 安装HAProxy
1 #安装
2 yum install haproxy
3
4
5 #检测安装是否成功
6 haproxy
7
8 #查找haproxy.cfg文件的位置
9 find / ‐name haproxy.cfg
10
11 #配置haproxy.cfg文件 具体参照 如下 1.5.2 配置HAProxy
12 vim /etc/haproxy/haproxy.cfg
13
14
15 #启动haproxy
16 haproxy ‐f /etc/haproxy/haproxy.cfg
17
18 #查看haproxy进程状态
19 systemctl status haproxy.service
20 #状态如下说明 已经启动成功 Active: active (running)
21
22 #访问如下地址对mq节点进行监控
23 http://47.114.175.29:1080/haproxy_stats
24
25 #代码中访问mq集群地址,则变为访问haproxy地址:5672
1.3.2 配置HAProxy
配置文件路径:/etc/haproxy/haproxy.cfg
1 #‐‐‐‐‐‐‐‐‐‐‐‐‐‐‐‐‐‐‐‐‐‐‐‐‐‐‐‐‐‐‐‐‐‐‐‐‐‐‐‐‐‐‐‐‐‐‐‐‐‐‐‐‐‐‐‐‐‐‐‐‐‐‐‐‐‐‐‐‐
2 # Example configuration for a possible web application. See the
3 # full configuration options online.
4 #
5 # http://haproxy.1wt.eu/download/1.4/doc/configuration.txt
6 #
7 #‐‐‐‐‐‐‐‐‐‐‐‐‐‐‐‐‐‐‐‐‐‐‐‐‐‐‐‐‐‐‐‐‐‐‐‐‐‐‐‐‐‐‐‐‐‐‐‐‐‐‐‐‐‐‐‐‐‐‐‐‐‐‐‐‐‐‐‐‐
8
9 #‐‐‐‐‐‐‐‐‐‐‐‐‐‐‐‐‐‐‐‐‐‐‐‐‐‐‐‐‐‐‐‐‐‐‐‐‐‐‐‐‐‐‐‐‐‐‐‐‐‐‐‐‐‐‐‐‐‐‐‐‐‐‐‐‐‐‐‐‐
10 # Global settings
11 #‐‐‐‐‐‐‐‐‐‐‐‐‐‐‐‐‐‐‐‐‐‐‐‐‐‐‐‐‐‐‐‐‐‐‐‐‐‐‐‐‐‐‐‐‐‐‐‐‐‐‐‐‐‐‐‐‐‐‐‐‐‐‐‐‐‐‐‐‐
12 global
13 # to have these messages end up in /var/log/haproxy.log you will
14 # need to:
15 #16 # 1) configure syslog to accept network log events. This is done
17 # by adding the ‘‐r’ option to the SYSLOGD_OPTIONS in
18 # /etc/sysconfig/syslog
19 #
20 # 2) configure local2 events to go to the /var/log/haproxy.log
21 # file. A line like the following can be added to
22 # /etc/sysconfig/syslog
23 #
24 # local2.* /var/log/haproxy.log
25 #
26 log 127.0.0.1 local2
27
28 chroot /var/lib/haproxy
29 pidfile /var/run/haproxy.pid
30 maxconn 4000
31 user haproxy
32 group haproxy
33 daemon
34
35 # turn on stats unix socket
36 stats socket /var/lib/haproxy/stats
37
38 #‐‐‐‐‐‐‐‐‐‐‐‐‐‐‐‐‐‐‐‐‐‐‐‐‐‐‐‐‐‐‐‐‐‐‐‐‐‐‐‐‐‐‐‐‐‐‐‐‐‐‐‐‐‐‐‐‐‐‐‐‐‐‐‐‐‐‐‐‐
39 # common defaults that all the ‘listen’ and ‘backend’ sections will
40 # use if not designated in their block
41 #‐‐‐‐‐‐‐‐‐‐‐‐‐‐‐‐‐‐‐‐‐‐‐‐‐‐‐‐‐‐‐‐‐‐‐‐‐‐‐‐‐‐‐‐‐‐‐‐‐‐‐‐‐‐‐‐‐‐‐‐‐‐‐‐‐‐‐‐‐
42 defaults
43 mode http
44 log global
45 option httplog
46 option dontlognull
47 option http‐server‐close
48 option forwardfor except 127.0.0.0/8
49 option redispatch
50 retries 3
51 timeout http‐request 10s
52 timeout queue 1m
53 timeout connect 10s
54 timeout client 1m
55 timeout server 1m
56 timeout http‐keep‐alive 10s
57 timeout check 10s
58 maxconn 300059
60
61 #对MQ集群进行监听
62 listen rabbitmq_cluster
63 bind 0.0.0.0:5672
64 option tcplog
65 mode tcp
66 option clitcpka
67 timeout connect 1s
68 timeout client 10s
69 timeout server 10s
70 balance roundrobin
71 server node1 节点1 ip地址:5672 check inter 5s rise 2 fall 3
72 server node2 节点2 ip地址:5672 check inter 5s rise 2 fall 3
73
74 #开启haproxy监控服务
75 listen http_front
76 bind 0.0.0.0:1080
77 stats refresh 30s
78 stats uri /haproxy_stats
79 stats auth admin:admin

