1. 自定义hook
尝试自己封装一个hook也就是useXxx函数
大致步骤:
- 在App.js组件实现一个记录鼠标移动坐标的功能
- 把实现功能的逻辑和状态封装在一个函数中
- 将函数放在一个单独的js文件中,导入给App.js使用
具体代码:
- 未封装前
App.js
import { useState, useEffect } from “react” const App = () => { const [mouse, setMouse] = useState({ x: 0, y: 0 }) useEffect(() => { const handelMouseMove = (e) => { setMouse({ x: e.pageX, y: e.pageY }) } document.addEventListener(‘mousemove’, handelMouseMove) return () => { document.removeEventListener(‘mousemove’, handelMouseMove) } }, []) return
- 封装hooks之后
hook.js
import { useState, useEffect } from “react” export const useMouse = () => { const [mouse, setMouse] = useState({ x: 0, y: 0 }) useEffect(() => { const handelMouseMove = (e) => { setMouse({ x: e.pageX, y: e.pageY }) } document.addEventListener(‘mousemove’, handelMouseMove) return () => { document.removeEventListener(‘mousemove’, handelMouseMove) } }, []) return mouse}
App.js
import { useMouse } from “./hooks” const App = () => { const mouse = useMouse() return
总结:
具体内容:
- 基本使用
- 导入 useRef 函数从 react 中
- 创建ref对象 const ref = useRef(null)
- 给需要获取的标签上 ref={ref} 绑定ref对象
- 渲染完毕后,可以通过 ref.current 获取dom元素
- 案例练习
- 组件初始化自动获取焦点功能
import { useRef, useEffect } from “react”; const App = () => { const inputRef = useRef(null); useEffect(() => { // input DOM元素 console.log(inputRef.current); // input 获取焦点 inputRef.current.focus() }, []); return (
总结
-
3. useContext-基本使用
掌握使用useContext来跨级组件通讯
大致步骤: 通过 createContext 创建context对象
- 通过 Provider 组件包裹根组件,注入数据
- 在 后代 组件中使用 useContext 使用数据
具体代码:
- 通过 createContext 创建context对象
context.js
import { createContext } from “react”;export default createContext({})
- 通过 Provider 组件包裹根组件,注入数据
App.jsx
import { useState } from “react”;import Context from “./context”;import Child from ‘./Child’ const App = () => { const [count, setCount] = useState(0) return (
- 在 后代 组件中使用 useContext 使用数据
Child.jsx
import { useContext } from “react”import Context from ‘./context’const Child = () => { const count = useContext(Context) return
总结:
创建context对象和Provider注入数据和之前一样,使用数据只需要 useContext 即可。
4. 购物车-封装CartCounter组件
完成CartCounter组件封装
大致步骤:创建 CartCounter 组件在 components下
- 创建 index.scss 文件,导入 CartCounter 组件
- 在 CartItem 组件中使用,传人id和数量,显示数量
具体代码:
- 创建 CartCounter 组件在 components下
components/CartCounter/index.js
import ‘./index.scss’export const CartCounter = () => { return (
- 创建 index.scss 文件,导入 CartCounter 组件
.my-counter { display: flex; .inp { width: 45px; text-align: center; margin: 0 10px; }}
- 在 CartItem 组件中使用
components/CartItem/index.js
+import { CartCounter } from ‘../CartCounter’// …
components/CartCounter/index.js
+export const CartCounter = ({ id, goods_count }) => { return (
5. 购物车-修改数量功能
通过useContext完成修改数量功能
大致步骤:
- 创建context对象在一个js文件并导出
- 在App组件导入context并使用Provider注入一个修改函数
- 函数中传入 id 和 数量进行本地和线上的修改
- 在CartCounter组件使用useContext获取修改函数,点击+-和输入的时候调用
落地代码:
- 创建context对象在一个js文件并导出
context.js
import { createContext } from “react”;export default createContext({})
- 在App组件导入context并使用Provider注入一个修改函数
App.js
+import Context from ‘./context’// … + const onChangeGoodsCount = () => {+ console.log(‘修改数据’)+ } return (+
- 函数中传入 id 和 数量进行本地和线上的修改
App.js
const onChangeGoodsCount = (id, goods_count) => { if (goods_count < 1) return // 本地 setGoodsList(goodsList.map(item => { if (item.id === id) { return { …item, goods_count } } else { return item } })) // 接口 http.patch(/goodsList/${id}, { goods_count }); }
components/CartCounter/index.js
import “./index.scss”;+import Context from “../../context”;+import { useContext } from “react”;export const CartCounter = ({ id, goods_count }) => { // @ts-ignore+ const { onChangeGoodsCount } = useContext(Context); return (
6. Redux-概念
能够说出为什么需要使用Redux
文档:
解释:
- Redux 是 React 中最常用的状态管理工具(状态容器)
React的问题:
- React 只是 DOM 的一个抽象层(UI 库),并不是 Web 应用的完整解决方案。
- 因此 React 在涉及到数据的处理以及组件之间的通信时会比较复杂 。
- 对于大型的复杂应用来说,这两方面恰恰是最关键的,需要一个专门的状态工具。
背景介绍:
- 2014 年 Facebook 提出了 Flux 架构的概念(前端状态管理的概念),引发了很多的实现
- 2015 年,Redux 出现,将 Flux 与函数式编程结合一起,很短时间内就成为了最热门的前端架构
- Flux 是最早的前端的状态管理工具,它提供了状态管理的思想,也提供对应的实现
- 除了 Flux、Redux 之外,还有:Mobx 等状态管理工具
为什么需要Redux?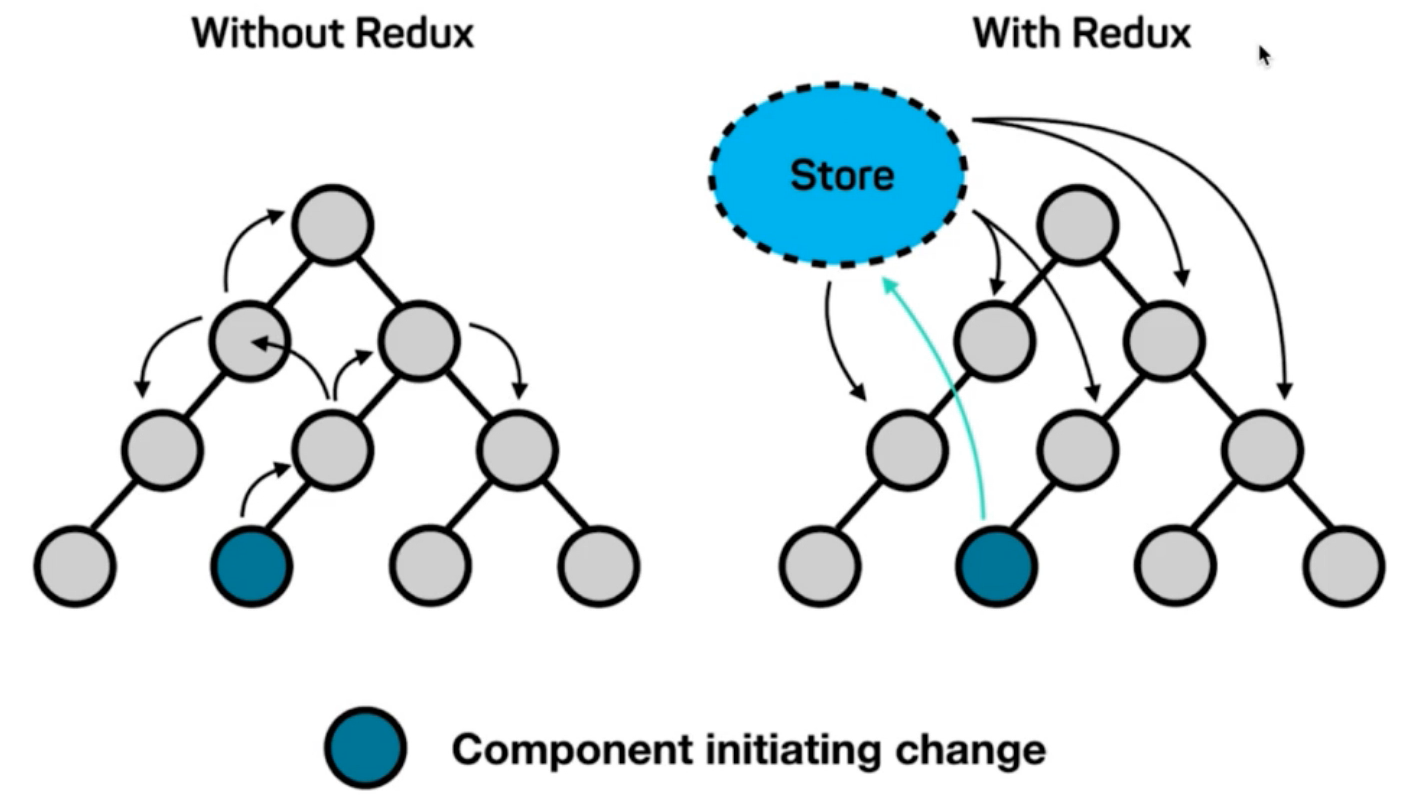
- 不使用 Redux (图左边) :
- 只能使用父子组件通讯、状态提升等 React 自带机制
- 处理远房亲戚(非父子)关系的组件通讯时乏力
- 组件之间的数据流混乱,出现 Bug 时难定位
使用 Redux (图右边):
知道三个核心概念是什么
- 三个核心概念的职责分别是什么
具体内容:
- 知道三个核心概念是什么
- 为了让代码各部分职责清晰、明确,Redux 代码被分为三个核心概念:action/reducer/store
- 三个核心概念的职责分别是什么
- action -> reducer -> store
- action(动作):描述要做的事情
- reducer(函数):更新状态
- store(仓库):整合 action 和 reducer
- 类比生活
- action 行动(名词)、动作
- 描述要做的事情,项目中的每一个功能都是一个 action
- 例如:
- 计数器案例:计数器加1、减1
- 购物车案例:获取购物车数据、切换商品选中状态
- 项目:登录,退出等
特点:
- action 只描述做什么事情
- action 是一个JS对象,必须带有 type 属性,用于区分动作的类型
- 根据功能的不同,可以携带额外的数据(比如,payload 有效载荷),配合该动作来完成相应功能
举例:
// 计数器案例{ type: ‘increment’ } // +1{ type: ‘decrement’ } // -1 // 累加10操作{ type: ‘increment’, payload: 10 } // +10{ type: ‘decrement’, payload: 10 } // -10 // 购物车案例{ type: ‘getGoodsList’ }{ type: ‘changeGoodsState’, payload: { id: 1, goodsState: true } }
思考:
// 添加任务,action怎么写?// 删除任务,action怎么写?
总结:
action 就是一个对象,type 描述行为,约定 payload 做为传参。
9. Redux-核心action creator
掌握来使用函数创建action
大致步骤:知道 action creator 是什么意思
- 知道 action creator 的优点
具体内容:
- 知道 action creator 是什么意思
- 使用函数创建 action 对象
- 知道 action creator 的优点
- 简化多次使用 action 时,重复创建 action 对象
举例:
// 1. 不使用 Action Creator// 创建多个 action 时,需要重复手动创建 action 对象,很繁琐{ type: ‘decrement’, payload: 2 }{ type: ‘decrement’, payload: 8 } // 2. 使用 Action Creatorconst decrement = payload => { return { type: ‘decrement’, payload }} decrement(2) // => { type: ‘decrement’, payload: 2 }decrement(8) // => { type: ‘decrement’, payload: 8 }// 可以动态创建action
练习:
// 删除任务,不使用 Action Creator // 删除任务,使用 Action Creator
总结:
- 使用 action creator 方式可以动态创建 action
-
10. Redux-核心reducer
能够掌握reducer的基本写法
解释: 名字是参考了 JS 数组中的 reduce 这个方法
- 数组中的 reduce 方法,可以来实现累计(比如,累加或者累减)
作用:
- 用来处理 action 并更新状态,是 Redux 状态更新 的地方
- 函数签名为:(prevState, action) => newState
- 接收上一次的状态和 action 作为参数,根据 action 的类型,执行不同操作,最终返回新的状态
原则:
- 函数一定要有返回值,即使状态没有改变也要返回上一次的状态
- reducer 是一个纯函数
- 不要使用 Math.random() / new Date() / Date.now() / ajax 请求等不纯的操作
- reducer 不能执行JS副作用
- 不要直接修改当前状态,而是根据当前状态值创建新的状态值(新替旧)
语法:
// 伪代码:// prevState 上一次的状态// action 当前要执行的动作const reducer = (prevState, action) => { return newState}
示例:
// 示例:// state 上一次的状态// action 当前要执行的动作const reducer = (state, action) => { switch (action.type) { // 计数器增加 case ‘increment’: // 返回新状态 // return state + 1 // 根据 action 中提供的 payload 来决定到底增加多少 return state + action.payload // 注意:一定要有 default,如果将来 reducer 无法处理某个 action,就直接将上一次的状态返回即可 default: return state }} // 模拟调用reducer(0, { type: ‘increment’ }) // 本次执行完成后,状态变为:1reducer(1, { type: ‘increment’ }) // 本次执行完成后,状态变为:2reducer(1, { type: ‘decrement’ }) // 无法处理该 action,所以返回上一次状态:1
总结:
- reducer 是修改状态的地方,这里根据action的类型去修改状态
修改的原则:新值替换旧值,不能发请求和随机返回,不能操作全局变量
11. 纯函数&JS副作用
了解什么是纯函数,什么是JS副作用
纯函数:纯函数是函数式编程中的概念,对于纯函数来说,相同的输入总是得到相同的输出
- 参考资料:函数式编程初探
// 纯函数:const add = () => { return 123}add() // 123add() // 123 const add = (num1, num2) => { return num1 + num2}add(1, 2) // 3add(1, 2) // 3 const add = (obj) => { return obj}add({ name: ‘jack’ }) // { name: ‘jack’ }add({ name: ‘jack’ }) // { name: ‘jack’ } // 不是纯函数:const add = () => { return Math.random()} add() // 0.12311293827497123add() // 0.82239841238741814
JS副作用:
- 如果一个函数或其他操作修改了其局部环境之外的状态变量值,那么它就被称为有副作用
// 无副作用const add = (num1, num2) => { return num1 + num2}add(1, 3) // 有副作用:let c = 0const add = (num1, num2) => { // 函数外部的环境产生了影响,所以是有副作用的 c = 1 return num1 + num2}add(1, 3) // 有副作用const add = (obj) => { // 因为直接修改了参数的值,对外部的数据产生了影响 obj.num = 123 return obj}const o = {}add(o)console.log(o) // { num: 123 }
12. Redux-核心store
通过store关联action和reducer
内容:
- store:仓库,Redux 的核心,整合 action 和 reducer
- 特点:
- 一个应用只有一个 store
- 维护应用的状态,获取状态:store.getState()
- 发起状态更新时,需要分发 action:store.dispatch(action)
- 创建 store 时接收 reducer 作为参数:const store = createStore(reducer)
- 其他 API,
- 订阅(监听)状态变化:const unSubscribe = store.subscribe(() => {})
- 取消订阅状态变化: unSubscribe()
核心代码
// 安装 redux 提前import { createStore } from ‘redux’ // 创建 store// 参数为:reducer 函数const store = createStore(reducer) // 更新状态// dispatch 派遣,派出。表示:分发一个 action,也就是发起状态更新store.dispatch(action)store.dispatch( increment(2) ) // 获取状态const state = store.getState() // —-// 其他 API // 监听状态变化const unSubscribe = store.subscribe(() => { // 状态改变时,执行相应操作 // 比如,记录 redux 状态 console.log(store.getState())}) // 取消监听状态变化unSubscribe()
13. Redux-默认值由来
能够知道 redux 状态默认值的生成
内容:
- 只要创建 store,那么,Redux 就会调用一次 reducer,这一次就是初始化默认值。
- 第一次调用 reducer reducer(undefined, {type: “@@redux/INITv.a.4.t.t.p”})
- 因为传入的状态值是 undefined ,并且是一个随机的 action type,所以:
- 状态值因为 undefined,所以,我们设置的默认值就会生效 state = 10
- 因为是一个随机的 action type,那就一定会走 default,返回默认值 10
- Redux 内部拿到状态值,就用这个状态值,来作为了 store 中状态的默认值
- 因此,将来当我们调用 store.getState() 方法来获取 Redux 状态值就是默认值
代码:
// 导入 createStoreimport { createStore } from ‘redux’// 创建 storeconst store = createStore(reducer) // action => { type: ‘increment’ }function reducer(state = 10, action) { console.log(‘reducer:’, state, action) switch (action.type) { case ‘increment’: return state + 1 default: return state }} store.dispatch(increment())// 相当于:store.dispatch({ type: ‘increment’ }) console.log(‘store 状态值为:’, store.getState())
14. Redux-执行过程分析
能够说出 redux 代码的执行流程
内容:
- 创建 store 时,Redux 就会先调用一次 reducer,来获取到默认状态
- 分发动作 store.dispatch(action) 更新状态
- Redux store 调用 reducer 传入:上一次的状态(当前示例中就是:10)和 action({ type: ‘increment’ }),计算出新的状态并返回
- reducer 执行完毕后,将最新的状态交给 store,store 用最新的状态替换旧状态,状态更新完毕
import { createStore } from ‘redux’const store = createStore(reducer) // reducer(10, { type: ‘increment’ })function reducer(state = 10, action) { console.log(‘reducer:’, state, action) switch (action.type) { case ‘increment’: return state + 1 default: return state }} console.log(‘状态值为:’, store.getState()) // 10 // 发起更新状态:// 参数: action 对象store.dispatch({ type: ‘increment’ })// 相当于: reducer(10, { type: ‘increment’ }) console.log(‘更新后:’, store.getState()) // 11

若有收获,就点个赞吧
0 人点赞
