中间件概述
目标: 能够理解为什么需要redux中间件
内容:
默认情况下,Redux 自身只能处理同步数据流。但是在实际项目开发中,状态的更新、获取,通常是使用异步操作来实现。
- 问题:如何在 Redux 中进行异步操作呢?
- 回答:通过 Redux 中间件机制来实现


Redux 中间件作用:处理具有副作用(side effect)的功能,比如,异步操作就是最常见的 side effect
中间件说明:
- 中间件,可以理解为处理一个功能的中间环节
- 下图中,自来水从水库到用户家庭中的每一个环节都是一个中间件
- 中间件的优势:可以串联、组合,在一个项目中使用多个中间件
Redux 中间件用来处理 状态 更新,也就是在 状态 更新的过程中,执行一系列的相应操作
中间件的触发时机
目标:能够理解中间件的触发时机
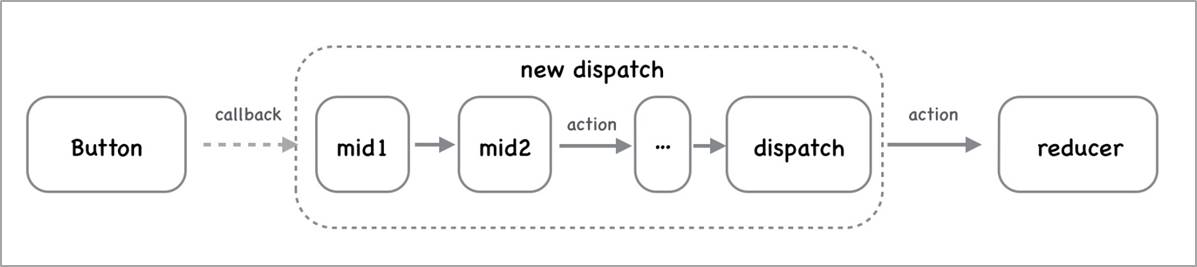
内容:Redux 中间件执行时机:在 dispatching action 和 到达 reducer 之间。
- 没有中间件:dispatch(action) => reducer
- 使用中间件:dispatch(action) => 执行中间件代码 => reducer
- 原理:封装了 redux 自己的 dispatch 方法
- 安装:yarn add redux-logger
- 导入 redux-logger 中间件
- 从 redux 中导入 applyMiddleware 函数
- 调用 applyMiddleware() 并传入 logger 中间件作为参数
- 将 applyMiddleware() 调用作为 createStore 函数的第二个参数
然后,调用 store.dispatch() 查看 console 中 logger 中间件记录的日志信息
核心代码:
store/index.js 中:
import { createStore, applyMiddleware } from ‘redux’
import logger from ‘redux-logger’
import rootReducer from ‘./reducers’
const store = createStore(rootReducer, applyMiddleware(logger))
redux-thunk中间件
目标:能够使用redux-thunk中间件处理异步操作
内容:
redux-thunk 中间件可以处理函数形式的 action。因此,在函数形式的 action 中就可以执行异步操作
语法:
- thunk action 是一个函数
- 函数包含两个参数:1 dispatch 2 getState
// 函数形式的 action
const thunkAction = () => {
return (dispatch, getState) => {}
}
// 解释:
const thunkAction = () => {
// 注意:此处返回的是一个函数,返回的函数有两个参数:
// 第一个参数:dispatch 函数,用来分发 action
// 第二个参数:getState 函数,用来获取 redux 状态
return (dispatch, getState) => {
setTimeout(() => {
// 执行异步操作
// 在异步操作成功后,可以继续分发对象形式的 action 来更新状态
}, 1000)
}
}
使用 redux-thunk 中间件前后对比:
- 不使用 redux-thunk 中间件,action 只能是一个对象
// 1 普通 action 对象
{ type: ‘counter/increment’ }
dispatch({ type: ‘counter/increment’ })
// 2 action creator
const increment = payload => ({ type: ‘counter/increment’, payload })
dispatch(increment(2))
- 使用 redux-thunk 中间件后,action 既可以是对象,又可以是函数
// 1 对象:
// 使用 action creator 返回对象
const increment = payload => ({ type: ‘counter/increment’, payload })
// 分发同步 action
dispatch(increment(2))
// 2 函数:
// 使用 action creator 返回函数
const incrementAsync = () => {
return (dispatch, getState) => {
// … 执行异步操作代码
}
}
// 分发异步 action
dispatch(incrementAsync())
步骤:
- 安装:yarn add redux-thunk
- 导入 redux-thunk
- 将 thunk 添加到 applyMiddleware 函数的参数(中间件列表)中
- 创建函数形式的 action,在函数中执行异步操作
核心代码:
store/index.js 中:
// 导入 thunk 中间件
import thunk from ‘redux-thunk’
// 将 thunk 添加到中间件列表中
// 知道:如果中间件中使用 logger 中间件,logger 中间件应该出现在 applyMiddleware 的最后一个参数
const store = createStore(rootReducer, applyMiddleware(thunk, logger))
actions/index.js 中:
export const clearAllAsync = () => {
return (dispatch) => {
// 处理异步的代码:1 秒后再清理已完成任务
setTimeout(() => {
dispatch(clearAll())
}, 1000)
}
}
App.js 中:
import { clearTodoAsync } from ‘../store/actions/todos’
const TodoFooter = () => {
return (
// …
onClick={() => dispatch(clearTodoAsync())}
>
Clear completed
)
}
了解:redux-thunk中间件原理
目标:能够了解redux-thunk中间件的原理
内容:
function createThunkMiddleware(extraArgument) {
// Redux 中间件的写法:const myMiddleware = store => next => action => { / 此处写 中间件 的代码 / }
return ({ dispatch, getState }) => (next) => (action) => {
// redux-thunk 的核心代码:
// 判断 action 的类型是不是函数
// 如果是函数,就调用该函数(action),并且传入了 dispatch 和 getState
if (typeof action === ‘function’) {
return action(dispatch, getState, extraArgument);
}
// 如果不是函数,就调用下一个中间件(next),将 action 传递过去
// 如果没有其他中间件,那么,此处的 next 指的就是:Redux 自己的 dispatch 方法
return next(action);
};
}
// 所以,在使用了 redux-thunk 中间件以后,那么,redux 就既可以处理 对象形式的 action 又可以处理 函数形式的 action 了
// 1 处理对象形式的 action
dispatch({ type: ‘todos/clearAll’ }) // 对应上面第 14 行代码
// 2 处理函数型的 action
export const clearAllAsync = () => {
return dispatch => {
// 在此处,执行异步操作
setTimeout(() => {
// 异步操作完成后,如果想要修改 redux 中的状态,就必须要
// 分发一个 对象形式的 action(同步的 action)
dispatch({ type: types.CLEAR_ALL })
}, 1000)
}
}
dispatch(clearAllAsync()) // 对应上面第 8、9 行代码
redux-devtools-extension中间件
目标:能够使用chrome开发者工具调试跟踪redux状态
内容:
- redux-devtools-exension 文档
- 先给 Chrome 浏览器安装 redux 开发者工具,然后,就可以查看 Redux 状态了
步骤:
- 安装: yarn add redux-devtools-extension
- 从该中间件中导入 composeWithDevTools 函数
- 调用该函数,将 applyMiddleware() 作为参数传入
- 打开 Chrome 浏览器的 redux 开发者工具并使用
import thunk from ‘redux-thunk’
import { composeWithDevTools } from ‘redux-devtools-extension’
const store = createStore(reducer, composeWithDevTools(applyMiddleware(thunk)))
export default store
了解:redux 中间件原理
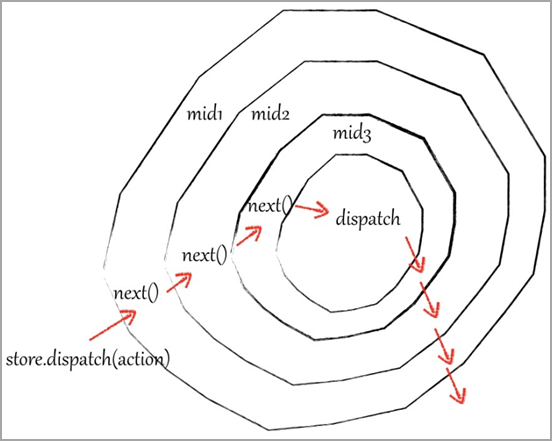
- Redux 中间件原理:创建一个函数,包装 store.dispatch,使用新创建的函数作为新的 dispatch
- 比如下图,logger 就是一个中间件,使用该中间件后 store.dispatch 就是包装后的新 dispatch
- 中间件修改了 store.dispatch,在分发动作和到达 reducer 之间提供了扩展
- redux 中间件采用了 洋葱模型 来实现
- 自己实现记录日志的 redux 中间件:
// 简化写法:
// store 表示:redux 的 store
// next 表示:下一个中间件,如果只使用一个中间,那么 next 就是 store.dispatch(redux 自己的 dispatch 函数)
// action 表示:要分发的动作
const logger = store => next => action => {
console.log(‘prev state:’, store.getState()) // 更新前的状态
// 记录日志代码
console.log(‘dispatching’, action)
// 如果只使用了一个中间件:
// 那么,next 就表示原始的 dispatch
// 也就是:logger中间件包装了 store.dispatch
let result = next(action)
// 上面 next 代码执行后,redux 状态就已经更新了,所以,再 getState() 拿到的就是更新后的最新状态值
// 记录日志代码
console.log(‘next state’, store.getState()) // 更新后的状态
return result
}
// 完整写法:
const logger = store => {
return next => {
return action => {
// 中间件代码写在这个位置:
}
}
}
理解Redux异步数据流
综合案例-黑马头条
接口说明
- 获取频道列表:http://geek.itheima.net/v1_0/channels
- 获取频道新闻:http://geek.itheima.net/v1_0/articles?channel_id=频道id×tamp=时间戳
1. 结构搭建
目标:能够根据模板搭建案例结构
内容:使用准备好的模板内容搭建项目
2. 配置Redux基本结构
目标:能够在黑马头条案例中配置Redux
步骤:
- 安装 redux:yarn add redux
- 在 src 目录中创建 store 文件夹
- 在 store 目录中创建 actions、reducers、actionTypes 目录以及 index.js 文件
- 在 reducers 目录中新建 channels.js、articles.js 和 index.js 文件
- 分别创建 channels 和 articles reducer 并导出
- 在 reducers/index.js 中创建根 reducer 并导出
- 在 store/index.js 中,导入根 reducer 并创建 store 然后导出
核心代码:
store/reducers/channel.js 中:
// 默认值:
const initialState = {
list: [],
activeId: 0
}
export const channels = (state = initialState, action) => {
return state
}
store/reducers/articleList.js 中:
// 默认值:
const initialState = []
export const articles = (state = initialState, action) => {
return state
}
store/reducers/index.js 中:
import { combineReducers } from ‘redux’
import { channels } from ‘./channels’
import { articles } from ‘./articles’
const rootReducer = combineReducers({
channels,
articles
})
export default rootReducer
store/index.js 中:
import { createStore } from ‘redux’
import rootReducer from ‘./reducers’
const store = createStore(rootReducer)
export default store
3. 配置 redux 中间件
目标:能够配置redux的 thunk 中间件和开发者工具
步骤:
- 安装:yarn add redux-thunk redux-devtools-extension
- 在 store 中导入两个包
- 创建 store 时,设置为 redux 的中间件
核心代码:
store/index.js 中:
import { applyMiddleware } from ‘redux’
import { composeWithDevTools } from ‘redux-devtools-extension’
import thunk from ‘redux-thunk’
const store = createStore(rootReducer, composeWithDevTools(applyMiddleware(thunk)))
4. 配置React-Redux
目标:能够在 todomvc 案例中配置 react-redux
步骤:
- 安装 react-redux:yarn add react-redux
- 在 src/index.js 中,导入 Provider 组件
- 在 src/index.js 中,导入创建好的 store
- 使用 Provider 包裹 App 组件,并设置其 store 属性
核心代码:
src/index.js 中:
import { Provider } from ‘react-redux’
import store from ‘./store’
import App from ‘./App’
ReactDOM.render(
document.querySelector(‘#root’)
)
5. 获取频道数据
目标:能够获取频道数据
分析说明:
对于频道数据来说,需要进入页面时就获取。因此,可以通过 useEffect hook 来实现。
步骤:
- 在 Channel 组件中通过 useEffect hook 分发获取频道数据的 action
- 创建 actionTypes/channels.js 文件,创建获取频道数据的 action type
- 创建 actions/channels.js 文件,创建获取频道数据的 thunk action
- 在该 thunk action 发送请求,获取频道数据
- 拿到数据后,再次分发 action 将拿到的频道数据存储到 redux 中
- 在 reducers/channels.js 文件中,将频道数据存储到 redux 中
核心代码:
Channel.js 中:
import { useEffect } from ‘react’
import { useDispatch } from ‘react-redux’
import { getChannels } from ‘../store/actions/channels’
export const Channel = () => {
const dispatch = useDispatch()
useEffect(() => {
dispatch(getChannels())
}, [dispatch])
// …
}
actionTypes/channels.js 中:
// 获取频道数据
export const GET_CHANNELS = ‘channels/get’
actions/channels.js 中:
import as types from ‘../actionTypes/channels’
import axios from ‘axios’
export const getChannels = () => {
return async dispatch => {
const res = await axios.get(‘http://toutiao.itheima.net/v1_0/channels‘)
dispatch({
type: types.GET_CHANNELS,
payload: res.data.data.channels
})
}
}
reducers/channels.js 中:
import as types from ‘../actionTypes/channels’
// 默认值:
const initialState = {
list: [],
activeId: 0
}
export const channels = (state = initialState, action) => {
switch (action.type) {
case types.GET_CHANNELS:
return {
…state,
list: action.payload
}
default:
return state
}
}
6. 渲染频道
目标:能够渲染频道数据
步骤:
- 在 Channel 组件中获取频道数据,并渲染
核心代码:
Channel.js 中:
import { useSelector } from ‘react-redux’
export const Channel = () => {
const dispatch = useDispatch()
const { list } = useSelector(state => state.channels)
return (
{list.map(item => (
className=”select”
>
{item.name}
))}
)
}
7. 点击频道高亮
目标:能够实现点击频道高亮
步骤:
- 在 Channel 组件中拿到高亮频道的 id,为频道项添加高亮类名
- 为频道项绑定点击事件,在点击事件中,分发切换高亮的 action
- 在 actionTypes/channels.js 文件,创建并导出切换高亮的 action type
- 创建 actions/channels.js 文件,创建切换高亮的 action
- 在 reducers/channels.js 中,根据 action 类型切换高亮
核心代码:
Channel.js 中:
import classNames from ‘classnames’
import { useSelector } from ‘react-redux’
export const Channel = () => {
const { list, activeId } = useSelector(state => state.channels)
return (
// …
select: item.id === activeId
})}
onClick={() => dispatch(changeActice(item.id))}
>
{item.name}
)
}
actionTypes/channels.js 中:
export const CHANGE_ACTIVE = ‘channels/changeActive’
actions/channel.js 中:
export const changeActice = id => ({
type: types.CHANGE_ACTIVE,
payload: id
})
reducers/channels.js 中:
// 默认值:
const initialState = {
list: [],
activeId: 0
}
export const channels = (state = initialState, action) => {
switch (action.type) {
case types.CHANGE_ACTIVE:
return {
…state,
active: action.payload
}
}
}
8. 获取文章列表数据
目标:能够获取文章列表数据
步骤:
- 在 ArticleList 组件中通过 useEffect hook 分发获取文章数据的 action
- 创建 actionTypes/articles.js 文件,创建获取文章数据的 action type
- 创建 actions/articles.js 文件,创建获取文章数据的 thunk action
- 在该 thunk action 发送请求,获取文章数据
- 拿到数据后,再次分发 action 将拿到的文章数据存储到 redux 中
- 在 reducers/articles.js 文件中,将文章数据存储到 redux 中
核心代码:
Article.js 中:
import { useEffect } from ‘react’
import { useDispatch, useSelector } from ‘react-redux’
import { getArticles } from ‘../store/actions/articles’
export const ArticleList = () => {
const dispatch = useDispatch()
const { active } = useSelector(state => state.channels)
useEffect(() => {
dispatch(getArticles(active))
}, [dispatch, active])
}
actionTypes/channels.js 中:
// 获取文章数据
export const GET_ARTICLES = ‘articles/get’
actions/channels.js 中:
import axios from ‘axios’
import as types from ‘../actionTypes/articles’
export const getArticles = id => {
return async dispatch => {
const res = await axios.get(
http://toutiao.itheima.net/v1_0/articles?channel_id=${id}×tamp=${Date.now()}
)
dispatch({
type: types.GET_ARTICLES,
payload: res.data.data.results
})
}
}
reducers/channels.js 中:
import as types from ‘../actionTypes/articles’
// 默认值:
const initialState = []
export const articles = (state = initialState, action) => {
switch (action.type) {
case types.GET_ARTICLES:
return action.payload
default:
return state
}
}
9. 渲染文章列表
目标:能够渲染文章列表数据
步骤:
- 在 ArticleList 组件中获取频道数据,并渲染
核心代码:
ArticleList.js 中:
import { useSelector } from ‘react-redux’
import avatar from ‘../assets/back.jpg’
export const ArticleList = () => {
const articles = useSelector(state => state.articles)
return (
{articles.map(item => (
{item.title}
className=”w100”
alt=””
/>
{item.aut_name}
{item.comm_count}评论
{item.pubdate}
))}
)
}

若有收获,就点个赞吧
0 人点赞
