- 一、
acme.sh的方式 - 二、 docker 镜像获取
- 如何在 CentOS 7 上生成 SSL 证书为 Nginx 加密
- apache版效果
- let’s encrypt基础知识
- our work to encrypt the web, protect its users and defend digital rights.
- Before continuing, verify the record is deployed.
- 使用到的命令
- linux使用certbot 自己生成证书apache版">linux使用certbot 自己生成证书apache版
- SSL证书申请与续约
- 注意
- 申请泛域名证书
- 证书移除
- 现在apache 服务器使用证书
一、acme.sh的方式
1.获取acme.sh
https://github.com/acmesh-official/acme.sh
curl https://get.acme.sh | sh
如下所示安装成功
注:我在centos 7上遇到问题,安装完后执行acme.sh,提示命令没找到,如果遇到跟我一样的问题,请关掉终端然后再登陆,或者执行以下指令:
source ~/.bashrc
2.开始获取证书
acme.sh强大之处在于,可以自动配置DNS,不用去域名后台操作解析记录了,我的域名是在阿里注册的,下面给出阿里云解析的例子,其他地方注册的请参考这里自行修改:传送门
请先前往阿里云后台获取App_Key跟App_Secret 传送门,然后执行以下脚本
# 替换成从阿里云后台获取的密钥
export Ali_Key=”sdfsdfsdfljlbjkljlkjsdfoiwje”
export Ali_Secret=”jlsdflanljkljlfdsaklkjflsa”
# 换成自己的域名
acme.sh —issue —dns dns_ali -d zhuziyu.cn -d *.zhuziyu.cn
这里是通过线程休眠120秒等待DNS生效的方式,所以至少需要等待两分钟
到了这一步大功告成,撒花
生成的证书放在该目录下: ~/acme.sh/domain/
下面是一个Nginx应用该证书的例子:
# domain自行替换成自己的域名
server {
server_name xx.domain.com;
listen 443 http2 ssl;
ssl_certificate /path/.acme.sh/domain/fullchain.cer;
ssl_certificate_key /path/.acme.sh/domain/domain.key;
ssl_trusted_certificate /path/.acme.sh/domain/ca.cer;
location / {<br /> proxy_set_header X-Forwarded-For $proxy_add_x_forwarded_for;<br /> proxy_set_header Host $host;<br /> proxy_pass http://127.0.0.1:10086;<br /> }<br />}<br /><br />`acme.sh`比`certbot`的方式更加自动化,省去了手动去域名后台改DNS记录的步骤,而且不用依赖Python,墙裂推荐<br />第一次成功之后,`acme.sh`会记录下App_Key跟App_Secret,并且生成一个定时任务,每天凌晨0:00自动检测过期域名并且自动续期。对这种方式有顾虑的,请慎重,不过也可以自行删掉用户级的定时任务,并且清理掉~/.acme.sh文件夹就行<br />
二、 docker 镜像获取
如果装有docker环境的话,也可以用docker镜像来获取证书,只需一行命令即可
docker run —rm -it \
-v “$(pwd)/out”:/acme.sh \
-e Ali_Key=”xxxxxx” \
-e Ali_Secret=”xxxx” \
neilpang/acme.sh —issue —dns dns_ali -d domain.cn -d *.domain.cn
成功之后,证书会保存在当前目录下的out文件夹,也可以指定路径,修改上面第一行 "$(pwd)/out",改为你想要保存的路径即可。
详细用法,可以参考:传送门
获取下来的证书跟方式一 获取的一模一样,其他信息请参考方式一。
https://linuxops.org/blog/linux/certbot.html
https://zzzmh.cn/single.jsp?id=45
如何在 CentOS 7 上生成 SSL 证书为 Nginx 加密
https://www.yuque.com/kaifazhinan/blog/nsd6np
./certbot-auto certonly --email 347900574@qq.com --agree-tos --webroot -w /home/www/htdocs/cms -d cms.bfire.vipcertbot certonly --webroot -w /home/www/htdocs/cms -d cms.bfire.vip -m 347900574@qq.com --agree-toscertbot certonly --email 347900574@qq.com --agree-tos --webroot -w /home/www/htdocs/cms -d cms.bfire.vip./certbot-auto certonly --manual -d *.bfire.vip --agree-tos --no-bootstrap --manual-public-ip-logging-ok --preferred-challenges dns-01 --server https://acme-v02.api.letsencrypt.org/directoryhttps://www.jianshu.com/p/df6d13187578./certbot-auto renew --force-renewal/etc/letsencrypt/live/bfire.vip/fullchain.pem/etc/letsencrypt/live/bfire.vip/privkey.pemcert.pem -> ../../archive/bfire.vip/cert1.pemlrwxrwxrwx 1 root root 34 Jul 26 15:01 chain.pem -> ../../archive/bfire.vip/chain1.pemlrwxrwxrwx 1 root root 38 Jul 26 15:01 fullchain.pem -> ../../archive/bfire.vip/fullchain1.pemlrwxrwxrwx 1 root root 36 Jul 26 15:01 privkey.pem -> ../../archive/bfire.vip/privkey1.pem/usr/local/apache/bin/apachectl restartvim conf/extra/httpd-ssl.conf
apache版效果
https://www.jianshu.com/p/df6d13187578
2018年3月13日,Let’s Encrypt终于上线了在1月就应该上线的泛域名证书,这个证书类型为泛域名提供了可用的HTTPS方案。
let’s encrypt基础知识
- let’s encrypt是一个认证机构(Certificate Authority = CA)
- 想使用HTTPS需要认证机构颁发的电子证书
- Let’s Encrypt和其他认证机构的区别(或者说是卖点):
- 免费,Let’s Encrypt提供期限是90天的免费电子证书
- 提供工具certbot自动生成电子证书文件
- Let’s Encrypt为了自动生成电子证书搞了一个ACME协议
- Automatic Certificate Management Environment=ACME,自动认证管理环境协议
- 协议草案已经提交IETF
- ACME协议的基本思路是:
- 在你服务器上生成一次性的随机特征数据(nonce)
- 然后通过Let’s Encrypt的服务器核对这个数据
- 核对成功发放证书
- 有两种方式,HTTP和DNS,一般使用的是前者
-
获取泛域名证书
安装Certbot
从官方源安装最新版certbot(最新版为0.22.0,从0.22.0版本才开始支持泛域名申请,不推荐从Debian源安装,常年不更新,还停留在0.10)
wget https://dl.eff.org/certbot-autochmod a+x ./certbot-auto
初始化
./certbot-auto
获取证书
因为目前大多数国内的DNS服务商不在API支持的列表里,所以以下使用手动方式进行DNS认证,只要将下方命令中的
*.minirplus.com替换为自己的域名即可./certbot-auto certonly --manual -d *.minirplus.com --agree-tos --no-bootstrap --manual-public-ip-logging-ok --preferred-challenges dns-01 --server https://acme-v02.api.letsencrypt.org/directory
注意!域名的
minirplus.com解析记录必须以A记录方式指向当前运行命令的服务器IP,而不能使用CNAME记录。否则会报错,报错信息如下:IMPORTANT NOTES:- The following errors were reported by the server:Domain: minirplus.comType: connectionDetail: DNS problem: SERVFAIL looking up TXT for_acme-challenge.minirplus.comTo fix these errors, please make sure that your domain name wasentered correctly and the DNS A/AAAA record(s) for that domaincontain(s) the right IP address. Additionally, please check thatyour computer has a publicly routable IP address and that nofirewalls are preventing the server from communicating with theclient. If you're using the webroot plugin, you should also verifythat you are serving files from the webroot path you provided.
运行该命令后,会要求
输入邮箱,用于接收证书过期通知Enter email address (used for urgent renewal and security notices) (Enter 'c' tocancel):
接着会出现一段广告,大意是收集客户邮箱给赞助商,
Y或N均可 ```
Would you be willing to share your email address with the Electronic Frontier Foundation, a founding partner of the Let’s Encrypt project and the non-profit organization that develops Certbot? We’d like to send you email about EFF and
our work to encrypt the web, protect its users and defend digital rights.
(Y)es/(N)o:
接着重要的部分来了,在DNS记录中添加一个 `_acme-challenge` 前缀的域名 `TXT记录`,记录的内容为中间显示的随机码`xVloe7V1kMEd2ZlOLlUxv-HltYfTDaMhrrwKjFU47DU`
Please deploy a DNS TXT record under the name _acme-challenge.minirplus.com with the following value:
xVloe7V1kMEd2ZlOLlUxv-HltYfTDaMhrrwKjFU47DU
Before continuing, verify the record is deployed.
Press Enter to Continue
接着确保当前域名的根记录 `minirplus.com` 为 `A记录` 并且指向当前服务器IP(这条原本不成问题,因为国外的服务商的DNS根域名只能添加A记录,但是国内的DNSPOD则更加灵活,可以添加CNAME记录,所以会在认证的时候出现问题)<br />按回车,进行认证<br />等待片刻,出现如下信息,说明认证成功<br />申请操作成功后, 会在界面中输出证书的存放路径, 以及证书的到期时间 (**90天**)
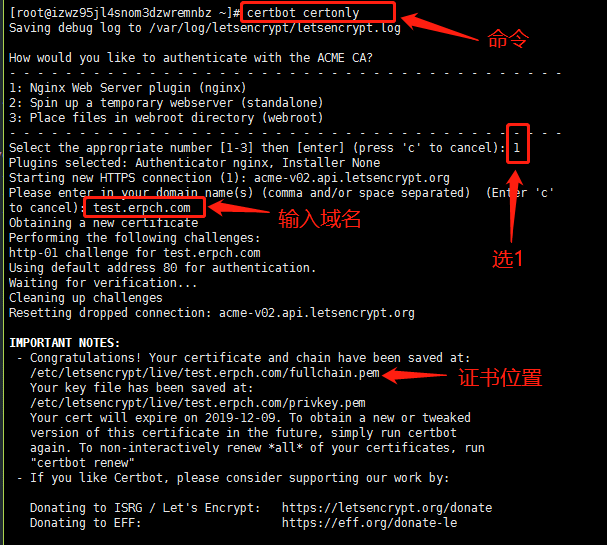
IMPORTANT NOTES:
- Congratulations! Your certificate and chain have been saved at: /etc/letsencrypt/live/minirplus.com/fullchain.pem Your key file has been saved at: /etc/letsencrypt/live/minirplus.com/privkey.pem Your cert will expire on 2018-06-19. To obtain a new or tweaked version of this certificate in the future, simply run certbot-auto again. To non-interactively renew all of your certificates, run “certbot-auto renew”
If you like Certbot, please consider supporting our work by:
Donating to ISRG / Let’s Encrypt: https://letsencrypt.org/donate Donating to EFF: https://eff.org/donate-le ```
证书的存放路径
( 这里以example.com为例 )
生成证书中会创建 /etc/letsencrypt 文件夹, 证书文件默认存放在 /etc/letsencrypt/live/example.com 文件夹中, 其中 example.com 取自第一个域名
在 example.com 文件夹中包含 4 个文件 ./cert.pem ./chain.pem ./fullchain.pem ./privkey.pem
- cert.pem 域名证书
- chain.pem 根证书及中间证书
- fullchain.pem 由 cert.pem 和 chain.pem 合并而成
- privkey.pem 证书私钥
创建一个 2048 位的 Diffie-Hellman 文件
(nginx 默认使用 1024 位的 Diffie–Hellman 进行密钥交换, 安全性太低)
openssl dhparam -out /etc/letsencrypt/live/dhparams.pem 2048
nginx TSL 配置 (强制http重定向到https)
( 这里以example.com为例 )
首先对 http 协议进行 301 重定向到 https 协议
server {listen 80;server_name example.com www.example.com;return 301 https://example.com$request_uri;}
nginx https 相关配置
( 这里以example.com为例 )
server {listen 443 ssl;server_name example.com www.example.com;# 配置站点证书文件地址ssl_certificate /etc/letsencrypt/live/example.com/fullchain.pem;# 配置证书私钥ssl_certificate_key /etc/letsencrypt/live/example.com/privkey.pem;# 配置 Diffie-Hellman 交换算法文件地址ssl_dhparam /etc/letsencrypt/live/dhparams.pem;# 配置服务器可使用的加密算法ssl_ciphers 'ECDHE-ECDSA-CHACHA20-POLY1305:ECDHE-RSA-CHACHA20-POLY1305:ECDHE-ECDSA-AES128-GCM-SHA256:ECDHE-RSA-AES128-GCM-SHA256:ECDHE-ECDSA-AES256-GCM-SHA384:ECDHE-RSA-AES256-GCM-SHA384:DHE-RSA-AES128-GCM-SHA256:DHE-RSA-AES256-GCM-SHA384:ECDHE-ECDSA-AES128-SHA256:ECDHE-RSA-AES128-SHA256:ECDHE-ECDSA-AES128-SHA:ECDHE-RSA-AES256-SHA384:ECDHE-RSA-AES128-SHA:ECDHE-ECDSA-AES256-SHA384:ECDHE-ECDSA-AES256-SHA:ECDHE-RSA-AES256-SHA:DHE-RSA-AES128-SHA256:DHE-RSA-AES128-SHA:DHE-RSA-AES256-SHA256:DHE-RSA-AES256-SHA:ECDHE-ECDSA-DES-CBC3-SHA:ECDHE-RSA-DES-CBC3-SHA:EDH-RSA-DES-CBC3-SHA:AES128-GCM-SHA256:AES256-GCM-SHA384:AES128-SHA256:AES256-SHA256:AES128-SHA:AES256-SHA:DES-CBC3-SHA:!DSS';# 指定服务器密码算法在优先于客户端密码算法时,使用 SSLv3 和 TLS 协议ssl_prefer_server_ciphers on;# ssl 版本 可用 SSLv2,SSLv3,TLSv1,TLSv1.1,TLSv1.2# ie6 只支持 SSLv2,SSLv3 但是存在安全问题, 故不支持ssl_protocols TLSv1 TLSv1.1 TLSv1.2;# 配置 TLS 握手后生成的 session 缓存空间大小 1m 大约能存储 4000 个 sessionssl_session_cache shared:SSL:50m;# session 超时时间ssl_session_timeout 1d;# 负载均衡时使用 此处暂时关闭 详情见 https://imququ.com/post/optimize-tls-handshake.html# 1.5.9 及以上支持ssl_session_tickets off;# 浏览器可能会在建立 TLS 连接时在线验证证书有效性,从而阻塞 TLS 握手,拖慢整体速度。OCSP stapling 是一种优化措施,服务端通过它可以在证书链中封装证书颁发机构的 OCSP(Online Certificate Status Protocol)响应,从而让浏览器跳过在线查询。服务端获取 OCSP 一方面更快(因为服务端一般有更好的网络环境),另一方面可以更好地缓存 以上内容来自 https://imququ.com/post/my-nginx-conf-for-wpo.html# 1.3.7 及以上支持ssl_stapling on;ssl_stapling_verify on;# 根证书 + 中间证书ssl_trusted_certificate /etc/letsencrypt/live/example.com/fullchain.pem;# HSTS 可以告诉浏览器,在指定的 max-age 内,始终通过 HTTPS 访问该域名。即使用户自己输入 HTTP 的地址,或者点击了 HTTP 链接,浏览器也会在本地替换为 HTTPS 再发送请求 相关配置见 https://imququ.com/post/sth-about-switch-to-https.htmladd_header Strict-Transport-Security max-age=60;# 在此填写原本 http 协议中的配置}
以上配置完成后, 重启 nginx 即可完成对 https 的切换
(如遇权限问题请使用sudo)
service nginx restart
或者
sudo systemctl reload nginx
更新证书
certbot生成的证书是有90天期限的。
使用以下命令即可进行 续期, 续期成功后需要服务器
./certbot-auto renew
该命令只会对快到期的证书才会进行更新, 如果希望强制更新, 可以增加 --force-renewal 参数
修改Apache配置文件
进入/etc/apache2/sites-available,修改泛域名配置文件(这里以000-default.conf为例),添加SSL配置,将下面配置中的SSL证书地址,替换为之前成功获取的证书地址(如直接使用以下配置,请修改DocumentRoot和Directory目录为泛域名指向的目录)
<VirtualHost *:80>ServerAdmin webmaster@localhostDocumentRoot /var/www/vpsServerSignature Off<Directory /var/www/vps >Options -Indexes</Directory></VirtualHost><IfModule mod_ssl.c><VirtualHost *:443>ServerAdmin webmaster@localhostDocumentRoot /var/www/vpsServerSignature Off<Directory /var/www/vps >Options -Indexes</Directory>SSLEngine onSSLCertificateFile /etc/letsencrypt/live/minirplus.com/fullchain.pem;SSLCertificateKeyFile /etc/letsencrypt/live/minirplus.com/privkey.pem</VirtualHost></IfModule>
效果
当用户访问任意域名,例如 https://xVloe7V1kMEd2ZlOLlUxv.minirplus.com
都会看到绿色的HTTPS连接标志。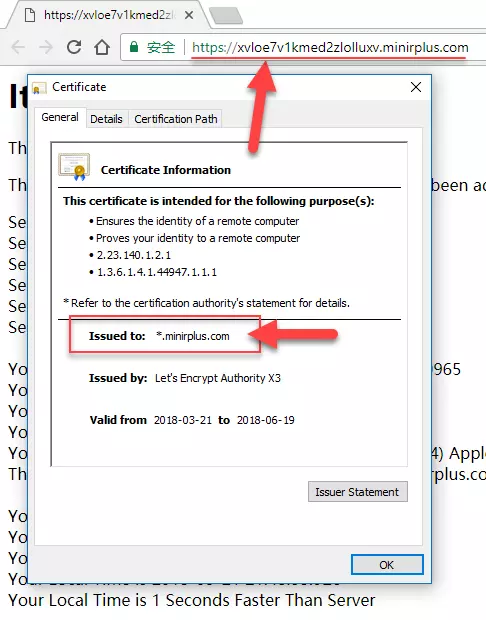
HTTPS连接.png
总结
有了泛域名证书之后有几个好处
使用到的命令
#certbot-auto 在/data/soft#./certbot-auto certonly --manual -d *.minirplus.com --agree-tos --no-bootstrap --manual-public-ip-logging-ok --preferred-challenges dns-01 --server https://acme-v02.api.letsencrypt.org/directory#/usr/local/apache/bin/apachectl restart#vim conf/extra/httpd-ssl.conf#./certbot-auto renew --force-renewalcert.pem -> ../../archive/bfire.vip/cert1.pemlrwxrwxrwx 1 root root 34 Jul 26 15:01 chain.pem -> ../../archive/bfire.vip/chain1.pemlrwxrwxrwx 1 root root 38 Jul 26 15:01 fullchain.pem -> ../../archive/bfire.vip/fullchain1.pemlrwxrwxrwx 1 root root 36 Jul 26 15:01 privkey.pem -> ../../archive/bfire.vip/privkey1.pem
linux使用certbot 自己生成证书apache版
linux使用certbot 自己生成证书apache版
1.获取certbot-auto
wget https://dl.eff.org/certbot-auto
2.添加执行权限
chmod a+x certbot-auto
3.自动下载和安装环境需要的组件
./certbot-auto —apache certonly
4.生成域名所需要的证书(红色部分为网站访问的路径和需要生成证书的域名)
./certbot-auto certonly —email 123456@qq.com —agree-tos —webroot -w /www/web/blxz/public_html -d blxz.qq.cn
5.生成的路径应该是(应该是四个证书文件):
/etc/letsencrypt/live/blxz.qq.com/privkey.pem
6.配置apache文件(vhost的域名配置文件.conf)
DocumentRoot /www/web/blxz/public_html
ServerName blxz.qq.com
ServerAlias blxz.qq.com
ErrorDocument 400 /errpage/400.html
ErrorDocument 403 /errpage/403.html
ErrorDocument 404 /errpage/404.html
SSLEngine on
SSLCertificateFile /etc/letsencrypt/live/blxz.qq.com/cert.pem
SSLCertificateKeyFile /etc/letsencrypt/live/blxz.qq.com/privkey.pem
SSLCertificateChainFile /etc/letsencrypt/live/blxz.qq.com/chain.pem
php_admin_value open_basedir /www/web/blxz:/tmp
DeflateCompressionLevel 7
AddOutputFilterByType DEFLATE text/html text/plain text/xml application/x-httpd-php
AddOutputFilter DEFLATE css js html htm gif jpg png bmp php
Options FollowSymLinks
AllowOverride All
Order allow,deny
Allow from all
7.重启apache配置
service httpd restart
注意:certbot Let’s Encrypt永久免费但需要90天激活一次续约
SSL证书申请与续约
安装certbot
yum install certbot python2-certbot-nginx
注意
每个域名有申请限量,请勿重复操作
每个注册域的证书(每周50个)
每周有5份重复证书数限制
限量方式:https://letsencrypt.org/docs/rate-limits/
查询申请历史:https://crt.sh/
申请泛域名证书
certbot certonly -d *.erpch.com -d erpch.com —manual —preferred-challenges dns —server https://acme-v02.api.letsencrypt.org/directory
certbot certonly -d *.72mao.com -d 72mao.com —manual —preferred-challenges dns —server https://acme-v02.api.letsencrypt.org/directory
参照文档:https://www.vxwo.com/t/1022
申请单域名证书
证书续约
certbot renew
证书移除
certbot revoke —cert-path /etc/letsencrypt/live/xxx/cert1.pem
现在apache 服务器使用证书
#cd /data/soft/#./certbot-auto certonly -d *.bfire.vip -d bfire.vip --manual --preferred-challenges dns --server https://acme-v02.api.letsencrypt.org/directory#/usr/local/apache/bin/apachectl restart# ps -ef|grep httpd#续约#./certbot-auto renew- Congratulations! Your certificate and chain have been saved at:/etc/letsencrypt/live/bfire.vip/fullchain.pemYour key file has been saved at:/etc/letsencrypt/live/bfire.vip/privkey.pemYour cert will expire on 2020-03-04. To obtain a new or tweakedversion of this certificate in the future, simply run certbot-autoagain. To non-interactively renew *all* of your certificates, run"certbot-auto renew"- If you like Certbot, please consider supporting our work by:Donating to ISRG / Let's Encrypt: https://letsencrypt.org/donateDonating to EFF: https://eff.org/donate-le

若有收获,就点个赞吧
0 人点赞
