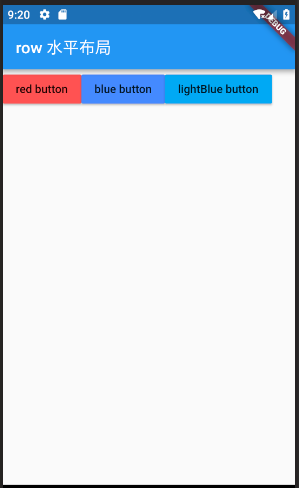
直接row包装
import 'package:flutter/material.dart';void main() => runApp(MyApp());class MyApp extends StatelessWidget {// This widget is the root of your application.@overrideWidget build(BuildContext context) {return MaterialApp(title: 'Flutter Demo',theme: ThemeData(primarySwatch: Colors.blue,),home: Scaffold(appBar: new AppBar(title: new Text ('row 水平布局')),body: new Row(children: <Widget>[new RaisedButton( //按钮onPressed: (){},color: Colors.redAccent,child: new Text('red button'),),new RaisedButton( //按钮onPressed: (){},color: Colors.blueAccent,child: new Text('blue button'),),new RaisedButton( //按钮onPressed: (){},color: Colors.lightBlue,child: new Text('lightBlue button'),),],)));}}
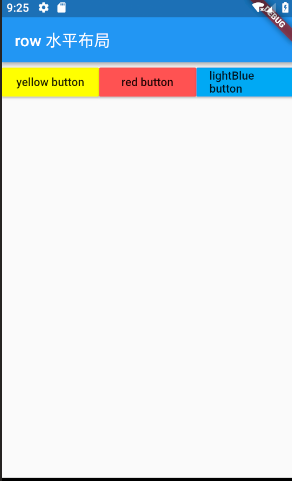
使用expanded 包装 填满水平 灵活布局
import 'package:flutter/material.dart';void main() => runApp(MyApp());class MyApp extends StatelessWidget {// This widget is the root of your application.@overrideWidget build(BuildContext context) {return MaterialApp(title: 'Flutter Demo',theme: ThemeData(primarySwatch: Colors.blue,),home: Scaffold(appBar: new AppBar(title: new Text ('row 水平布局')),body: new Row(children: <Widget>[Expanded(child: new RaisedButton( //按钮onPressed: (){},color: Colors.yellowAccent,child: new Text('yellow button'),),),Expanded(child: new RaisedButton( //按钮onPressed: (){},color: Colors.redAccent,child: new Text('red button'),),),Expanded(child: new RaisedButton( //按钮onPressed: (){},color: Colors.lightBlue,child: new Text('lightBlue button'),),),],)));}}

若有收获,就点个赞吧
0 人点赞
