安装 iTerm2
首先,下载 iTerm2 来替换默认终端。
https://iterm2.com/
什么是 iTerm2?
iTerm2 is a replacement for Terminal and the successor to iTerm. It works on Macs with macOS 10.12 or newer. iTerm2 brings the terminal into the modern age with features you never knew you always wanted.
iTerm2 是默认终端的替代品,也是目前 Mac 系统下最好用的终端工具,集颜值和效率于一身。
迁移配置(可选)
因为我之前也是 Mac 平台,所以有一些配置可以在 ITerm 里导出,其实重新配置也都一样,没有什么影响。
在原电脑上的 iterm 导出配置:
导出配置
然后在新电脑导入:
如上图 import JSON Profiles,然后设置为默认配置。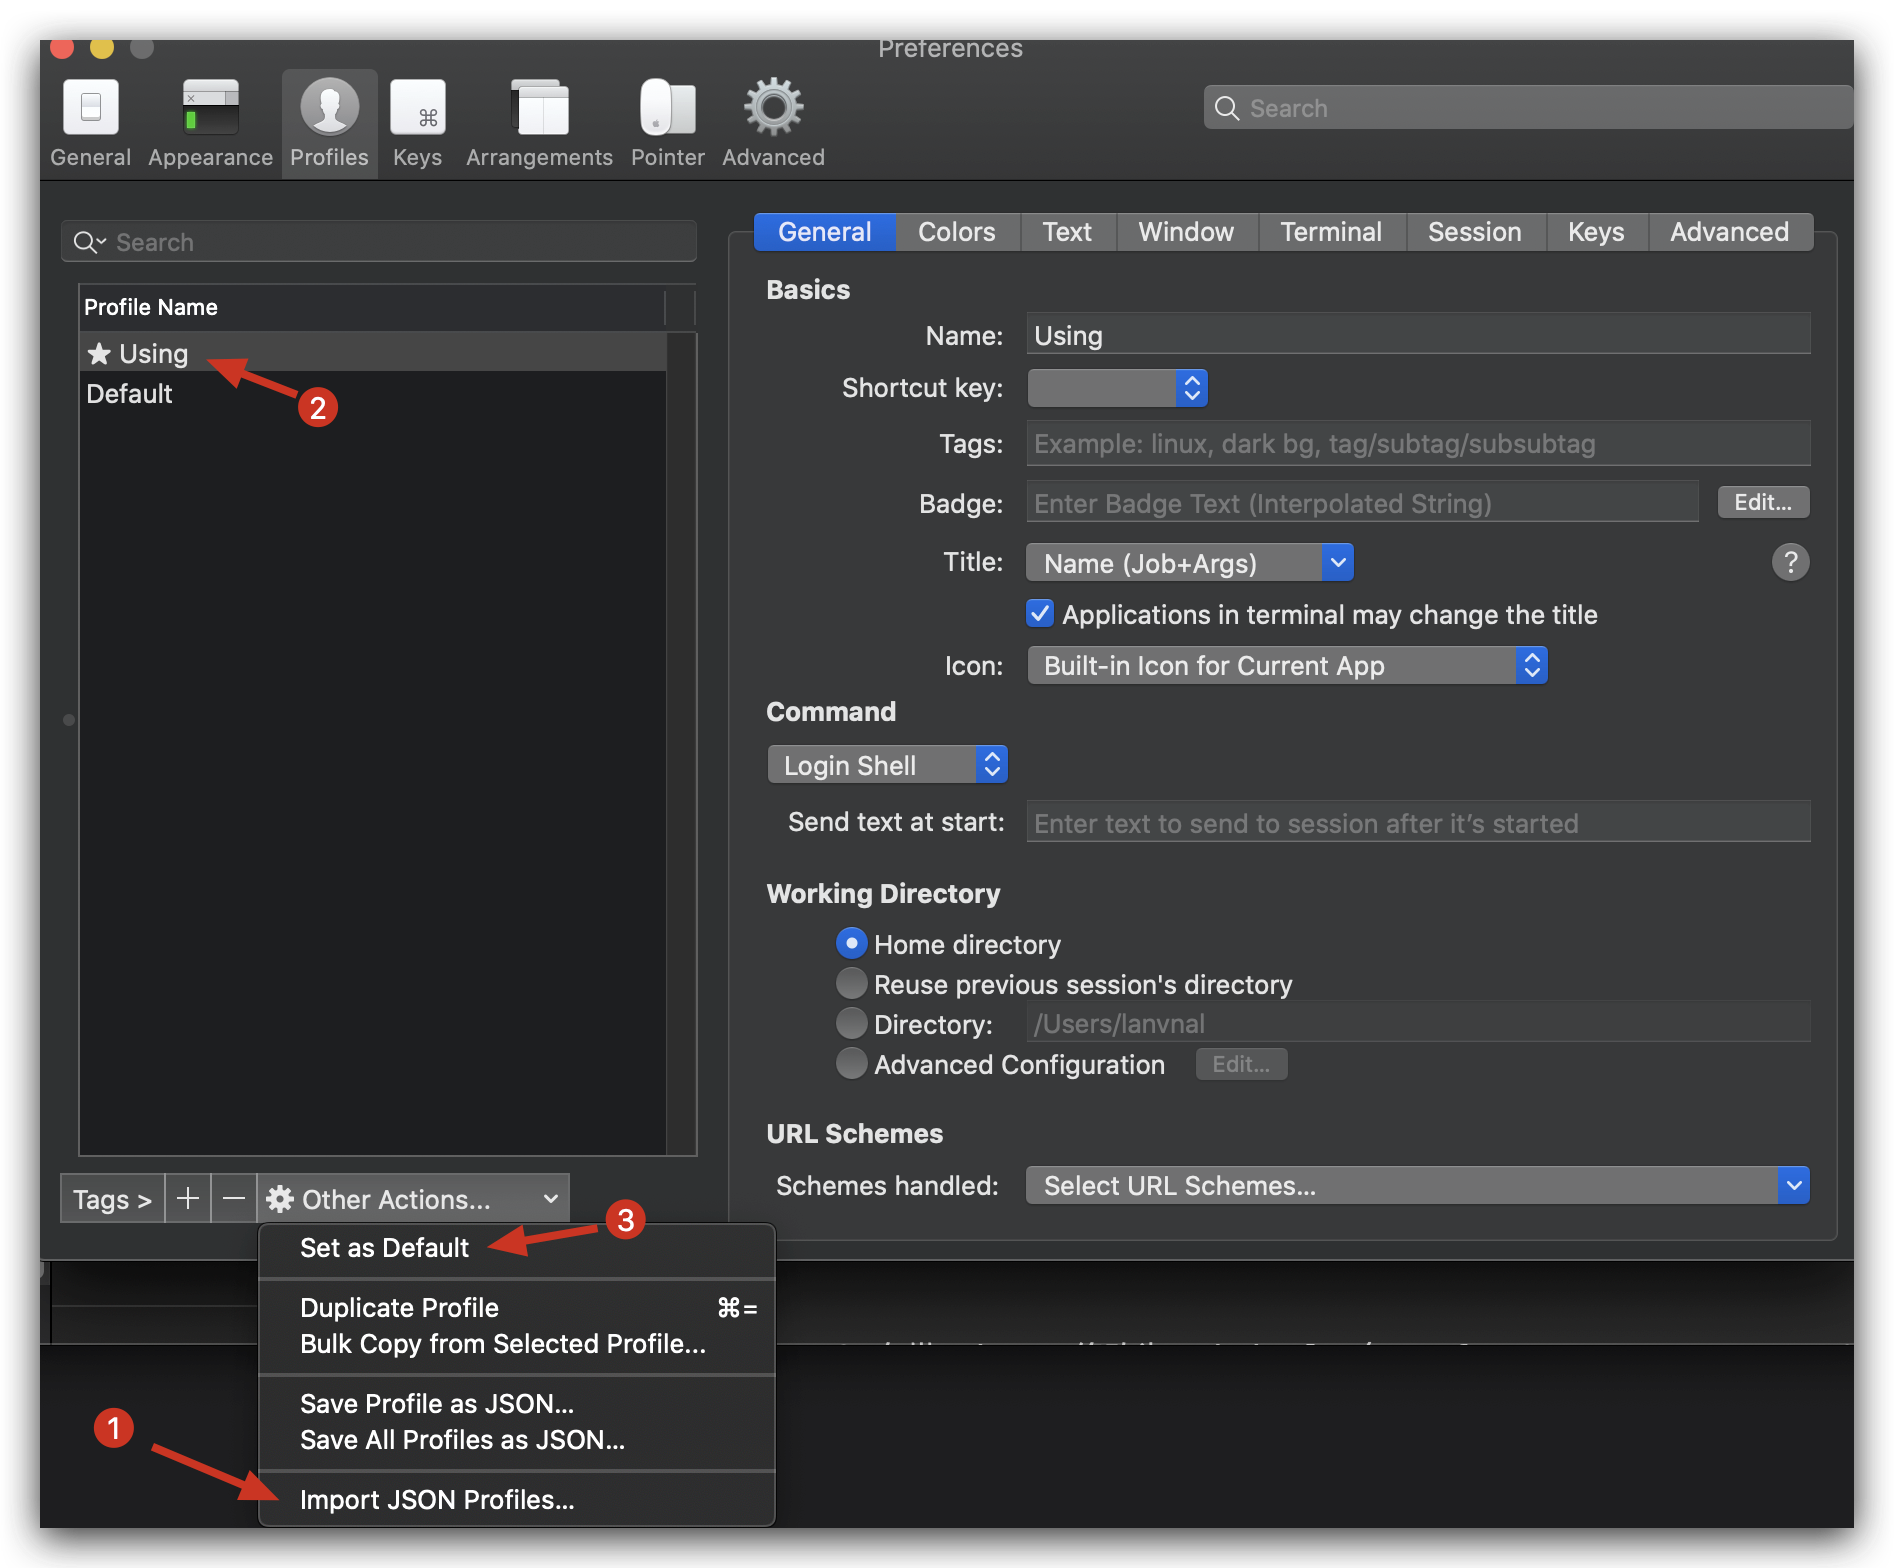
导入并使用
调整 Status Bar
将 iTerm2 自带 theme 修改为 Minimal ( Preferences-Appearance-General-Theme ) 以达到顶栏沉浸式的效果
可以在 Profiles 选项卡,Session 页面最底部看到开启选项。Status bar enabled 选项,勾选上即可打开。点击右边的 Configure Status Bar 按钮可设置显示的内容。
可以看到能显示的内容非常多,把上方要显示的内容拖动到下方 Active Components 区域即添加。
在 Preference 页面中点击 Appearance 选项卡,可以设置 Status bar 的位置,修改 Status bar location,我这里改到 Bottom 底部。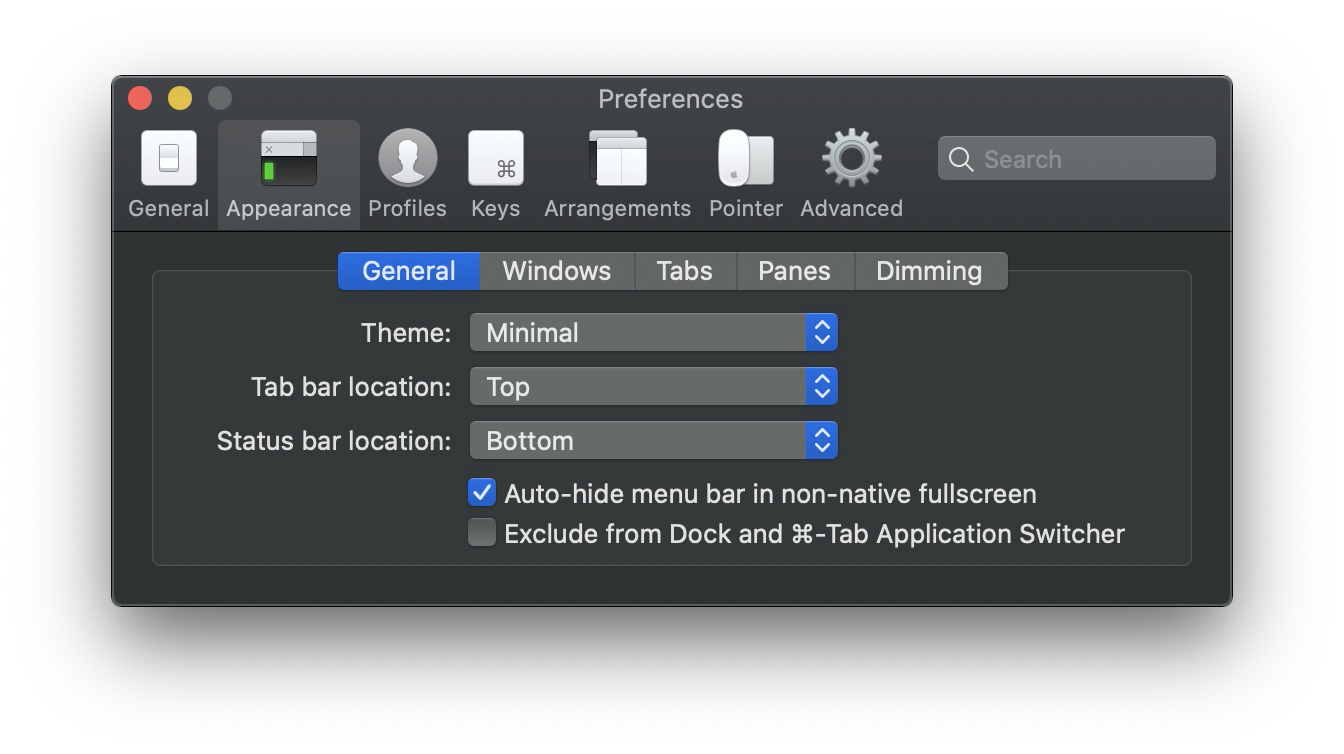
设置位置
Status bar 效果:
显示的内容也可以自己调节: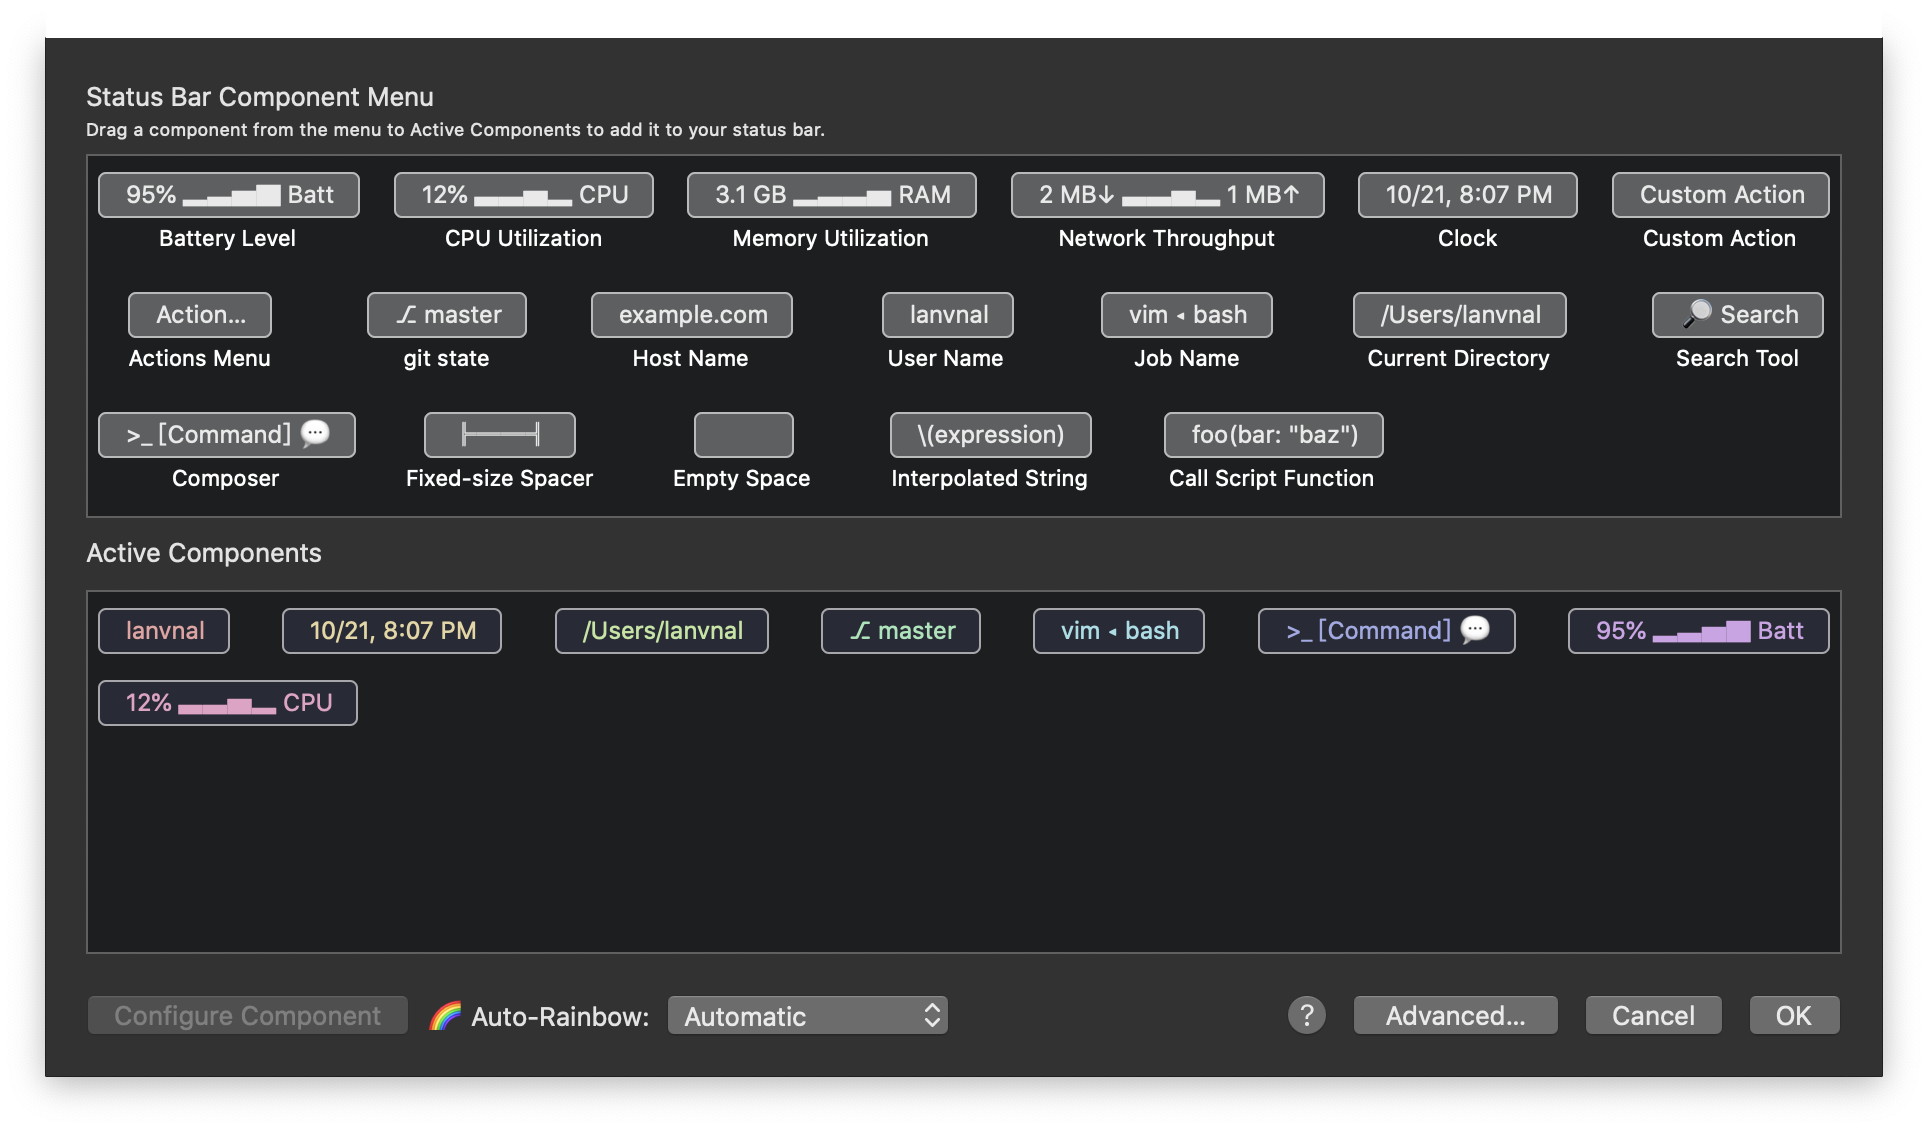
Status bar 调节
更改配色 (可选)
我比较喜欢 Dracula 配色方案,包括 VS Code 使用的都是这个配色方案。
https://draculatheme.com/iterm/
解压后更换 Preferences-Profiles-Color-Color Presets-Import
设置 zsh 主题
配置主题:
只需要修改 .zshrc 文件中的 ZSH_THEME="xx" 属性即可。
我目前使用的主题是:spaceship
按照 github 项目说明中的方法配置即可,或者参考本文下面的主题配置
前提:
安装了 zsh
安装了 powerline 字体
安装方法参考:https://github.com/powerline/fonts
然后把 iTerm 的字体设置为 powerline,包括 Font 和 Non-ASCII Font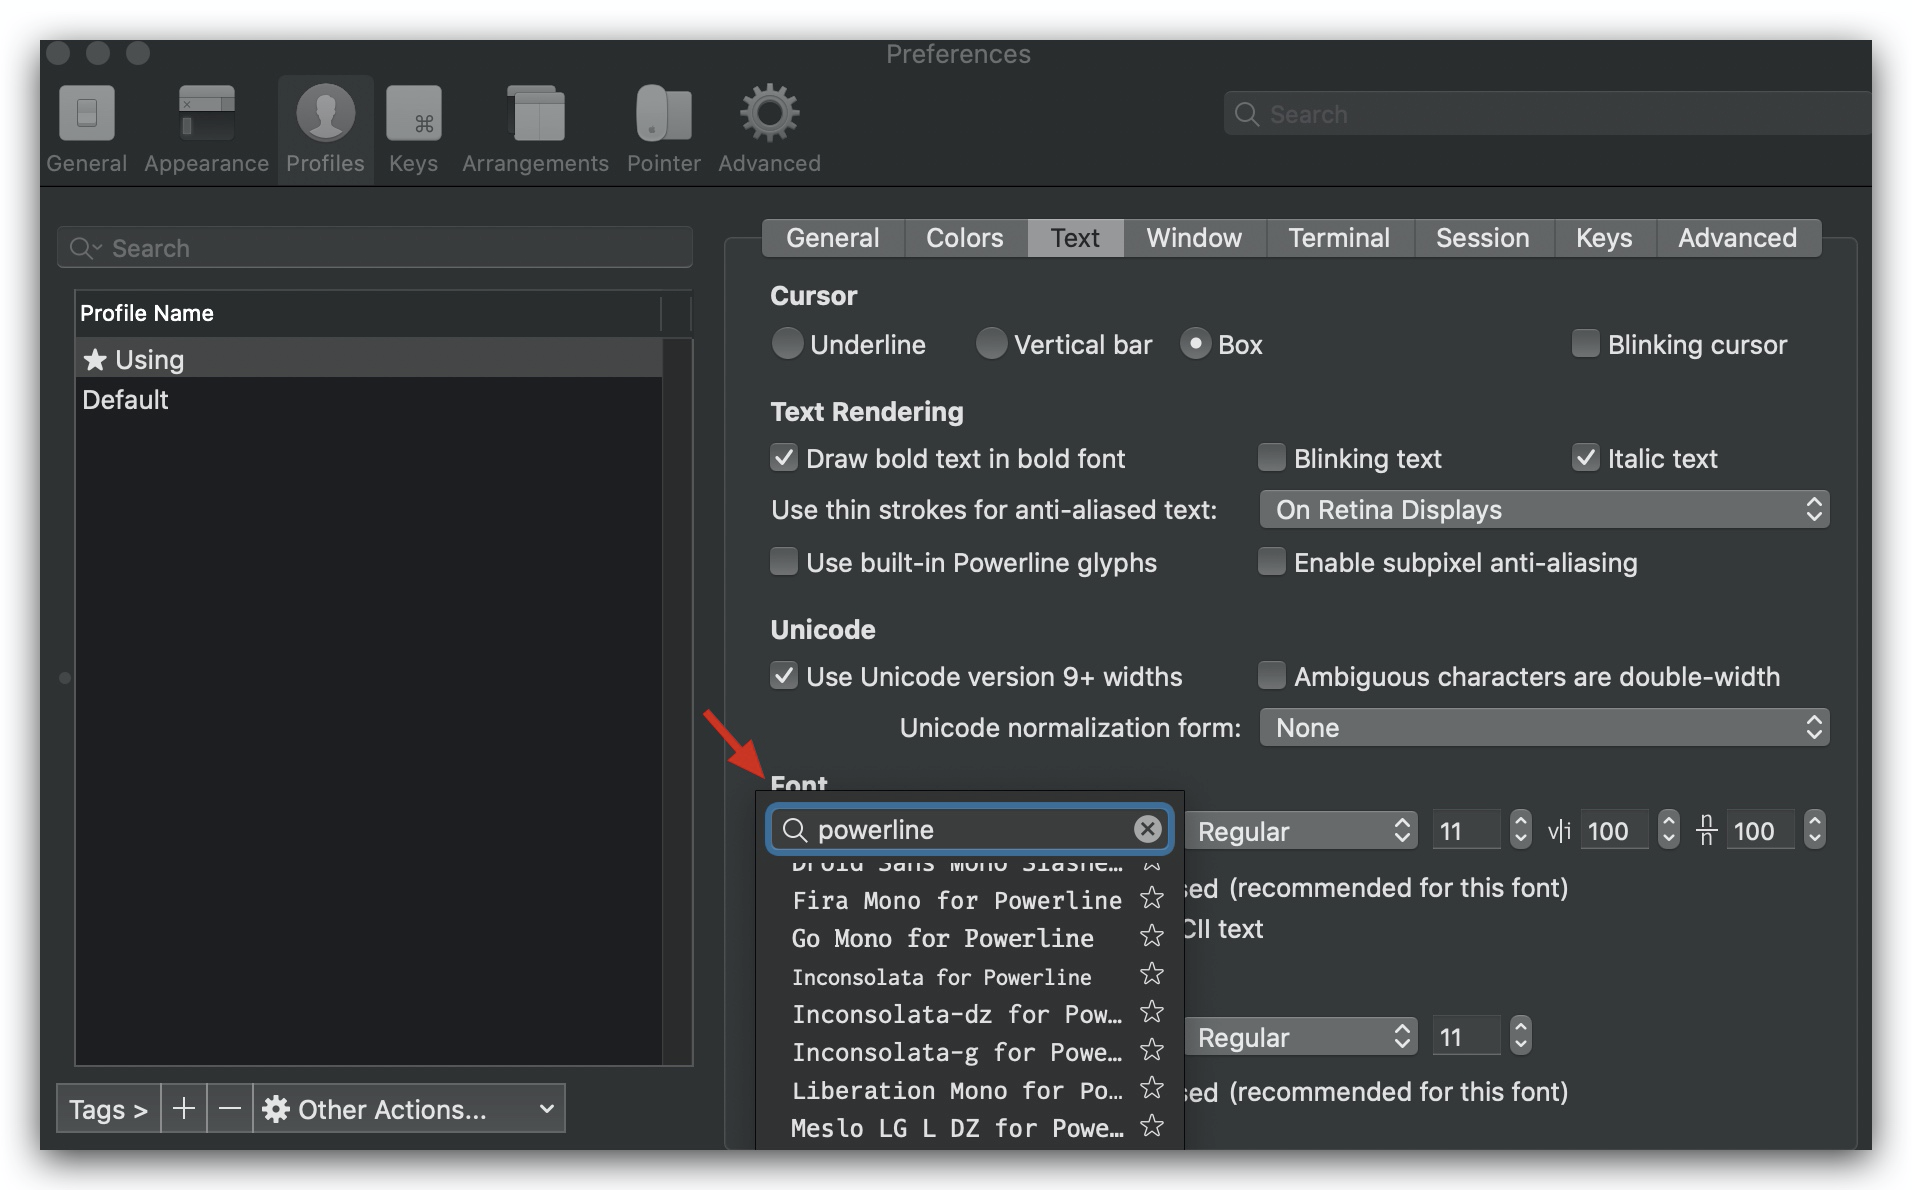
设置字体
下载主题文件:git clone [https://github.com/denysdovhan/spaceship-prompt.git](https://github.com/denysdovhan/spaceship-prompt.git) "$ZSH_CUSTOM/themes/spaceship-prompt" --depth=1
创建软连接ln -s "$ZSH_CUSTOM/themes/spaceship-prompt/spaceship.zsh-theme" "$ZSH_CUSTOM/themes/spaceship.zsh-theme"
修改 zsh 配置vim ~/.zshrc
修改:ZSH_THEME="spaceship"
生效:source ~/.zshrc
然后就是主题的一些配置,配置说明参考这个文件:[https://github.com/denysdovhan/spaceship-prompt/blob/master/docs/Options.md](https://github.com/denysdovhan/spaceship-prompt/blob/master/docs/Options.md)
具体配置显示哪些内容,根据文档在 ./zshrc中添加就好。这里说一下我的配置:
PS:颜色数值参考这个 https://upload.wikimedia.org/wikipedia/commons/1/15/Xterm_256color_chart.svg
我的配置
设置显示时间
SPACESHIP_TIME_SHOW=”true”
设置显示用户名,并改用户名颜色为猛男粉
SPACESHIP_USER_SHOW=”always”
SPACESHIP_USER_COLOR=”212”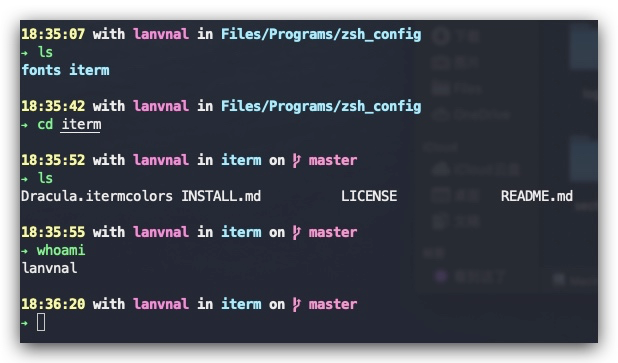
主题对应地址:
https://github.com/denysdovhan/spaceship-prompt
设置 Oh-My-Zsh
什么是 Oh-My-Zsh?
Oh My Zsh 是一款社区驱动的命令行工具,它基于 zsh 命令行,提供了主题配置,插件机制,大大提高了可玩(用)性。提升使用效率还能使人愉快 hhh
Oh My Zsh is a delightful, open source, community-driven framework for managing your Zsh configuration. It comes bundled with thousands of helpful functions, helpers, plugins, themes, and a few things that make you shout…
网站:https://ohmyz.sh/
输入如下命令:
curl 方式sh -c "$(curl -fsSL [https://raw.githubusercontent.com/ohmyzsh/ohmyzsh/master/tools/install.sh)"](https://raw.githubusercontent.com/ohmyzsh/ohmyzsh/master/tools/install.sh)%22)
或者使用 wget:sh -c "$(wget [https://raw.githubusercontent.com/robbyrussell/oh-my-zsh/master/tools/install.sh](https://raw.githubusercontent.com/robbyrussell/oh-my-zsh/master/tools/install.sh) -O -)"
配置 Oh-My-Zsh
配置命令自动提示
关于插件的配置,如果要看目前安装了哪些插件,可以在. zshrc 中搜索 plugins 关键字,获得如下,也是我老电脑中的配置内容:
plugins=(
git
autojump
zsh-autosuggestion
zsh-syntax-highlighting
)
关于命令提示
当我们输入命令过程中,终端会自动提示你接下来可能要输入的命令,这时按 → 便可输出这些命令,非常方便。
效果可参考 GitHub 项目说明中的视频
项目地址:https://github.com/zsh-users/zsh-autosuggestions
1、克隆项目到本地 $ZSH_CUSTOM/plugins 路径下 默认是 ·~/.oh-my-zsh/custom/plugins<br />git clone https://github.com/zsh-users/zsh-autosuggestions ${ZSH_CUSTOM:-~/.oh-my-zsh/custom}/plugins/zsh-autosuggestions<br />**2、**编辑~/.zshrc配置文件,添加到 plugins 列表中<br />plugins=(zsh-autosuggestion)`
3、新开一个终端窗口查看效果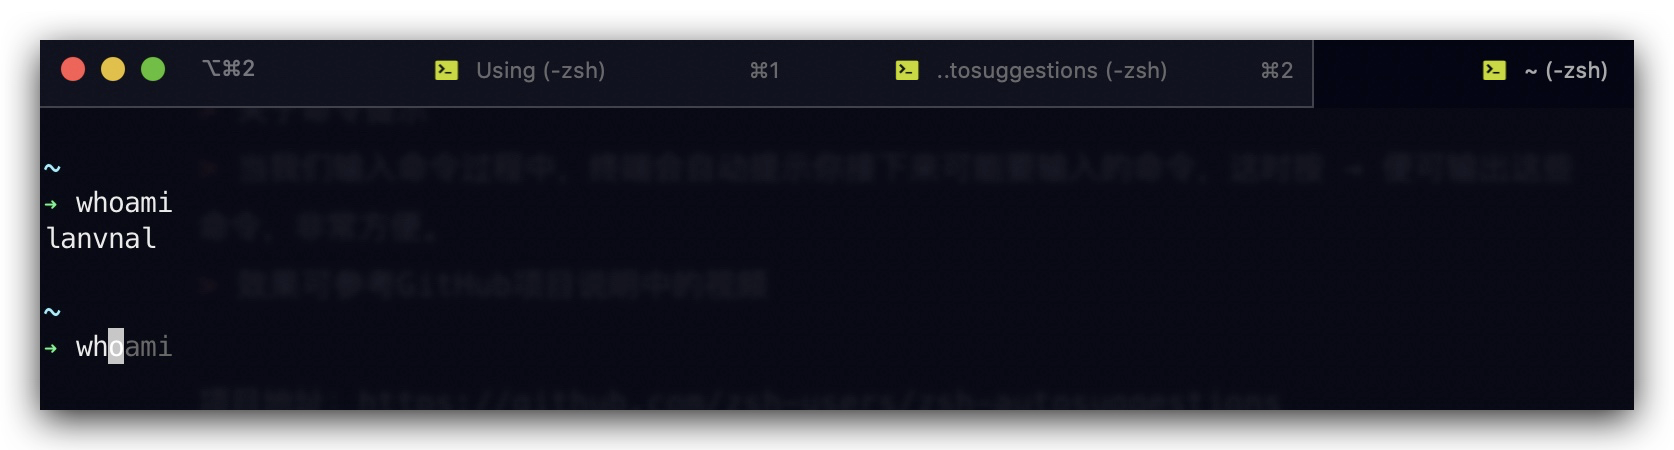
自动提示
如果最后看不到提示的效果可能是颜色配置问题,参考 GitHub 项目说明中的修改方法去修改配置
配置语法高亮显示
项目地址:
https://github.com/zsh-users/zsh-syntax-highlighting
安装方法:
推荐使用 HomeBrew 进行安装:
1、brew 安装
brew install zsh-syntax-highlighting
brew 的项目地址 https://brew.sh/
2、在 ~/.zshrc 尾部,插入一行:
source /usr/local/share/zsh-syntax-highlighting/zsh-syntax-highlighting.zsh
vim 中 直接使用 shift+g 可以跳转的最后一行
3、生效配置
source ~/.zshrc
❗️不过这时产生了一些警告信息:
➜ source ~/.zshrc
[oh-my-zsh] Insecure completion-dependent directories detected:
drwxrwxr-x 3 lanvnal admin 96 9 22 01:51 /usr/local/share/zsh
drwxrwxr-x 4 lanvnal admin 128 9 22 01:53 /usr/local/share/zsh/site-functions
[oh-my-zsh] For safety, we will not load completions from these directories until
[oh-my-zsh] you fix their permissions and ownership and restart zsh.
[oh-my-zsh] See the above list for directories with group or other writability.
[oh-my-zsh] To fix your permissions you can do so by disabling
[oh-my-zsh] the write permission of “group” and “others” and making sure that the
[oh-my-zsh] owner of these directories is either root or your current user.
[oh-my-zsh] The following command may help:
[oh-my-zsh] compaudit | xargs chmod g-w,o-w
[oh-my-zsh] If the above didn’t help or you want to skip the verification of
[oh-my-zsh] insecure directories you can set the variable ZSH_DISABLE_COMPFIX to
两种解决方法:
1、按照安装提示去修改对应目录的权限:
chmod 755 /usr/local/share/zsh
chmod 755 /usr/local/share/zsh/site-functions
2、在 ~/.zshrc 这个文件中新增 ZSH_DISABLE_COMPFIX=true 即可。
配置 autojump
效果:
实现目录间快速跳转,想去哪个目录直接 j + 目录名 (甚至不用输全),不用在频繁的 cd 了
项目地址:https://github.com/wting/autojump
安装方法:
1、brew 安装brew install autojump
2、修改 ~/.zshrc 文件,添加到 plugins 配置列表并在尾部追加如下内容:[ -f /usr/local/etc/profile.d/autojump.sh ] && . /usr/local/etc/profile.d/autojump.sh
plugins 中别忘了添加上 autojump:
plugins=(
git
zsh-autosuggestion
autojump
)
然后 source 使他生效
PS:在 brew 安装完会有提示输出,按照提示来配置就好:
Add the following line to your ~/.bash_profile or ~/.zshrc file (and remember
to source the file to update your current session):
[ -f /usr/local/etc/profile.d/autojump.sh ] && . /usr/local/etc/profile.d/autojump.sh
If you use the Fish shell then add the following line to your ~/.config/fish/config.fish:
[ -f /usr/local/share/autojump/autojump.fish ]; and source /usr/local/share/autojump/autojump.fish
zsh completions have been installed to:
/usr/local/share/zsh/site-functions
其他:item2 快捷命令
command + t 新建标签
command + w 关闭标签
command + 数字 command + 左右方向键 切换标签
command + enter 切换全屏
command + f 查找
command + d 垂直分屏
command + shift + d 水平分屏
command + option + 方向键 command + [ 或 command + ] 切换屏幕
command + ; 查看历史命令
command + shift + h 查看剪贴板历史
Control + u 清除当前行
Control + l 清屏
Control + a 到行首
Control + e 到行尾
Control + f/b 前进后退
Control + p 上一条命令
Control + r 搜索命令历史

若有收获,就点个赞吧
0 人点赞
