一、商品的基本知识
1.1 基本信息—分类
一般情况可以分为两级或者三级。咱们的项目一共分为三级,即一级分类、二级分类、三级分类。<br /> <br />比如:家用电器是一级分类,电视是二级分类,那么超薄电视就是三级分类。<br />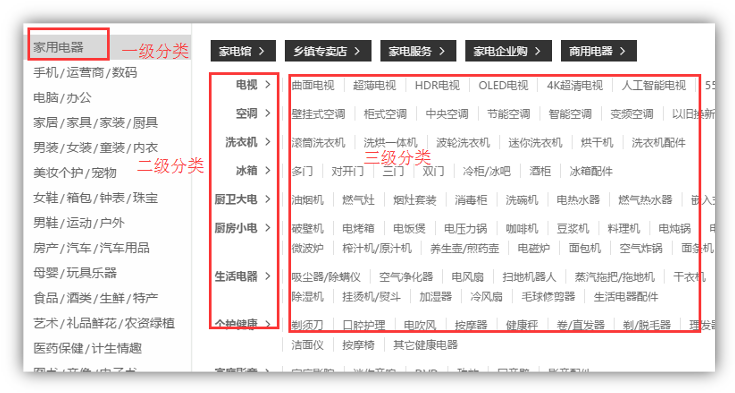<br /> <br />数据库结构<br />
1.2 基本信息—平台属性
平台属性和平台属性值
平台属性和平台属性值主要用于商品的检索,每个分类对应的属性都不同,分类包含一级分类、二级分类和三级分类,分类层级区分对应分类。
1.3 基本信息—销售属性与销售属性值
销售属性,就是商品详情页右边,可以通过销售属性来定位一组spu下的哪款sku。可以让当前的商品详情页,跳转到自己的“兄弟”商品。<br /> 一般每种商品的销售属性不会太多,大约1-4种。整个平台的属性种类也不会太多,大概10种以内。比如:颜色、尺寸、版本、套装等等。<br /><br />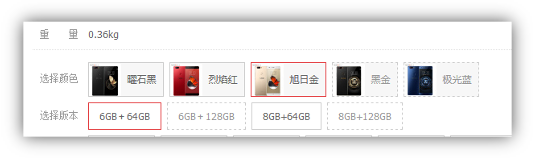<br />
1.4 基本信息—spu与 sku
SKU=Stock Keeping Unit(库存量单位)。即库存进出计量的基本单元,可以是以件,盒,托盘等为单位。SKU这是对于大型连锁超市DC(配送中心)物流管理的一个必要的方法。现在已经被引申为产品**统一编号**的简称,**每种产品均对应有唯一的SKU号。**<br />SPU(Standard Product Unit):标准化产品单元。是商品信息**聚合**的最小单位,是一组**可复用、易检索**的标准化信息的集合,该集合描述了一个产品的特性。<br /> <br />首先通过检索搜索出来的商品列表中,每个商品都是一个sku。每个sku都有自己独立的库存数。也就是说每一个商品详情展示都是一个sku。<br />那spu又是干什么的呢?<br />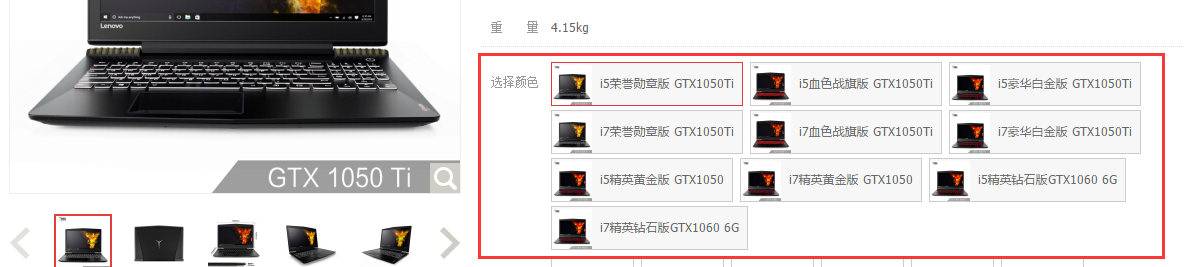<br />如上图,一般的电商系统你点击进去以后,都能看到这个商品关联了其他好几个类似的商品,而且这些商品很多的信息都是共用的,比如商品图片,海报、销售属性等。<br /> 那么系统是靠什么把这些sku识别为一组的呢,那是这些sku都有一个公用的spu信息。而它们公共的信息,都放在spu信息下。<br /> 所以,sku与spu的结构如下:<br /> <br />图中有两个图片信息表,其中spu_image表示整个spu相关下的所有图片信息,而sku_image表示这个spu下的某个sku使用的图片。sku_image中的图片是从spu_image中选取的。<br /> <br />但是由于一个spu下的所有sku的海报都是一样,所以只存一份spu_poster就可以了。<br />
二、商品管理模块开发
2.1 在service 模块下搭建service-product
2.1.1 搭建service-product
搭建过程同common-util
如图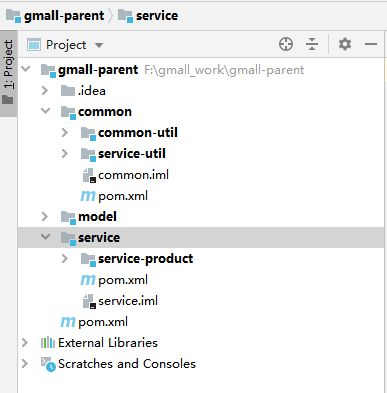
图一: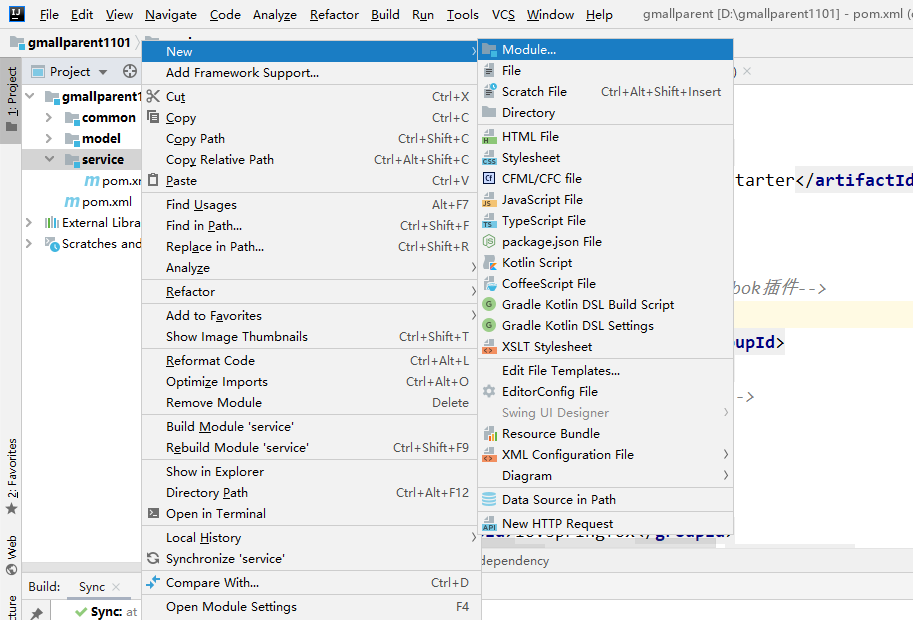
图二: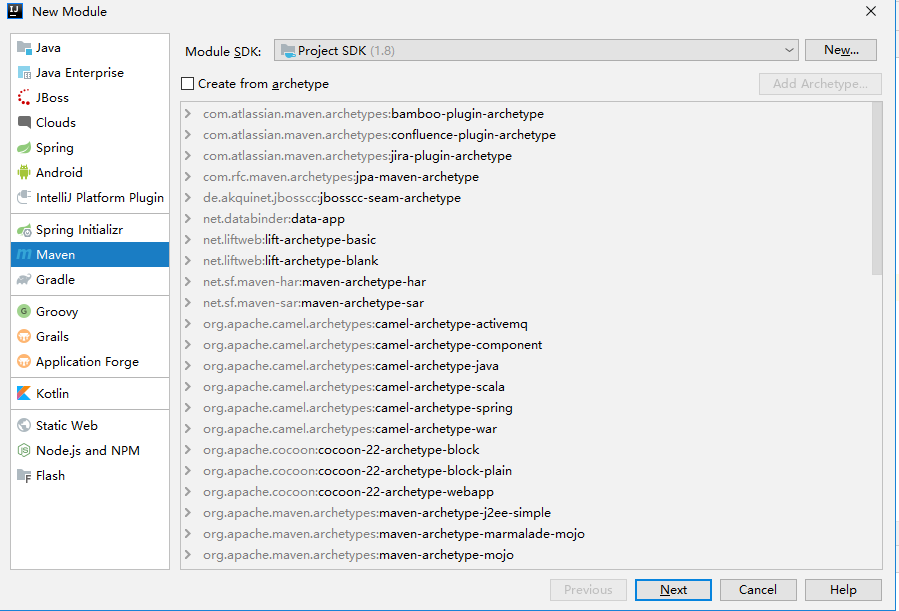
图三: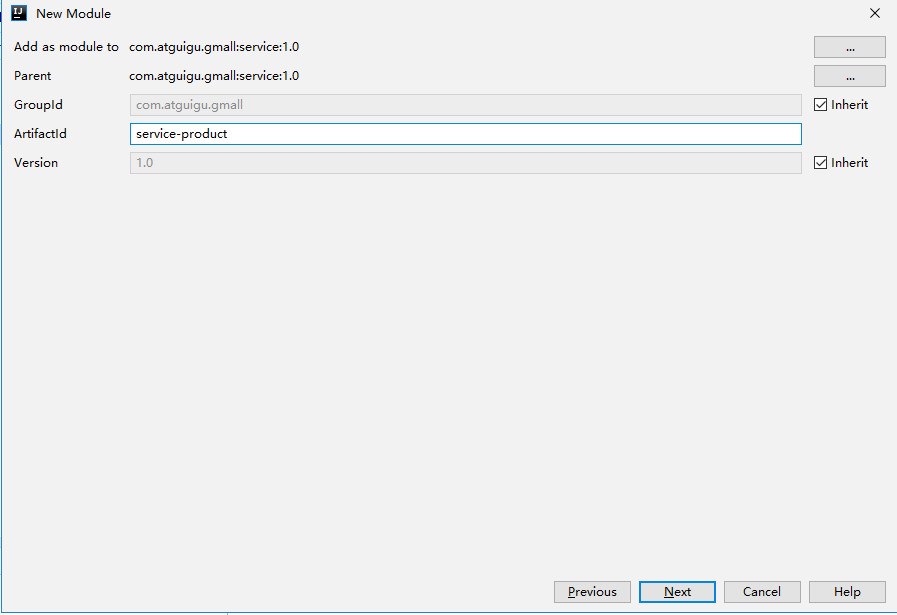
图四: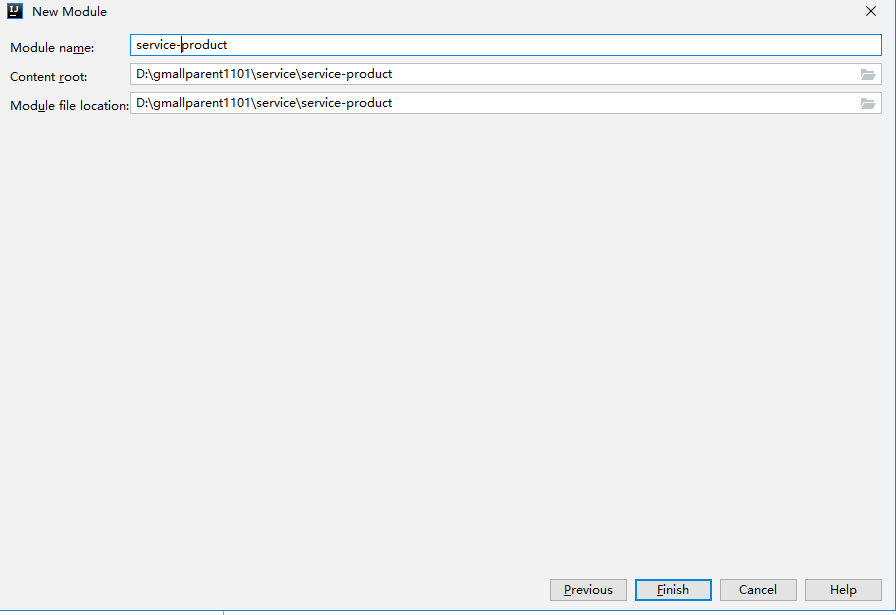
2.1.2 修改配置
修改pom.xml
| <?xml version=”1.0” encoding=”UTF-8”?><project xmlns=”http://maven.apache.org/POM/4.0.0“
xmlns:xsi=”http://www.w3.org/2001/XMLSchema-instance“
xsi:schemaLocation=”http://maven.apache.org/POM/4.0.0 http://maven.apache.org/xsd/maven-4.0.0.xsd”> <modelVersion>4.0.0</modelVersion> <parent> <groupId>com.atguigu.gmall</groupId> <artifactId>service</artifactId> <version>1.0</version> </parent>
<artifactId>service-product</artifactId> <version>1.0</version>
<packaging>jar</packaging> <name>service-product</name> <description>service-product</description>
</project> | | —- |
添加配置文件application.yml
| spring: application: name: service-product profiles: active: dev cloud: nacos: discovery: server-addr: 127.0.0.1:8848 |
|---|
添加配置文件application-dev.yml
| server:
port: 8206
mybatis-plus:
configuration:
log-impl: org.apache.ibatis.logging.stdout.StdOutImpl
mapper-locations: classpath:mapper/Mapper.xml # 编写复杂的sql 语句 ,mybatis-plus 对多表关联支持性差。手写xml文件{sql语句}
spring:
cloud:
sentinel:
transport:
*dashboard: http://127.0.0.1:8858
rabbitmq:
host: localhost
port: 5672
username: guest
password: guest
# publisher-confirms: true
publisher-returns: true
listener:
simple:
acknowledge-mode: manual #默认情况下消息消费者是自动确认消息的,如果要手动确认消息则需要修改确认模式为manual
prefetch: 1 # 消费者每次从队列获取的消息数量。此属性当不设置时为:轮询分发,设置为1为:公平分发 redis:
host: localhost
port: 6379
database: 0
timeout: 1800000
password:
lettuce:
pool:
max-active: 20 #最大连接数 max-wait: -1 #最大阻塞等待时间(负数表示没限制)
max-idle: 5 #最大空闲 min-idle: 0 #最小空闲 datasource:
type: com.zaxxer.hikari.HikariDataSource
driver-class-name: com.mysql.jdbc.Driver
url: jdbc:mysql://localhost:3306/gmallproduct?characterEncoding=utf-8&useSSL=false
username: root
password: root
hikari:
connection-test-query: SELECT 1 # 自动检测连接 connection-timeout: 60000 #数据库连接超时时间,默认30秒 idle-timeout: 500000 #空闲连接存活最大时间,默认600000(10分钟) max-lifetime: 540000 #此属性控制池中连接的最长生命周期,值0表示无限生命周期,默认1800000即30分钟 maximum-pool-size: 12 #连接池最大连接数,默认是10
minimum-idle: 10 #最小空闲连接数量 pool-name: SPHHikariPool # 连接池名称 _jackson:
date-format: yyyy-MM-dd HH:mm:ss
time-zone: GMT+8
minio:
endpointUrl: http://localhost:9000
accessKey: admin
secreKey: admin123456
bucketName: gmall |
| —- |
2.1.3 创建启动类
包名:com.atguigu.gmall.product
| @SpringBootApplication @ComponentScan({“com.atguigu.gmall”}) @EnableDiscoveryClient public class ServiceProductApplication { public static void main(String[] args) { SpringApplication.run(ServiceProductApplication.class, args); } } |
|---|
2.2 搭建后台页面
- 拷贝资料中的前端项目页面,放入一个没有中文目录的文件下
2. 在gmall-admin当前目录下cmd 回车
a) npm install [安装依赖 node_modules] 项目库中有node_modules 就不需要执行npm install
b) npm run dev
c) 直接访问浏览器
3. 将两个配置文件
a) dev.env.js http://localhost
b) index.js host: ‘localhost’, port: 8888
注:第一个为网关地址,第二个为项目访问地址
注意:如果出现未找到node-sass模块,只需要在窗口中运行
npm install node-sass 即可,然后重新npm install,npm run dev运行项目的时候,没有提示node-sass 模块为找到,需要看一下当前的nodejs 版本
node -v : 建议v10.15.3
2.3 属性管理功能
2.3.1 分类信息及属性的查询
2.3.1.1 创建Mapper
包名:com.atguigu.gmall.product.mapper
BaseCategory1Mapper
| @Mapper public interface BaseCategory1Mapper extends BaseMapper } |
|---|
BaseCategory2Mapper
| @Mapperpublic interface BaseCategory2Mapper extends BaseMapper } |
|---|
BaseCategory3Mapper
| @Mapperpublic interface BaseCategory3Mapper extends BaseMapper } |
|---|
BaseAttrInfoMapper
| @Mapper public interface BaseAttrInfoMapper extends BaseMapper |
|---|
BaseAttrValueMapper
| @Mapper public interface BaseAttrValueMapper extends BaseMapper } |
|---|
2.3.1.2 创建service接口
包名:com.atguigu.gmall.product.service
接口方法是根据页面得来
| public interface ManageService { / 查询所有的一级分类信息 @return * /_List 根据一级分类Id 查询二级分类数据 @param _category1Id __ _* @return * /List 根据二级分类Id 查询三级分类数据 @param _category2Id __ _* @return * /List 根据分类Id 获取平台属性数据 接口说明: 1,平台属性可以挂在一级分类、二级分类和三级分类 2,查询一级分类下面的平台属性,传:category1Id,0,0; 取出该分类的平台属性 3,查询二级分类下面的平台属性,传:category1Id,category2Id,0; 取出对应一级分类下面的平台属性与二级分类对应的平台属性 4,查询三级分类下面的平台属性,传:category1Id,category2Id,category3Id; 取出对应一级分类、二级分类与三级分类对应的平台属性 @param _category1Id __ _* @param _category2Id __ _* @param _category3Id __ _* @return * /_List |
|---|
2.3.1.3 创建实现类ManageServiceImpl
包名:com.atguigu.gmall.product.service.impl
增加实现类
| @Service public class ManageServiceImpl implements ManageService { @Autowired private BaseCategory1Mapper baseCategory1Mapper; @Autowired private BaseCategory2Mapper baseCategory2Mapper; @Autowired private BaseCategory3Mapper baseCategory3Mapper; @Autowired private BaseAttrInfoMapper baseAttrInfoMapper; @Autowired private BaseAttrValueMapper baseAttrValueMapper; @Override public List return baseCategory1Mapper.selectList(null); } @Override public List // select from baseCategory2 where Category1Id = ? _QueryWrapper queryWrapper = new QueryWrapper queryWrapper.eq(“category1_id”,category1Id); List return baseCategory2List; } @Override *public QueryWrapper queryWrapper = new QueryWrapper queryWrapper.eq(“category2_id”,category2Id); return baseCategory3Mapper.selectList(queryWrapper); } @Override public List } } |
|---|
2.3.1.4 在BaseAttrInfoMapper类添加方法
| / 根据分类Id 查询平台属性集合对象 | 编写xml 文件 @param **category1Id __ *@param category2Id *@param category3Id __ _ @return ** **/ _List |
|---|
2.3.1.5 在BaseAttrInfoMapper.xml添加查询方法
在resources目录添加mapper文件夹,添加 BaseAttrInfoMapper.xml文件
| <?xml version=”1.0” encoding=”UTF-8”?> <!DOCTYPE mapper SYSTEM “http://mybatis.org/dtd/mybatis-3-mapper.dtd“ > __ <mapper namespace=”com.atguigu.gmall.product.mapper.BaseAttrInfoMapper”> <resultMap id=”baseAttrInfoMap” type=”com.atguigu.gmall.model.product.BaseAttrInfo” autoMapping=”true”> <id property=”id” column=”id”></id> <collection property=”attrValueList” ofType=”com.atguigu.gmall.model.product.BaseAttrValue” autoMapping=”true”> <id property=”id” column=”attr_value_id”></id> </collection> </resultMap> <select id=”selectBaseAttrInfoList” resultMap=”baseAttrInfoMap”> SELECT bai.id, bai.attr_name, bai.category_id, bai.category_level, bav.id attr_value_id, bav.value_name, bav.attr_id FROM base_attr_info bai INNER JOIN base_attr_value bav ON bai.id = bav.attr_id <where> <if test=”category1Id != null and category1Id != 0”> or (bai.category_id = #{category1Id} and bai.category_level = 1) </if> <if test=”category2Id != null and category2Id != 0”> or (bai.category_id = #{category2Id} and bai.category_level = 2) </if> <if test=”category3Id != null and category3Id != 0”> or (bai.category_id = #{category3Id} and bai.category_level = 3) </if> </where> order by bai.category_level, bai.id </select> </mapper> |
|---|
2.3.1.6 创建BaseManageController
针对平台属性的操作!
| @Api(tags = “商品基础属性接口”) @RestController @RequestMapping(“admin/product”) public class BaseManageController { @Autowired private ManageService manageService; / 查询所有的一级分类信息 @return * / @GetMapping(“getCategory1”) public Result List return Result.ok(baseCategory1List); } / 根据一级分类Id 查询二级分类数据 @param **category1Id __ @return ** **/ @GetMapping(“getCategory2/{category1Id}”) public Result List return Result.ok(baseCategory2List); } / 根据二级分类Id 查询三级分类数据 @param **category2Id __ @return ** **/ @GetMapping(“getCategory3/{category2Id}”) public Result List return Result.ok(baseCategory3List); } / 根据分类Id 获取平台属性数据 @param **category1Id __ *@param category2Id __ *@param category3Id __ @return ** **/ @GetMapping(“attrInfoList/{category1Id}/{category2Id}/{category3Id}”) public Result @PathVariable(“category2Id”) Long category2Id, @PathVariable(“category3Id”) Long category3Id) { List return Result.ok(baseAttrInfoList); } } |
|---|
http://localhost:8206/swagger-ui.html 测试数据接口!
2.3.2 属性的添加
数据库中的表!<br />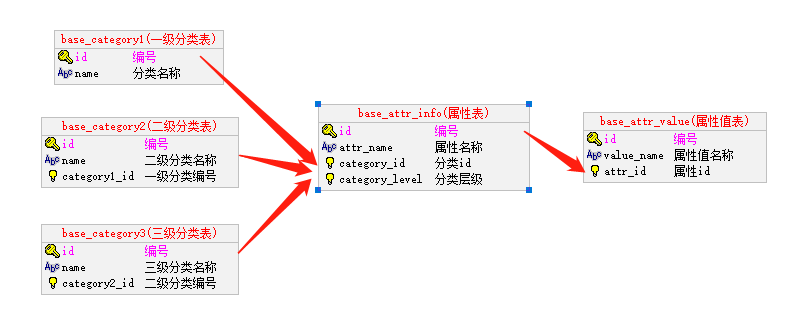
2.3.2.1 创建service接口
在ManageService添加service接口
| / 保存平台属性方法 @param **baseAttrInfo __ */ void saveAttrInfo(BaseAttrInfo baseAttrInfo); |
|---|
| @Override @Transactional(rollbackFor = Exception.class) public void saveAttrInfo(BaseAttrInfo baseAttrInfo) { // 什么情况下 是添加,什么情况下是更新,修改 根据baseAttrInfo 的Id // baseAttrInfo if (baseAttrInfo.getId() != null) { // 修改数据 baseAttrInfoMapper.updateById(baseAttrInfo); } else { // 新增 // baseAttrInfo 插入数据 baseAttrInfoMapper.insert(baseAttrInfo); } // baseAttrValue 平台属性值 // 修改:通过先删除{baseAttrValue},在新增的方式! // 删除条件:baseAttrValue.attrId = baseAttrInfo.id _QueryWrapper queryWrapper = new QueryWrapper queryWrapper.eq(“attr_id”, baseAttrInfo.getId()); baseAttrValueMapper.delete(queryWrapper); if (attrValueList != null && attrValueList.size() > 0) { // 获取平台属性Id 给attrId baseAttrValue.setAttrId(baseAttrInfo.getId()); // ? _baseAttrValueMapper.insert(baseAttrValue); } } } |
2.3.2.2 创建控制器
BaseManageController
| / 保存平台属性方法 @param **baseAttrInfo __ @return ** **/ @PostMapping(“saveAttrInfo”) public Result saveAttrInfo(@RequestBody BaseAttrInfo baseAttrInfo) { // 前台数据都被封装到该对象中baseAttrInfo manageService.saveAttrInfo(baseAttrInfo); return Result.ok(); } |
|---|
2.3.3 修改平台属性
2.3.3.1 接口
| 接口 选中准修改数据 , 根据该attrId 去查找AttrInfo,该对象下 List 所以在返回的时候,需要返回BaseAttrInfo / 根据attrId 查询平台属性对象 @param **attrId __ _ @return ** **/_BaseAttrInfo getAttrInfo(Long attrId); |
|---|
2.3.3.2 实现类
| 实现类 @Overridepublic BaseAttrInfo getAttrInfo(Long attrId) { BaseAttrInfo baseAttrInfo = baseAttrInfoMapper.selectById(attrId); // 查询到最新的平台属性值集合数据放入平台属性中! _baseAttrInfo.setAttrValueList(getAttrValueList(attrId)); return baseAttrInfo; } / 根据属性id获取属性值 @param _attrId __ _* @return * /private List _QueryWrapper queryWrapper = new QueryWrapper queryWrapper.eq(“attr_id”, attrId); List *return } |
|---|
2.3.3.3 控制器
| @GetMapping(“getAttrValueList/{attrId}”)public Result BaseAttrInfo baseAttrInfo = manageService.getAttrInfo(attrId); List return Result.ok(baseAttrValueList); } |
|---|
2.4 搭建server-gateway模块
2.4.1 搭建server-gateway
点击gmall-parent,选择New–>Module,操作如下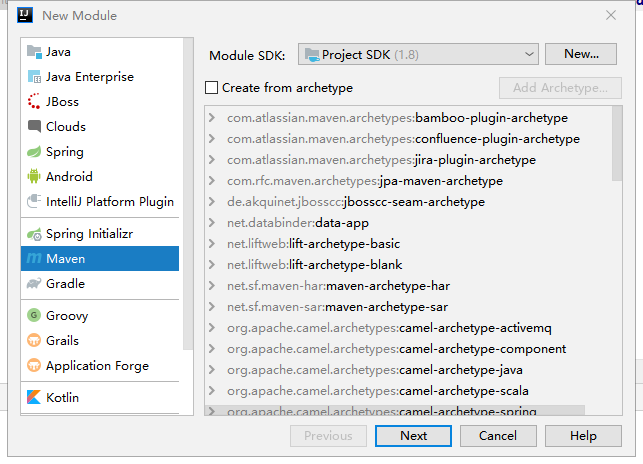
点击下一步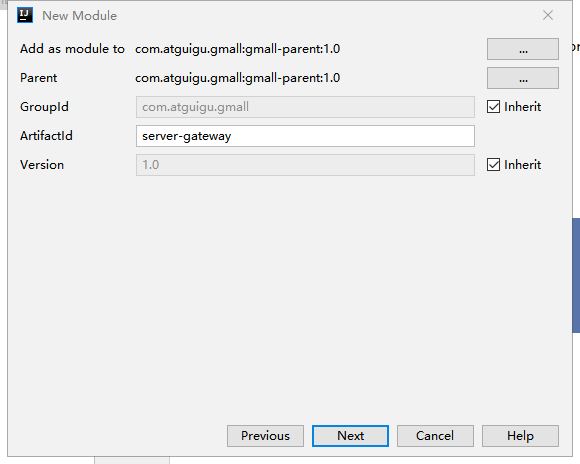
点击下一步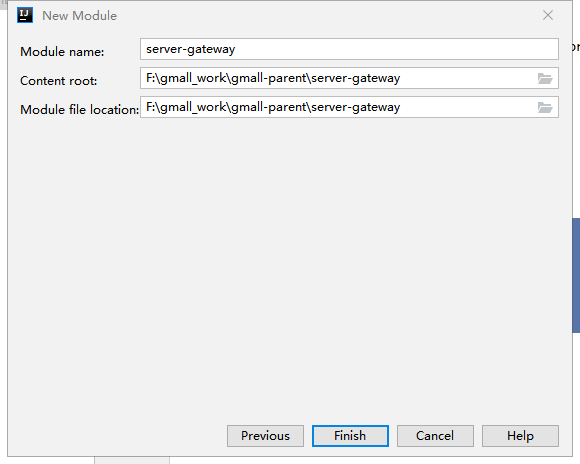
点击完成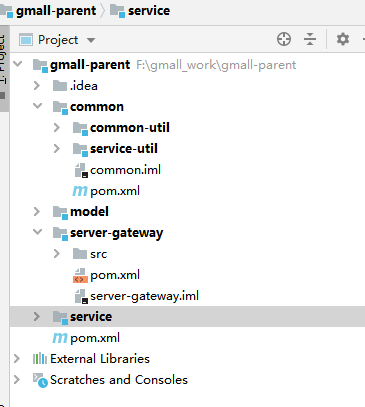
2.4.2 修改配置pom.xml
修改pom.xml
| <?xml version=”1.0” encoding=”UTF-8”?> <project xmlns=”http://maven.apache.org/POM/4.0.0“ xmlns:xsi=”http://www.w3.org/2001/XMLSchema-instance“ xsi:schemaLocation=”http://maven.apache.org/POM/4.0.0 http://maven.apache.org/xsd/maven-4.0.0.xsd” > <modelVersion>4.0.0</modelVersion> <parent> <groupId>com.atguigu.gmall</groupId> <artifactId>gmall-parent</artifactId> <version>1.0</version> </parent> <version>1.0</version> <artifactId>server-gateway</artifactId> <packaging>jar</packaging> <name>server-gateway</name> <dependencies> <dependency> <groupId>com.atguigu.gmall</groupId> <artifactId>common-util</artifactId> <version>1.0</version> </dependency> <dependency> <groupId>com.alibaba.cloud</groupId> <artifactId>spring-cloud-starter-alibaba-nacos-discovery</artifactId> </dependency><!— <dependency> <groupId>com.alibaba.cloud</groupId> <artifactId>spring-cloud-starter-alibaba-nacos-config</artifactId> </dependency>—> <dependency> <groupId>org.springframework.cloud</groupId> <artifactId>spring-cloud-starter-gateway</artifactId> </dependency> </dependencies> </project> |
|---|
2.4.3 在resources下添加配置文件
| 启动类:package com.atguigu.gmall.gateway;@SpringBootApplication public class ServerGatewayApplication { public static void main(String[] args) { SpringApplication.run(ServerGatewayApplication.class,args); } } |
|---|
application.yml
| server: port: 80spring: application: name: api-gateway cloud: nacos: discovery: server-addr: localhost:8848 gateway: discovery: #是否与服务发现组件进行结合,通过 serviceId(必须设置成大写) 转发到具体的服务实例。默认为false,设为true便开启通过服务中心的自动根据 serviceId 创建路由的功能。 locator: #路由访问方式:http://Gateway_HOST:Gateway_PORT/大写的serviceId/**,其中微服务应用名默认大写访问。 enabled: true routes: - id: service-product uri: lb://service-product predicates: - Path=//product/* # 路径匹配 |
|---|
2.4.4 跨域处理
跨域:浏览器对于javascript的同源策略的限制 。
以下情况都属于跨域:
| 跨域原因说明 | 示例 |
|---|---|
| 域名不同 | www.jd.com 与 www.taobao.com |
| 域名相同,端口不同 | www.jd.com:8080 与 www.jd.com:8081 |
| 二级域名不同 | item.jd.com 与 miaosha.jd.com |
如果域名和端口都相同,但是请求路径不同,不属于跨域,如:
www.jd.com/item
www.jd.com/goods
http和https也属于跨域
而我们刚才是从localhost:1000去访问localhost:8888,这属于端口不同,跨域了。
2.4.4.1 为什么有跨域问题?
跨域不一定都会有跨域问题。
因为跨域问题是浏览器对于ajax请求的一种安全限制:一个页面发起的ajax请求,只能是与当前页域名相同的路径,这能有效的阻止跨站攻击。
因此:跨域问题 是针对ajax的一种限制。
但是这却给我们的开发带来了不便,而且在实际生产环境中,肯定会有很多台服务器之间交互,地址和端口都可能不同,怎么办?
2.4.4.2 解决跨域问题的方案
目前比较常用的跨域解决方案有3种:
- Jsonp
最早的解决方案,利用script标签可以跨域的原理实现。
https://www.w3cschool.cn/json/json-jsonp.html
限制:
- 需要服务的支持
- 只能发起GET请求
- nginx反向代理
思路是:利用nginx把跨域反向代理为不跨域,支持各种请求方式
缺点:需要在nginx进行额外配置,语义不清晰
- CORS
规范化的跨域请求解决方案,安全可靠。
优势:
- 在服务端进行控制是否允许跨域,可自定义规则
- 支持各种请求方式
缺点:
- 会产生额外的请求
我们这里会采用cors的跨域方案。
2.4.4.3 什么是cors
CORS是一个W3C标准,全称是”跨域资源共享”(Cross-origin resource sharing)。
它允许浏览器向跨源服务器,发出XMLHttpRequest请求,从而克服了AJAX只能同源使用的限制。
CORS需要浏览器和服务器同时支持。目前,所有浏览器都支持该功能,IE浏览器不能低于IE10。
- 浏览器端:不用考虑
目前,所有浏览器都支持该功能(IE10以下不行)。整个CORS通信过程,都是浏览器自动完成,不需要用户参与。
- 服务端:进行相关设置
CORS通信与AJAX没有任何差别,因此你不需要改变以前的业务逻辑。只不过,浏览器会在请求中携带一些头信息,我们需要以此判断是否允许其跨域,然后在响应头中加入一些信息即可。这一般通过过滤器完成即可。
2.4.4.4 原理有点复杂
预检请求
跨域请求会在正式通信之前,增加一次HTTP查询请求,称为”预检”请求(preflight)。
浏览器先询问服务器,当前网页所在的域名是否在服务器的许可名单之中,以及可以使用哪些HTTP动词和头信息字段。只有得到肯定答复,浏览器才会发出正式的XMLHttpRequest请求,否则就报错。
一个“预检”请求的样板:
OPTIONS /cors HTTP/1.1
Origin: http://localhost:1000
Access-Control-Request-Method: GET
Access-Control-Request-Headers: X-Custom-Header
User-Agent: Mozilla/5.0…
- Origin:会指出当前请求属于哪个域(协议+域名+端口)。服务会根据这个值决定是否允许其跨域。
- Access-Control-Request-Method:接下来会用到的请求方式,比如PUT
- Access-Control-Request-Headers:会额外用到的头信息
预检请求的响应
服务的收到预检请求,如果许可跨域,会发出响应:
HTTP/1.1 200 OK
Date: Mon, 01 Dec 2008 01:15:39 GMT
Server: Apache/2.0.61 (Unix)
Access-Control-Allow-Origin: http://localhost:1000
Access-Control-Allow-Credentials: true
Access-Control-Allow-Methods: GET, POST, PUT
Access-Control-Allow-Headers: X-Custom-Header
Access-Control-Max-Age: 1728000
Content-Type: text/html; charset=utf-8
Content-Encoding: gzip
Content-Length: 0
Keep-Alive: timeout=2, max=100
Connection: Keep-Alive
Content-Type: text/plain
如果服务器允许跨域,需要在返回的响应头中携带下面信息:
- Access-Control-Allow-Origin:可接受的域,是一个具体域名或者*(代表任意域名)
- Access-Control-Allow-Credentials:是否允许携带cookie,默认情况下,cors不会携带cookie,除非这个值是true
- Access-Control-Allow-Methods:允许访问的方式
- Access-Control-Allow-Headers:允许携带的头
- Access-Control-Max-Age:本次许可的有效时长,单位是秒,过期之前的ajax请求就无需再次进行预检了
有关cookie:
要想操作cookie,需要满足以下条件:
- 服务的响应头中需要携带Access-Control-Allow-Credentials并且为true。
- 浏览器发起ajax需要指定withCredentials 为true
2.4.4.5 在网关中实现跨域
全局配置类实现
包名:com.atguigu.gmall.gateway.config
CorsConfig类
| @Configuration public class CorsConfig { @Bean public CorsWebFilter corsWebFilter(){ // cors跨域配置对象 _CorsConfiguration configuration = new CorsConfiguration(); configuration.addAllowedOrigin(“*”); //设置允许访问的网络 configuration.setAllowCredentials(true); // 设置是否从服务器获取cookie configuration.addAllowedMethod(“*”); // 设置请求方法 表示任意 _configuration.addAllowedHeader(**”“); _// 所有请求头信息 * 表示任意 // 配置源对象 _UrlBasedCorsConfigurationSource configurationSource = new UrlBasedCorsConfigurationSource(); configurationSource.registerCorsConfiguration(“/“, configuration); // cors过滤器对象 return new CorsWebFilter(configurationSource); } } |
|---|
2.5 配置文件迁移nacos
2.5.1安装nacos
1,重新安装nacos,nacos数据保存至mysql,先删除已安装的nacos,再安装
2,资源库获取nacos数据库表结构并且导入数据库
3,更改nacos启动配置参数
| docker run -d \ -e MODE=standalone \ -e PREFER_HOST_MODE=hostname \ -e SPRING_DATASOURCE_PLATFORM=mysql \ -e MYSQL_SERVICE_HOST=192.168.200.129 \ -e MYSQL_SERVICE_PORT=3306 \ -e MYSQL_SERVICE_USER=root \ -e MYSQL_SERVICE_PASSWORD=root \ -e MYSQL_SERVICE_DB_NAME=nacos \ -p 8848:8848 \ —name nacos \ —restart=always \ nacos/nacos-server:1.4.1 |
|---|
2.5.2添加依赖
在sevice,还有gateway 父模块添加依赖
| <dependency> <groupId>com.alibaba.cloud</groupId> <artifactId>spring-cloud-starter-alibaba-nacos-config</artifactId> </dependency> |
|---|
2.5.3 改造service-product
删除之前的配置文件
1,添加配置文件bootstrap.properties
| #server.port = 8206 spring.application.name=service-product spring.profiles.active=dev spring.cloud.nacos.discovery.server-addr=192.168.200.128:8848 spring.cloud.nacos.config.server-addr=192.168.200.128:8848 spring.cloud.nacos.config.prefix=${spring.application.name} spring.cloud.nacos.config.file-extension=yaml spring.cloud.nacos.config.shared-configs[0].data-id=common.yaml |
|---|
说明:
1,配置文件统一配置到nacos配置中心
2,common.yaml为公共配置,后续有需要的service模块都可直接引用,避免重复配置
2,common.yaml配置文件如下:
| mybatis-plus:
configuration:
log-impl: org.apache.ibatis.logging.stdout.StdOutImpl
mapper-locations: classpath:mapper/Mapper.xml
feign:
sentinel:
enabled: true
client:
config:
default:
readTimeout: 3000
connectTimeout: 1000
spring: cloud:
sentinel:
transport:
*dashboard: http://192.168.200.128:8080
rabbitmq:
host: 47.93.148.192
port: 5672
username: guest
password: guest
publisher-confirm-type: correlated
publisher-returns: true
listener:
simple:
acknowledge-mode: manual #默认情况下消息消费者是自动确认消息的,如果要手动确认消息则需要修改确认模式为manual
prefetch: 1 # 消费者每次从队列获取的消息数量。此属性当不设置时为:轮询分发,设置为1为:公平分发
redis:
host: localhost
port: 6379
database: 0
timeout: 1800000
password:
lettuce:
pool:
max-active: 20 #最大连接数
max-wait: -1 #最大阻塞等待时间(负数表示没限制)
max-idle: 5 #最大空闲
min-idle: 0 #最小空闲
jackson:
date-format: yyyy-MM-dd HH:mm:ss
time-zone: GMT+8 |
| —- |
3,商品模块配置文件service-product-dev.yaml
| server:
port: 8206
spring:
datasource:
type: com.zaxxer.hikari.HikariDataSource
driver-class-name: com.mysql.jdbc.Driver
url: jdbc:mysql://localhost:3306/gmallproduct?characterEncoding=utf-8&useSSL=false
username: root
password: root
hikari:
connection-test-query: SELECT 1 # 自动检测连接
connection-timeout: 60000 #数据库连接超时时间,默认30秒
idle-timeout: 500000 #空闲连接存活最大时间,默认600000(10分钟)
max-lifetime: 540000 #此属性控制池中连接的最长生命周期,值0表示无限生命周期,默认1800000即30分钟
maximum-pool-size: 12 #连接池最大连接数,默认是10
minimum-idle: 10 #最小空闲连接数量
pool-name: SPHHikariPool # 连接池名称
_minio:
endpointUrl: http://47.93.148.192:9000
accessKey: admin
secreKey: admin123456
bucketName: gmall |
| —- |
说明:其实配置属性还是以前项目的配置属性,只是变化了文件命名规则,配置项不变。
2.5.3 改造server-gateway
删除之前的配置文件
1,添加配置文件bootstrap.properties
| spring.application.name=server-gateway spring.profiles.active=dev spring.cloud.nacos.discovery.server-addr=192.168.200.129:8848 spring.cloud.nacos.config.server-addr=192.168.200.129:8848 spring.cloud.nacos.config.prefix=${spring.application.name} spring.cloud.nacos.config.file-extension=yaml |
|---|
说明:其他服务配置文件统一提供,资源库获取,上传nacos

若有收获,就点个赞吧
0 人点赞
