Spring授课笔记3
1 AOP注解方式:在通知中获取连接点细节信息
| //这是一个切面@Aspect//要创建Bean并放入到IoC容器中@Componentpublic class LogAspect {
@Before(value = “MyPointcut.pointcut1()”)
public void beforeLog(JoinPoint joinPoint){ //add(int int) sub(int int)
Object[] args = joinPoint.getArgs();
Signature signature = joinPoint.getSignature();
String methodName = signature.getName();//方法名 add
int modifiers = signature.getModifiers(); //修饰符 public
String declaringTypeName = signature.getDeclaringTypeName();//方法属于哪个类
//joinPoint.getTarget(); //目标对象
//joinPoint.getThis();//代理对象
// System.out.println(“[日志]:”+modifiers+” “+ Modifier.toString(modifiers)+” “+declaringTypeName);
System.**_out_**.println(**"[日志]:"**+methodName+**"方法开始执行,参数是:"**+ Arrays._toString_(args));<br /> }<br /> @AfterReturning(value = **"MyPointcut.pointcut1()"**,returning = **"result1"**)<br /> **public void **afterSuccessLog(JoinPoint joinPoint,Object result1){<br /> String methodName = joinPoint.getSignature().getName();<br /> System.**_out_**.println(**"[日志]:"**+methodName+**"方法执行成功结束,结果是:"**+result1);<br /> }<br /> @AfterThrowing(value = **"MyPointcut.pointcut1()"**,throwing=**"ex"**)<br /> **public void **afterExceptionLog(Exception ex){<br /> System.**_out_**.println(**"[日志]:方法执行异常结束,异常是:"**+ex);<br /> }<br /> @After(**"MyPointcut.pointcut1()"**)<br /> **public void **afterFinallyLog(){<br /> System.**_out_**.println(**"[日志]:方法执行结束Finally,执行最后的扫尾操作:"**);<br /> }<br />} |
| —- |
2 AOP注解方式:切入点的详细语法
- 切入点是某包某类的无参数的方法:
示例:execution(* com.atguigu.service.impl.Student.test())
- 切入点是某包某类带有参数的方法
示例: execution(* com.atguigu.service.impl.Student.test(String,int))
- 切入点是某包某类的某个同名的所有方法
示例:.. 表示任意个数任意类型的参数
execution(* com.atguigu.service.impl.Student.test(..))
- 切入点是某包下的某类的所有方法
示例:表示任意的类名,方法名,包名
execution( com.atguigu.service.impl.Student.*(..))
- 切入点是某包下的所有类的所有方法
示例: 表示任意的类名,方法名,包名
execution( com.atguigu.service.impl. . (..))
注意:
- 如何通配public int
- 如何通配任意的一级包(.)和多级包(..)
-
3 AOP注解方式:环绕通知
| //这是一个切面@Aspect//创建Bean对象放入IoC容器@Componentpublic class TransactionAspect {
@Around(“execution( com.atguigu.service.CalculatorPureImpl.(..))”)
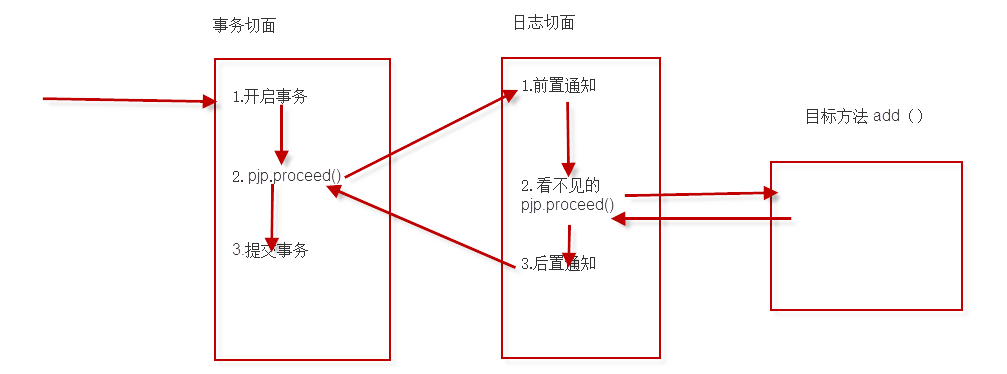
public Object manageTransaction(ProceedingJoinPoint pjp){
Object result = null;
try{
//调用目标对象之前通知:前置通知
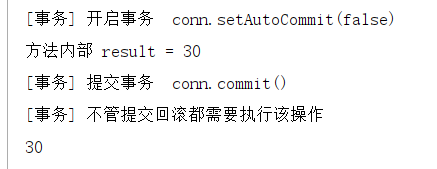
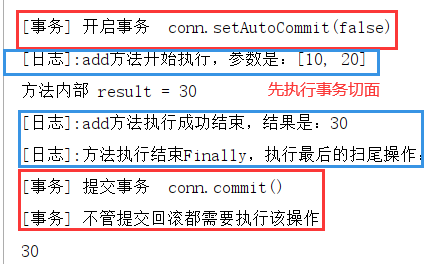
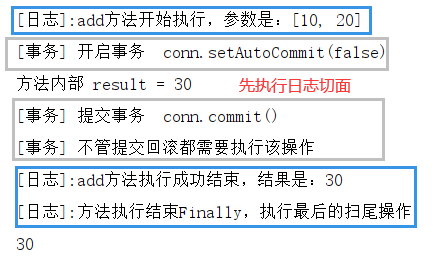
System.out.println(“[事务] 开启事务 conn.setAutoCommit(false) “);
//调用目标对象的方法
result = pjp.proceed(); // 调用下一个切面或者目标方法
//特别像过滤器中 chain.doFilter(request,response)
//调用目标对象成功结束之后通知:返回通知
System.out.println(“[事务] 提交事务 conn.commit()”);
}catch(Throwable e){
//调用目标对象异常结束后通知:异常通知
System.out.println(“[事务] 回滚事务 conn.rollback()”);
}finally{
//不管成功失败都执行的通知:后置通知
System.out.println(“[事务] 不管提交回滚都需要执行该操作”);
}//返回目标方法的执行结果<br /> **return **result;<br /> }<br />} || —- |
使用@Around通知,需要使用ProceedingJoinPoint而不是JoinPoint。
4 AOP注解方式:优先级Order
如何确定各个切面的执行顺序,通过@Order指定,值越小越早执行
| //这是一个切面@Aspect//创建Bean对象放入IoC容器@Component @Order(4)public class TransactionAspect { } |
|---|
| //这是一个切面@Aspect//要创建Bean并放入到IoC容器中@Component @Order(3)public class LogAspect { |
5 AOP注解方式:没有接口的情况
情况1:没有切面
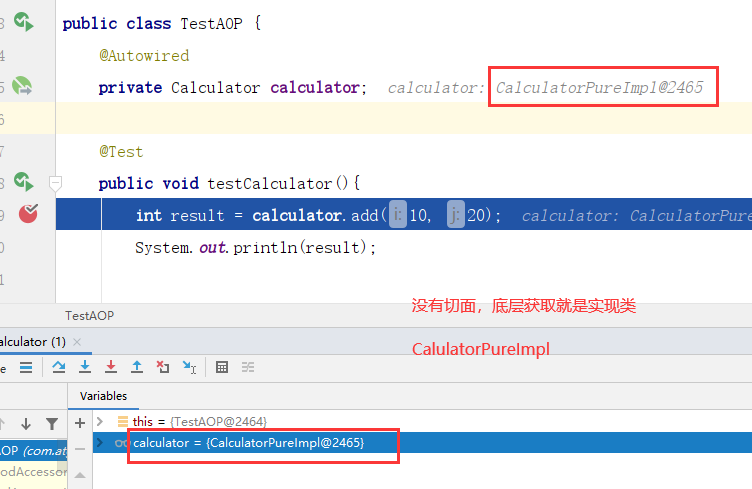
情况2:使用切面,但是有接口(底层使用JDK的动态代理)
public class CalculatorPureImpl implements Calculator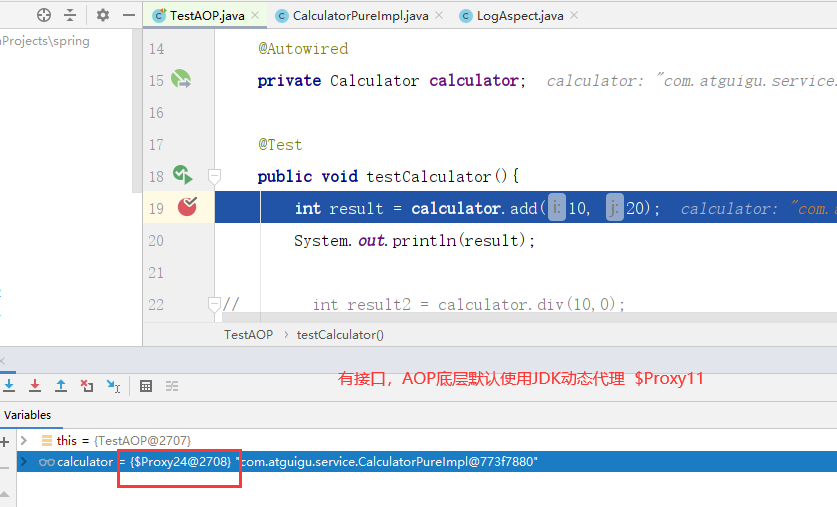
情况3:使用切面,但是没有接口
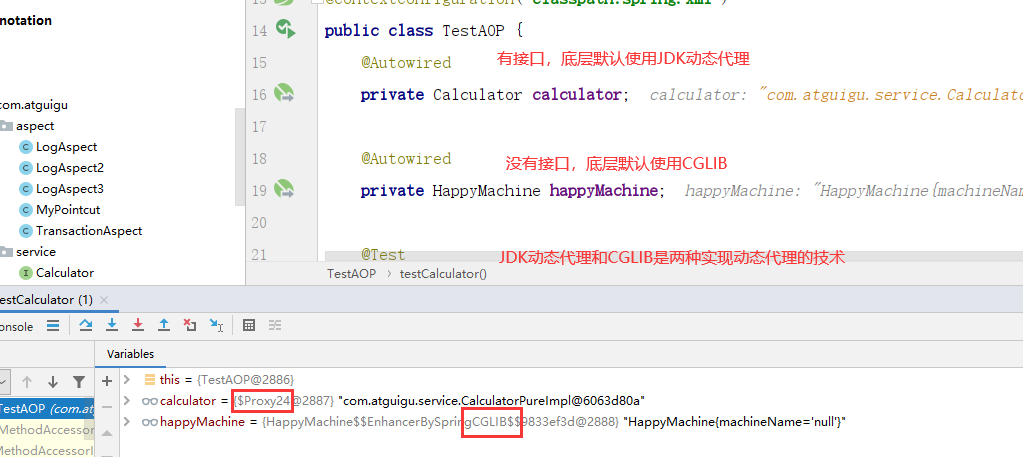
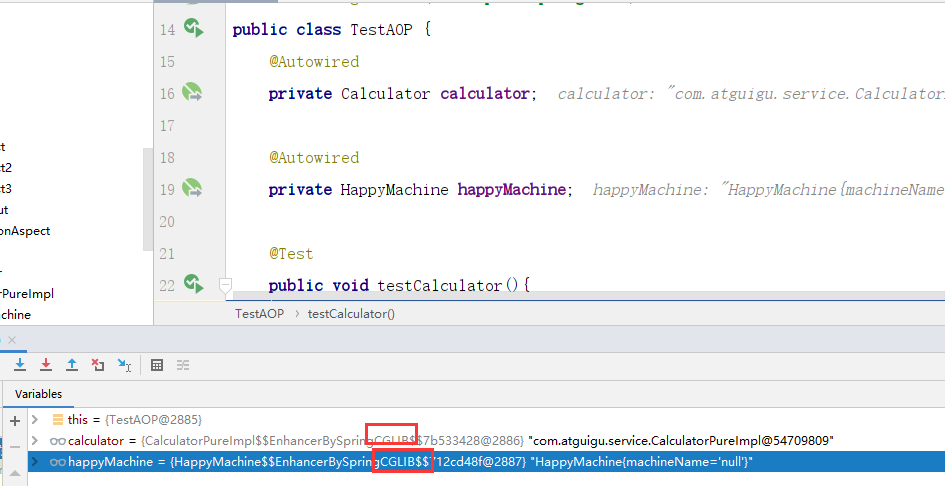
情况4:使用切面,不管是否有接口,都使用CGLIB
JDK动态代理:前提,必须有接口
CGLIB动态代理:有没有接口都可以
| <aop:aspectj-autoproxy proxy-target-class=”true”/> 不管是否有接口,都是要CGLIB实现AOP |
|---|
| <aop:aspectj-autoproxy proxy-target-class=”false”/> 默认值,有接口使用JDK动态代理,没有接口使用CGLIB |
问题:为什么JDK动态代理必须有接口
因为JDK动态代理生成的代理类已继承了Proxy,而Java是单继承的,所以必须有接口。
| package com.atguigu.util; import com.atguigu.service.CalculatorPureImpl;import sun.misc.ProxyGenerator; import java.io.FileOutputStream;import java.io.IOException; public class Util { public static void writeProxyClassToHardDisk(String path,Class[] clazz) { byte[] classFile = ProxyGenerator.generateProxyClass(“$Proxy22”, clazz); FileOutputStream out = null; try { out = new FileOutputStream(path); out.write(classFile); out.flush(); } catch (Exception e) { e.printStackTrace(); } finally { try { out.close(); } catch (IOException e) { e.printStackTrace(); } } } public static void main(String[] args) { Util.writeProxyClassToHardDisk(“d:/$Proxy22.class”, CalculatorPureImpl.class.getInterfaces()); } } |
|---|
问题2:为什么CGLIB实现动态代理不要求有接口
| static{ System.setProperty(DebuggingClassWriter.DEBUG_LOCATION_PROPERTY, “cglib”); } |
|---|
因为CGLIB生成的代理类没有固定的父类,所以可以直接继承目标类,不需要接口。

6 AOP对IoC的影响
情况1: 没有AOP
使用接口和实现类都可以(前提,使用接口,接口只有一个实现类;使用实现类,实现类只能在SpringIoC容器中一个实例)
| public class TestAOP2 { @Autowired //private Calculator calculator; private CalculatorPureImpl calculator; } |
|---|
情况2: 使用AOP,但是使用JDK动态代理(Proxy)
使用接口可以,使用实现类不可以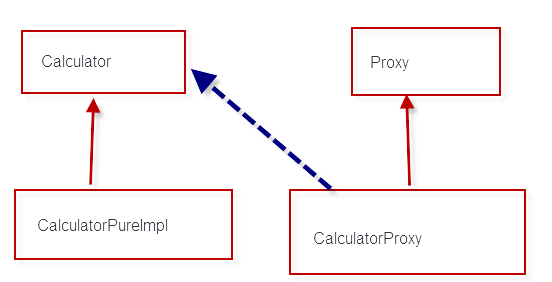
情况3: 使用AOP,但是使用CGLIB
使用接口、实现类都可以。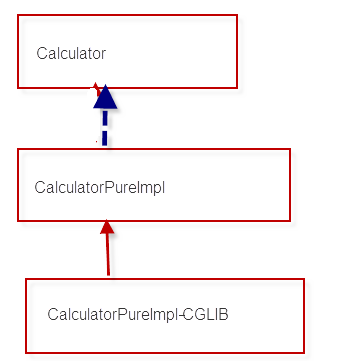
7 AOP XML配置(了解)
目前Spring的开发以注解开发为主。XML配置基本不使用。
| <bean id=”calculatorPure” class=”com.atguigu.service.CalculatorPureImpl”></bean>
<bean id=”logAspect” class=”com.atguigu.aspect.LogAspect”></bean>
<aop:config>
<aop:pointcut id=”pointcut1” expression=”execution( com.atguigu.service..*(..))”/>
_<!--@Aspect --><br /> <!--@Order --><br /> _<**aop:aspect ref="logAspect" order="3"**><br /> _<!--@Before --><br /> _<**aop:before method="beforeLog" pointcut-ref="pointcut1"**></**aop:before**><br /> _<!-- @AfterReturning--><br /> _<**aop:after-returning method="afterSuccessLog" pointcut-ref="pointcut1" returning="result1"**></**aop:after-returning**><br /> _<!-- @AfterThrowing--><br /> _<**aop:after-throwing method="afterExceptionLog" pointcut-ref="pointcut1" throwing="ex"**></**aop:after-throwing**><br /> _<!--@After --><br /> _<**aop:after method="afterFinallyLog" pointcut-ref="pointcut1"**></**aop:after**><br /> </**aop:aspect**> <br /></**aop:config**> |
| —- |
8 JDBCTemplate
Spring提供了整合JDBC的JDBCTemplate
因为先有Spring,再出现MyBatis,所以整合包不是有spring提供的,而是第三方提供的。
JDBCTemplate和MyBatis共同点:都是对JDBC进行了封装
不同点:肯定是MyBatis封装的更彻底,提供了更多的功能
9 添加依赖
| <dependency> <groupId>org.springframework</groupId> <artifactId>spring-orm</artifactId> <version>5.3.1</version> </dependency> |
|---|
Spring 在执行持久化层操作、与持久化层技术进行整合过程中,需要使用orm、jdbc、tx三个jar包;导入 orm 包就可以通过 Maven 的依赖传递性把其他两个也导入
10 进行配置
| <context:property-placeholder location=”classpath:db.properties”></context:property-placeholder>
<bean id=”dataSource” class=”com.alibaba.druid.pool.DruidDataSource”>
<property name=”driverClassName” value=”${jdbc.driver}”></property>
<property name=”url” value=”${jdbc.url}”></property>
<property name=”username” value=”${jdbc.user}”></property>
<property name=”password” value=”${jdbc.password}”></property>
</bean>
<bean id=”jdbcTemplate” class=”org.springframework.jdbc.core.JdbcTemplate”>
<property name=”dataSource” ref=”dataSource”></property>
</bean> |
| —- |
11 测试
| @RunWith(SpringJUnit4ClassRunner.class)@ContextConfiguration(locations = “classpath:spring.xml”)public class TestJDBCTemplate {
@Autowired
private DataSource dataSource;
@Autowired
private JdbcTemplate jdbcTemplate;
@Test<br /> **public void **testConnection() **throws **SQLException {<br /> Connection connection = **dataSource**.getConnection();<br /> System.**_out_**.println(connection);<br /> }<br />} |
| —- |
12 具体操作
| @Testpublic void testInsert() throws SQLException { String sql = “insert into t_emp values(null,?,?)”; jdbcTemplate.update(sql,“johnson”,400.45); }@Testpublic void testUpdate() throws SQLException { String sql = “update t_emp set emp_name = ? ,emp_salary = ? where emp_id = ?”; jdbcTemplate.update(sql,“johnson2”,800.45,31); }@Testpublic void testDelete() throws SQLException { String sql = “delete from t_emp where emp_id = ?”; jdbcTemplate.update(sql,31); }@Testpublic void testQueryName() throws SQLException { String sql = “select emp_name from t_emp where emp_id =1”; String ename = jdbcTemplate.queryForObject(sql, String.class); System.out.println(ename); } |
|---|
| @Testpublic void testQueryEntity() throws SQLException { String sql = “select * from t_emp where emp_id =1”; //BeanPropertyRowMapper:按照驼峰命名规则进行映射 empid ——> empId emp_salary—>empSalary RowMapper Employee emp = jdbcTemplate.queryForObject(sql, rowMapper); System.**_out }@Testpublic void testQueryList() throws SQLException { String sql = “select * from temp”; //BeanPropertyRowMapper:按照驼峰命名规则进行映射 emp_id ——> empId emp_salary—>empSalary RowMapper List Employee emp = new Employee(); emp.setEmpId(rs.getInt(1)); emp.setEmpName(rs.getString(“emp_name”)); emp.setSalary(rs.getDouble(“emp_salary”)); return emp; }); list.forEach((emp)-> System._out**.println(emp)); } |
| @Testpublic void testCount() throws SQLException { String sql = “select count(*) from t_emp”; Integer count = jdbcTemplate.queryForObject(sql,Integer.class); System.out.println(count); } |
13 声明式事务概念
事务的类型
- 编程式事务
- 声明式事务(xml声明、注解声明)
Spring的事务管理的API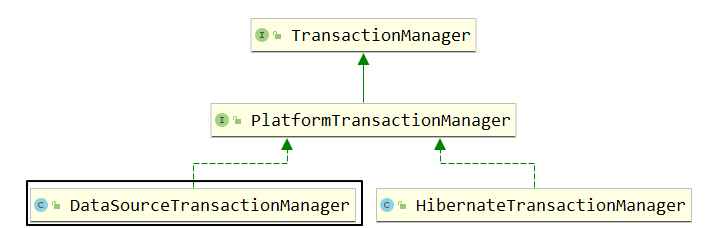


我们现在(使用JDBCTemplate访问数据库)要使用的事务管理器是org.springframework.jdbc.datasource.DataSourceTransactionManager,将来整合 Mybatis 用的也是这个类。
DataSourceTransactionManager类中的主要方法:
- doBegin():开启事务
- doSuspend():挂起事务
- doResume():恢复挂起的事务
- doCommit():提交事务
- doRollback():回滚事务
14 事务实验1:准备工作
15 添加依赖
和JdbcTemplate相同的依赖:必须有spring-orm。16 配置文件
和JdbcTemplate相同的配置17 DAO层代码
EmpDao18 业务代码
EmpService19 测试代码
| @RunWith(SpringJUnit4ClassRunner.class)@ContextConfiguration(locations = “classpath:spring.xml”)public class TestTransaction { @Autowired private EmpService empService; @Test public void testUpdate(){ empService.updateTwice(1,“tomcat”,2,800.0); } } |
|---|
20 事务实验2:应用最基本的事务控制
21 配置事务管理器
| <bean id=”transactionManager” class=”org.springframework.jdbc.datasource.DataSourceTransactionManager”> <property name=”dataSource” ref=”dataSource”></property> </bean> |
|---|
22 开启基于注解的声明式事务功能
| <tx:annotation-driven transaction-manager=”transactionManager”></tx:annotation-driven> |
|---|

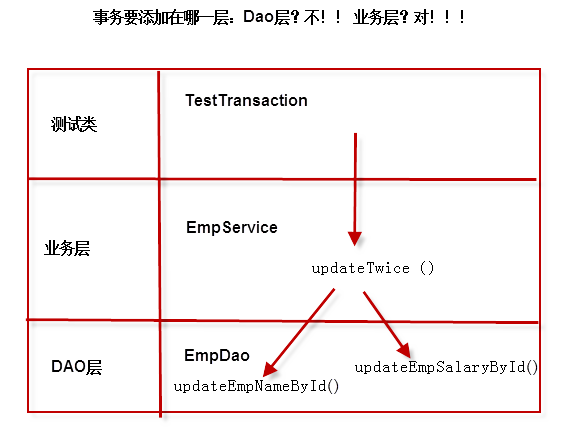
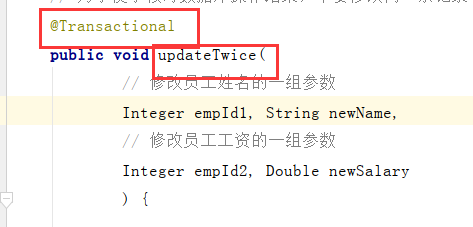
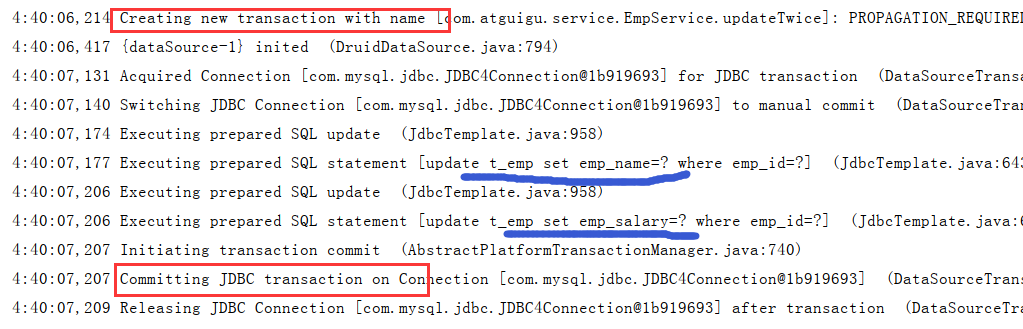
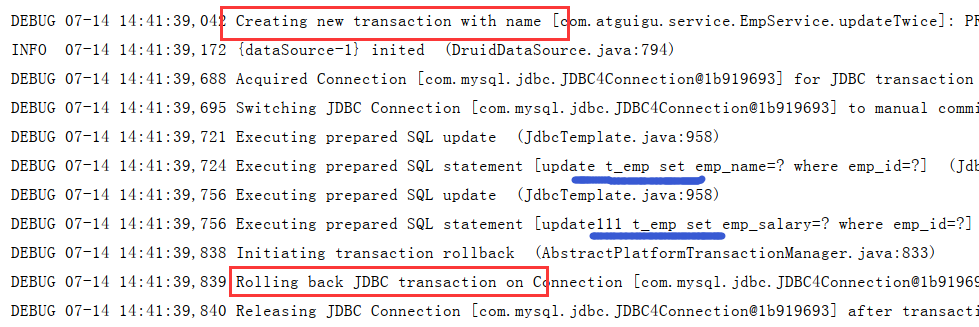
23 在需要事务的方法上使用注解(事务加载业务层)
24 启用日志
| <dependency> <groupId>ch.qos.logback</groupId> <artifactId>logback-classic</artifactId> <version>1.2.3</version> </dependency> |
|---|
| <?xml version=”1.0” encoding=”UTF-8”?><configuration debug=”true”> <appender name=”STDOUT” class=”ch.qos.logback.core.ConsoleAppender”> <encoder> <pattern>[%d{HH:mm:ss.SSS}] [%-5level] [%thread] [%logger] [%msg]%n</pattern> </encoder> </appender> |
_<!-- 设置全局日志级别。日志级别按顺序分别是:DEBUG、INFO、WARN、ERROR --><br />    <!-- 指定任何一个日志级别都只打印当前级别和后面级别的日志。 --><br />    _<**root level="INFO"**><br />        _<!-- 指定打印日志的appender,这里通过“STDOUT”引用了前面配置的appender --><br />        _<**appender-ref ref="STDOUT" **/><br />    </**root**>

_<!-- 根据特殊需求指定局部日志级别 --><br />    _<**logger name="org.springframework.jdbc.datasource.DataSourceTransactionManager" level="DEBUG"**/><br />    <**logger name="org.springframework.jdbc.core.JdbcTemplate" level="DEBUG" **/>
</configuration> |
25 事务实验3:只读
| public @interface Transactional {
@AliasFor(“transactionManager”)
String value() default “”;
@AliasFor(**"value"**)<br />    String transactionManager() **default ""**;

String[] label() **default **{};

Propagation propagation() **default **Propagation.REQUIRED;

Isolation isolation() **default **Isolation.DEFAULT;

**int **timeout() **default **-1;

String timeoutString() **default ""**;

**boolean **readOnly() **default false**;

Class<? **extends **Throwable>[] rollbackFor() **default **{};

String[] rollbackForClassName() **default **{};

Class<? **extends **Throwable>[] noRollbackFor() **default **{};

String[] noRollbackForClassName() **default **{};<br />} |
| —- |
事务的四大特征:ACID 原子性 一致性 隔离性 持久化
Spring中事务的四大属性:
Propagation 传播特性 Isolation 隔离级别 timeout 超时时间 只读事务readonly 异常回滚类型
对一个查询操作来说,如果我们把它设置成只读,就能够明确告诉数据库,这个操作不涉及写操作。这样数据库就能够针对查询操作来进行优化。
针对增删改操作设置只读,就会抛出异常:Caused by: java.sql.SQLException: Connection is read-only. Queries leading to data modification are not allowed
问题:查询不使用事务, 还是使用只读事务??
应用场合:
如果你一次执行单条查询语句,则没有必要启用事务支持,数据库默认支持SQL执行期间的读一致性;
如果你一次执行多条查询语句,例如统计查询,报表查询,在这种场景下,多条查询SQL必须保证整体的读一致性,否则,在前条SQL查询之后,后条SQL查询之前,数据被其他用户改变,则该次整体的统计查询将会出现读数据不一致的状态,此时,应该启用事务支持。
————————————————
版权声明:本文为CSDN博主「renminzdb2」的原创文章,遵循CC 4.0 BY-SA版权协议,转载请附上原文出处链接及本声明。
原文链接:https://blog.csdn.net/renminzdb2/article/details/84616004
注解@Transactional的位置
类上:该类的所有方法都启用事务
方法上:只有该方法启用事务,和其他方法无关
如果类上和某些方法上都有事务,以方法上的事务配置为准。
26 事务实验4:超时
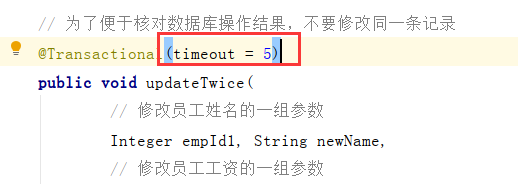
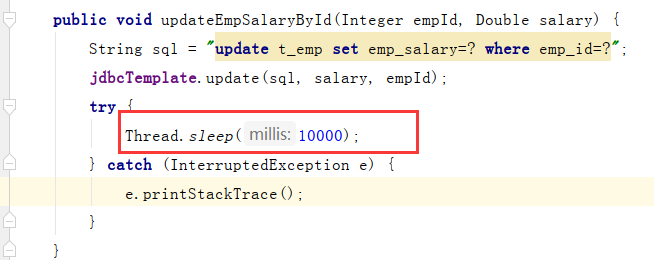
- 如果事务中后一个操作超时,事务会回滚,前一个操作也回滚。
- 如果超时,出现如下org.springframework.transaction.TransactionTimedOutException: Transaction timed out: deadline was Fri Jun 04 16:25:39 CST 2021
- Thread.sleep()要注意位置,如果添加在上图的位置,即使超时,也不会回滚
27 事务实验5:回滚异常类型
默认只针对运行时异常回滚,编译时异常不回滚
验证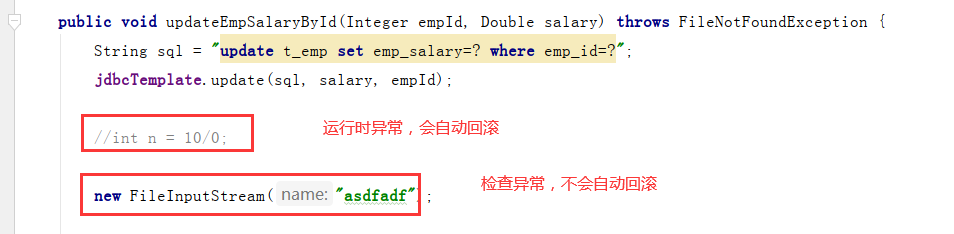
修改
| @Transactional(timeout = 5, rollbackFor = Exception.class, noRollbackFor = SQLException.class ) |
|---|
| @Transactional(timeout = 5, noRollbackFor = Exception.class, rollbackFor = SQLException.class ) |
|---|
案例:所有的异常都回滚
方法1:设置rollbackFor=Exception.class
| @Transactional(timeout = 5, rollbackFor = Exception.class ) |
|---|
方法2:异常链。底层出现了检查异常,进行处理,并向上层抛出一个新的异常(一般是运行异常)。既可以传递异常到上层,还可以避免方法签名中使用throws。在Spring事务中还可以实现所有异常都回滚的效果
| public void updateEmpSalaryById(Integer empId, Double salary) {
String sql = “update t_emp set emp_salary=? where emp_id=?”;
jdbcTemplate.update(sql, salary, empId);
//int n = 10/0;<br /> //new FileInputStream("asdfadf");<br /> **try **{<br /> **new **FileInputStream(**"asdfadf"**);<br /> } **catch **(FileNotFoundException e) {<br /> e.printStackTrace();<br /> **throw new **RuntimeException(e.getMessage());<br /> }<br />} |
| —- |
28 事务实验4:隔离级别
1.数据库访问的并发问题
- 脏读 :一个事务读到了另一个事务的未提交的数据
- 不可重复读 :一个事务读到了另一个事务已经提交的 update 的数据导致多次查询结果不一致.
- 幻读 :一个事务读到了另一个事务已经提交的 insert或者delete 的数据导致多次查询结果不一致.
2.通过设置不同的隔离级别解决数据库访问的并发问题
| 隔离级别 | 脏读 | 不可重复读 | 幻读 | | —- | —- | —- | —- | | READ_UNCOMMITTED | √ | √ | √ | | READ_COMMITTED | × | √ | √ | | REPEATABLE_READ | × | × | √ | | SERIALIZABLE | × | × | × |
3.Spring的隔离级别
| public enum Isolation { DEFAULT(-1), READ_UNCOMMITTED(1), READ_COMMITTED(2), REPEATABLE_READ(4), SERIALIZABLE(8); private final int value; private Isolation(int value) { this.value = value; } public int value() { return this.value; } } |
|---|
如果选择DEFAULT,默认值,由底层数据库自动判断应该使用什么隔离级别。
对于互联网高并发项目来说,如采用隔离级别SERIALIZABLE,固然安全,担心性能会受到严重影响。此时一般将隔离级别降低,保证效率,再配合悲观锁、乐观锁等技术保证安全性。
事务的隔离级别要得到底层数据库引擎的支持, 而不是应用程序或者框架的支持。Oracle 支持的 2 种事务隔离级别:READ_COMMITED(默认) , SERIALIZABLE。MySQL 支持 4种事务隔离级别,默认REPEATABLE READ。
注意:mysql中使用了MVCC多版本控制技术,在REPEATABLE READ这个级别也可以避免幻读。
29 事务实验4:传播特性
在大多数情况下,我们会认为事务操作要么都成功,要么回到初始状态。比如下订单,如果主订单添加成功,三个订单明细添加成功两个,总额就对不上了,顾客最终收货会有减少的。这种情况肯定要保证全部成功。类似还有银行转账例子。但也存在不同的需求,
一般是业务层直接调用DAO层,不存在业务层平行调用的问题。哪怎么会有被调用的方法还是否开启事务的问题呢?比如:
①Service方法应用了通知
②过滤器或拦截器等类似组件
| 名称 | 含义 |
|---|---|
| REQUIRED | 如果当前没有事务,就新建一个事务,如果已经存在一个事务中,加入到这个事务中。这是默认值。 |
| REQUIRES_NEW | 新建事务,如果当前存在事务,把当前事务挂起。 |
| SUPPORTS | 支持当前事务,如果当前没有事务,就以非事务方式执行。 |
| MANDATORY | 使用当前的事务,如果当前没有事务,就抛出异常。 |
| NOT_SUPPORTED | 以非事务方式执行操作,如果当前存在事务,就把当前事务挂起。 |
| NEVER | 以非事务方式执行,如果当前存在事务,则抛出异常。 |
| NESTED | 如当前存在事务,则在嵌套事务内执行。如当前没有事务,则执行与PROPAGATION_REQUIRED类似的操作 |

若有收获,就点个赞吧
0 人点赞
