SpringMVC授课笔记3
1 案例:影院系统
数据库怎么办?使用HashMap模拟。不涉及和MyBatis、Spring的整合,重点就是SpringMVC的使用:先搭建SpringMVC的环境,通过页面、分控制器的操作来说功能。
2 准备SpringMVC环境
2.1 依赖
Servlet依赖
SpringMVC依赖
Spring和Thymeleaf的整合依赖
Lombok
日志Logback
Spring Test
Junit5
2.2 web.xml
2.3 springmvc.xml
启用MVC注解驱动
解决静态资源访问问题
组件(@Controller @Service)扫描
Thymeleaf解析器
2.4 日志logback.xml
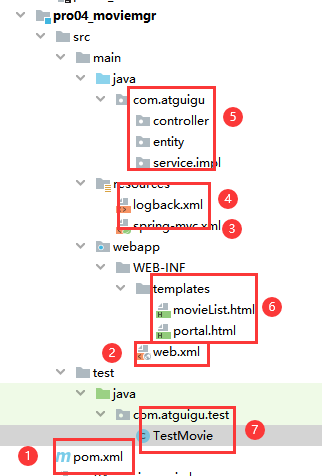
2.5 创建目录结构
3 准备实体类
| @Data
@AllArgsConstructor
@NoArgsConstructorpublic class Movie {
**private **String **movieId**;<br /> **private **String **movieName**;<br /> **private **Double **moviePrice**;<br />} |
| —- |
4 准备业务层接口和实现类代码(提供模拟数据)
| public interface MovieService { List Movie getMovieById(String movieId); void saveMovie(Movie movie); void updateMovie(Movie movie); void removeMovieById(String movieId); } |
|---|
5 测试业务层代码
| @SpringJUnitConfig(locations = “classpath:spring-mvc.xml”)public class TestMovie {
@Autowired<br />    **private **MovieService **movieService**;

@Test<br />    **public void **testSelectAll(){<br />        List<Movie> movieList = **this**.**movieService**.getAll();<br />        movieList.forEach(m-> System.**_out_**.println(m));<br />    }<br />    @Test<br />    **public void **testSaveMovie(){<br />        Movie movie = **new **Movie(**"m17"**,**"唐人街探案2"**,60.0);<br />        **this**.**movieService**.saveMovie(movie);<br />        List<Movie> movieList = **this**.**movieService**.getAll();<br />        movieList.forEach(m-> System.**_out_**.println(m));<br />    }<br />} |
| —- |
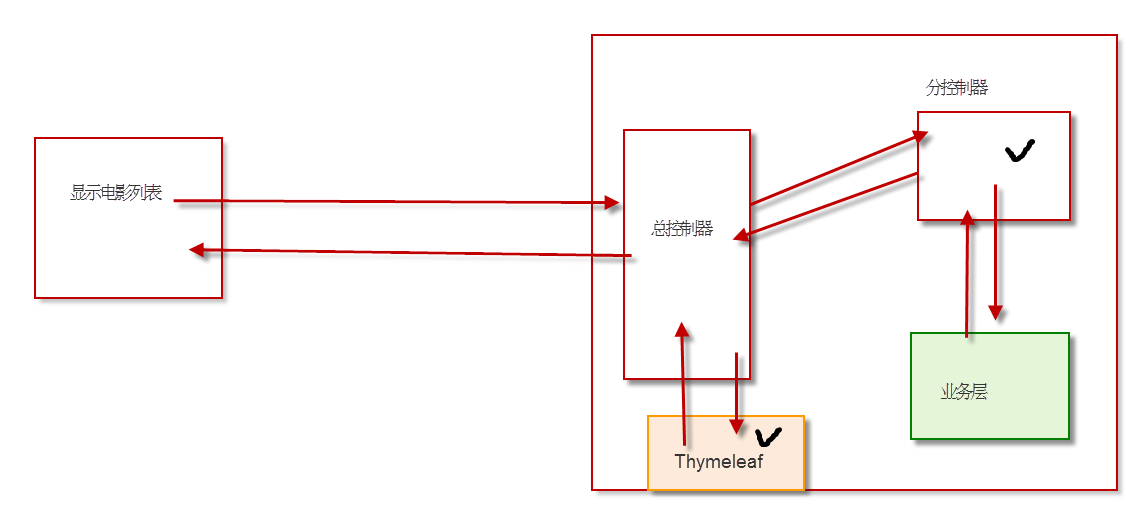
6 影院案例-显示首页
| <mvc:view-controller path=”/“ view-name=”portal”></mvc:view-controller> |
|---|
| <a th:href=”@{/movie/getAll}”>进入影院系统</a> |
7 影院案例-显示所有电影
| @Controller
@RequestMapping(“/movie”)public class MovieController {
@Autowired
private MovieService movieService;
@RequestMapping(**"/getAll"**)<br /> **public **String getAll(Model model){<br /> //调用业务层获取电影列表<br /> List<Movie> movieList = **this**.**movieService**.getAll();<br /> //将电影列表数据存入请求域<br /> model.addAttribute(**"movieList"**,movieList);<br /> //指定返回的视图<br /> **return "movieList"**;<br /> }<br />} |
| —- |
| <!DOCTYPE html>
<html lang=”en” xmlns:th=”http://www.thymeleaf.org“>
<head>
<meta charset=”UTF-8”>
<title>Title</title>
<style type=”text/css”>
h3{
text-align: center;
}
table#table1{
width: 60%;
margin: 10px auto;
border-collapse: collapse;
}
table#table1 th, td{
text-align: center;
border:1px solid red;
}
</style>
</head>
<body>
<h3>电影列表</h3>
<table id=”table1”>
<tr>
<th>电影编号</th>
<th>电影名称</th>
<th>观看价格</th>
<th>操作</th>
</tr>
<tbody>
<tr th:each=”movie:${movieList}”>
<td th:text=”${movie.movieId}”></td>
<td th:text=”${movie.movieName}”></td>
<td th:text=”${movie.moviePrice}”></td>
<td>
修改 删除
</td>
</tr>
</tbody>
</table>
</body>
</html> |
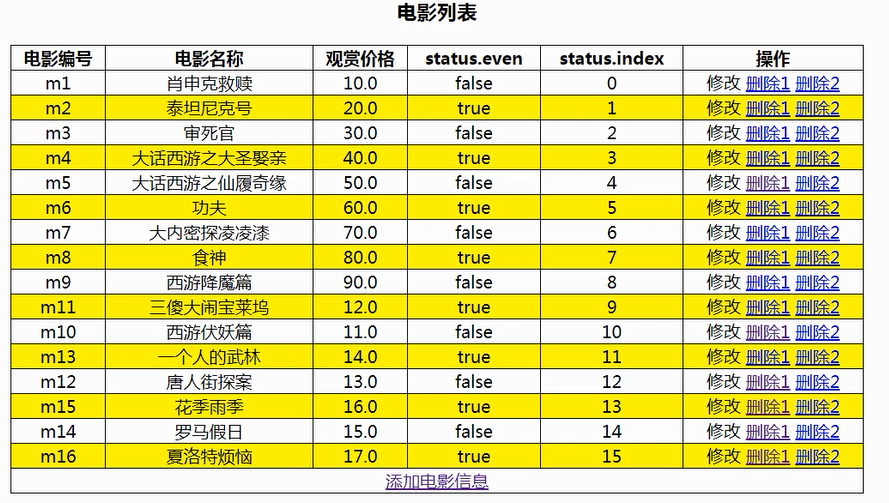
8 影院案例-完善显示所有电影
隔行变色
区分是否有电影
| <h3>电影列表</h3> <table id=”table1”> <tr> <th>电影编号</th> <th>电影名称</th> <th>观看价格</th> <th>status.index</th> <th>status.count</th> <th>操作</th> </tr> <tbody th:if=”${movieList==null || movieList.size()==0}”> <tr> <td colspan=”10”>一部电影也没有</td> </tr> </tbody> <tbody th:if=”${not #lists.isEmpty(movieList)}”> <tr th:each=”movie,status:${movieList}” th:class=”${status.index%2==0?’white’:’beige’}”> <td th:text=”${movie.movieId}”></td> <td th:text=”${movie.movieName}”></td> <td th:text=”${movie.moviePrice}”></td> <td th:text=”${status.index}”></td> <td th:text=”${status.count}”></td> <td> 修改 删除 </td> </tr> </tbody> </table> |
|---|
| 影院案例-删除指定电影信息<a th:href=”@{/movie/removeMovieById(movieId=${movie.movieId})}”>删除</a> <a href=”javascript:void(0)” th:onclick=”confirmRemove([[${movie.movieId}]])”>删除2</a> <a href=”javascript:void(0)” th:onclick=’confirmRemove([[${movie.movieId}]])’>删除3</a> |
| <script type=”text/javascript”> function confirmRemove(movieId){ var flag = window.confirm(“您确认要删除该电影信息吗”); if(flag){ location.href=“/moviemgr/movie/removeMovieById?movieId=”+movieId } } </script> |
| @RequestMapping(“/removeMovieById”)public String removeMovieById(String movieId){ this.movieService.removeMovieById(movieId); //return “movieList”; return “redirect:/movie/getAll”; //DML操作后推荐使用redirect //return “redirect:/getAll”; // return “forward:/movie/getAll”;//而不是forward,尤其是insert操作} |
注意:return时,如果要跳转到分控制器的方法,而不是页面,必须要添加forward或者redirect
9 影院案例-添加新电影
10 跳转到添加页面
| <mvc:view-controller path=”/movie/toAdd” view-name=”movieAdd”></mvc:view-controller> |
|---|
| <h3>添加电影信息</h3> <form th:action=”@{/movie/addMovie}” method=”post”> 电影编号:<input type=”text” name=”movieId”><br> 电影名称:<input type=”text” name=”movieName”><br> 电影价格:<input type=”number” step=”0.01” name=”moviePrice”><br> <input type=”submit”> </form> |
11 完成添加功能
| @RequestMapping(“/addMovie”)public String addMovie(Movie movie){ this.movieService.saveMovie(movie); //return “forward:/movie/getAll”;//?? return “redirect:/movie/getAll”; } |
|---|


12 影院案例-修改指定电影信息
13 查询指定电影信息并回显
| <a th:href=”@{/movie/getMovieById(movieId=${movie.movieId})}”>修改</a> |
|---|
| @RequestMapping(“/getMovieById”)public String getMovieById(String movieId,Model model){ Movie movie = this.movieService.getMovieById(movieId); model.addAttribute(“movie”,movie); return “movieUpdate”; } |
| <h3>修改电影信息</h3> <form th:action=”@{/movie/updateMovie}” method=”post”> 电影编号:<input type=”text” name=”movieId” th:value=”${movie.movieId}” readonly><br> 电影名称:<input type=”text” name=”movieName” th:value=”${movie.movieName}”><br> 电影价格:<input type=”number” step=”0.01” name=”moviePrice” th:value=”${movie.moviePrice}”><br> <input type=”submit”> </form> |
14 完成修改功能
| @RequestMapping(“/updateMovie”)public String updateMovie(Movie movie){ this.movieService.updateMovie(movie); return “redirect:/movie/getAll”; } |
|---|
15 影院案例-总结
16 开发主要步骤
搭建项目环境
准备业务层代码(使用HashMap模拟数据库)
进行功能开发(页面Thymeleaf)和分控制器(@Controller)
17 页面
判断集合内容是否为空
| <tbody th:if=”${movieList==null || movieList.size()==0}”> |
|---|
| <tbody th:if=”${not #lists.isEmpty(movieList)}”> |
如何遍历List
| <tr th:each=”movie,status:${movieList}”> <td th:text=”${movie.movieId}”></td> <td th:text=”${movie.movieName}”></td> <td th:text=”${movie.moviePrice}”></td> <td th:text=”${status.index}”></td> <td th:text=”${status.count}”></td> |
|---|
实现隔行变色
| .white{ background-color: white; } .beige{ background-color: beige; } |
|---|
| <tr th:each=”movie,status:${movieList}” th:class=”${status.index%2==0?’white’:’beige’}”> </tr> |
修改和删除的超链接,如何传递参数
| <a th:href=”@{/movie/getMovieById(movieId=${movie.movieId})}”>修改</a> <a th:href=”@{/movie/removeMovieById(movieId=${movie.movieId})}”>删除</a> <a href=”javascript:void(0)” th:onclick=”confirmRemove([[${movie.movieId}]])”>删除2</a> <a href=”javascript:void(0)” th:onclick=’confirmRemove([[${movie.movieId}]])’>删除3</a> |
|---|
表单数据回显
| <form th:action=”@{/movie/updateMovie}” method=”post”> 电影编号:<input type=”text” name=”movieId” th:value=”${movie.movieId}” readonly><br> 电影名称:<input type=”text” name=”movieName” th:value=”${movie.movieName}”><br> 电影价格:<input type=”number” step=”0.01” name=”moviePrice” th:value=”${movie.moviePrice}”><br> <input type=”submit”> </form> |
|---|
18 分控制器
如何接收客户端的参数:传递基本参数和实体类
| public String removeMovieById(String movieId){} |
|---|
| public String addMovie(Movie movie){ |
如何传递参数给下一个组件,多种方式,此处采用Model传递,底层将数据保存在request域。
| @RequestMapping(“/getMovieById”)public String getMovieById(String movieId,Model model){ Movie movie = this.movieService.getMovieById(movieId); model.addAttribute(“movie”,movie); return “movieUpdate”; } |
|---|
DML操作后如何跳转
- 不能直接跳转到页面来显示,应该先查询再显示
- 处理完后建议使用redirect而不是forward进行跳转,避免表单的重复提交。
| @RequestMapping(“/updateMovie”)public String updateMovie(Movie movie){
this.movieService.updateMovie(movie);
return “redirect:/movie/getAll”;
} | | —- |
19 Restful风格
RESTful架构,是目前非常流行的一种互联网软件架构。它结构清晰、符合标准、易于理解、扩展方便,正得到越来越多网站的采用。
REST,即Representational State Transfer的缩写,可以翻译我为“表示性的状态转移”,“表现层资源的状态转移”
如果一个架构符合REST原则,就称它为RESTful架构。
①资源
REST的名称”表现层状态转化”中,省略了主语。”表现层”其实指的是”资源”(Resources)的”表现层”。
所谓”资源”,就是网络上的一个实体,或者说是网络上的一个具体信息。它可以是一段文本、一张图片、一首歌曲、一种服务,总之就是一个具体的实在。你可以用一个URI(统一资源定位符)指向它,每种资源对应一个特定的URI。要获取这个资源,访问它的URI就可以,因此URI就成了每一个资源的地址或独一无二的识别符。
②表现层(Representation)
资源是一种信息实体,它可以有多种外在表现形式。我们把”资源”具体呈现出来的形式,叫做它的”表现层”(Representation)。
比如,文本可以用txt格式表现,也可以用HTML格式、XML格式、JSON格式表现,甚至可以采用二进制格式;图片可以用JPG格式表现,也可以用PNG格式表现。
③状态转移
互联网通信协议HTTP协议,是一个无状态协议。这意味着,所有的状态都保存在服务器端。因此,如果客户端想要操作服务器,必须通过某种手段,让服务器端发生”状态转化”(State Transfer)。而这种转化是建立在表现层之上的,所以就是”表现层状态转化”。
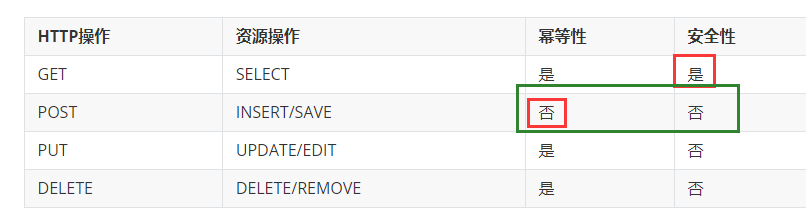
客户端用到的手段,只能是HTTP协议。具体来说,就是HTTP协议里面,四个表示操作方式的动词:GET、POST、PUT、DELETE。它们分别对应四种基本操作:GET用来获取资源,POST用来新建资源,PUT用来更新资源,DELETE用来删除资源。
| 操作 | 传统风格 | REST 风格 |
|---|---|---|
| 保存 | /CRUD/saveEmp | URI 地址:/CRUD/emp 请求方式:POST |
| 删除 | /CRUD/removeEmp?empId=2 | URI 地址:/CRUD/emp/2 请求方式:DELETE |
| 更新 | /CRUD/updateEmp | URI 地址:/CRUD/emp 请求方式:PUT |
| 查询(表单回显) | /CRUD/findEmpById?empId=2 | URI 地址:/CRUD/emp/2 请求方式:GET |
目前主要使用HTTP协议(就是REST思想提出者Roy Thomas Fielding设计的)来实现REST思想,网络上有人从实践的角度,一句话总结REST:URI定位资源,用HTTP动词(GET,POST,DELETE,DETC)描述操作。
20 幂等性和安全性
21 Restful请求方式映射:GET
| <h3>Restful请求映射:Get</h3> <a th:href=”@{/emp}”>查询所有员工</a><br> <a th:href=”@{/emp/1}”>查询指定编号的员工</a><br> <a th:href=”@{/emp/zh/300}”>按照姓名和工资查询员工</a><br |
|---|
| @Controller @Slf4jpublic class EmployeeController { @GetMapping(“/emp”) public String findAll(){ log.debug(“————EmployeeController findAll ————-“); return “result”; } @GetMapping(“/emp/{empId}”) public String findById(@PathVariable(“empId”) Integer empId){ log.debug(“———-EmployeeController findById :”+empId+“———“); return “result”; } |
@GetMapping(**"/emp/{empName}/{minSalary}"**)<br /> **public **String findEmp(@PathVariable(**"empName"**) String ename,@PathVariable(**"minSalary"**) Double minSal){<br /> **_log_**.debug(**"-------EmployeeController findEmp :"**+ename+**","**+minSal+**"------"**);<br /> **return "result"**;<br /> }<br />} |
RequestMapping中使用{}表示参数,方法的参数中使用@PathVariable指定对应关系
22 Restful请求方式映射:POST
| <h3>Restful请求映射:POST</h3> <form th:action=”@{/emp}” method=”post”> 员工姓名:<input type=”text” name=”empName”><br> 员工薪水:<input type=”text” name=”empSalary”><br> <input type=”submit” value=”提交”> </form> |
|---|
| @PostMapping(“/emp”)public String addEmp(Employee emp){ log.debug(“———-EmployeeController addEmp:”+emp+“ —————“); return “result”; } |
23 Restful请求方式映射:PUT
| <filter> <filter-name>HiddenHttpMethodFilter</filter-name> <filter-class>org.springframework.web.filter.HiddenHttpMethodFilter</filter-class> </filter> <filter-mapping> <filter-name>HiddenHttpMethodFilter</filter-name> <url-pattern>/</url-pattern> </*filter-mapping> |
|---|
| <h3>Restful请求映射:PUT</h3> <form th:action=”@{/emp}” method=”POST”> <input type=”hidden” name=”_method” value=”put”> 员工编号:<input type=”text” name=”empId” value=”7839”><br> 员工姓名:<input type=”text” name=”empName” value=”King”><br> 员工薪水:<input type=”text” name=”empSalary” value=”5000”><br> <input type=”submit” value=”提交”> </form> - 要点1:原请求方式必须是 post - 要点2:新的请求方式名称通过请求参数发送 - 要点3:请求参数名称必须是_method - 要点4:请求参数的值就是要改成的请求方式 |
| @PutMapping(“/emp”)public String updateEmp(Employee emp, HttpServletRequest request){ log.debug(“——-EmployeeController updateEmp:”+request.getMethod()+“———————“); log.debug(“———-EmployeeController updateEmp:”+emp+“ —————“); return “result”; } |


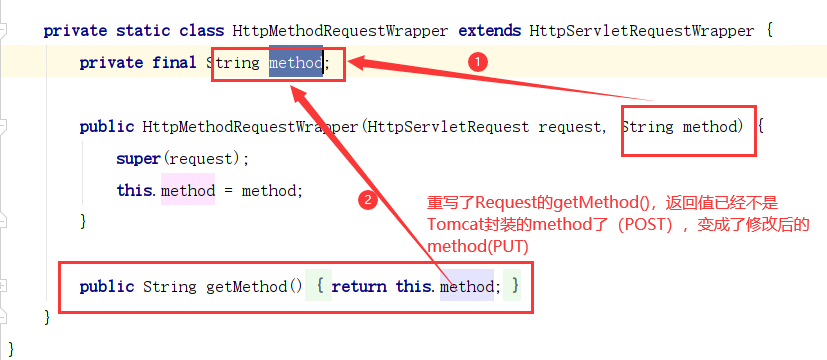
HiddenHttpMethodFilter必须写在CharacterEncodingFilter后面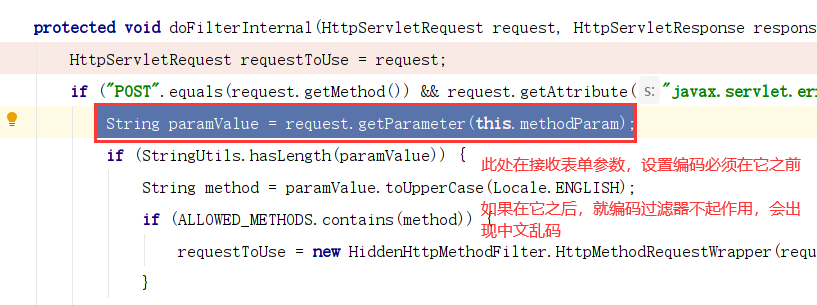
24 Restful请求方式映射:DELETE
| <script type=”text/javascript” th:src=”@{/js/vue.js}”></script> |
|---|
| <h3>Restful请求映射:DELETE</h3> <div id=”app”> <a th:href=”@{/emp/1}” @click=”deleteEmp”>删除编号为1的员工</a> <a th:href=”@{/emp/2}” @click.prevent=”confirmDeleteEmp”>删除编号为2的员工</a> </div> |
| <form id=”form1” method=”post”> <input type=”hidden” name=”_method” value=”delete”> </form> |
| script type=”text/javascript”> new Vue({ el:“#app”, data:{ } , methods:{ deleteEmp:function(event){ //获取通用表单 var formElem = document.getElementById(“form1”); //修改通用表单的action为超链接的href _formElem.action = event.target.href; //提交表单 formElem.submit(); //阻止超链接的默认行为(请求href的资源) //event.preventDefault(); }, confirmDeleteEmp:function(event){ var flag = **_window.confirm(“您确认要删除该员工信息吗”); if(flag){ //获取通用表单 var formElem = document.getElementById(“form1”); _//修改通用表单的action为超链接的href _formElem.action = event.target.href; //提交表单 _formElem.submit(); //阻止超链接的默认行为(请求href的资源) //event.preventDefault(); _} } } }); </script**> |
| @DeleteMapping(“/emp/{empId}”)public String deleteEmp(@PathVariable(“empId”) Integer empId,HttpServletRequest request){ log.debug(“—————-EmployeeController deleteEmp:”+request.getMethod()+“———————“); log.debug(“———-EmployeeController deleteEmp:”+empId+“ —————“); return “result”; } |
console.info(event);console.info(event.target);console.info(event.target.href)

25 使用Restful风格重构影院系统
26 路径清单
| 功能 | URL 地址 | 请求方式 |
|---|---|---|
| 访问首页√ | / | GET |
| 查询全部数据√ | /movie | GET |
| 删除√ | /movie/m1 | DELETE |
| 跳转到添加数据的表单√ | /movie/page/toAdd | GET |
| 执行保存√ | /movie | POST |
| 跳转到更新数据的表单√ | /movie/m1 | GET |
| 执行更新√ | /movie | PUT |
27 准备操作
| <filter> <filter-name>HiddenHttpMethodFilter</filter-name> <filter-class>org.springframework.web.filter.HiddenHttpMethodFilter</filter-class> </filter> <filter-mapping> <filter-name>HiddenHttpMethodFilter</filter-name> <url-pattern>/</url-pattern> </*filter-mapping> |
|---|
28 访问首页
| <mvc:view-controller path=”/“ view-name=”portal”></mvc:view-controller> |
|---|
29 查询所有
| <a th:href=”@{/movie}”>进入影院系统</a> |
|---|
| @GetMappingpublic String getAll(Model model){ //调用业务层获取电影列表 List //将电影列表数据存入请求域 model.addAttribute(“movieList”,movieList); //指定返回的视图 return “movieList”; } |
30 添加操作
跳到添加页面 无需修改 | <a th:href=”@{/movie/toAdd}”>添加电影信息</a> | | —- |
完成添加操作 | <h3>添加电影信息</h3>
<form th:action=”@{/movie}” method=”post”>
电影编号:<input type=”text” name=”movieId”><br>
电影名称:<input type=”text” name=”movieName”><br>
电影价格:<input type=”number” step=”0.01” name=”moviePrice”><br>
<input type=”submit”>
</form> | | —- | | @PostMappingpublic String addMovie(Movie movie){
this.movieService.saveMovie(movie);
return “redirect:/movie”;
} |
31 修改操作
查询指定的电影信息 | <a th:href=”@{/movie/}+${movie.movieId}”>修改</a>
<a th:href=”@{|/movie/${movie.movieId}|}”>修改</a> | | —- | | @RequestMapping(“/{movieId}”)public String getMovieById(@PathVariable(“movieId”) String movieId, Model model){
Movie movie = this.movieService.getMovieById(movieId);
model.addAttribute(“movie”,movie);
return “movieUpdate”;
} |修改电影信息
| <h3>修改电影信息</h3> <form th:action=”@{/movie}” method=”post”> <input type=”hidden” name=”_method” value=”put”> 电影编号:<input type=”text” name=”movieId” th:value=”${movie.movieId}” readonly><br> 电影名称:<input type=”text” name=”movieName” th:value=”${movie.movieName}”><br> 电影价格:<input type=”number” step=”0.01” name=”moviePrice” th:value=”${movie.moviePrice}”><br> <input type=”submit”> </form> |
|---|
| @PutMapping()public String updateMovie(Movie movie){ this.movieService.updateMovie(movie); return “redirect:/movie”; } |
32 删除操作
| <a th:href=”@{|/movie/${movie.movieId}|}” @click=”deleteEmp”>删除</a> <a th:href=”@{|/movie/${movie.movieId}|}” @click.prevent=”confirmDeleteEmp”>删除2</a> |
|---|
| <form id=”form1” method=”post”> <input type=”hidden” name=”_method” value=”delete”> </form> |
| <script type=”text/javascript” th:src=”@{/js/vue.js}”></script> <script type=”text/javascript”> window.onload= function(){ new Vue({ el:“#tbody1”, methods:{ deleteEmp:function(event){ //获取表单 var formElem = document.getElementById(“form1”); //修改表单的action _formElem.action = event.target.href; //提交表单 formElem.submit(); //阻止事件默认行为 event.preventDefault(); }, confirmDeleteEmp:function(event){ var flag = **_window.confirm(“您确认要删除该电影信息吗”); if(flag){ //获取表单 var formElem = document.getElementById(“form1”); _//修改表单的action _formElem.action = event.target.href; _//提交表单 _formElem.submit(); } } } }); } </script**> |
| @DeleteMapping(“/{movieId}”)public String removeMovieById(@PathVariable(“movieId”) String movieId){ this.movieService.removeMovieById(movieId); return “redirect:/movie”; } |
33 总体测试
出问题,点击“添加电影信息”,调用了分控制器的findById(),然后跳转到了修改页面。
原因:两个操作的路径
| 跳转到添加数据的表单√ | /movie/toAdd | GET |
|---|---|---|
| 跳转到更新数据的表单√ | /movie/m1 | GET |
SpringMVC会将toAdd理解为一个电影的编号。
解决:增加层次
| <a th:href=”@{/movie/page/toAdd}”>添加电影信息</a> |
|---|
| <mvc:view-controller path=”/movie/page/toAdd” view-name=”movieAdd”></mvc:view-controller> |
总结:使用Restful风格重构项目:
- 修改页面路径
- 修改分控制器的RequestMapping
- 使用@PathVariable指定对应关系
- 页面跳转到分控制器方法是注意路径。
34 Ajax传递基本类型参数
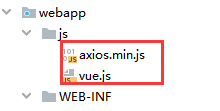
| <script type=”text/javascript” th:src=”@{/js/vue.js}”></script> <script type=”text/javascript” th:src=”@{/js/axios.min.js}”></script> |
|---|
| <a href=”javascript:void(0)” @click=”AjaxDemo1”>Ajax请求1</a> |
| <script type=”text/javascript”> new Vue({ el:“#app”, methods:{ AjaxDemo1:function(){ //发送一个Ajax请求 axios({ method:“POST”, //url:”/springmvc/ajax/ajaxDemo1”, url:“[[@{/ajax/ajaxDemo1}]]”, params:{ sid:1, name:“zhangsan”, score:90.5 } }) .then(function(result){ //console.info(result); alert(result.data+“ “+result.status); }) .catch(function(error1){ //console.debug(error) console.debug(error1) //console.debug(error1.data) }); } } }); </script> |
| @Controller @Slf4jpublic class AjaxController { @RequestMapping(“/ajax/ajaxDemo1”) @ResponseBody public String ajaxDemo1(Integer sid,String name,Double score){ log.debug(“ajaxDemo1:”+sid+“,”+name+“,”+score); int n = 10/0; return “ok”; //WEB-INF/templates/ok.html } } |
35 Ajax传递实体类

若有收获,就点个赞吧
0 人点赞
