一. Spring Boot 概述与入门(掌握)
1.1 Spring Boot 概述
1.1.1 什么是Spring Boot
Spring Boot是Spring项目中的一个子工程,与我们所熟知的Spring-framework 同属于spring的产品:
其最主要作用就是帮助开发人员快速的构建庞大的spring项目,并且尽可能的减少一切xml配置,做到开箱即用,迅速上手,让开发人员关注业务而非配置。
主要特点:
- 自动配置 : 不需要再关注各个框架的整合配置, springboot全部已经配置好了
- 起步依赖 : 我们在需要使用某个框架的时候, 直接添加这个框架的启动器依赖即可 , 不需要再关注jar包的冲突和整合
设计目的: 用来简化 Spring 应用的初始搭建以及开发过程。
从最根本上来讲,Spring Boot 就是一些库的集合,它能够被任意项目所使用。它使用 “习惯优于配置”的理念让你的项目快速运行起来。spring boot 其实不是什么新的框架,它默认配置了很多框架的使用方式,就像 maven 整合了所有的 jar 包,spring boot 整合了所有的框架,总结一下及几点:
(1)为所有 Spring 开发提供一个更快更广泛的入门体验。
(2)零配置。无冗余代码生成和XML 强制配置,遵循“约定大于配置” 。
(3)集成了大量常用的第三方库的配置, Spring Boot 应用为这些第三方库提供了几乎可以零配置的开箱即用的能力。
(4)提供一系列大型项目常用的非功能性特征,如嵌入服务器等。
使用 Spring Boot有什么好处:
其实就是简单、快速、方便!
平时如果我们需要搭建一个 Spring Web 项目的时候需要怎么做呢?
- 1)配置 web.xml,加载 Spring 和 Spring mvc
- 2)配置数据库连接、配置 Spring 事务
- 3)配置加载配置文件的读取,开启注解
- 4)配置日志文件
- …
- 配置完成之后部署 Tomcat 调试
- …
1.1.2 Spring Boot的优势
使用Java开发程序 , 一直困扰我们的就是臃肿、麻烦。搭建项目的过程相当复杂 , 我们需要考虑很多问题 , 主要的问题有如下两点 :
- 复杂的配置
- 混乱的依赖管理
Spring Boot帮我们解决了这些, 我们在使用Spring Boot开发时, 不需要关注各种复杂的整合配置 , 也不用关注各个库之间的依赖及冲突问题 , Spring Boot已经默认帮我们整合配置好了 !
节省了大量的配置及依赖调整时间, 让我们能够把时间用在刀刃上, 专注业务逻辑的开发。
1.2 Spring Boot 快速入门
下面,我们就利用Spring Boot搭建一个web工程,体会一下Spring Boot的魅力所在!
1.2.1 需求
需求:访问 http://localhost:8080/hello输出 “Hello Spring Boot”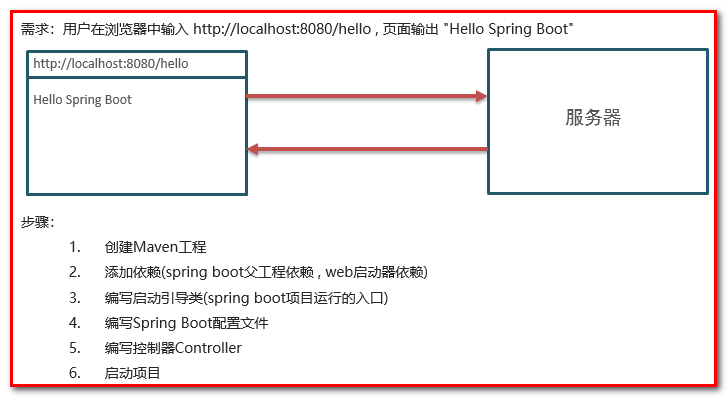
1.2.2 步骤
- 创建Maven工程
- 添加依赖(springboot父工程依赖 , web启动器依赖)
- 编写启动引导类(springboot项目运行的入口)
- 编写处理器Controller
-
1.2.3 实现
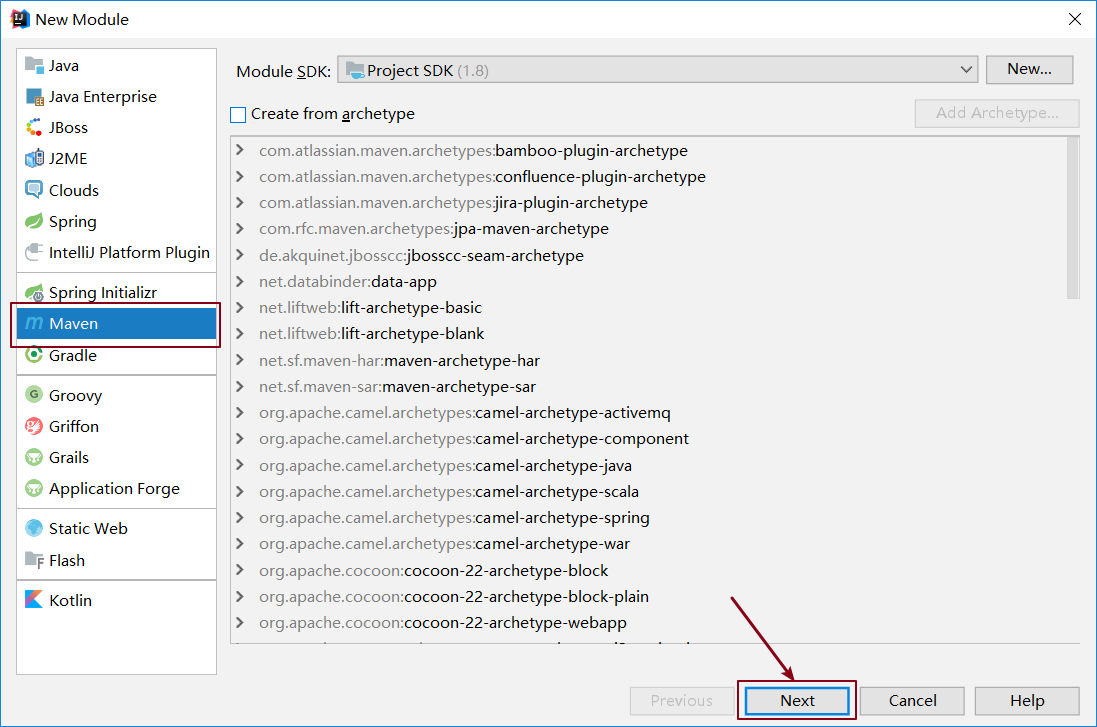
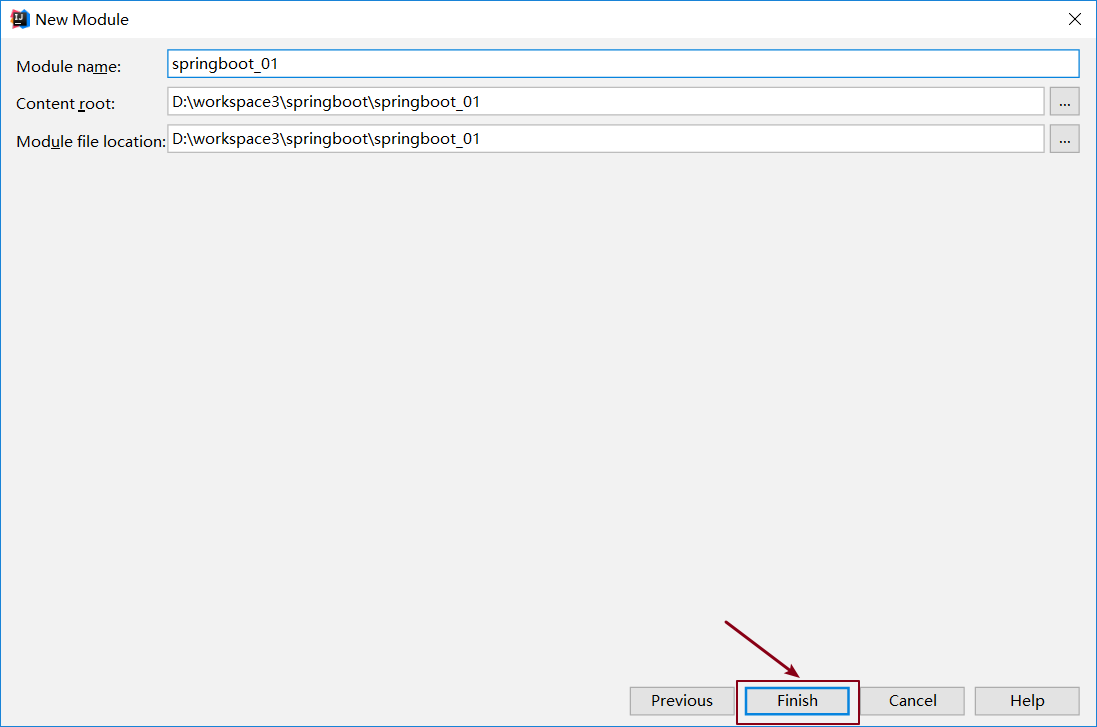
1.2.3.1 创建工程
1.2.3.2 添加依赖
SpringBoot可以帮我们方便的管理项目依赖 , 在Spring Boot提供了一个名为spring-boot-starter-parent的工程,里面已经对各种常用依赖的版本进行了管理,我们的项目需要以这个项目为父工程,这样我们就不用操心依赖的版本问题了,需要什么依赖,直接引入坐标(不需要添加版本)即可!
添加父工程坐标 | <parent>
<groupId>org.springframework.boot</groupId>
<artifactId>spring-boot-starter-parent</artifactId>
<version>2.2.2.RELEASE</version>
</parent> | | —- |添加web启动器
为了让Spring Boot帮我们完成各种自动配置,我们必须引入Spring Boot提供的自动配置依赖,我们称为启动器。因为我们是web项目,这里我们引入web启动器,在 pom.xml 文件中加入如下依赖:
| <dependencies> <dependency> <groupId>org.springframework.boot</groupId> <artifactId>spring-boot-starter-web</artifactId> </dependency> </dependencies> |
|---|
需要注意的是,我们并没有在这里指定版本信息 , 当我们添加好启动器之后我们发现项目中已经依赖了大量的Jar包
- 配置JDK版本
| <properties>
<java.version>1.8</java.version>
</properties> | | —- |
思考: 为什么我们这里仅仅配置了这么一个变量 , 项目的JDK版本就会改变呢 ?
因为jdk插件已经在父工程中定义好了 , 默认会读取${java.version}变量值
- 完整的pom.xml文件
配置完毕之后完整的pom.xml配置文件如下所示
| <?xml version=”1.0” encoding=”UTF-8”?> <project xmlns=”http://maven.apache.org/POM/4.0.0“ xmlns:xsi=”http://www.w3.org/2001/XMLSchema-instance“ xsi:schemaLocation=”http://maven.apache.org/POM/4.0.0 http://maven.apache.org/xsd/maven-4.0.0.xsd”> <modelVersion>4.0.0</modelVersion> <parent> <groupId>org.springframework.boot</groupId> <artifactId>spring-boot-starter-parent</artifactId> <version>2.2.2.RELEASE</version> </parent> <groupId>com.atguigu</groupId> <artifactId>springboot_01</artifactId> <version>1.0-SNAPSHOT</version> <properties> <java.version>1.8</java.version> </properties> <dependencies> <dependency> <groupId>org.springframework.boot</groupId> <artifactId>spring-boot-starter-web</artifactId> </dependency> </dependencies> </project> |
|---|
1.2.3.3 创建启动类
Spring Boot项目通过main函数即可启动,我们需要创建一个启动类:
| package com.atguigu; import org.springframework.boot.SpringApplication; import org.springframework.boot.autoconfigure.SpringBootApplication; @SpringBootApplication public class Application { public static void main(String[] args) { SpringApplication.run(Application.class,args); } } |
|---|
1.2.3.4 编写controller
| package com.atguigu.controller; import org.springframework.web.bind.annotation.RequestMapping; import org.springframework.web.bind.annotation.RestController; @RestController public class HelloController { @RequestMapping(“/hello”) public String sayHello(){ return “hello spring boot!!” ; } } |
|---|
1.2.3.5 启动测试
运行启动类的main方法 :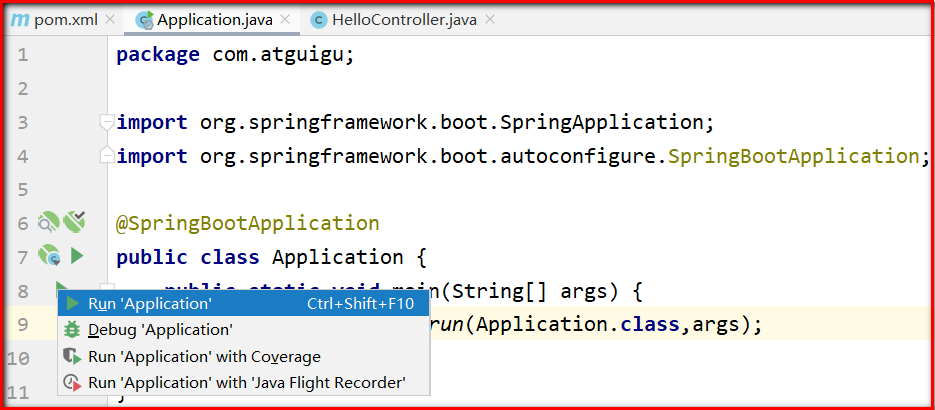
控制台会输出如下信息 :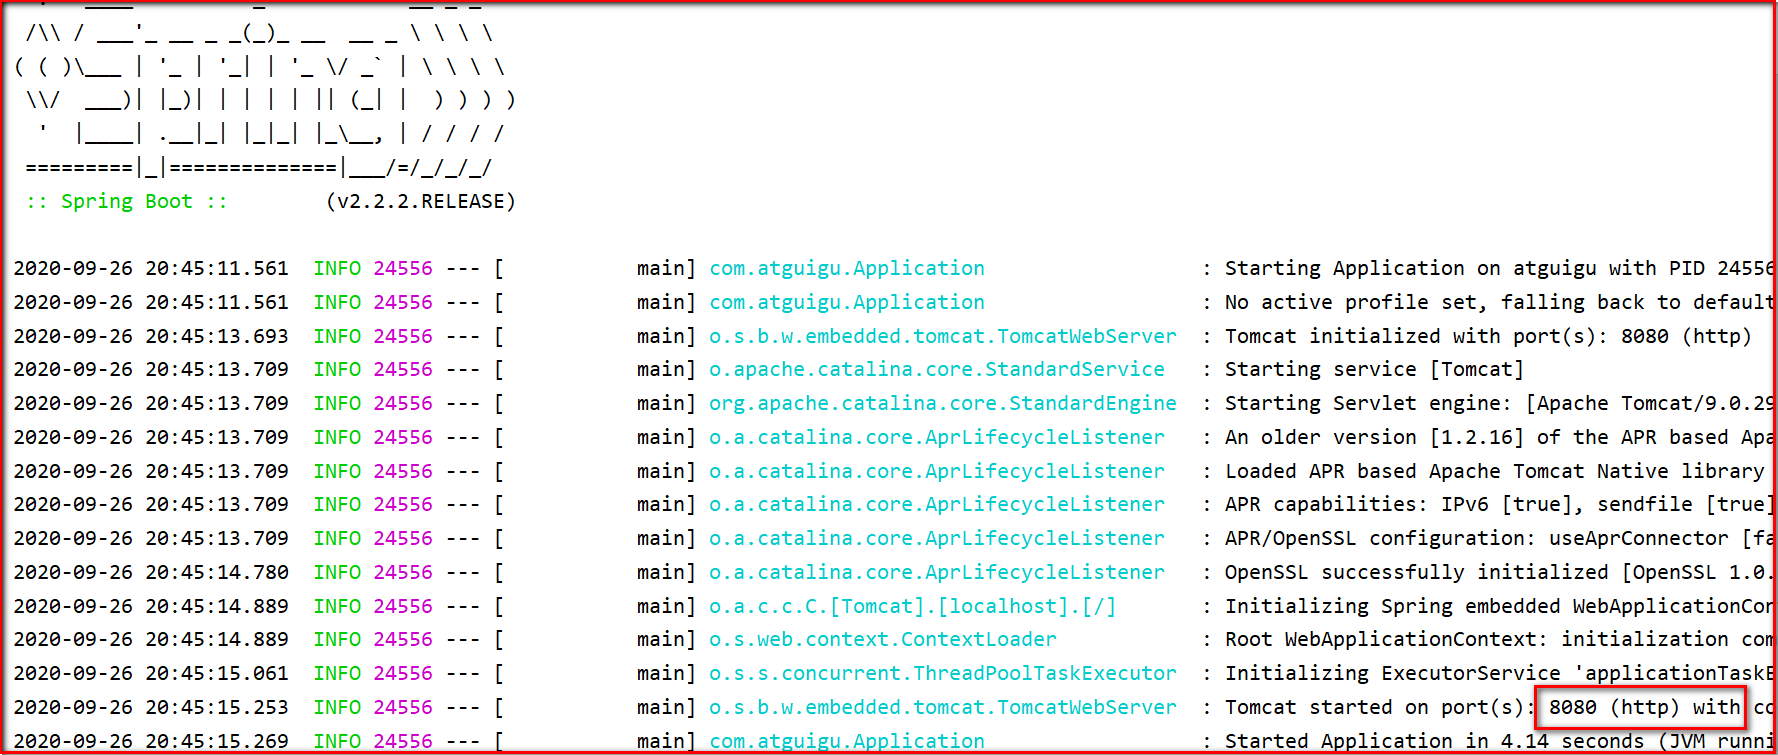
通过输出的日志我们知道了以下信息 :
- 监听的端口是8080
- 项目的上下文路径是””
打开浏览器,访问:http://localhost:8080/hello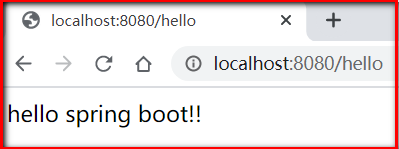
1.3 Spring Boot 入门 – 思考
问题1:
为什么我们在添加启动器的时候不需要在启动器的坐标中指定版本?
答案:因为我们指定了项目的父工程,在spring-boot-starter-parent中已经通过Maven的版本锁定了Jar包的版本,所以就不需要再指定了。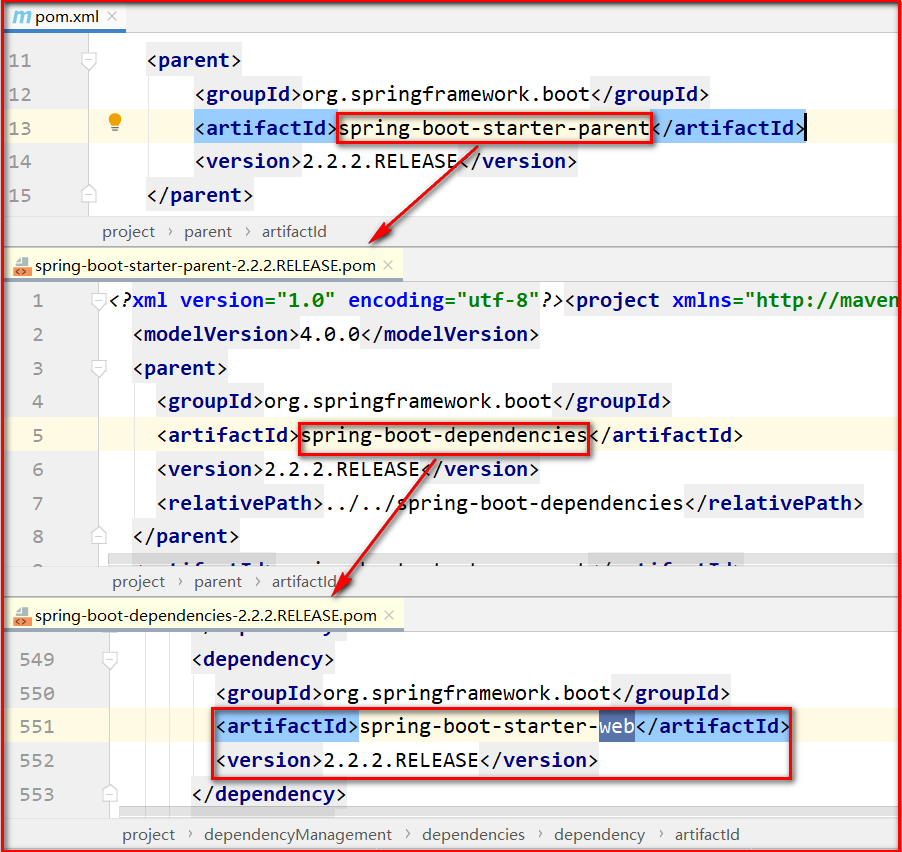
问题2:
为什么我们就添加一个启动器依赖,项目就可以运行起来了,运行项目所需要的Jar包从何而来?
答案:因为我们添加了这个启动器的依赖,它已经把自己运行所需要的必要包集成在这个启动器中,通过Maven的依赖传递性,将这些包都依赖到咱们的项目里了。
点击项目右键 open module settings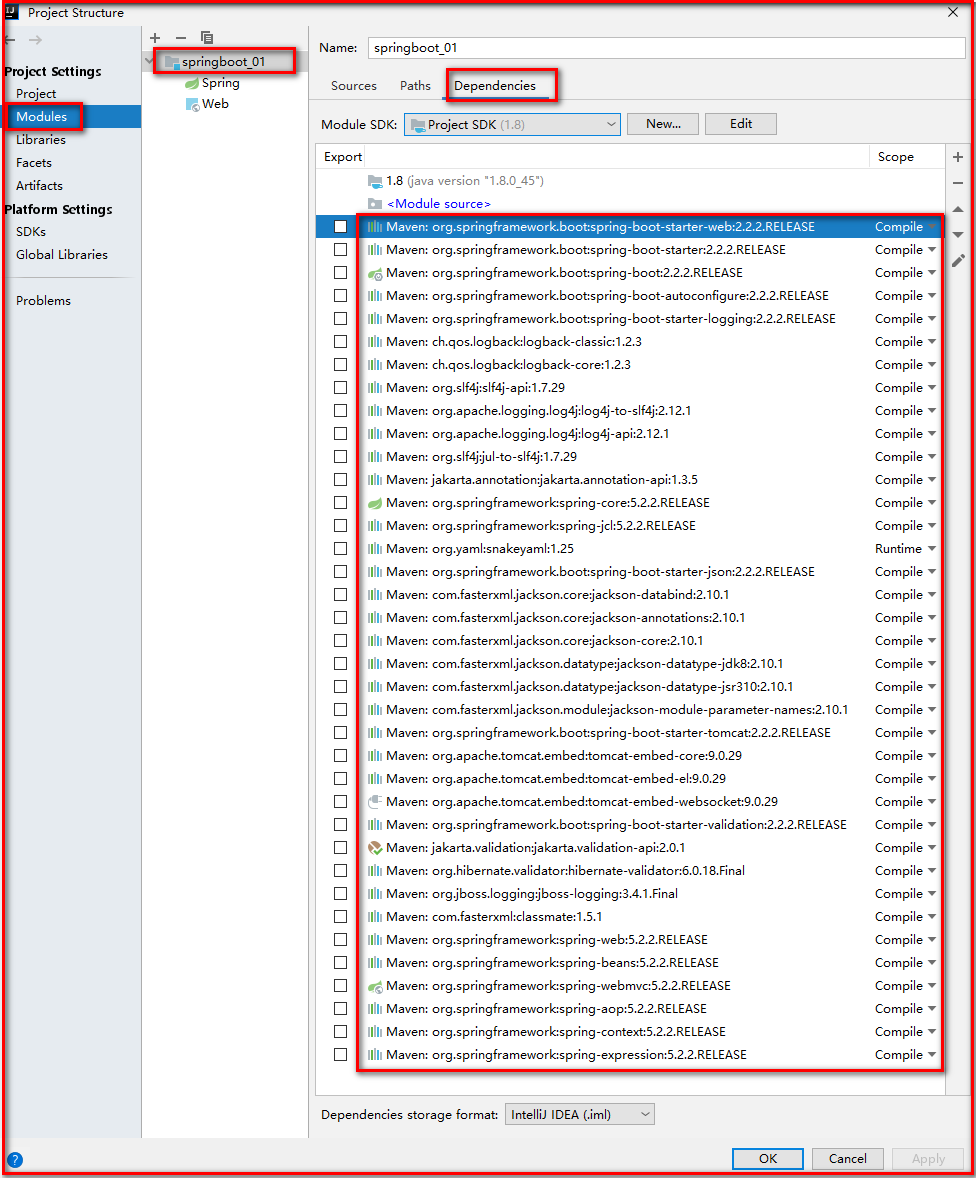
1.4 配置文件详解
springboot支持两种类型的配置文件
- properties属性配置文件
- yaml配置文件
配置文件必须放置在项目的类加载目录下, 并且名字必须是application
springboot项目在运行的时候会自动加载这些配置文件
同级目录下打开:spring-configuration-metadata.json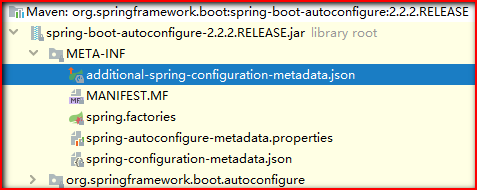
搜素:server.port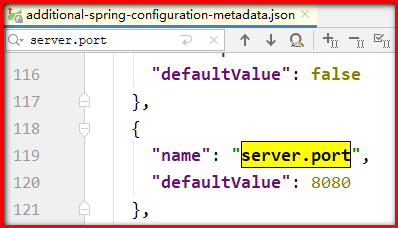
为什么可以在resources下创建application.properties文件呢?我们查看springboot的启动依赖: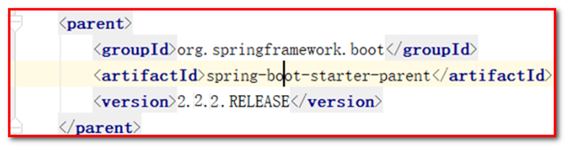
点击spring-boot-starter-parent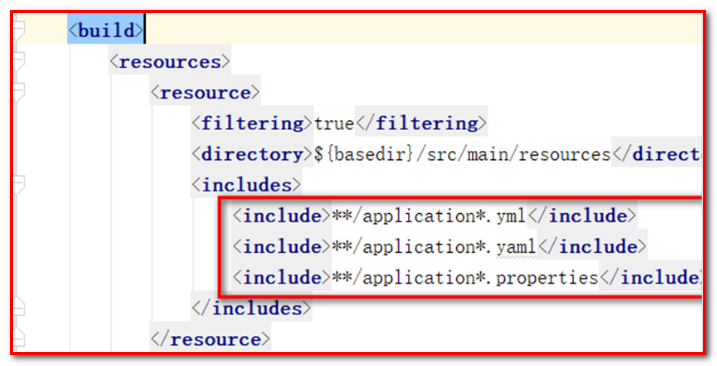
1.4.1 属性配置文件
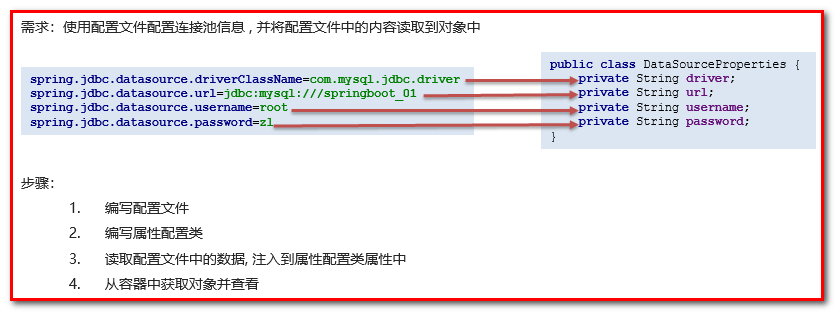
在 resource 文件夹下面新建 application.properties 配置文件
| spring.jdbc.datasource.driverClassName=com.mysql.jdbc.driver spring.jdbc.datasource.url=jdbc:mysql:///springboot_01 spring.jdbc.datasource.username=root spring.jdbc.datasource.password=root |
|---|
新建 properties 包,创建类 DataSourceProperties
| package com.atguigu.properties; import org.springframework.beans.factory.annotation.Value; import org.springframework.stereotype.Component; @Component public class DataSourceProperties { @Value(“${spring.jdbc.datasource.driverClassName}”) private String driverClassName; @Value(“${spring.jdbc.datasource.url}”) private String url; @Value(“${spring.jdbc.datasource.username}”) private String username; @Value(“${spring.jdbc.datasource.password}”) private String password; // 生成get set 和 toString方法 } |
|---|
在 controller 添加 sayHello2 方法
| package com.atguigu.controller; import com.atguigu.properties.DataSourceProperties; import org.springframework.beans.factory.annotation.Autowired; import org.springframework.web.bind.annotation.RequestMapping; import org.springframework.web.bind.annotation.RestController; @RestController public class HelloController { @Autowired private DataSourceProperties dataSourceProperties ; @RequestMapping(path = “/hello”) public String sayHello() { System.out.println(dataSourceProperties); return “Hello Spring Boot ! “ ; } } |
|---|
请求地址:http://localhost:8080/hello
控制台打印:
| DataSourceProperties{driverClassName=’com.mysql.jdbc.Driver’, url=’jdbc:mysql:///springboot_01’, username=’root’, password=’root’} |
|---|
1.4.2 YAML配置文件
何谓YAML?
YAML是一种配置文件格式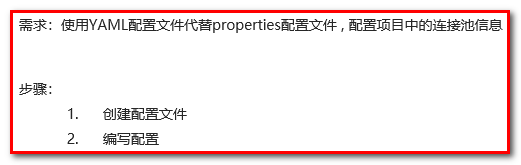
基本格式:
语法 :
1.数据结构用树形结构呈现,通过缩进来表示层级,
2.连续的项目通过减号 ” - ” 来表示
3.键值结构里面的key/value对用冒号 ” : ” 来分隔。
4.YAML配置文件的扩展名是yaml 或 yml
在 resource 文件夹下面新建 application.yml 配置文件,修改 application.properties 配置文件名字为 application.properties.bak
| spring: jdbc: datasource: driverClassName: com.mysql.jdbc.Driver url: jdbc:mysql:///springboot_01 username: root password: root |
|---|
运行项目,重新请求 http://localhost:8080/hello
yml配置文件的特征:
- 树状层级结构展示配置项;
- 配置项之间如果有关系的话需要分行,空两格;
- 配置项如果有值的话,那么需要在 :之后空一格再写配置项值;
yaml与properties配置文件除了展示形式不相同以外,其它功能和作用都是一样的
1.4.3 多环境profile切换配置
我们刚刚说过在Spring Boot项目中配置文件的名称只能是application , 如果我们把所有的配置全都写在一个配置文件中如果配置项比较多, 配置文件就会显得比较复杂和臃肿 ! 不利于后期的项目维护和开发
例如下面几个场景 :
1.因为开发环境的变化, 我们需要修改配置文件中某一个配置项的值(比如之前是mysql数据库,切换成oracle数据库)
2.项目开发完成需要上线了 , 需要把一些环境修改成正式环境(开发,测试,上线,多环境切换)
解决方案 :使用profiles拆分配置
spring boot项目中允许使用多个YAML配置文件。
这些文件名称必须为application-*.yml,并且在application.yml中激活。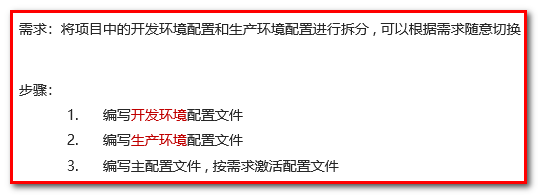
创建application-dev.yml**文件如下:
# 配置数据库连接池信息 ,开发环境
| spring: jdbc: datasource: driverClassName: com.mysql.jdbc.Driver url: jdbc:mysql:///springboot username: root password: root |
|---|
创建application-pro.yml文件如下:
# 配置数据库连接池信息,上线环境
| spring: jdbc: datasource: driverClassName: com.mysql.jdbc.Driver url: jdbc:mysql:///business username: business password: business |
|---|
在 application.yml 文件中添加如下配置:
# 激活配置文件
| spring: profiles: active: dev |
|---|
直接运行项目:http://localhost:8080/hello
打印结果:
| DataSourceProperties{driverClassName=’com.mysql.jdbc.Driver’, url=’jdbc:mysql:///springboot’, username=’root’, password=’root’} |
|---|
修改 application.yml 配置文件:
# 激活配置文件
| spring: profiles: active: pro |
|---|
打印结果:
| DataSourceProperties{driverClassName=’com.mysql.jdbc.Driver’, url=’jdbc:mysql:///business’, username=’business’, password=’business’} |
|---|
注意 :
如果properties和yml文件都存在,不存在spring.profiles.active设置,如果有重叠属性,默认以properties优先。
如果设置了spring.profiles.active,并且有重叠属性,以active设置优先。
可以在两种文件中分别增加server.port属性指定不同的端口,启动项目查看控制台端口号进行测试。
二. Spring Boot 自动配置(理解)
2.1 @SpringBootApplication注解
- @SpringBootConfiguration : 代表这个类就是一个配置类 , 本质上就是一个@Configuration注解
- @ComponentScan : 组件扫描, 默认扫描启动类所在包及子包下的类身上的注解
- @EnableAutoConfiguration : 自动配置注解 , 添加了此注解会自动去读取spring.factories配置文件中的自动配置类
2.2 @ConfigurationProperties注解
@ConfigurationProperties是SpringBoot提供的重要注解, 他可以将一些配置属性批量注入到bean对象。
application.yml配置文件
| spring: jdbc: datasource: driverClassName: com.mysql.jdbc.driver url: jdbc:mysql:///springboot_01 username: root password: root |
|---|
DataSourceProperties.java
| public class DataSourceProperties { private String driverClassName; private String url; private String username; private String password; // 省略getter和setter….. } |
|---|
方式一 : 使用@Value一个个注入
这种注入方式,如果属性特别多,一个一个注入太麻烦啦o(╥﹏╥)o
| @Component public class DataSourceProperties { @Value(“${spring.jdbc.datasource.driverClassName}”) private String driverClassName; @Value(“${spring.jdbc.datasource.url}”) private String url; @Value(“${spring.jdbc.datasource.username}”) private String username; @Value(“${spring.jdbc.datasource.password}”) private String password; // 省略getter和setter….. } |
|---|
方式二 : 使用@ConfigurationProperties批量注入
这种注入方式,属性再多,只要按照规则就可以一次性自动注入。方便的很哦(^o^)/~
| package com.atguigu.properties; import org.springframework.boot.context.properties.ConfigurationProperties; import org.springframework.stereotype.Component; @Component @ConfigurationProperties(prefix = “spring.jdbc.datasource”) public class DataSourceProperties2 { private String driverClassName; private String url; private String username; private String password; // 省略getter和setter….. } |
|---|
- 在类上通过@ConfigurationProperties注解声明该类要读取属性配置
- prefix=”spring.jdbc.datasource” 读取属性文件中前缀为spring.jdbc.datasource的值。前缀和属性名称和配置文件中的key必须要保持一致才可以注入成功
- Spring Boot默认读取application.properties属性文件
开启@ConfigurationProperties注解使用
| @Controller @EnableConfigurationProperties(DataSourceProperties2.class) public class HelloController { @Autowired private DataSourceProperties2 dataSourceProperties2 ; @RequestMapping(path = “/hello”) @ResponseBody public String sayHello(){ System.out.println(dataSourceProperties2); return “hello spring boot”; } } |
|---|
使用@EnableConfigurationProperties(DataSourceProperties2.class),开启DataSourceProperties2身上的@ConfigurationProperties注解 , 他就会生效了, 就会帮助我们注入数据了
请求地址:http://localhost:8080/hello
打印结果:
| DataSourceProperties2{driverClassName=’com.mysql.jdbc.Driver’, url=’jdbc:mysql:///springboot_01’, username=’root’, password=’root’} |
|---|
报错提示,请在pom文件添加配置信息
| <dependency> <groupId>org.springframework.boot</groupId> <artifactId>spring-boot-configuration-processor</artifactId> <optional>true</optional> </dependency> |
|---|
2.3 条件化配置注解
我们看到自动配置类上有一些ConditionalXxxx注解 , 这些注解的作用就是进行条件化选择
所谓条件化选择就是如果满足条件, 该配置类就生效, 如果不满足该配置类就不生效
常用的条件化选择注解如下 :
| 注解 | 作用 |
|---|---|
| @ConditionalOnBean | 如果存在某个Bean, 配置类生效 |
| @ConditionalOnMissingBean | 如果不存在某个Bean, 配置类生效 |
| @ConditionalOnClass | 如果存在某个类, 配置类生效 |
| @ConditionalOnMissingClass | 如果不存在某个类, 配置类生效 |
| @ConditionalOnProperty | 如果存在某个属性配置, 配置类生效 |
| @ConditionalOnWebApplication | 如果是一个web应用, 配置类生效 |
| @ConditionalOnNotWebApplication | 如果不是一个web应用, 配置类生效 |
因为我们配置了DispatcherServlet 满足上面定义的条件, 所以WebMvcAutoConfiguration会生效 , 那么WebMvcAutoConfiguration自动配置类中帮我们配置了什么呢 ?
视图解析器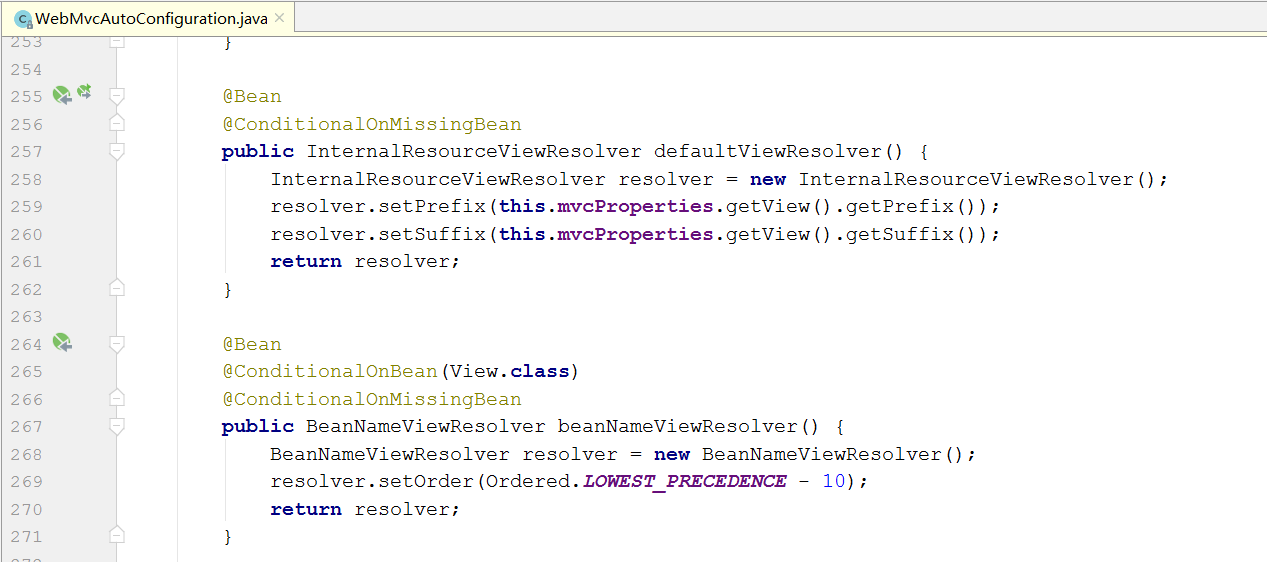
处理器适配器(HandlerAdapter)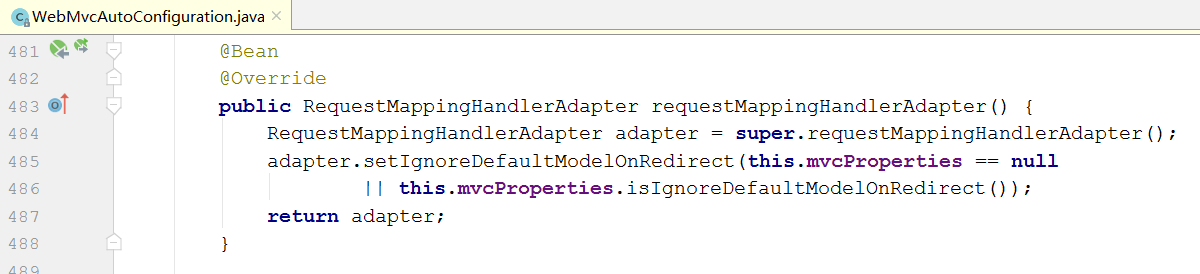
这些配置都是我们之前在学习SpringMVC时需要自己配置的 , 现在Spring Boot框架都已经提前帮我们配置好了 , 所以我们才能使用的那么方便
2.4 自动配置原理
2.4.1 加载spring.factories
在SpringApplication类构建的时候,有这样一段初始化代码: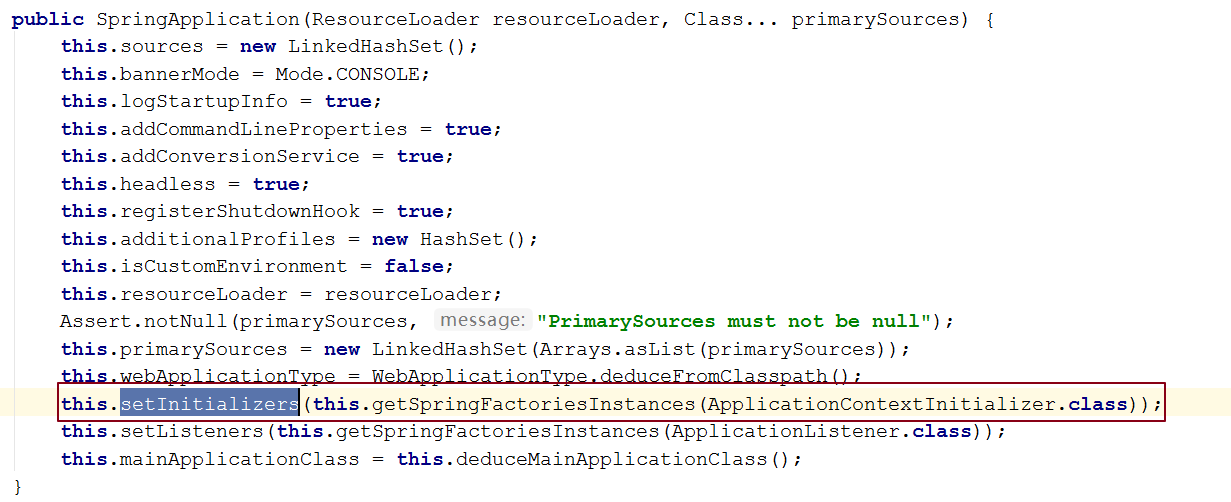
跟进去往下走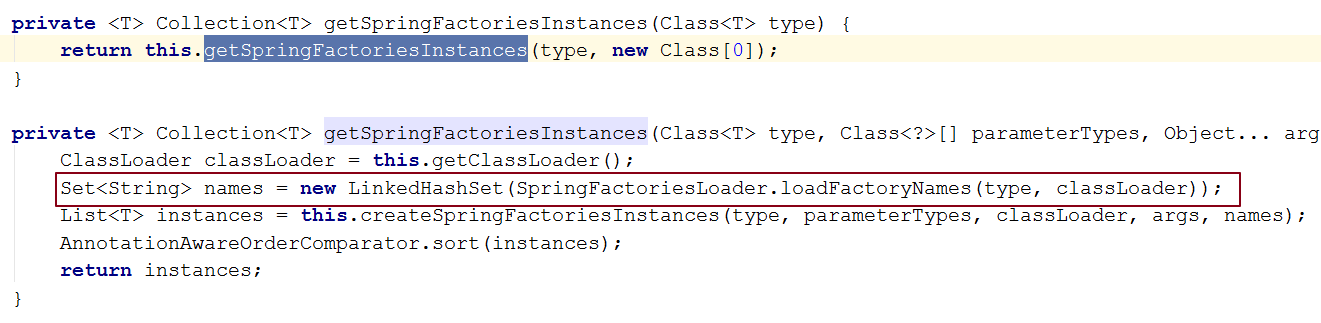
这里发现会通过loadFactoryNames尝试加载一些FactoryName,然后利用createSpringFactoriesInstances将这些加载到的类名进行实例化。 继续跟进loadFactoryNames方法: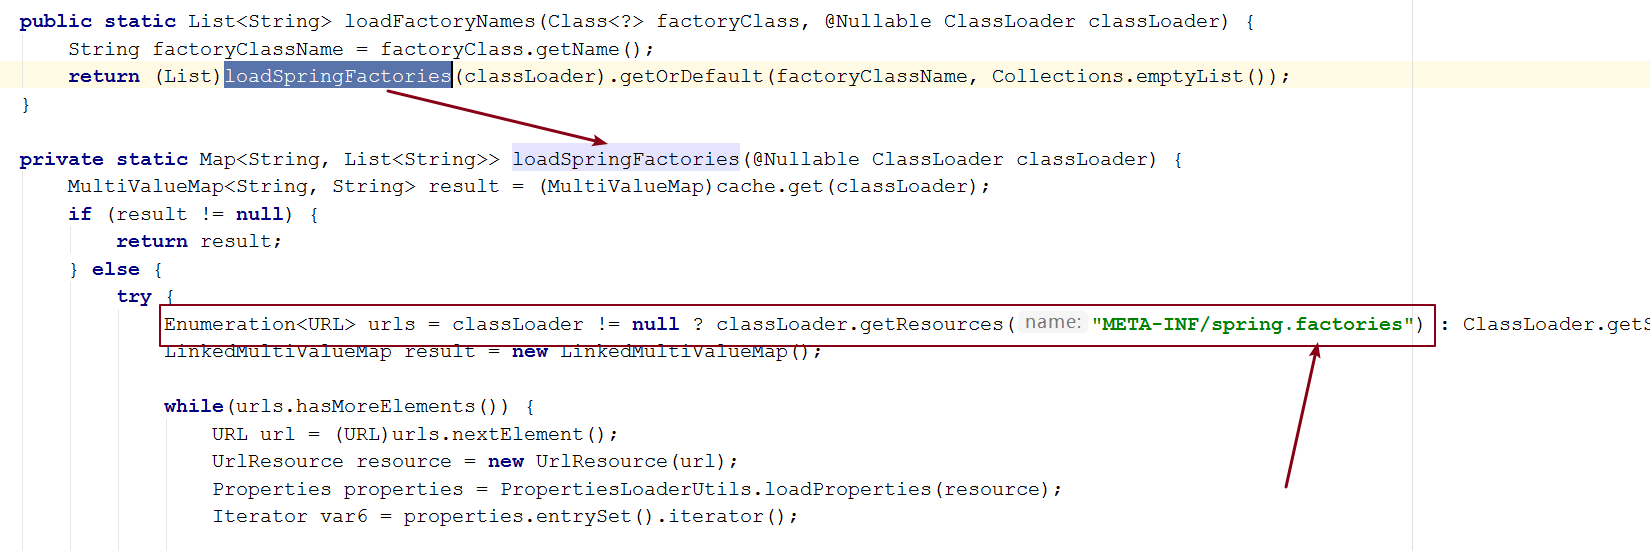
发现此处会利用类加载器加载一个文件: META-INF/spring.factories 。我们知道,ClassLoader默认是从classpath下读取文件,因此,SpringBoot会在初始化的时候,加载所有classpath:META-INF/spring.factories文件,包括jar包当中的。而在Spring的一个依赖包:spring-boot-autoconfigure中,就有这样的文件: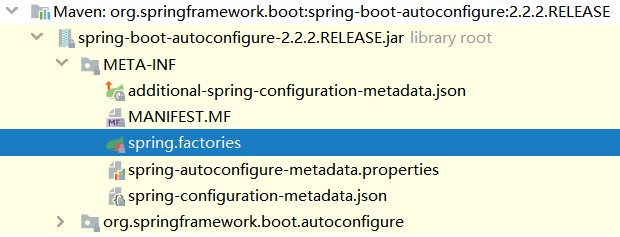
我们引入的任何第三方启动器,只要实现自动配置,也都会有类似文件。
2.4.2 读取自动配置类
我们打开spring.factories文件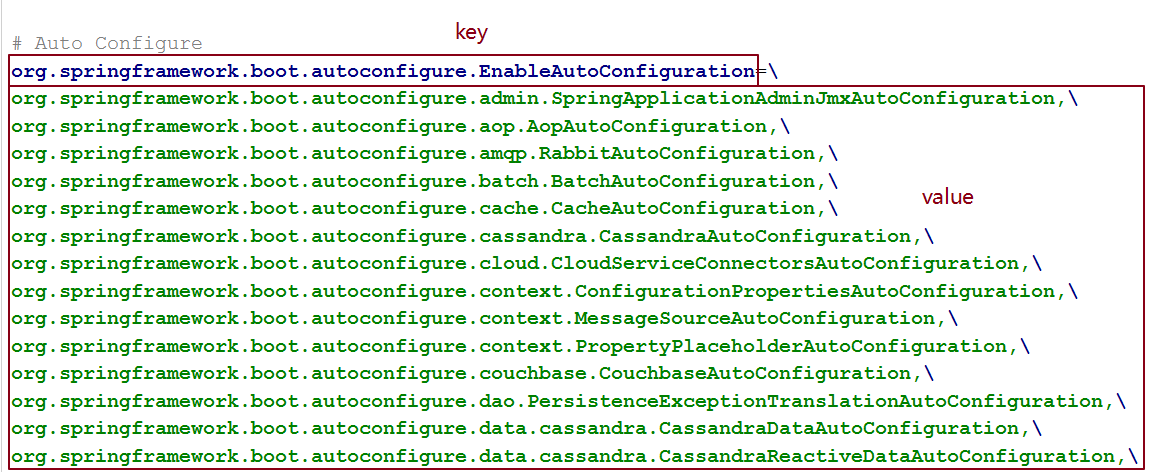
可以发现以EnableAutoConfiguration接口为key的一系列配置,key所对应的值,就是所有的自动配置类,可以在当前的jar包中找到这些自动配置类: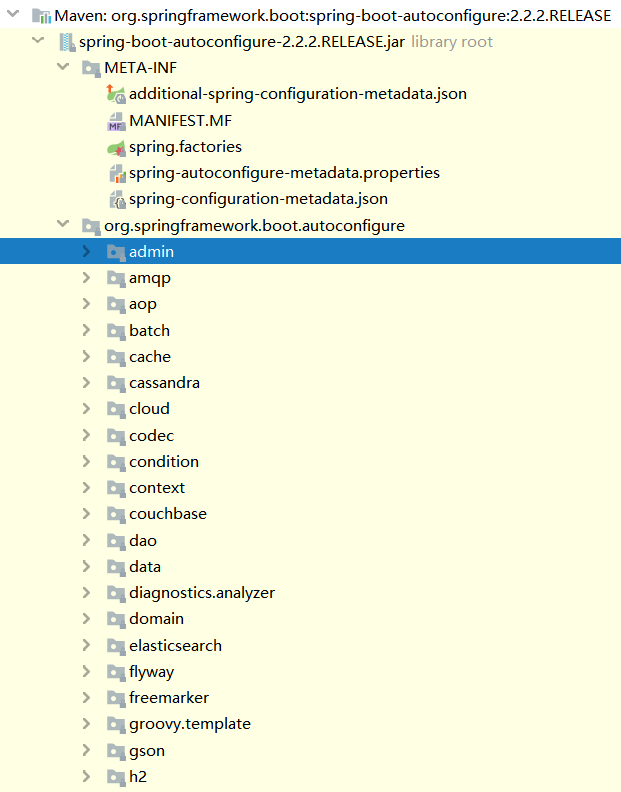
几乎涵盖了现在主流的开源框架 , 我们来看一个我们熟悉的,例如SpringMVC,查看mvc 的自动配置类: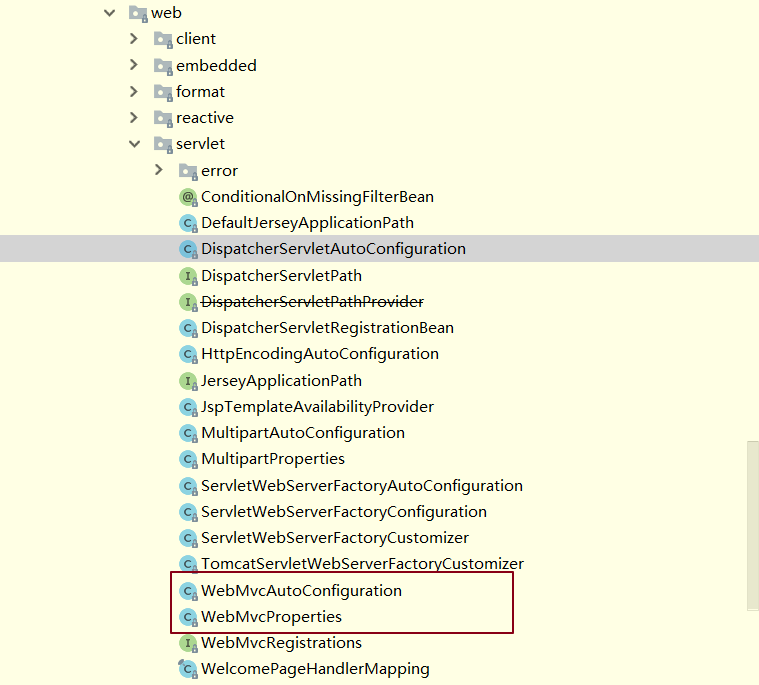
打开WebMvcAutoConfiguration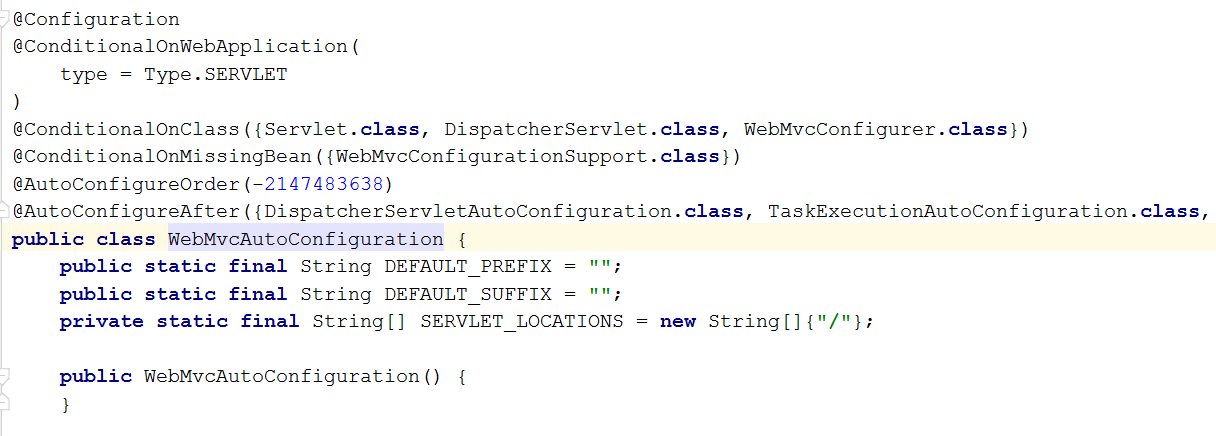
2.4.3 默认属性配置
配置类我们找到了 , 那么这些默认配置的属性来自哪里呢?
例如 : 我们配置视图解析器的时候需要配置前缀和后缀 , 那么这些配置在哪配置的呢 ?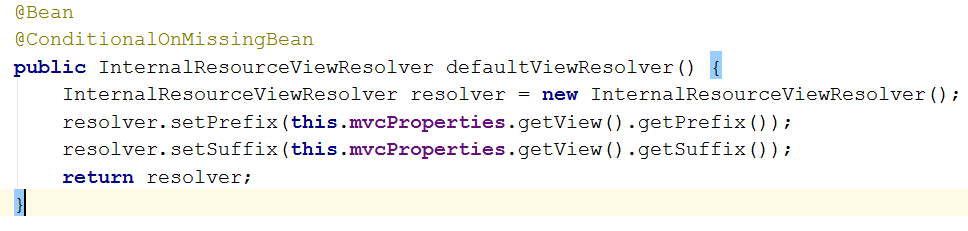
通过源码发现, 这个配置是从this.mvcProperties.getView()中读取的 ,this.mvcProperties又是什么呢 ? 我们继续跟踪,发现其实就是定义的一个变量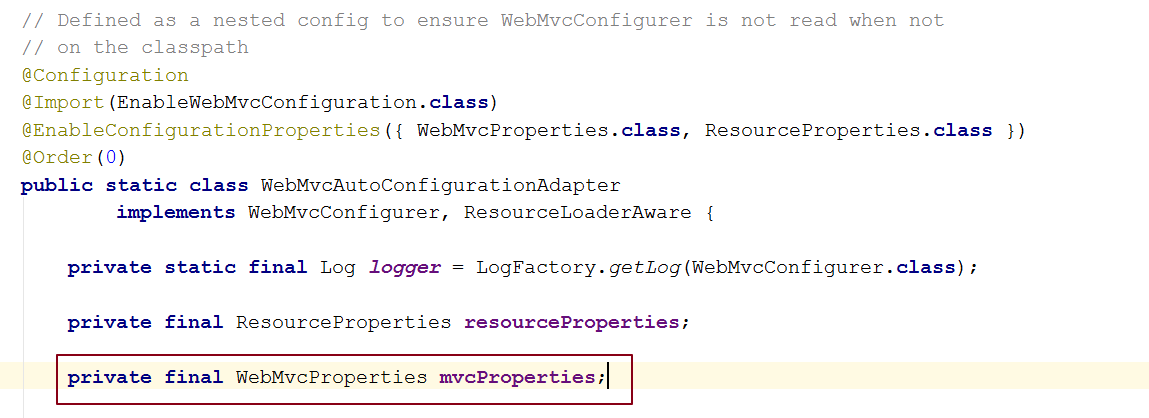
这个变量中又有一个View类型的变量 , 这个变量中配置的就是前缀和后缀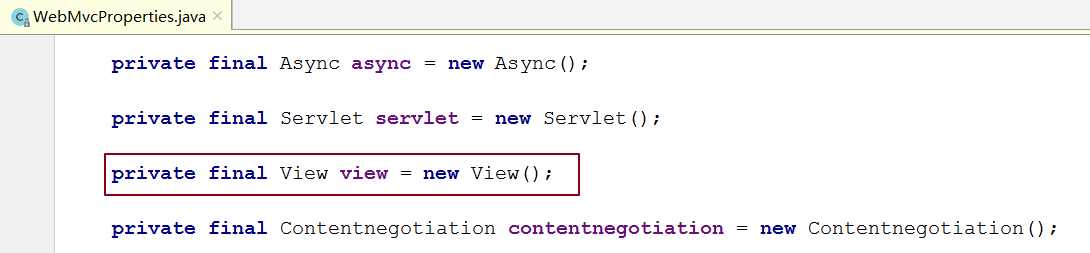
View中的源码如下 :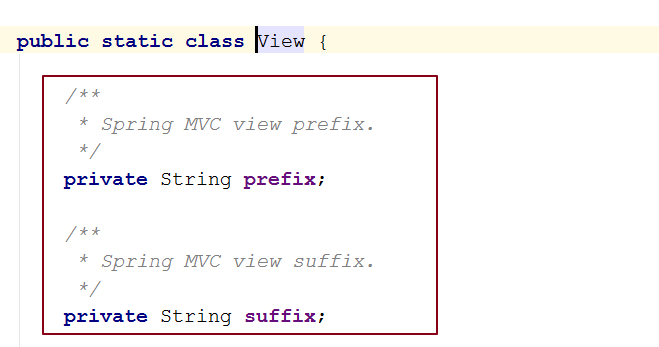
可以看到, 默认读取就是这里的前缀和后缀变量的值 , 默认就是null .
2.4.4 覆盖默认属性配置
如果我们想自己指定视图的前缀和后缀该如何去做呢 ?
我们再看WebMvcAutoConfiguration这个类的声明, 发现这个类身上有这么一个注解, 我们之前也使用过 , 引入了二个配置对象 , 所以我们知道下面成员位置的WebMvcProperties这个成员变量 , 就是从这里来的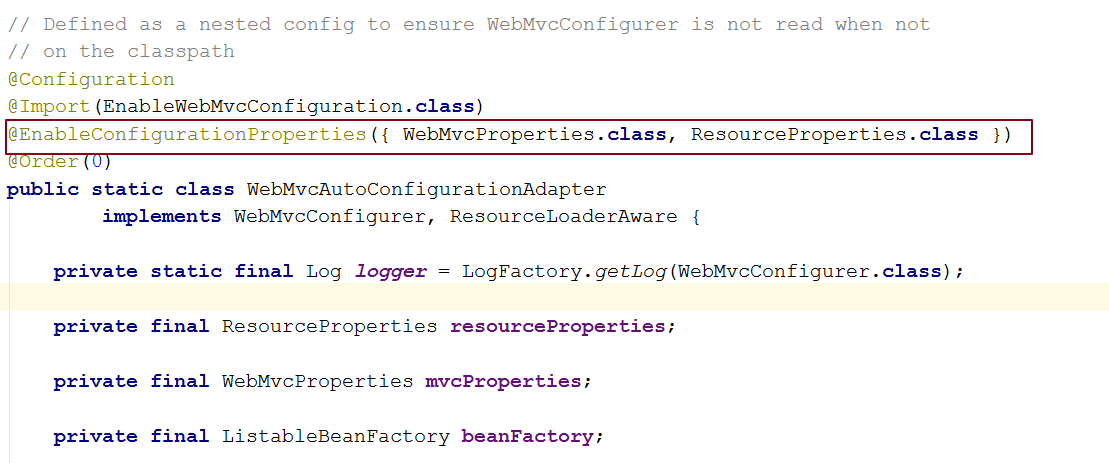
我们再进去看看这两个配置类 , 配置类身上使用ConfigurationProperties读取配置,前缀是spring.mvc , 所以如果我们在配置文件中配置spring.mvc前缀开头的配置 , 是不是就可以将自己配置的数据注入到这个对象的属性中 !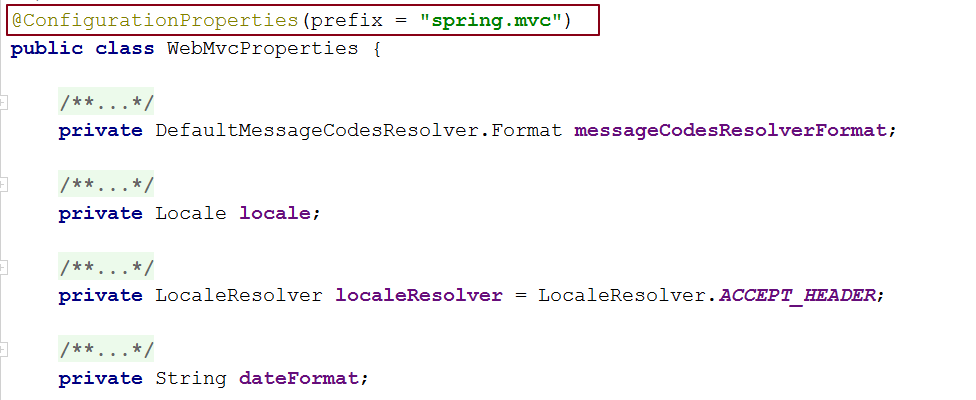
所以如果想要自己设置视图前缀和后缀就可以这么配置
# 激活配置文件
| spring: mvc: view: prefix: /WEB-INF/ suffix: .jsp |
|---|
修改服务器端口 :
| server: port: 10000 |
|---|
2.5 自定义启动器
2.5.1 需求介绍
定义一个连接池启动器 , 当用户引入了连接池启动依赖之后 , 项目中就已经自动配置了连接池
2.5.2 步骤分析
- 创建启动器项目
- 添加启动器相关依赖
- 创建属性配置类
- 创建自动配置类
- 编写自动配置文件(spring.factories)
- 使用自定义的启动器
2.5.3 代码实现
2.5.3.1 创建项目并引入依赖
创建项目 spring-boot-jdbc-starter
引入依赖
| <parent> <groupId>org.springframework.boot</groupId> <artifactId>spring-boot-starter-parent</artifactId> <version>2.2.2.RELEASE</version> </parent> <properties> <project.build.sourceEncoding>UTF-8</project.build.sourceEncoding> <project.reporting.outputEncoding>UTF-8</project.reporting.outputEncoding> <java.version>1.8</java.version> </properties> <dependencies> <dependency> <groupId>org.springframework.boot</groupId> <artifactId>spring-boot-starter</artifactId> </dependency> <dependency> <groupId>com.alibaba</groupId> <artifactId>druid</artifactId> <version>1.1.12</version> </dependency> <dependency> <groupId>c3p0</groupId> <artifactId>c3p0</artifactId> <version>0.9.1.2</version> </dependency> <dependency> <groupId>org.springframework.boot</groupId> <artifactId>spring-boot-configuration-processor</artifactId> <optional>true</optional> </dependency> </dependencies> |
|---|
2.5.3.2 创建属性配置类
| package com.atguigu.autoconfig; import org.springframework.boot.context.properties.ConfigurationProperties; @Component @ConfigurationProperties(prefix = “spring.jdbc.datasource”) public class DataSourceProperties { private String driverClassName ; private String url; private String username; private String password; // 生成set get toString方法 } |
|---|
2.5.3.3 创建自动配置类
| package com.atguigu.autoconfig; import com.alibaba.druid.pool.DruidDataSource; import org.springframework.beans.factory.annotation.Autowired; import org.springframework.boot.context.properties.EnableConfigurationProperties; import org.springframework.context.annotation.Bean; import org.springframework.context.annotation.Configuration; import javax.sql.DataSource; @SpringBootConfiguration @EnableConfigurationProperties(DataSourceProperties.class) public class DataSourceAutoConfiguration { @Autowired private DataSourceProperties dataSourceProperties ; @Bean public DataSource createDataSource(){ DruidDataSource dataSource = new DruidDataSource(); dataSource.setDriverClassName(dataSourceProperties.getDriverClassName()); dataSource.setUrl(dataSourceProperties.getUrl()); dataSource.setUsername(dataSourceProperties.getUsername()); dataSource.setPassword(dataSourceProperties.getPassword()); return dataSource; } } |
|---|
2.5.3.4 编写自动配置属性文件
在 resource 文件夹下面新建 META-INF/spring.factories
| # Auto Configure org.springframework.boot.autoconfigure.EnableAutoConfiguration=com.atguigu.autoconfig.DataSourceAutoConfiguration |
|---|
2.5.3.5 使用自定义启动器
在 springboot_01 项目当中引入依赖
| <dependency> <groupId>com.atguigu</groupId> <artifactId>spring-boot-jdbc-starter</artifactId> <version>1.0-SNAPSHOT</version> </dependency> |
|---|
配置连接池信息
新建 application-datasource.yml
| spring: jdbc: datasource: driverClassName: com.mysql.jdbc.Driver url: jdbc:mysql:///springboot_01 username: root password: root |
|---|
激活配置文件 application.yml
# 激活配置文件
| spring: profiles: active: datasource |
|---|
注入连接池, 查看连接池属性
| package com.atguigu.controller; import org.springframework.beans.factory.annotation.Autowired; import org.springframework.boot.context.properties.EnableConfigurationProperties; import org.springframework.web.bind.annotation.RequestMapping; import org.springframework.web.bind.annotation.RestController; import javax.sql.DataSource; @RestController public class HelloController { @Autowired private DataSource dataSource ; @RequestMapping(path = “/hello”) public String sayHello() { System.out.println(dataSource.getClass());//打印DruidDataSource数据源 return “Hello Spring Boot ! “ ; } } |
|---|
2.5.4 多种数据源
如果想让我们的启动器支持多种数据源, 例如 : C3P0和Druid , 根据配置进行选择 , 就可以使用条件选择进行实现。例如 : 如下配置中, 有二个创建连接池的配置, 一个是C3P0 , 一个是Druid ,如何能够根据配置文件自动选择呢 ?
修改配置文件 application-datasource.yml
| spring: jdbc: datasource: driverClassName: com.mysql.jdbc.Driver url: jdbc:mysql:///springboot_01 username: root password: root type: druid # 数据源类型 |
|---|
- 如果配置文件中配置了spring.jdbc.datasource.type=c3p0使用c3p0数据源
- 如果配置文件中配置了spring.jdbc.datasource.type=druid使用druid数据源
在项目 spring-boot-jdbc-starter , 添加创建 c3p0 方法
| package com.atguigu.autoconfig; import com.alibaba.druid.pool.DruidDataSource; import com.mchange.v2.c3p0.ComboPooledDataSource; import org.springframework.beans.factory.annotation.Autowired; import org.springframework.boot.context.properties.EnableConfigurationProperties; import org.springframework.context.annotation.Bean; import org.springframework.context.annotation.Configuration; import javax.sql.DataSource; @Configuration @EnableConfigurationProperties(DataSourceProperties.class) public class DataSourceAutoConfiguratioin { @Autowired private DataSourceProperties dataSourceProperties ; @Bean @ConditionalOnProperty(value = “spring.jdbc.datasource.type”,havingValue = “druid”) public DataSource createDataSource(){ DruidDataSource dataSource = new DruidDataSource(); dataSource.setDriverClassName(dataSourceProperties.getDriverClassName()); dataSource.setUrl(dataSourceProperties.getUrl()); dataSource.setUsername(dataSourceProperties.getUsername()); dataSource.setPassword(dataSourceProperties.getPassword()); return dataSource; } @Bean @ConditionalOnProperty(value = “spring.jdbc.datasource.type”,havingValue = “c3p0”) public DataSource createC3P0DataSource() throws Exception{ ComboPooledDataSource dataSource = new ComboPooledDataSource(); dataSource.setDriverClass(dataSourceProperties.getDriverClassName()); dataSource.setJdbcUrl(dataSourceProperties.getUrl()); dataSource.setUser(dataSourceProperties.getUsername()); dataSource.setPassword(dataSourceProperties.getPassword()); return dataSource; } } |
|---|
我们可以使用条件选择实现 , 如下图所示
@ConditionalOnProperty(value = “spring.jdbc.datasource.type”,havingValue = “druid”)
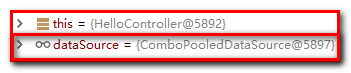
install 安装 spring-boot-jdbc-starter , 运行 springboot_01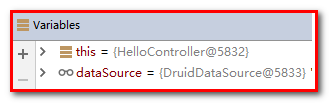
修改配置文件 ,重新安装,再次请求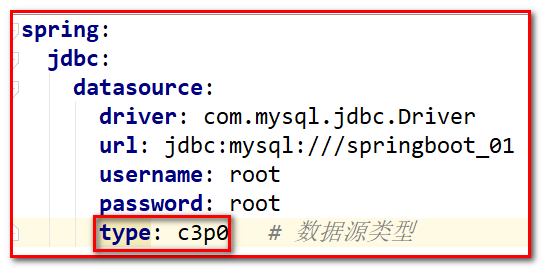
三. Spring Boot常用启动器(掌握)
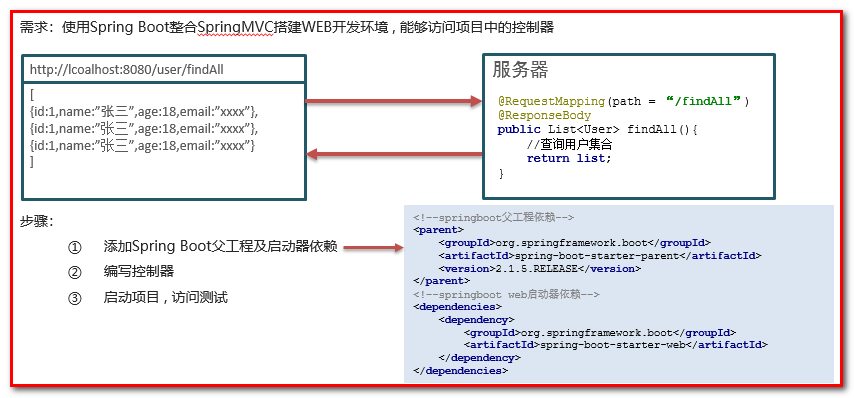
3.1 SpringBoot整合MVC
3.1.1 起步依赖
| <parent> <groupId>org.springframework.boot</groupId> <artifactId>spring-boot-starter-parent</artifactId> <version>2.2.2.RELEASE</version> </parent> <dependencies> <dependency> <groupId>org.springframework.boot</groupId> <artifactId>spring-boot-starter-web</artifactId> </dependency> </dependencies> |
|---|
① 新建入口程序类 Application
| package com.atguigu; import org.springframework.boot.SpringApplication; import org.springframework.boot.autoconfigure.SpringBootApplication; @SpringBootApplication public class Application { public static void main(String[] args) { SpringApplication.run(Application.class,args); } } |
|---|
② 新建 javabean
| package com.atguigu.pojo; public class User { private String username ; private String password ; private Integer age ; private String sex ; … |
|---|
③ 新建 UserController
| package com.atguigu.controller; import com.atguigu.pojo.User; import org.springframework.stereotype.Controller; import org.springframework.web.bind.annotation.RequestMapping; import org.springframework.web.bind.annotation.ResponseBody; import java.util.ArrayList; import java.util.List; @Controller @RequestMapping(path = “/user”) public class UserController { @RequestMapping(path = “/findAll”) @ResponseBody public List //查询所有 List User user1 = new User(); user1.setUsername(“杨过”); user1.setPassword(“123456”); user1.setAge(18); user1.setSex(“男”); User user2 = new User(); user2.setUsername(“杨过”); user2.setPassword(“123456”); user2.setAge(18); user2.setSex(“男”); User user3 = new User(); user3.setUsername(“杨过”); user3.setPassword(“123456”); user3.setAge(18); user3.setSex(“男”); users.add(user1); users.add(user2); users.add(user3); return users ; } } |
|---|
3.1.2 静态资源目录
在WEB开发中我们经常需要引入一些静态资源 , 例如 : HTML , CSS , JS , 图片等 , 如果是普通的项目静态资源可以放在项目的webapp目录下
现在使用Spring Boot做开发 , 项目中没有webapp目录 , 我们的项目是一个jar工程,那么就没有webapp,我们的静态资源该放哪里呢?
在springboot中有一个叫做ResourceProperties的类,里面就定义了静态资源的默认查找路径: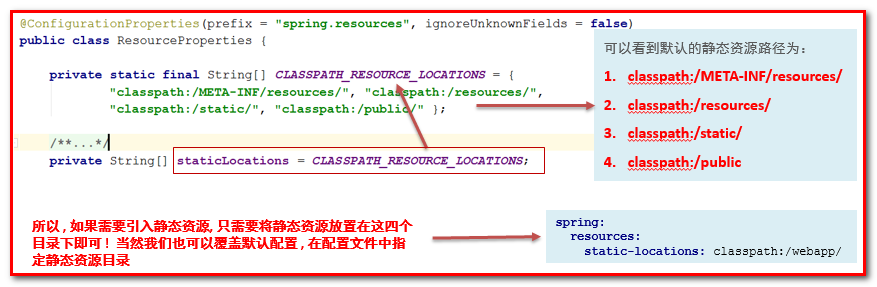
默认的静态资源路径为:
- classpath:/META-INF/resources/
- classpath:/resources/
- classpath:/static/
- classpath:/public
我们只要静态资源放在这些目录中任何一个,SpringMVC都会帮我们处理。 我们习惯会把静态资源放在classpath:/static/ 目录下。在resources目录下创建index.html文件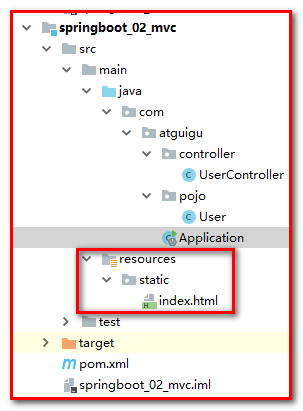
打开浏览器输入 : http://localhost:8080/index.html
覆盖路径
如果想要修改默认的静态资源路径, 配置如下 :
新建 application.yml
| spring: resources: static-locations: classpath:/webapp/ |
|---|
请求地址 http://localhost:8080/index.html
3.1.3 自定义拦截器
web开发中的拦截器也是我们经常需要使用的组件,可以帮我们完成一些日志记录 , 数据过滤 , 请求过滤等等很多功能,那么在SpringBoot中该如何配置呢?
回顾一下SpringMVC中配置拦截器的步骤 :
- 编写一个拦截器(实现HandlerInterceptor接口)
- 注册拦截器(mvc:interceptors)
xml
<mvc:interceptors> <mvc:interceptor> <mvc:mapping path=”/user/“/> <mvc:exclude-mapping path=”/user/sayByby”></mvc:exclude-mapping> <bean class=”com.atguigu.interceptor.LogInterceptor2”></bean> </mvc:interceptor> </mvc:interceptors**> |
|---|
因为SpringBoot没有XML配置文件了 , 所以在SpringBoot中使用拦截器的注册拦截器的方式就不太一样了, 需要借助一个WebMvcConfigurer类帮助我们注册拦截器 , 实现拦截器的具体步骤如下 :
- 编写一个拦截器
- 通过WebMvcConfigurer注册拦截器
编写拦截器
| package com.atguigu.interceptor; import org.springframework.stereotype.Component; import org.springframework.web.servlet.HandlerInterceptor; import javax.servlet.http.HttpServletRequest; import javax.servlet.http.HttpServletResponse; @Component public class MyInterceptor implements HandlerInterceptor { @Override public boolean preHandle(HttpServletRequest request, HttpServletResponse response, Object handler) throws Exception { System.out.println(“MyInterceptor拦截器的preHandle方法执行….”); return false; } @Override public void postHandle(HttpServletRequest request, HttpServletResponse response, Object handler, ModelAndView modelAndView) throws Exception { System.out.println(“MyInterceptor拦截器的postHandle方法执行….”); } @Override public void afterCompletion(HttpServletRequest request, HttpServletResponse response, Object handler, Exception ex) throws Exception { System.out.println(“MyInterceptor拦截器的afterCompletion方法执行….”); } } |
|---|
注册拦截器
| package com.atguigu.config; import com.atguigu.interceptor.MyInterceptor; import org.springframework.beans.factory.annotation.Autowired; import org.springframework.context.annotation.Configuration; import org.springframework.web.servlet.config.annotation.InterceptorRegistry; import org.springframework.web.servlet.config.annotation.WebMvcConfigurer; @Configuration public class MvcConfig implements WebMvcConfigurer { @Autowired private MyInterceptor myInterceptor ; / * / 拦截当前目录及子目录下的所有路径 /user/ /user/findAll /user/order/findAll / 拦截当前目录下的以及子路径 /user/ /user/findAll @param registry */ @Override public void addInterceptors(InterceptorRegistry registry) { registry.addInterceptor(myInterceptor).addPathPatterns(“/“); } } |
|---|
打开浏览器,输入 : http://localhost:8888/user/findAll
3.2 SpringBoot整合Spring Data JPA
新建项目 springboot_jpa
添加Spring Data JPA的起步依赖
| <parent> <groupId>org.springframework.boot</groupId> <artifactId>spring-boot-starter-parent</artifactId> <version>2.2.2.RELEASE</version> <relativePath/> </parent> <properties> <project.build.sourceEncoding>UTF-8</project.build.sourceEncoding> <project.reporting.outputEncoding>UTF-8</project.reporting.outputEncoding> <java.version>1.8</java.version> </properties> <dependencies> <dependency> <groupId>org.springframework.boot</groupId> <artifactId>spring-boot-starter-web</artifactId> </dependency> <dependency> <groupId>org.springframework.boot</groupId> <artifactId>spring-boot-starter-test</artifactId> <scope>test</scope> </dependency> <dependency> <groupId>org.springframework.boot</groupId> <artifactId>spring-boot-starter-data-jpa</artifactId> </dependency> <dependency> <groupId>mysql</groupId> <artifactId>mysql-connector-java</artifactId> </dependency> <dependency> <groupId>org.springframework.boot</groupId> <artifactId>spring-boot-starter-data-redis</artifactId> </dependency> </dependencies> |
|---|
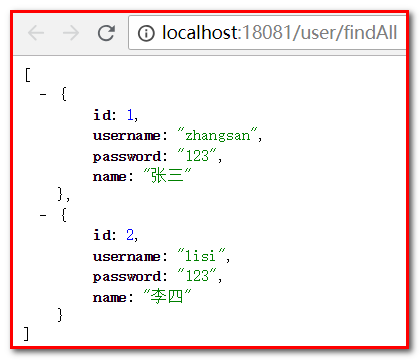
在application.yml中配置数据库和jpa的相关属性
| logging: level: com.atguigu.dao: debug # 配置日志 spring: datasource: username: root password: root url: jdbc:mysql://127.0.0.1:3306/springboot?useUnicode=true&characterEncoding=utf8&serverTimezone=Asia/Shanghai driver-class-name: com.mysql.cj.jdbc.Driver jpa: database: mysql show-sql: true generate-ddl: true hibernate: ddl-auto: update naming_strategy: org.hibernate.cfg.ImprovedNamingStrategy server: port: 18081 |
|---|
注意:Mysql8.x版本,连接时url需要指定时区,并且驱动类包名发生了变化。
创建实体配置实体
| package com.atguigu.domain; import javax.persistence.; @Entity @Table(name = “user”) public class User{ @Id @GeneratedValue(strategy = GenerationType.IDENTITY) @Column(name = “id”) private Long id; @Column(name = “username”) private String username; @Column(name = “password”) private String password; @Column(name = “name”) *private String name; //此处省略setter和getter方法… … } |
|---|
编写UserRepository
| package com.atguigu.dao; import com.atguigu.domain.User; import org.springframework.data.jpa.repository.JpaRepository; public interface UserDao extends JpaRepository<User,Integer> { } |
|---|
编写service类
| package com.atguigu.service; import com.atguigu.domain.User; import java.util.List; public interface UserService { List User findUserById(Integer id); void saveUser(User user); void updateUser(User user); void deleteUserById(Integer id); } |
|---|
| package com.atguigu.service.impl; import com.atguigu.dao.UserDao; import com.atguigu.domain.User; import com.atguigu.service.UserService; import org.springframework.beans.factory.annotation.Autowired; import org.springframework.stereotype.Service; import java.util.List; @Service public class UserServiceImpl implements UserService { @Autowired private UserDao userDao; / 查询所有 @return */ @Override public List return userDao.findAll(); } / 根据id查询 @return / @Override public User findUserById(Integer id) { return userDao.findById(id).get(); } /** 保存 @return / @Override public void saveUser(User user) { userDao.save(user); } / 更新 @return */ @Override public void updateUser(User user) { userDao.save(user); } / 根据id删除 @return / @Override public void *deleteUserById(Integer id) { userDao.deleteById(id); } } |
|---|
编写controller类
| package com.atguigu.controller; import com.atguigu.domain.User; import com.atguigu.service.UserService; import org.springframework.beans.factory.annotation.Autowired; import org.springframework.web.bind.annotation.RequestMapping; import org.springframework.web.bind.annotation.RestController; import java.util.List; @RestController @RequestMapping(“/user”) public class UserController { @Autowired private UserService userService; @RequestMapping(“/findAll”) public List return userService.findUsers(); } } |
|---|
四. SpringBoot综合案例(应用)
4.2 环境搭建
4.2.1 数据库准备
| create database springboot character set utf8 ; use springboot ; CREATE TABLE tb_user (id int(11) NOT NULL AUTO_INCREMENT,name varchar(20) NOT NULL,gender varchar(5) DEFAULT NULL,age int(11) DEFAULT NULL,address varchar(32) DEFAULT NULL,qq varchar(20) DEFAULT NULL,email varchar(50) DEFAULT NULL,username varchar(20) NOT NULL,phone varchar(11) DEFAULT NULL,PRIMARY KEY ( id),UNIQUE KEY user_username_uindex (username)) ENGINE=InnoDB AUTO_INCREMENT=8 DEFAULT CHARSET=utf8; INSERT INTO tb_user VALUES (1,’黄蓉’,’女’,38,’桃花岛’,’212223390222’,’huangrong222@qq.com’,’huangrong’,’15600003333’),(2,’黄老邪’,’男’,58,’湖北省武汉市’,’212223390’,’huanglaoxie@qq.com’,’huanglaoxie’,’15872320405’),(3,’小龙女’,’男’,18,’湖北省荆门市’,’212223390’,’xiaolongnv@qq.com’,’xiaolongnv’,’15600004444’),(7,’杨过’,’男’,30,’扬州’,’212223390’,’yangguo@qq.com’,’yangguo’,’15600005555’); |
|---|
4.2.2 创建项目及包结构
4.2.3 导入依赖
| <?xml version=”1.0” encoding=”UTF-8”?> <project xmlns=”http://maven.apache.org/POM/4.0.0“ xmlns:xsi=”http://www.w3.org/2001/XMLSchema-instance“ xsi:schemaLocation=”http://maven.apache.org/POM/4.0.0 http://maven.apache.org/xsd/maven-4.0.0.xsd”> <modelVersion>4.0.0</modelVersion> <parent> <groupId>org.springframework.boot</groupId> <artifactId>spring-boot-starter-parent</artifactId> <version>2.2.2.RELEASE</version> </parent> <dependencies> <dependency> <groupId>org.springframework.boot</groupId> <artifactId>spring-boot-starter-test</artifactId> </dependency> <dependency> <groupId>tk.mybatis</groupId> <artifactId>mapper-spring-boot-starter</artifactId> <version>2.1.5</version> </dependency> <dependency> <groupId>org.springframework.boot</groupId> <artifactId>spring-boot-starter-jdbc</artifactId> </dependency> <dependency> <groupId>mysql</groupId> <artifactId>mysql-connector-java</artifactId> <version>5.1.47</version> <dependency> <groupId>com.alibaba</groupId> <artifactId>druid-spring-boot-starter</artifactId> <version>1.1.10</version> </dependency> <dependency> <groupId>org.springframework.boot</groupId> <artifactId>spring-boot-starter-web</artifactId> </dependency> <dependency> <groupId>org.springframework.boot</groupId> <artifactId>spring-boot-starter-actuator</artifactId> </dependency> <dependency> <groupId>org.apache.commons</groupId> <artifactId>commons-lang3</artifactId> </dependency> <!—热部署 —> <dependency> <groupId>org.springframework.boot</groupId> <artifactId>spring-boot-devtools</artifactId> <scope>runtime</scope> <optional>true</optional> </dependency> </dependencies> <build> <plugins> <plugin> <groupId>org.springframework.boot</groupId> <artifactId>spring-boot-maven-plugin</artifactId> </plugin> </plugins> </build> </project> |
|---|
4.2.4 创建启动类
| package com.atguigu; import org.springframework.boot.SpringApplication; import org.springframework.boot.autoconfigure.SpringBootApplication; import tk.mybatis.spring.annotation.MapperScan; @SpringBootApplication @MapperScan(basePackages = “com.atguigu.dao”) @EnableTransactionManagement public class Application { public static void main(String[] args) { SpringApplication.run(Application.class,args); } } |
|---|
4.3 数据访问层
4.3.1 编写配置文件application.yml
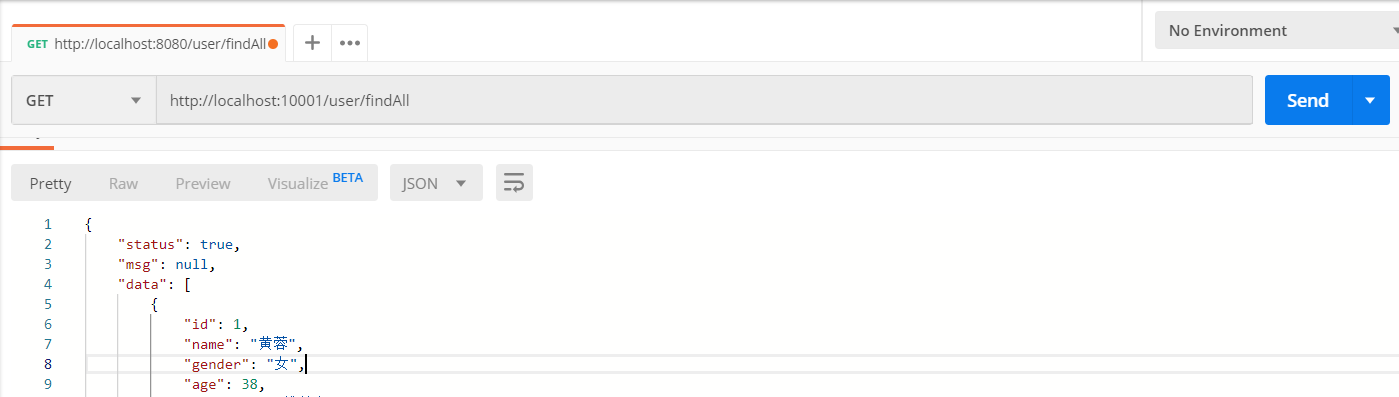
| server: port: 10001 spring: datasource: driver-class-name: com.mysql.jdbc.Driver url: jdbc:mysql:///springboot username: root password: root type: com.alibaba.druid.pool.DruidDataSource mybatis: type-aliases-package: com.atguigu.pojo |
|---|
4.3.2 编写实体类User
| package com.atguigu.pojo;
import java.io.Serializable;
@Entity
@Table(name = “tb_user”)
public class User implements Serializable {
private Integer id;
private String name;
private String gender;
private Integer age;
private String address;
private String qq;
private String email;
private String username;
private String phone;
… |
| —- |
4.3.3 Mapper接口和映射配置
| package com.atguigu.dao; import com.atguigu.pojo.User; import tk.mybatis.mapper.common.Mapper; import java.util.List; public interface UserMapper extends Mapper<User> { } |
|---|
4.3.4 编写测试代码
| @RunWith(SpringRunner.class) @SpringBootTest public class UserMapperTest { @Autowired private UserMapper userMapper ; @Test public void findAll() { List System.out.println(users); } } |
|---|
4.4 业务层
4.4.1编写接口
| public interface UserService { / 查询所有用户信息 @return */ public List } |
|---|
4.4.2 编写实现类
| package com.atguigu.service.impl; import com.atguigu.dao.UserMapper; import com.atguigu.pojo.User; import com.atguigu.service.UserService; import org.springframework.beans.factory.annotation.Autowired; import org.springframework.stereotype.Service; import java.util.List; @Service public class UserServiceImpl implements UserService { @Autowired private UserMapper userMapper; @Override @Transactional(readOnly = true ,propagation = Propagation.SUPPORTS) public List return userMapper.selectAll(); } } |
|---|
4.4.3 编写测试代码
| @RunWith(SpringRunner.class) @SpringBootTest public class UserServiceTest { @Autowired private UserService userService; @Test public void findAll() { List System.out.println(users); } } |
|---|
Spring Boot整合单元测试 , 需要在测试类上添加二个注解
- @RunWith(SpringRunner.class)指定Junit核心运行类
- @SpringBootTest 指定这是一个Spring Boot的测试类, 运行时会自动加载Spring Boot运行环境
4.5 表现层
4.5.1 引入起步依赖
|
<dependency>
<groupId>org.springframework.boot</groupId>
<artifactId>spring-boot-starter-web</artifactId>
</dependency>
<dependency>
<groupId>org.apache.commons</groupId>
<artifactId>commons-lang3</artifactId>
</dependency> | | —- |
4.5.2 新建工具类
| package com.atguigu.utils; import java.io.Serializable; public class Result implements Serializable { private boolean status ; //响应状态 true false private String msg ; // 响应信息 private Object data ; //处理成功的响应数据 public static Result ok(Object data){ Result result = new Result(); result.setStatus(true); result.setData(data); return result ; } public static Result error(String msg){ Result result = new Result(); result.setStatus(false); result.setMsg(msg); return result ; } // 生成set get tostring方法 } |
|---|
4.5.3 编写表现层代码
| @Controller @RequestMapping(path = “/user”) public class UserController { @Autowired private UserService userService; / 查询所有用户信息 @return */ @RequestMapping(path = “/findAll”) @ResponseBody public Result findAll() { List } } |
|---|
4.5.4 代码测试
4.6 页面展示
在resources目录下创建static目录 , 将提供的页面复制进来 , 修改即可 :
- 页面异步请求的端口和服务器端口一致
- 页面异步请求访问的路径和对应的表现层控制方法路径要致
- 页面异步请求参数名称和和对应的表现层控制方法参数一致
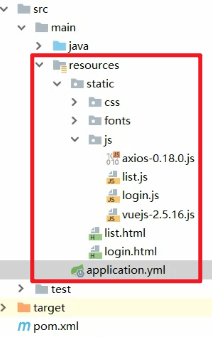
修改之后, 访问页面即可 : localhost:10001/list.html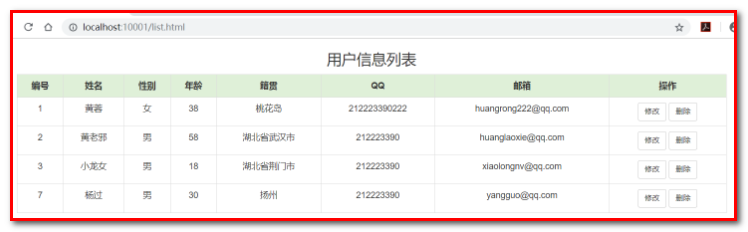
4.7 缓存优化
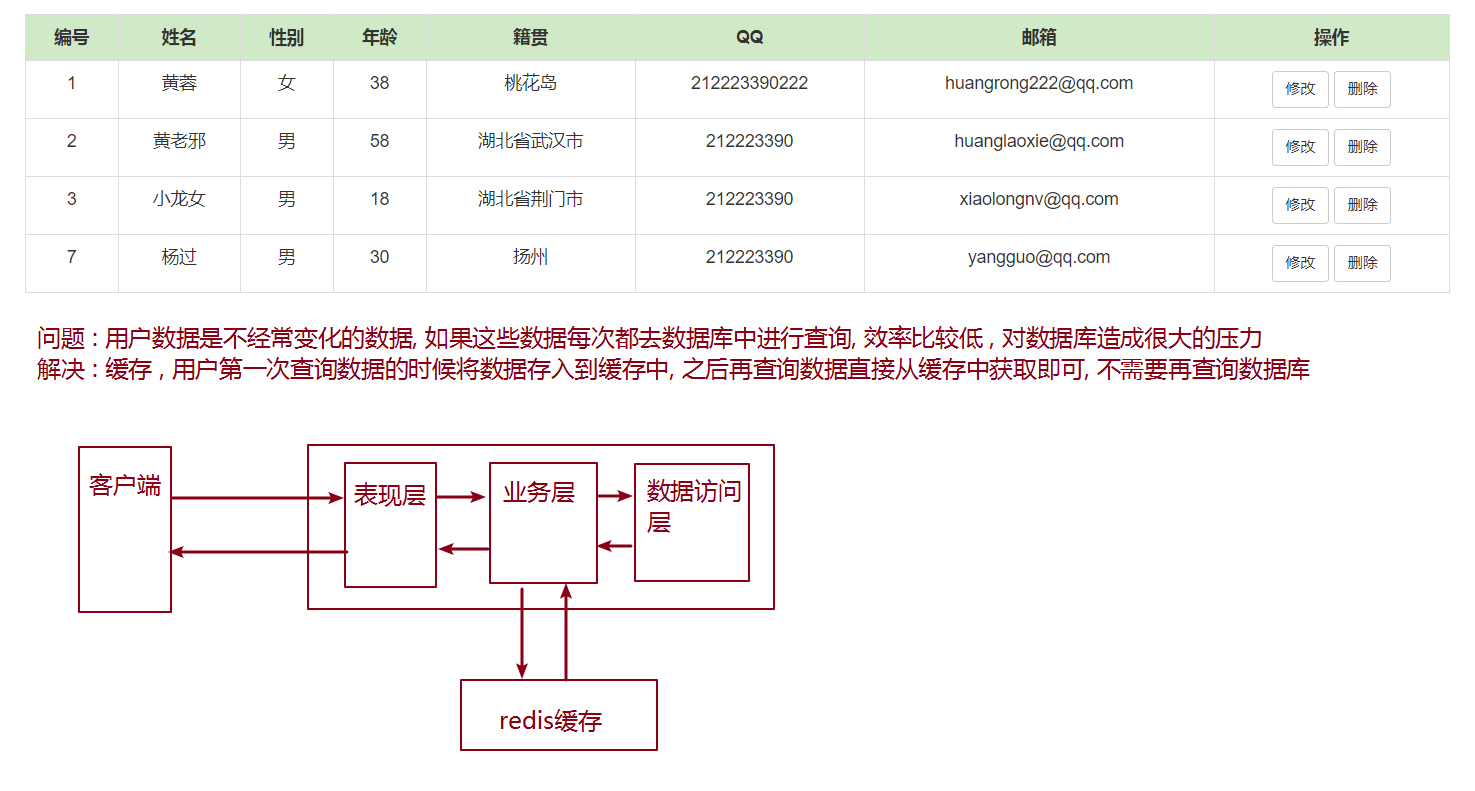
4.7.1 缓存需求
4.7.2 引入起步依赖
<dependency> <groupId>org.springframework.boot</groupId> <artifactId>spring-boot-starter-data-redis</artifactId> </dependency> |
|---|
4.7.3 编写配置文件
| spring: redis: # 配置redis host: localhost port: 6379 |
|---|
4.7.4 修改业务层实现类代码
| package com.atguigu.service.impl; import com.atguigu.mapper.UserMapper; import com.atguigu.pojo.User; import com.atguigu.service.UserService; import org.springframework.beans.factory.annotation.Autowired; import org.springframework.data.redis.core.RedisTemplate; import org.springframework.stereotype.Service; import org.springframework.transaction.annotation.Propagation; import org.springframework.transaction.annotation.Transactional; import java.util.List; @Service public class UserServiceImpl implements UserService { @Autowired private UserMapper userMapper ; @Autowired private RedisTemplate redisTemplate ; @Override @Transactional(readOnly = true ,propagation = Propagation.SUPPORTS) public List //从缓存中查询数据 规定存储用户信息使用string类型进行存储, 存储的key就是userList List //如果缓存中没有数据, 查询数据库 , 将查询到的数据放入缓存 if(userList==null){ userList = userMapper.findAll(); redisTemplate.boundValueOps(“userList”).set(userList); System.out.println(“从数据库中查询…”); }else { System.out.println(“从缓存中查询…..”); } //如果缓存中有数据, 直接返回 return userList ; } } |
|---|
五. SpringBoot其他组件(了解)
5.1 SpringBoot Actuator组件
Spring Boot Actuator是SpringBoot自带的一个组件 , 可以帮助我们监控和管理Spring Boot应用,比如健康检查、审计、统计和HTTP追踪等。
引入SpringBoot Actuator起步依赖
| <dependency> <groupId>org.springframework.boot</groupId> <artifactId>spring-boot-starter-actuator</artifactId> </dependency> |
|---|
配置SpringBoot Actuator参数
| management: endpoints: web: exposure: include: ‘*’ # 对外暴露的访问入口 , 默认是/health和/info base-path: /monitor # 默认是actuator endpoint: health: show-details: ALWAYS # 显示所有健康状态 server: port: 9999 |
|---|
启动项目获取系统信息
项目启动之后就可以通过发送http请求获取系统健康数据了 , 例如 : http://localhost:9999/monitor/health , 返回数据如下 :
| { “status“: “UP”, “details“: { “db“: { “status“: “UP”, “details“: { “database“: “MySQL”, “hello“: 1 } }, “diskSpace“: { “status“: “UP”, “details“: { “total“: 355816562688, “free“: 129251151872, “threshold“: 10485760 } }, “redis“: { “status“: “UP”, “details“: { “version“: “2.8.9” } } } } |
|---|
常用的访问路径如下 :
| HTTP 方法 | 路径 | 描述 |
|---|---|---|
| GET | /autoconfig | 提供了一份自动配置报告,记录哪些自动配置条件通过了,哪些没通过 |
| GET | /configprops | 描述配置属性(包含默认值)如何注入Bean |
| GET | /beans | 描述应用程序上下文里全部的Bean,以及它们的关系 |
| GET | /dump | 获取线程活动的快照 |
| GET | /env | 获取全部环境属性 |
| GET | /env/{name} | 根据名称获取特定的环境属性值 |
| GET | /health | 报告应用程序的健康指标,这些值由HealthIndicator的实现类提供 |
| GET | /info | 获取应用程序的定制信息,这些信息由info打头的属性提供 |
| GET | /mappings | 描述全部的URI路径,以及它们和控制器(包含Actuator端点)的映射关系 |
| GET | /metrics | 报告各种应用程序度量信息,比如内存用量和HTTP请求计数 |
| GET | /metrics/{name} | 报告指定名称的应用程序度量值 |
| POST | /shutdown | 关闭应用程序,要求endpoints.shutdown.enabled设置为true |
| GET | /trace | 提供基本的HTTP请求跟踪信息(时间戳、HTTP头等) |
5.2 SpringBoot Admin组件
上面我们讲了Spring Boot Actuator , 可以通过http协议获取系统状态信息 , 但是返回的是JSON格式数据, 看起来不太方面, 而且还需要记忆路径, 比较麻烦 , Spring Boot Admin给我们提供了更加友好的可视化界面来查看这些信息 !
Spring Boot Admin是一个开源社区项目,用于管理和监控SpringBoot应用程序。 应用程序作为Spring Boot Admin Client向Spring Boot Admin Server注册 , Client会定时向Server发送数据, Server使用友好的界面展示数据。
5.2.1 SpringBoot Admin服务端
- 创建项目springboot-admin-server
- 起步依赖
| <?xml version=”1.0” encoding=”UTF-8”?> <project xmlns=”http://maven.apache.org/POM/4.0.0“ xmlns:xsi=”http://www.w3.org/2001/XMLSchema-instance“ xsi:schemaLocation=”http://maven.apache.org/POM/4.0.0 http://maven.apache.org/xsd/maven-4.0.0.xsd”> <modelVersion>4.0.0</modelVersion> <parent> <groupId>org.springframework.boot</groupId> <artifactId>spring-boot-starter-parent</artifactId> <version>2.2.2.RELEASE</version> </parent> <groupId>com.atguigu</groupId> <artifactId>springboot-admin-server</artifactId> <version>1.0-SNAPSHOT</version> <properties> <java.version>1.8</java.version> </properties> <dependencies> <dependency> <groupId>org.springframework.boot</groupId> <artifactId>spring-boot-starter-web</artifactId> </dependency> <dependency> <groupId>de.codecentric</groupId> <artifactId>spring-boot-admin-starter-server</artifactId> <version>2.2.0</version> </dependency> </dependencies> </project> |
|---|
- 配置application.yml
| spring:
application:
name: admin-server
server:
port: 8769 | | —- |
Spring Boot Admin 端口号 8769
- 启动类
| @SpringBootApplication
@EnableAdminServer
public class Application {
public static void main(String[] args) {
SpringApplication.run(Application.class,args);
}
} | | —- |
5.2.2 SpringBoot Admin客户端
起步依赖 | <dependency>
<groupId>de.codecentric</groupId>
<artifactId>spring-boot-admin-starter-client</artifactId>
<version>2.2.0</version>
</dependency>
org.springframework.boot
spring-boot-starter-web
| | —- | | 原文档没有加web注解,运行后会自动结束程序 |配置
向admin-server注册的地址为http://localhost:8769,最后暴露自己的actuator的所有端口信息,具体配置如下:
| server: port: 9999 spring: application: name: admin-client boot: admin: client: url: http://localhost:8769 # 指定注册地址 , Spring Boot Admin Server地址 management: endpoints: web: exposure: include: ‘*’ endpoint: health: show-details: ALWAYS |
|---|
注册地址一定要和Spring Boot Admin Server地址匹配
5.3.3 启动测试
分别开启客户端(应用程序)和服务端 ,访问http://localhost:8769 , 可以看到如下界面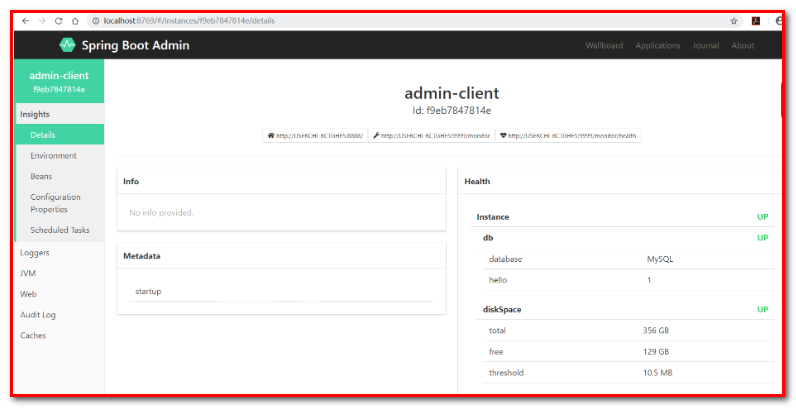
六. Spring Boot项目打包部署(应用)
6.1 项目打包
在pom.xml中配置Spring Boot项目的maven插件 | <build>
<plugins>
<plugin>
<groupId>org.springframework.boot</groupId>
<artifactId>spring-boot-maven-plugin</artifactId>
</plugin>
</plugins>
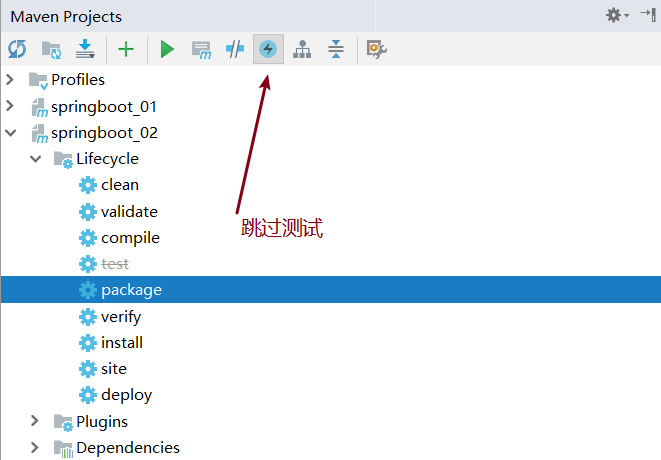
</build> | | —- |运行maven的打包命令 : package
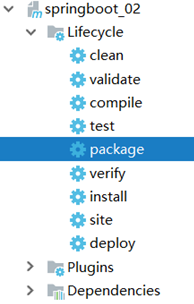
- 打包之前我们需要跳过测试 , 如果不跳过测试那么我们编写的测试类都会被maven自动执行, 可能会出现错误,导致打包不成功
- 执行之后可以在控制台看到打包的日志信息, 其中有生成的包的位置
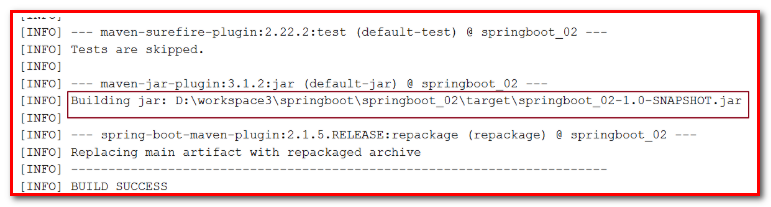
打开指定目录就可以发现有一个jar包存在 , 仔细观察其实我们会发现 , 在target目录下其实会存在二个jar包 , 一个是springboot_02-1.0-SNAPSHOT.jar一个是springboot_02-1.0-SNAPSHOT.jar.original , 那么这两个jar包有什么区别呢?
我们如果是普通项目打包那么就只会得到一个jar包 , 这个jar包中不包含项目的一些依赖jar包
但是我们现在是一个Spring Boot项目 , 我们希望打完的包能够直接运行, 所以项目中就必须包含他的依赖jar包 , 我们之前在pom.xml中配置一个Spring Boot的maven插件可以在普通包的基础上将我们项目的一些运行及依赖信息打进jar包里面 , 打完包之后将原来的普通包改名为xxx.jar.original , 新打的包为xxx.jar .
- 简单总结一下 :
- .jar.original 是普通jar包,不包含依赖
- .jar 是可执行jar包,包含了pom中的所有依赖,可以直接用java -jar 命令执行
- 如果是部署,就用.jar , 如果是给别的项目用,就要给.jar.original这个包
6.2 项目运行
打开命令行运行打出来的包;使用命令:java –jar 包全名
| java -jar springboot_02-1.0-SNAPSHOT.jar |
|---|

若有收获,就点个赞吧
0 人点赞
