SpringMVC授课笔记2
1 获取请求参数
2 一名一值
| <h3>获取请求参数-一名一值</h3> <a th:href=”@{/hello/login1(username=zhangsan,password=123456)}”>登录1</a><br> <a href=”/springmvc/hello/login2?username=zhangsan&password=123456”>登录2</a><br> <a th:href=”@{/hello/register(username=zhangsan,age=12,salary=600.0)}”>注册</a><br> <a th:href=”@{/hello/register(username=zhangsan,age=12)}”>注册2</a><br> |
|---|
| @Controller @Slf4j @RequestMapping(“/hello”)public class UserController { //UserHandler @RequestMapping(“/login1”) public String login(String username,String password){ log.debug(“login:”+username+“ “+password); return “result”; } @RequestMapping(“/login2”) public String login2(@RequestParam(“username”) String uname, @RequestParam(“password”) String pwd){ log.debug(“login:”+uname+“ “+pwd); return “result”; } @RequestMapping(“/register”) public String register(String username,Integer age,double salary){ log.debug(“login:”+username+“ “+age+“ “+salary); return “result”; } @RequestMapping(“/register2”) public String register2(String username,Integer age, @RequestParam(value = “salary”,required = false,defaultValue = “800”) double salary){ log.debug(“login:”+username+“ “+age+“ “+salary); return “result”; } } |
3 一名多值
| <h3>获取请求参数-一名多值</h3> <form th:action=”@{/hello/getTeams}” method=”post”> 请选择你最喜欢的球队: <input type=”checkbox” name=”team” value=”Brazil”/>巴西 <input type=”checkbox” name=”team” value=”German”/>德国 <input type=”checkbox” name=”team” value=”French”/>法国 <input type=”checkbox” name=”team” value=”Holland”/>荷兰 <input type=”checkbox” name=”team” value=”Italian”/>意大利 <input type=”checkbox” name=”team” value=”China”/>中国 <br/> <input type=”submit” value=”保存”/> </form> |
|---|
| @RequestMapping(“/getTeams”)public String getTeam(@RequestParam(“team”) List log.debug(“teamList:”+teamList); return “result”; } |
4 实体类
| <h3>获取请求参数-实体类</h3> <form th:action=”@{/hello/addEmp}” method=”post”> 姓名:<input type=”text” name=”empName”/><br/> 年龄:<input type=”text” name=”empAge”/><br/> 工资:<input type=”text” name=”empSalary”/><br/> <input type=”submit” value=”保存”/> </form> |
|---|
| @RequestMapping(“/addEmp”)public String addEmp(Employee emp123){ log.debug(“emp:”+emp123); return “result”; } |
注意1:页面上直接写实体类的属性,比如empName,而不需要写emp123.empName
注意2:分控制器中使用实体类的参数直接接收,和变量名无关。底层调用相应属性的getter和setter方法
注意3:解决POST中文乱码问题:
| <filter> <filter-name>CharacterEncodingFilter</filter-name> <filter-class>org.springframework.web.filter.CharacterEncodingFilter</filter-class> <init-param> <param-name>encoding</param-name> <param-value>utf-8</param-value> </init-param> <init-param> <param-name>forceRequestEncoding</param-name> <param-value>true</param-value> </init-param> <init-param> <param-name>forceResponseEncoding</param-name> <param-value>true</param-value> </init-param> </filter> <filter-mapping> <filter-name>CharacterEncodingFilter</filter-name> <url-pattern>/</url-pattern> </*filter-mapping> |
|---|
5 实体类含级联属性
| @Data @AllArgsConstructor @NoArgsConstructorpublic class Student { private String stuName; private School school; private List //private Subject[] subjectArray;//Array //private Set private Map |
|---|
| <h3>获取请求参数-实体类包含级联属性</h3> <form th:action=”@{/hello/addStu}” method=”post”> 姓名:<input type=”text” name=”stuName”/><br/> 学校编号:<input type=”text” name=”school.schoolNo”/><br/> 学校名称:<input type=”text” name=”school.schoolName”/><br/> 课程1编号:<input type=”text” name=”subjectList[0].subjectId”/><br/> 课程1名称:<input type=”text” name=”subjectList[0].subjectName”/><br/> 课程2编号:<input type=”text” name=”subjectList[1].subjectId”/><br/> 课程2名称:<input type=”text” name=”subjectList[1].subjectName”/><br/> MySQL课程成绩:<input type=”text” name=”scores[‘mysql’]”/><br/> Java课程成绩:<input type=”text” name=”scores[‘java’]”/><br/> <input type=”submit” value=”保存”/> </form> |
| @RequestMapping(“/addStu”)public String addStu(Student stu){ log.debug(“stu:”+stu); return “result”; } |
6 获取请求头
| @RequestMapping(“/getHeader”)public String getHeader(@RequestHeader(“User-Agent”) String userAgent, @RequestHeader(“Referer”) String referer){ log.debug(“header User-Agent:”+userAgent); log.debug(“header Referer:”+referer); return “result”; } |
|---|
7 获取指定Cookie
| @RequestMapping(“/getCookie”)public String getCookie(@CookieValue(value = “JSESSIONID”,defaultValue = “null”) String sessionId, HttpSession session){ log.debug(“sessionId:”+sessionId); return “result”; } |
|---|
8 页面跳转控制
转发是服务器端跳转,客户端不知道 110 呼叫转移 一个请求在服务器传递
重定向是客户端跳转,客户端知道。 114 发起了一个新的请求
如果要获取保存在request中数据,必须使用转发。
转发只能转发到同一个项目,最多也就是同一个服务器的其他项目(特殊设置)
重定向可以跳转到互联网的任意位置
转发可以跳转到项目的WEB-INF目录下
重定向不可以跳转都项目的WEB-INF目录下(重定向是客户端跳转)
| @RequestMapping(“/dispatcher1”)public String dispatcher1(){ //return “result”; return “forward:/WEB-INF/templates/result.html”; }@RequestMapping(“/dispatcher2”)public String dispatcher2(){ return “forward:/outer.html”; }@RequestMapping(“/redirect1”)public String redirect1(){ return “redirect:/WEB-INF/templates/result.html”; //不可以}@RequestMapping(“/redirect2”)public String redirect2(){ return “redirect:/outer.html”; //在Spring中,重定向的/也代表当前项目}@RequestMapping(“/redirect3”)public String redirect3(){ return “redirect:http://www.atguigu.com“; } |
|---|
9 获取原生Servlet API对象
| @Autowiredprivate ServletContext servletContext;
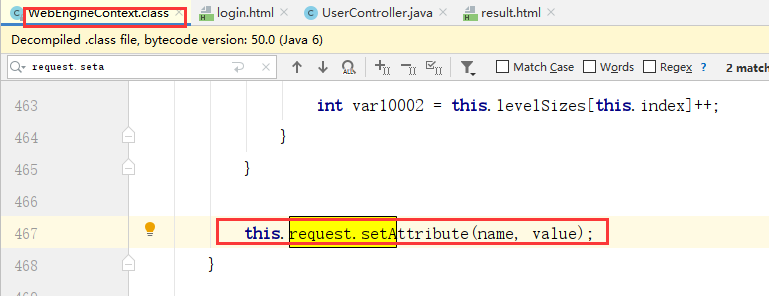
@RequestMapping(“/getAPI”)public String getAPI(HttpServletRequest request, HttpServletResponse response,HttpSession session){
String requestURL = request.getRequestURL().toString();
//HttpSession session1 = request.getSession();
request.setAttribute(**"msg"**,**"username is error"**); //仅限于当前用户的当前请求<br /> session.setAttribute(**"username"**,**"zhangsan"**);//仅限于当前用户的多个请求 购物车 用户<br /> **servletContext**.setAttribute(**"count"**,10000);//所有用户的所有请求 网站的访问认识<br /> response.addHeader(**"schoolName"**,**"atguigu"**);<br /> **return "result"**;<br />} |
| —- |
| <span th:text=”${msg}”></span><br>
<hr>
<span th:text=”${session.username}”></span><br>
<span th:text=”${application.count}”></span><br> |
注意:如果在Web组件直接传递数据,在session与、application域中传递数据,请使用原生API。如果在request域中传递数据,一般不使用原生API,而是使用下面的四种方式。
10 属性域
11 使用 Model 类型的形参
| @RequestMapping(“/getModel”)public String getModel(Model model){ model.addAttribute(“msg”,“username is null(model)”); return “result”; //请求域的数据必须使用转发} |
|---|
12 使用 Map 类型的形参
| @RequestMapping(“/getMap”)public String getMap(Map map){ map.put(“msg”,“username is null(map)”); return “result”; //请求域的数据必须使用转发} |
|---|
13 使用 ModelMap 类型的形参
| @RequestMapping(“/getModelMap”)public String getModelMap(ModelMap modelMap){ modelMap.addAttribute(“msg”,“username is null(modelmap)”); return “result”; //请求域的数据必须使用转发} |
|---|
14 使用 ModelAndView 对象
| @RequestMapping(“/getModelAndView”)public ModelAndView getModelAndView(){ ModelAndView modelAndView = new ModelAndView(); modelAndView.addObject(“msg”,“username is null(modelandview)”); modelAndView.setViewName(“result”); return modelAndView; //请求域的数据必须使用转发} |
|---|
注意
- 使用Model、Map、ModelMap来传递数据,方法的返回值是String类,最终SpringMVC的底层都会变为使用ModelAndView来存储数据和视图
- 不是使用Model、Map、ModelMap、ModelAndView,底层都是在请求域传递数据,底层都调用了request.setAttribute(key,value)。
- 使用Model、Map、ModelMap来传递数据,底层实现类都是BindingAwareModelMap

15 表单数据回显
16 回显简单标签
| @Controllerpublic class TigerController { @RequestMapping(“/tiger/findById”) public String findById(Model model){ //实际中要访问数据库,获取指定id的数据 Tiger tiger = new Tiger(); tiger.setTigerId(5); tiger.setTigerName(“tomCat老虎”); tiger.setTigerSalary(666.66); //存储信息到请求域 model.addAttribute(“tiger1”,tiger); //返回(转发) return “updateTiger”; } } |
|---|
| <h3>修改信息</h3> <form> ID: <input type=”text” name=”tigerId” th:value=”${tiger1.tigerId}”><br> 名称:<input type=”text” name=”tigerName” th:value=”${tiger1.tigerName}”><br> 薪资:<input type=”text” name=”tigerSalary” th:value=”${tiger1.tigerSalary}”><br> <input type=”submit” value=”提交”> </form> |
17 回显单选框和下拉框
| @RequestMapping(“/tiger/findById2”)public String findById2(Model model){
//实际中要访问数据库,获取指定id的数据
Tiger tiger = new Tiger();
tiger.setTigerId(5);
tiger.setTigerName(“tomCat”);
tiger.setTigerSalary(666.66);
tiger.setSeason(new Season(“s3”,“Authmn”));
//准备四个季节<br /> List<Season> seasonList = **new **ArrayList<>();<br /> seasonList.add(**new **Season(**"s1"**,**"Spring"**));<br /> seasonList.add(**new **Season(**"s2"**,**"Summer"**));<br /> seasonList.add(**new **Season(**"s3"**,**"Authmn"**));<br /> seasonList.add(**new **Season(**"s4"**,**"Winter"**));<br /> //存储信息到请求域<br /> model.addAttribute(**"tiger1"**,tiger);<br /> model.addAttribute(**"seasonList"**,seasonList);<br /> //返回(转发)<br /> **return "updateTiger2"**;<br />} |
| —- |
| 季节:<input type=”radio” name=”season”
th:each=”season:${seasonList}”
th:value=”${season.seasonId}”
th:text=”${season.seasonName}”
th:checked=”${season.seasonId==tiger1.season.seasonId}”><br> |
| 季节:<select name=”season” >
<option th:each=”season:${seasonList}”
th:value=”${season.seasonId}”
th:text=”${season.seasonName}”
th:selected=”${season.seasonId==tiger1.season.seasonId}”
></option>
</select> |
18 回显复选框
| @RequestMapping(“/tiger/findById3”)public String findById3(Model model){
//实际中要访问数据库,获取指定id的数据
Tiger tiger = new Tiger();
tiger.setTigerId(5);
tiger.setTigerName(“tomCat”);
tiger.setTigerSalary(666.66);
tiger.getFriendList().add(new Friend(1,“monkey”));
tiger.getFriendList().add(new Friend(3,“turkey”));
//准备四个朋友<br /> List<Friend> friendList = **new **ArrayList<>();<br /> friendList.add(**new **Friend(1,**"monkey"**));<br /> friendList.add(**new **Friend(2,**"donkey"**));<br /> friendList.add(**new **Friend(3,**"turkey"**));<br /> friendList.add(**new **Friend(4,**"mickey"**));<br /> //存储信息到请求域<br /> model.addAttribute(**"tiger1"**,tiger);<br /> model.addAttribute(**"friendList"**,friendList);<br /> //返回(转发)<br /> **return "updateTiger3"**;<br />} |
| —- |
| <h3>修改信息</h3>
<form>
ID: <input type=”text” name=”tigerId” th:value=”${tiger1.tigerId}”><br>
名称:<input type=”text” name=”tigerName” th:value=”${tiger1.tigerName}”><br>
薪资:<input type=”text” name=”tigerSalary” th:value=”${tiger1.tigerSalary}”><br>
朋友:<input type=”checkbox” name=”season”
th:each=”friend:${friendList}”
th:value=”${friend.friendId}”
th:text=”${friend.friendName}”
th:checked=”${#lists.contains(tiger1.friendList,friend)}”><br>
<input type=”submit” value=”提交”>
</form> |
19 案例:影院系统

数据库怎么办?使用HashMap模拟。不涉及和MyBatis、Spring的整合,重点就是SpringMVC的使用:先搭建SpringMVC的环境,通过页面、分控制器的操作来说功能。
20 准备SpringMVC环境
20.1 依赖
Servlet依赖
SpringMVC依赖
Spring和Thymeleaf的整合依赖
Lombok
日志Logback
Spring Test
Junit5
20.2 web.xml
20.3 springmvc.xml
启用MVC注解驱动
解决静态资源访问问题
组件(@Controller @Service)扫描
Thymeleaf解析器
20.4 日志logback.xml
20.5 创建目录结构
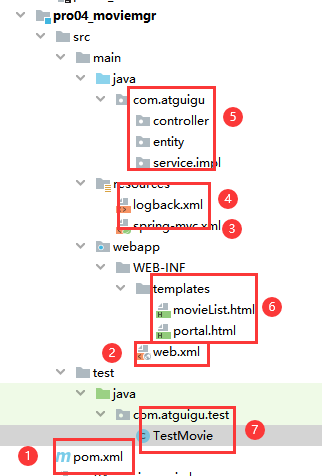
21 准备实体类
| @Data
@AllArgsConstructor
@NoArgsConstructorpublic class Movie {
**private **String **movieId**;<br /> **private **String **movieName**;<br /> **private **Double **moviePrice**;<br />} |
| —- |
22 准备业务层接口和实现类代码(提供模拟数据)
| public interface MovieService { List Movie getMovieById(String movieId); void saveMovie(Movie movie); void updateMovie(Movie movie); void removeMovieById(String movieId); } |
|---|
23 测试业务层代码
| @SpringJUnitConfig(locations = “classpath:spring-mvc.xml”)public class TestMovie {
@Autowired<br />    **private **MovieService **movieService**;

@Test<br />    **public void **testSelectAll(){<br />        List<Movie> movieList = **this**.**movieService**.getAll();<br />        movieList.forEach(m-> System.**_out_**.println(m));<br />    }<br />    @Test<br />    **public void **testSaveMovie(){<br />        Movie movie = **new **Movie(**"m17"**,**"唐人街探案2"**,60.0);<br />        **this**.**movieService**.saveMovie(movie);<br />        List<Movie> movieList = **this**.**movieService**.getAll();<br />        movieList.forEach(m-> System.**_out_**.println(m));<br />    }<br />} |
| —- |
24 影院案例-显示首页
| <mvc:view-controller path=”/“ view-name=”portal”></mvc:view-controller> |
|---|
| <a th:href=”@{/movie/getAll}”>进入影院系统</a> |
25 影院案例-显示所有电影
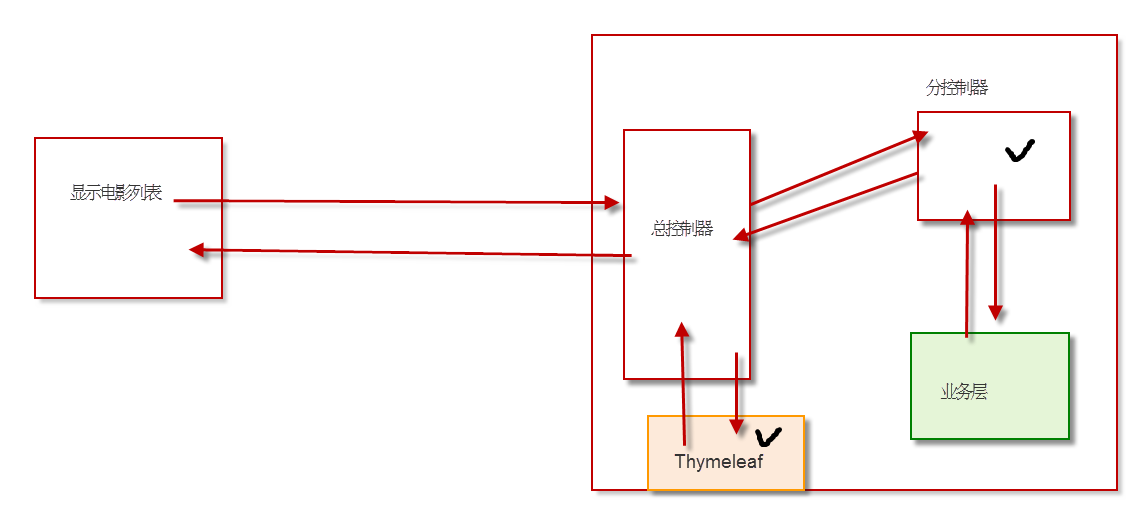
| @Controller
@RequestMapping(“/movie”)public class MovieController {
@Autowired
private MovieService movieService;
@RequestMapping(**"/getAll"**)<br /> **public **String getAll(Model model){<br /> //调用业务层获取电影列表<br /> List<Movie> movieList = **this**.**movieService**.getAll();<br /> //将电影列表数据存入请求域<br /> model.addAttribute(**"movieList"**,movieList);<br /> //指定返回的视图<br /> **return "movieList"**;<br /> }<br />} |
| —- |
| <!DOCTYPE html>
<html lang=”en” xmlns:th=”http://www.thymeleaf.org“>
<head>
<meta charset=”UTF-8”>
<title>Title</title>
<style type=”text/css”>
h3{
text-align: center;
}
table#table1{
width: 60%;
margin: 10px auto;
border-collapse: collapse;
}
table#table1 th, td{
text-align: center;
border:1px solid red;
}
</style>
</head>
<body>
<h3>电影列表</h3>
<table id=”table1”>
<tr>
<th>电影编号</th>
<th>电影名称</th>
<th>观看价格</th>
<th>操作</th>
</tr>
<tbody>
<tr th:each=”movie:${movieList}”>
<td th:text=”${movie.movieId}”></td>
<td th:text=”${movie.movieName}”></td>
<td th:text=”${movie.moviePrice}”></td>
<td>
修改 删除
</td>
</tr>
</tbody>
</table>
</body>
</html> |
26 影院案例-完善显示所有电影
隔行变色
区分是否有电影
| <h3>电影列表</h3> <table id=”table1”> <tr> <th>电影编号</th> <th>电影名称</th> <th>观看价格</th> <th>status.index</th> <th>status.count</th> <th>操作</th> </tr> <tbody th:if=”${movieList==null || movieList.size()==0}”> <tr> <td colspan=”10”>一部电影也没有</td> </tr> </tbody> <tbody th:if=”${not #lists.isEmpty(movieList)}”> <tr th:each=”movie,status:${movieList}” th:class=”${status.index%2==0?’white’:’beige’}”> <td th:text=”${movie.movieId}”></td> <td th:text=”${movie.movieName}”></td> <td th:text=”${movie.moviePrice}”></td> <td th:text=”${status.index}”></td> <td th:text=”${status.count}”></td> <td> 修改 删除 </td> </tr> </tbody> </table> |
|---|

若有收获,就点个赞吧
0 人点赞
