在程序中可以使用缓存的技术来节省对数据库的开销。Spring Boot对缓存提供了很好的支持,我们几乎不用做过多的配置即可使用各种缓存实现。这里主要介绍平日里个人接触较多的Ehcache和Redis缓存实现。
准备工作
可根据Spring-Boot中使用Mybatis.html搭建一个Spring Boot项目,然后yml中配置日志输出级别以观察SQL的执行情况:
logging:level:com:springboot:mapper: debug
其中com.spring.mapper为MyBatis的Mapper接口路径。
然后编写如下测试方法:
@RunWith(SpringRunner.class)@SpringBootTest(classes = DemoApplication.class)public class ApplicationTest {@Autowiredprivate StudentService studentService;@Testpublic void test() throws Exception {Student student1 = this.studentService.queryStudentBySno("001");System.out.println("学号" + student1.getSno() + "的学生姓名为:" + student1.getName());Student student2 = this.studentService.queryStudentBySno("001");System.out.println("学号" + student2.getSno() + "的学生姓名为:" + student2.getName());}}
右键Debug test():
2017-11-17 16:34:26.535 DEBUG 9932 --- [main] c.s.m.StudentMapper.queryStudentBySno : ==> Preparing: select * from student where sno=?2017-11-17 16:34:26.688 DEBUG 9932 --- [main] c.s.m.StudentMapper.queryStudentBySno : ==> Parameters: 001(String)2017-11-17 16:34:26.716 DEBUG 9932 --- [main] c.s.m.StudentMapper.queryStudentBySno : <== Total: 1学号001的学生姓名为:KangKang2017-11-17 16:34:26.720 DEBUG 9932 --- [main] c.s.m.StudentMapper.queryStudentBySno : ==> Preparing: select * from student where sno=?2017-11-17 16:34:26.720 DEBUG 9932 --- [main] c.s.m.StudentMapper.queryStudentBySno : ==> Parameters: 001(String)2017-11-17 16:34:26.721 DEBUG 9932 --- [main] c.s.m.StudentMapper.queryStudentBySno : <== Total: 1学号001的学生姓名为:KangKang
可发现第二个查询虽然和第一个查询完全一样,但其还是对数据库进行了查询。接下来引入缓存来改善这个结果。
使用缓存
要开启Spring Boot的缓存功能,需要在pom中引入spring-boot-starter-cache:
<dependency><groupId>org.springframework.boot</groupId><artifactId>spring-boot-starter-cache</artifactId></dependency>
接着在Spring Boot入口类中加入@EnableCaching注解开启缓存功能:
@SpringBootApplication@EnableCachingpublic class Application {public static void main(String[] args) {SpringApplication.run(Application.class,args);}}
在StudentService接口中加入缓存注解:
@CacheConfig(cacheNames = "student")@Repositorypublic interface StudentService {@CachePut(key = "#p0.sno")Student update(Student student);@CacheEvict(key = "#p0", allEntries = true)void deleteStudentBySno(String sno);@Cacheable(key = "#p0")Student queryStudentBySno(String sno);}
我们在StudentService接口中加入了@CacheConfig注解,queryStudentBySno方法使用了注解@Cacheable(key="#p0"),即将id作为redis中的key值。当我们更新数据的时候,应该使用@CachePut(key="#p0.sno")进行缓存数据的更新,否则将查询到脏数据,因为该注解保存的是方法的返回值,所以这里应该返回Student。
其实现类:
@Repository("studentService")public class StudentServiceImpl implements StudentService{@Autowiredprivate StudentMapper studentMapper;@Overridepublic Student update(Student student) {this.studentMapper.update(student);return this.studentMapper.queryStudentBySno(student.getSno());}@Overridepublic void deleteStudentBySno(String sno) {this.studentMapper.deleteStudentBySno(sno);}@Overridepublic Student queryStudentBySno(String sno) {return this.studentMapper.queryStudentBySno(sno);}}
在Spring Boot中可使用的缓存注解有:
缓存注解
@CacheConfig:主要用于配置该类中会用到的一些共用的缓存配置。在这里@CacheConfig(cacheNames = "student"):配置了该数据访问对象中返回的内容将存储于名为student的缓存对象中,我们也可以不使用该注解,直接通过@Cacheable自己配置缓存集的名字来定义;@Cacheable:配置了queryStudentBySno函数的返回值将被加入缓存。同时在查询时,会先从缓存中获取,若不存在才再发起对数据库的访问。该注解主要有下面几个参数:value、cacheNames:两个等同的参数(cacheNames为Spring 4新增,作为value的别名),用于指定缓存存储的集合名。由于Spring 4中新增了@CacheConfig,因此在Spring 3中原本必须有的value属性,也成为非必需项了;key:缓存对象存储在Map集合中的key值,非必需,缺省按照函数的所有参数组合作为key值,若自己配置需使用SpEL表达式,比如:@Cacheable(key = "#p0"):使用函数第一个参数作为缓存的key值,更多关于SpEL表达式的详细内容可参考https://docs.spring.io/spring/docs/current/spring-framework-reference/integration.html#cache;condition:缓存对象的条件,非必需,也需使用SpEL表达式,只有满足表达式条件的内容才会被缓存,比如:@Cacheable(key = "#p0", condition = "#p0.length() < 3"),表示只有当第一个参数的长度小于3的时候才会被缓存;unless:另外一个缓存条件参数,非必需,需使用SpEL表达式。它不同于condition参数的地方在于它的判断时机,该条件是在函数被调用之后才做判断的,所以它可以通过对result进行判断;keyGenerator:用于指定key生成器,非必需。若需要指定一个自定义的key生成器,我们需要去实现org.springframework.cache.interceptor.KeyGenerator接口,并使用该参数来指定;cacheManager:用于指定使用哪个缓存管理器,非必需。只有当有多个时才需要使用;cacheResolver:用于指定使用那个缓存解析器,非必需。需通过org.springframework.cache.interceptor.CacheResolver接口来实现自己的缓存解析器,并用该参数指定;
@CachePut:配置于函数上,能够根据参数定义条件来进行缓存,其缓存的是方法的返回值,它与@Cacheable不同的是,它每次都会真实调用函数,所以主要用于数据新增和修改操作上。它的参数与@Cacheable类似,具体功能可参考上面对@Cacheable参数的解析;@CacheEvict:配置于函数上,通常用在删除方法上,用来从缓存中移除相应数据。除了同@Cacheable一样的参数之外,它还有下面两个参数:allEntries:非必需,默认为false。当为true时,会移除所有数据;beforeInvocation:非必需,默认为false,会在调用方法之后移除数据。当为true时,会在调用方法之前移除数据。
缓存实现
要使用上Spring Boot的缓存功能,还需要提供一个缓存的具体实现。Spring Boot根据下面的顺序去侦测缓存实现:
- Generic
- JCache (JSR-107)
- EhCache 2.x
- Hazelcast
- Infinispan
- Redis
- Guava
- Simple
除了按顺序侦测外,我们也可以通过配置属性spring.cache.type来强制指定。
接下来主要介绍基于Redis和Ehcache的缓存实现。
Redis
Redis的下载地址为https://github.com/MicrosoftArchive/redis/releases,Redis 支持 32 位和 64 位。这个需要根据你系统平台的实际情况选择,这里我们下载 Redis-x64-xxx.zip压缩包到C盘。打开一个CMD窗口,输入如下命令:
C:\Users\Administrator>cd c:\Redis-x64-3.2.100c:\Redis-x64-3.2.100>redis-server.exe redis.windows.conf_.__.-``__ ''-.__.-`` `. `_. ''-._ Redis 3.2.100 (00000000/0) 64 bit.-`` .-```. ```\/ _.,_ ''-._( ' , .-` | `, ) Running in standalone mode|`-._`-...-` __...-.``-._|'` _.-'| Port: 6379| `-._ `._ / _.-' | PID: 6404`-._ `-._ `-./ _.-' _.-'|`-._`-._ `-.__.-' _.-'_.-'|| `-._`-._ _.-'_.-' | http://redis.io`-._ `-._`-.__.-'_.-' _.-'|`-._`-._ `-.__.-' _.-'_.-'|| `-._`-._ _.-'_.-' |`-._ `-._`-.__.-'_.-' _.-'`-._ `-.__.-' _.-'`-._ _.-'`-.__.-'[6404] 25 Dec 09:47:58.890 # Server started, Redis version 3.2.100[6404] 25 Dec 09:47:58.898 * DB loaded from disk: 0.007 seconds[6404] 25 Dec 09:47:58.898 * The server is now ready to accept connections on port 6379
然后打开另外一个CMD终端,输入:
C:\Users\Administrator>cd c:\Redis-x64-3.2.100c:\Redis-x64-3.2.100>redis-cli.exe -p 6379127.0.0.1:6379>
准备工作做完后,接下来开始在Spring Boot项目里引入Redis:
<!-- spring-boot redis --><dependency><groupId>org.springframework.boot</groupId><artifactId>spring-boot-starter-data-redis</artifactId></dependency>
在application.yml中配置Redis:
spring:redis:# Redis数据库索引(默认为0)database: 0# Redis服务器地址host: localhost# Redis服务器连接端口port: 6379pool:# 连接池最大连接数(使用负值表示没有限制)max-active: 8# 连接池最大阻塞等待时间(使用负值表示没有限制)max-wait: -1# 连接池中的最大空闲连接max-idle: 8# 连接池中的最小空闲连接min-idle: 0# 连接超时时间(毫秒)timeout: 0
更多关于Spring Boot Redis配置可参考:https://docs.spring.io/spring-boot/docs/current/reference/html/common-application-properties.html# REDIS
接着创建一个Redis配置类:
@Configurationpublic class RedisConfig extends CachingConfigurerSupport {// 自定义缓存key生成策略@Beanpublic KeyGenerator keyGenerator() {return new KeyGenerator() {@Overridepublic Object generate(Object target, java.lang.reflect.Method method, Object... params) {StringBuffer sb = new StringBuffer();sb.append(target.getClass().getName());sb.append(method.getName());for (Object obj : params) {sb.append(obj.toString());}return sb.toString();}};}// 缓存管理器@Beanpublic CacheManager cacheManager(@SuppressWarnings("rawtypes") RedisTemplate redisTemplate) {RedisCacheManager cacheManager = new RedisCacheManager(redisTemplate);// 设置缓存过期时间(秒)cacheManager.setDefaultExpiration(3600);return cacheManager;}@Beanpublic RedisTemplate<String, String> redisTemplate(RedisConnectionFactory factory) {StringRedisTemplate template = new StringRedisTemplate(factory);setSerializer(template);// 设置序列化工具template.afterPropertiesSet();return template;}private void setSerializer(StringRedisTemplate template) {@SuppressWarnings({ "rawtypes", "unchecked" })Jackson2JsonRedisSerializer jackson2JsonRedisSerializer = new Jackson2JsonRedisSerializer(Object.class);ObjectMapper om = new ObjectMapper();om.setVisibility(PropertyAccessor.ALL, JsonAutoDetect.Visibility.ANY);om.enableDefaultTyping(ObjectMapper.DefaultTyping.NON_FINAL);jackson2JsonRedisSerializer.setObjectMapper(om);template.setValueSerializer(jackson2JsonRedisSerializer);}}
Spring Boot 2x 版本
// 缓存管理器@Beanpublic CacheManager cacheManager(@SuppressWarnings("rawtypes") RedisConnectionFactory redisConnectionFactory) {RedisCacheConfiguration redisCacheConfiguration = RedisCacheConfiguration.defaultCacheConfig().entryTtl( Duration.ofHours(1)); // 设置缓存有效期一小时return RedisCacheManager.builder( RedisCacheWriter.nonLockingRedisCacheWriter(redisConnectionFactory)).cacheDefaults(redisCacheConfiguration).build();}@Beanpublic RedisTemplate<String, ?> redisTemplate(RedisConnectionFactory factory) {// 使用fastjson序列化替代jdk序列化RedisSerializer<Object> redisSerializer = getRedisSerializer();RedisTemplate<String, Object> template = new RedisTemplate<>();template.setConnectionFactory(factory);template.setKeySerializer(redisSerializer);template.setValueSerializer(redisSerializer);template.setHashKeySerializer(redisSerializer);template.setHashValueSerializer(redisSerializer);template.afterPropertiesSet();return template;}private RedisSerializer<Object> getRedisSerializer() {return new GenericFastJsonRedisSerializer();}
运行测试,控制台输出:
2017-11-17 18:17:06.995 DEBUG 8836 --- [main] c.s.m.StudentMapper.queryStudentBySno : ==> Preparing: select * from student where sno=?2017-11-17 18:17:07.128 DEBUG 8836 --- [main] c.s.m.StudentMapper.queryStudentBySno : ==> Parameters: 001(String)2017-11-17 18:17:07.152 DEBUG 8836 --- [main] c.s.m.StudentMapper.queryStudentBySno : <== Total: 1学号001的学生姓名为:KangKang学号001的学生姓名为:KangKang
第二次查询没有访问数据库,而是从缓存中获取的,在redis中查看该值:
127.0.0.1:6379> keys *1) "student~keys"2) "001"127.0.0.1:6379> get 001"[\"com.springboot.bean.Student\",{\"sno\":\"001\",\"name\":\"KangKang\",\"sex\":\"M \"}]"

在测试方法中测试更新:
@Testpublic void test() throws Exception {Student student1 = this.studentService.queryStudentBySno("001");System.out.println("学号" + student1.getSno() + "的学生姓名为:" + student1.getName());student1.setName("康康");this.studentService.update(student1);Student student2 = this.studentService.queryStudentBySno("001");System.out.println("学号" + student2.getSno() + "的学生姓名为:" + student2.getName());}
控制台输出:
学号001的学生姓名为:KangKang2017-11-17 19:30:05.813 INFO 11244 --- [main] com.alibaba.druid.pool.DruidDataSource : {dataSource-1} inited2017-11-17 19:30:05.823 DEBUG 11244 --- [main] c.s.mapper.StudentMapper.update : ==> Preparing: update student set sname=?,ssex=? where sno=?2017-11-17 19:30:05.941 DEBUG 11244 --- [main] c.s.mapper.StudentMapper.update : ==> Parameters: 康康(String), M (String), 001(String)2017-11-17 19:30:05.953 DEBUG 11244 --- [main] c.s.mapper.StudentMapper.update : <== Updates: 12017-11-17 19:30:05.957 DEBUG 11244 --- [main] c.s.m.StudentMapper.queryStudentBySno : ==> Preparing: select * from student where sno=?2017-11-17 19:30:05.959 DEBUG 11244 --- [main] c.s.m.StudentMapper.queryStudentBySno : ==> Parameters: 001(String)2017-11-17 19:30:05.976 DEBUG 11244 --- [main] c.s.m.StudentMapper.queryStudentBySno : <== Total: 1学号001的学生姓名为:康康
在redis中查看:
127.0.0.1:6379> get 001"[\"com.springboot.bean.Student\",{\"sno\":\"001\",\"name\":\"\xe5\xba\xb7\xe5\xba\xb7\",\"sex\":\"M \"}]"
可见更新数据库的同时,缓存也得到了更新。
Ehcache
引入Ehcache依赖:
<!-- ehcache --><dependency><groupId>net.sf.ehcache</groupId><artifactId>ehcache</artifactId></dependency>
在src/main/resources目录下新建ehcache.xml:
<?xml version="1.0" encoding="UTF-8"?><ehcache xmlns:xsi="http://www.w3.org/2001/XMLSchema-instance"xsi:noNamespaceSchemaLocation="ehcache.xsd"><defaultCachemaxElementsInMemory="10000"eternal="false"timeToIdleSeconds="3600"timeToLiveSeconds="0"overflowToDisk="false"diskPersistent="false"diskExpiryThreadIntervalSeconds="120" /><cachename="student"maxEntriesLocalHeap="2000"eternal="false"timeToIdleSeconds="3600"timeToLiveSeconds="0"overflowToDisk="false"statistics="true"/></ehcache>
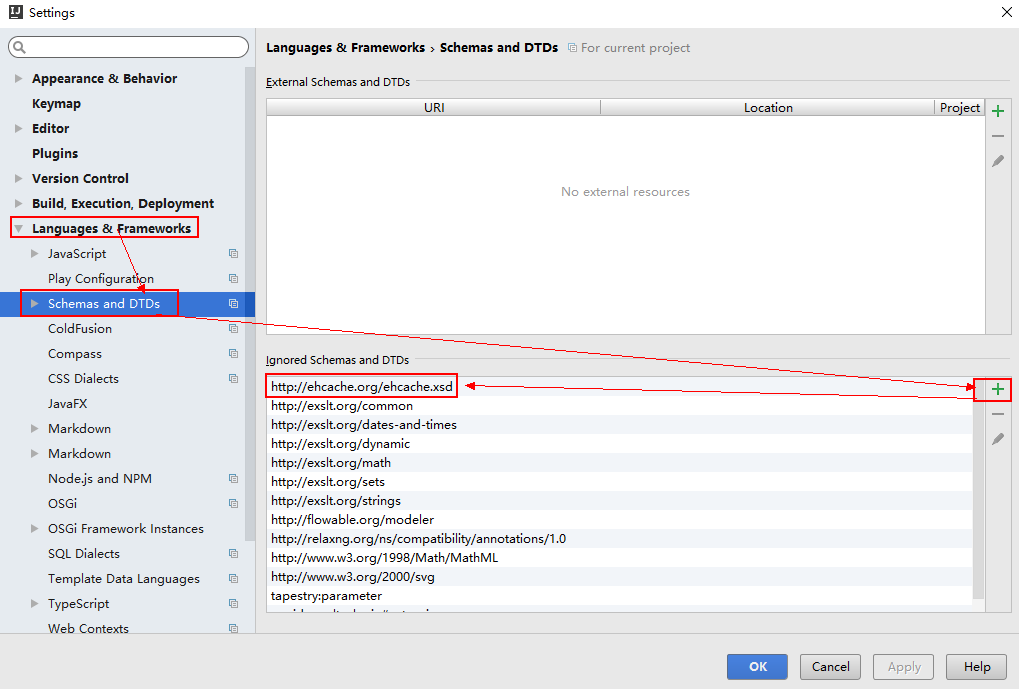
这里会报错
解决方法:
打开settings->languages&frameworks->schemas and dtds ,添加地址 http://ehcache.org/ehcache.xsd
然后将ehcache.xml 这里做修改
关于Ehcahe的一些说明:
- name:缓存名称。
- maxElementsInMemory:缓存最大数目
- maxElementsOnDisk:硬盘最大缓存个数。
- eternal:对象是否永久有效,一但设置了,timeout将不起作用。
- overflowToDisk:是否保存到磁盘。
- timeToIdleSeconds:设置对象在失效前的允许闲置时间(单位:秒)。仅当
eternal=false对象不是永久有效时使用,可选属性,默认值是0,也就是可闲置时间无穷大。 - timeToLiveSeconds:设置对象在失效前允许存活时间(单位:秒)。最大时间介于创建时间和失效时间之间。仅当
eternal=false对象不是永久有效时使用,默认是0,也就是对象存活时间无穷大。 - diskPersistent:是否缓存虚拟机重启期数据,默认值为false。
- diskSpoolBufferSizeMB:这个参数设置DiskStore(磁盘缓存)的缓存区大小。默认是30MB。每个Cache都应该有自己的一个缓冲区。
- diskExpiryThreadIntervalSeconds:磁盘失效线程运行时间间隔,默认是120秒。
- memoryStoreEvictionPolicy:当达到maxElementsInMemory限制时,Ehcache将会根据指定的策略去清理内存。默认策略是LRU(最近最少使用)。你可以设置为FIFO(先进先出)或是LFU(较少使用)。
- clearOnFlush:内存数量最大时是否清除。
- memoryStoreEvictionPolicy:Ehcache的三种清空策略:FIFO,first in first out,这个是大家最熟的,先进先出。LFU, Less Frequently Used,就是上面例子中使用的策略,直白一点就是讲一直以来最少被使用的。如上面所讲,缓存的元素有一个hit属性,hit值最小的将会被清出缓存。LRU,Least Recently Used,最近最少使用的,缓存的元素有一个时间戳,当缓存容量满了,而又需要腾出地方来缓存新的元素的时候,那么现有缓存元素中时间戳离当前时间最远的元素将被清出缓存。
接着在application.yml中指定ehcache配置的路径:
spring:cache:ehcache:config: 'classpath:ehcache.xml'
这样就可以开始使用ehcache了,运行测试类,观察控制台:
2017-11-18 09:10:40.201 DEBUG 3364 --- [main] c.s.m.StudentMapper.queryStudentBySno : ==> Preparing: select * from student where sno=?2017-11-18 09:10:40.343 DEBUG 3364 --- [main] c.s.m.StudentMapper.queryStudentBySno : ==> Parameters: 001(String)2017-11-18 09:10:40.364 DEBUG 3364 --- [main] c.s.m.StudentMapper.queryStudentBySno : <== Total: 1学号001的学生姓名为:KangKang学号001的学生姓名为:KangKang
可看到第二次是从缓存中获取的。
测试更新:
2017-11-18 09:18:04.230 DEBUG 11556 --- [main] c.s.m.StudentMapper.queryStudentBySno : ==> Preparing: select * from student where sno=?2017-11-18 09:18:04.397 DEBUG 11556 --- [main] c.s.m.StudentMapper.queryStudentBySno : ==> Parameters: 001(String)2017-11-18 09:18:04.427 DEBUG 11556 --- [main] c.s.m.StudentMapper.queryStudentBySno : <== Total: 1学号001的学生姓名为:KangKang2017-11-18 09:18:04.433 DEBUG 11556 --- [main] c.s.mapper.StudentMapper.update : ==> Preparing: update student set sname=?,ssex=? where sno=?2017-11-18 09:18:04.438 DEBUG 11556 --- [main] c.s.mapper.StudentMapper.update : ==> Parameters: 康康(String), M (String), 001(String)2017-11-18 09:18:04.440 DEBUG 11556 --- [main] c.s.mapper.StudentMapper.update : <== Updates: 12017-11-18 09:18:04.440 DEBUG 11556 --- [main] c.s.m.StudentMapper.queryStudentBySno : ==> Preparing: select * from student where sno=?2017-11-18 09:18:04.441 DEBUG 11556 --- [main] c.s.m.StudentMapper.queryStudentBySno : ==> Parameters: 001(String)2017-11-18 09:18:04.442 DEBUG 11556 --- [main] c.s.m.StudentMapper.queryStudentBySno : <== Total: 1学号001的学生姓名为:康康
可见,即使更新方法加了@CachePut注解,第二次查询因为Student对象更新了,其实从数据库获取数据的,所以对于Ehcache来说,更新方法加不加@CachePut注解,结果都一样。

若有收获,就点个赞吧
0 人点赞
