本系列代码地址:
Spring Boot是在Spring框架上创建的一个全新的框架,其设计目的是简化Spring应用的搭建和开发过程。开启Spring Boot有许多种方法可供选择,这里仅介绍使用http://start.spring.io/来构建一个简单的Spring Boot项目。
生成项目文件
访问http://start.spring.io/,页面显示如下:
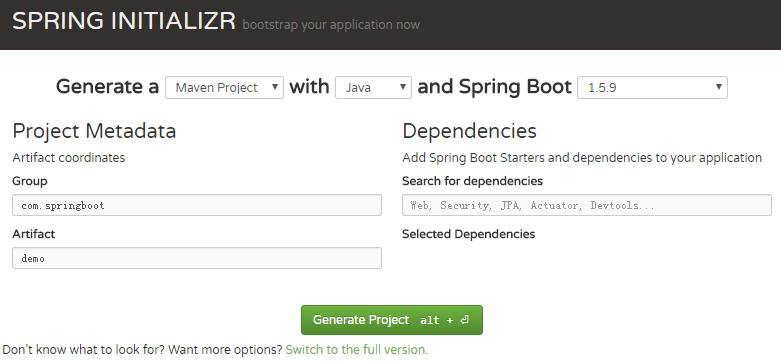
这里选择以Maven构建,语言选择Java,Spring Boot版本为1.5.9。然后点击Switch to the full version,可看到更多的配置以及依赖选择:
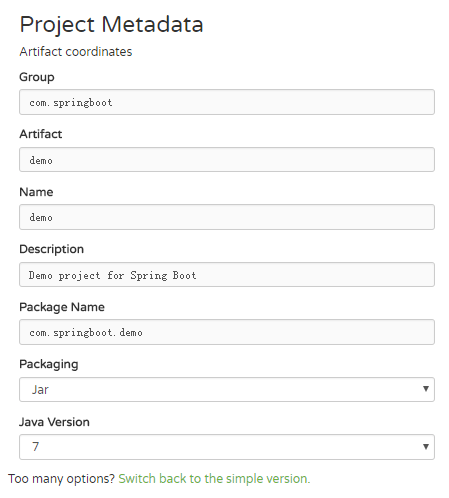
在项目信息里选择以jar包的方式部署,Java版本为7。在页面的下方还可以选择诸多的依赖,这里仅选择web进行演示:

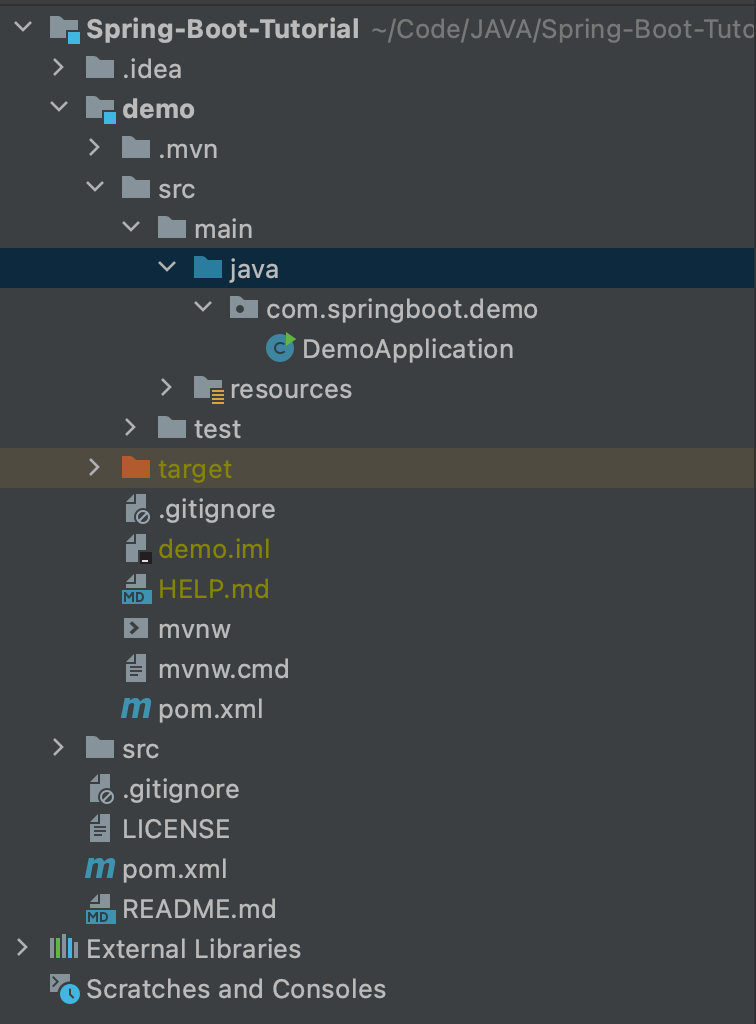
最后点击页面的generate project按钮生成项目文件。文件下载后是一个压缩包,进行解压然后使用eclipse以Maven项目的形式导入。导入后eclipse会自动编译项目并下载相应的依赖,项目目录如下所示:
配置Maven标准settings.xml文件
配置目标
- 默认jdk采用java8
- 配置阿里云镜像和私服镜像, 并且先从阿里云下载, 下载不到的再去私服下载
- 配置mvnrepository
<?xml version="1.0" encoding="UTF-8"?><settings xmlns="http://maven.apache.org/SETTINGS/1.0.0"xmlns:xsi="http://www.w3.org/2001/XMLSchema-instance" xsi:schemaLocation="http://maven.apache.org/SETTINGS/1.0.0 http://maven.apache.org/xsd/settings-1.0.0.xsd"><!-- 本地仓库的位置 --><localRepository>${user.home}/.m2/repository</localRepository><!-- Apache Maven 配置 --><pluginGroups/><proxies/><!-- 私服发布的用户名密码 --><servers><server><id>releases</id><username>deployment</username><password>He2019</password></server><server><id>snapshots</id><username>deployment</username><password>He2019</password></server></servers><!-- 阿里云镜像 --><mirrors><mirror><id>alimaven</id><name>aliyun maven</name><!-- https://maven.aliyun.com/repository/public/ --><url>http://maven.aliyun.com/nexus/content/groups/public/</url><mirrorOf>central</mirrorOf></mirror></mirrors><!-- 配置: java8, 先从阿里云下载, 没有再去私服下载 --><!-- 20190929 hepengju 测试结果: 影响下载顺序的是profiles标签的配置顺序(后面配置的ali仓库先下载), 而不是activeProfiles的顺序 --><profiles><!-- 全局JDK1.8配置 --><profile><id>jdk1.8</id><activation><activeByDefault>true</activeByDefault><jdk>1.8</jdk></activation><properties><project.build.sourceEncoding>UTF-8</project.build.sourceEncoding><maven.compiler.source>1.8</maven.compiler.source><maven.compiler.target>1.8</maven.compiler.target><maven.compiler.compilerVersion>1.8</maven.compiler.compilerVersion></properties></profile><!-- Nexus私服配置: 第三方jar包下载, 比如oracle的jdbc驱动等 --><profile><id>dev</id><repositories><repository><id>nexus</id><url>http://nexus.hepengju.cn:8081/nexus/content/groups/public/</url><releases><enabled>true</enabled></releases><snapshots><enabled>true</enabled></snapshots></repository></repositories><pluginRepositories><pluginRepository><id>public</id><name>Public Repositories</name><url>http://nexus.hepengju.cn:8081/nexus/content/groups/public/</url></pluginRepository></pluginRepositories></profile><!-- 阿里云配置: 提高国内的jar包下载速度 --><profile><id>ali</id><repositories><repository><id>nexus-aliyun</id><name>Nexus aliyun</name><url>http://maven.aliyun.com/nexus/content/repositories/central</url><releases><enabled>true</enabled></releases><snapshots><enabled>true</enabled></snapshots></repository></repositories><pluginRepositories><pluginRepository><id>nexus-aliyun</id><name>Nexus aliyun</name><url>http://maven.aliyun.com/nexus/content/repositories/central</url></pluginRepository></pluginRepositories></profile><!-- mvnrepository 中央仓库 --><profile><id>mvnrepository</id><repositories><repository><id>mvnrepository</id><url>http://repo1.maven.org/maven2/</url><snapshots><enabled>false</enabled></snapshots><releases><enabled>true</enabled></releases></repository></repositories><pluginRepositories><pluginRepository><id>mvnrepository</id><name>mvnrepository maven</name><url>https://repo1.maven.org/maven2/</url></pluginRepository></pluginRepositories></profile></profiles><!-- 激活配置 --><activeProfiles><activeProfile>jdk1.8</activeProfile><activeProfile>dev</activeProfile><activeProfile>ali</activeProfile><activeProfile>mvnrepository</activeProfile></activeProfiles></settings>
可以配置国内阿里镜像:
<mirror><id>nexus-aliyun </id><mirrorOf>central </mirrorOf><name>Nexus aliyun </name><url>http://maven.aliyun.com/nexus/content/repositories/central </url></mirror>
简单演示
项目根目录下生成了一个artifactId+Application命名规则的入口类,为了演示简单,不再新建控制器,直接在入口类中编写代码:
package com.springboot.demo;import org.springframework.boot.SpringApplication;import org.springframework.boot.autoconfigure.SpringBootApplication;import org.springframework.web.bind.annotation.RequestMapping;import org.springframework.web.bind.annotation.RestController;@RestController@SpringBootApplicationpublic class DemoApplication {@RequestMapping("/")String index() {return "hello spring boot";}public static void main(String[] args) {SpringApplication.run(DemoApplication.class, args);}}
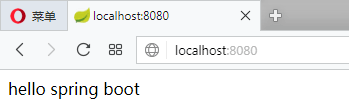
然后右键点击DemoAppliction,选择run as → Java Application:

访问http://localhost:8080,页面显示如下:
打包发布
在eclipse中右击项目,选择run as → Maven build…,如下图所示:
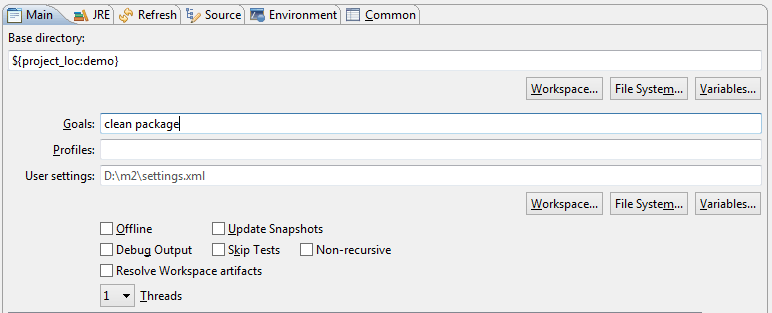
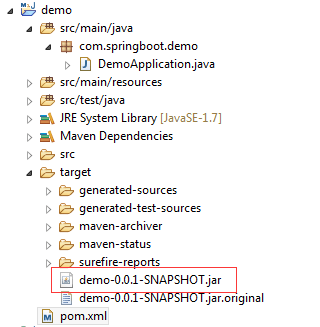
在Goals中输入clean package命令,然后点击下方的run就将项目打包成jar包(初次打包会自动下载一些依赖)。打包完毕后可看到项目目录target文件夹下生成了一个jar文件:
生成jar包后,cd到target目录下,执行以下命令:
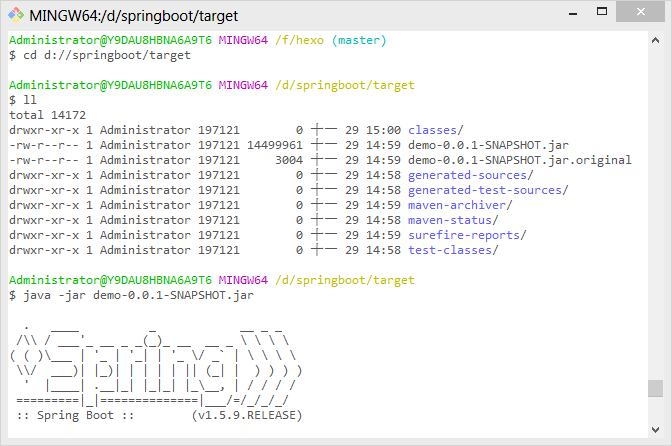
访问http://localhost:8080,效果如上。
聊聊pom.xml
打开pom.xml可看到配置如下:
<?xml version="1.0" encoding="UTF-8"?><project xmlns="http://maven.apache.org/POM/4.0.0" xmlns:xsi="http://www.w3.org/2001/XMLSchema-instance"xsi:schemaLocation="http://maven.apache.org/POM/4.0.0 http://maven.apache.org/xsd/maven-4.0.0.xsd"><modelVersion>4.0.0</modelVersion><groupId>com.springboot</groupId><artifactId>demo</artifactId><version>0.0.1-SNAPSHOT</version><packaging>jar</packaging><name>demo</name><description>Demo project for Spring Boot</description><parent><groupId>org.springframework.boot</groupId><artifactId>spring-boot-starter-parent</artifactId><version>1.5.9.RELEASE</version><relativePath/> <!-- lookup parent from repository --></parent><properties><project.build.sourceEncoding>UTF-8</project.build.sourceEncoding><project.reporting.outputEncoding>UTF-8</project.reporting.outputEncoding><java.version>1.7</java.version></properties><dependencies><dependency><groupId>org.springframework.boot</groupId><artifactId>spring-boot-starter-web</artifactId></dependency><dependency><groupId>org.springframework.boot</groupId><artifactId>spring-boot-starter-test</artifactId><scope>test</scope></dependency></dependencies><build><plugins><plugin><groupId>org.springframework.boot</groupId><artifactId>spring-boot-maven-plugin</artifactId></plugin></plugins></build></project>
maven项目pom.xml中scope类型
scope的分类
- compile:默认值 他表示被依赖项目需要参与当前项目的编译,还有后续的测试,运行周期也参与其中,是一个比较强的依赖。打包的时候通常需要包含进去
- test:依赖项目仅仅参与测试相关的工作,包括测试代码的编译和执行,不会被打包,例如:junit
- runtime:表示被依赖项目无需参与项目的编译,不过后期的测试和运行周期需要其参与。与compile相比,跳过了编译而已。例如JDBC驱动,适用运行和测试阶段
- provided:打包的时候可以不用包进去,别的设施会提供。事实上该依赖理论上可以参与编译,测试,运行等周期。相当于compile,但是打包阶段做了exclude操作
- system:从参与度来说,和provided相同,不过被依赖项不会从maven仓库下载,而是从本地文件系统拿。需要添加systemPath的属性来定义路径
spring-boot-starter-parent
spring-boot-starter-parent指定了当前项目为一个Spring Boot项目,它提供了诸多的默认Maven依赖,具体可查看目录~/.m2/repository/org/springframework/boot/spring-boot-dependencies/1.5.9.RELEASE下的spring-boot-dependencies-1.5.9.RELEASE.pom文件,这里仅截取一小部分:
<properties>...<spring-security.version>4.2.3.RELEASE</spring-security.version><spring-security-jwt.version>1.0.8.RELEASE</spring-security-jwt.version><spring-security-oauth.version>2.0.14.RELEASE</spring-security-oauth.version><spring-session.version>1.3.1.RELEASE</spring-session.version><spring-social.version>1.1.4.RELEASE</spring-social.version><spring-social-facebook.version>2.0.3.RELEASE</spring-social-facebook.version><spring-social-linkedin.version>1.0.2.RELEASE</spring-social-linkedin.version><spring-social-twitter.version>1.1.2.RELEASE</spring-social-twitter.version><spring-ws.version>2.4.2.RELEASE</spring-ws.version><sqlite-jdbc.version>3.15.1</sqlite-jdbc.version><statsd-client.version>3.1.0</statsd-client.version><sun-mail.version>${javax-mail.version}</sun-mail.version><thymeleaf.version>2.1.6.RELEASE</thymeleaf.version><thymeleaf-extras-springsecurity4.version>2.1.3.RELEASE</thymeleaf-extras-springsecurity4.version><thymeleaf-extras-conditionalcomments.version>2.1.2.RELEASE</thymeleaf-extras-conditionalcomments.version><thymeleaf-layout-dialect.version>1.4.0</thymeleaf-layout-dialect.version><thymeleaf-extras-data-attribute.version>1.3</thymeleaf-extras-data-attribute.version><thymeleaf-extras-java8time.version>2.1.0.RELEASE</thymeleaf-extras-java8time.version><tomcat.version>8.5.23</tomcat.version>...</properties>
需要说明的是,并非所有在<properties>标签中配置了版本号的依赖都有被启用,其启用与否取决于您是否配置了相应的starter。比如tomcat这个依赖就是spring-boot-starter-web的传递性依赖(下面将会描述到)。
当然,我们可以手动改变这些依赖的版本。比如我想把thymeleaf的版本改为3.0.0.RELEASE,我们可以在pom.xml中进行如下配置:
<properties><thymeleaf.version>3.0.0.RELEASE</thymeleaf.version></properties>
spring-boot-starter-web
Spring Boot提供了许多开箱即用的依赖模块,这些模块都是以spring-boot-starter-XX命名的。比如要开启Spring Boot的web功能,只需要在pom.xml中配置spring-boot-starter-web即可:
<dependency><groupId>org.springframework.boot</groupId><artifactId>spring-boot-starter-web</artifactId></dependency>
因为其依赖于spring-boot-starter-parent,所以这里可以不用配置version。保存后Maven会自动帮我们下载spring-boot-starter-web模块所包含的jar文件。
如果需要修改服务根目录、监听端口等信息。可以在application.yml中对项目进行简单的配置:
server:port: 8080servlet: #spring 2.x修改application-display-name: ProjectTemplate-Webcontext-path: /web
如果需要具体查看spring-boot-starter-web包含了哪些依赖,我们可以右键项目选择run as → Maven Build…,在Goals中输入命令dependency:tree,然后点击run即可在eclipse控制台查看到如下信息:
[INFO] +- org.springframework.boot:spring-boot-starter-web:jar:1.5.9.RELEASE:compile[INFO] | +- org.springframework.boot:spring-boot-starter:jar:1.5.9.RELEASE:compile[INFO] | | +- org.springframework.boot:spring-boot:jar:1.5.9.RELEASE:compile[INFO] | | +- org.springframework.boot:spring-boot-autoconfigure:jar:1.5.9.RELEASE:compile[INFO] | | +- org.springframework.boot:spring-boot-starter-logging:jar:1.5.9.RELEASE:compile[INFO] | | | +- ch.qos.logback:logback-classic:jar:1.1.11:compile[INFO] | | | | \- ch.qos.logback:logback-core:jar:1.1.11:compile[INFO] | | | +- org.slf4j:jcl-over-slf4j:jar:1.7.25:compile[INFO] | | | +- org.slf4j:jul-to-slf4j:jar:1.7.25:compile[INFO] | | | \- org.slf4j:log4j-over-slf4j:jar:1.7.25:compile[INFO] | | \- org.yaml:snakeyaml:jar:1.17:runtime[INFO] | +- org.springframework.boot:spring-boot-starter-tomcat:jar:1.5.9.RELEASE:compile[INFO] | | +- org.apache.tomcat.embed:tomcat-embed-core:jar:8.5.23:compile[INFO] | | | \- org.apache.tomcat:tomcat-annotations-api:jar:8.5.23:compile[INFO] | | +- org.apache.tomcat.embed:tomcat-embed-el:jar:8.5.23:compile[INFO] | | \- org.apache.tomcat.embed:tomcat-embed-websocket:jar:8.5.23:compile[INFO] | +- org.hibernate:hibernate-validator:jar:5.3.6.Final:compile[INFO] | | +- javax.validation:validation-api:jar:1.1.0.Final:compile[INFO] | | +- org.jboss.logging:jboss-logging:jar:3.3.1.Final:compile[INFO] | | \- com.fasterxml:classmate:jar:1.3.4:compile[INFO] | +- com.fasterxml.jackson.core:jackson-databind:jar:2.8.10:compile[INFO] | | +- com.fasterxml.jackson.core:jackson-annotations:jar:2.8.0:compile[INFO] | | \- com.fasterxml.jackson.core:jackson-core:jar:2.8.10:compile[INFO] | +- org.springframework:spring-web:jar:4.3.13.RELEASE:compile[INFO] | | +- org.springframework:spring-aop:jar:4.3.13.RELEASE:compile[INFO] | | +- org.springframework:spring-beans:jar:4.3.13.RELEASE:compile[INFO] | | \- org.springframework:spring-context:jar:4.3.13.RELEASE:compile[INFO] | \- org.springframework:spring-webmvc:jar:4.3.13.RELEASE:compile[INFO] | \- org.springframework:spring-expression:jar:4.3.13.RELEASE:compile
上述这些依赖都是隐式依赖于spring-boot-starter-web,我们也可以手动排除一些我们不需要的依赖。
比如spring-boot-starter-web默认集成了tomcat,假如我们想把它换为jetty,可以在pom.xml中spring-boot-starter-web下排除tomcat依赖,然后手动引入jetty依赖:
<dependencies><dependency><groupId>org.springframework.boot</groupId><artifactId>spring-boot-starter-web</artifactId><exclusions><exclusion><groupId>org.springframework.boot</groupId><artifactId>spring-boot-starter-tomcat</artifactId></exclusion></exclusions></dependency><dependency><groupId>org.springframework.boot</groupId><artifactId>spring-boot-starter-jetty</artifactId></dependency></dependencies>
tips:依赖的坐标可以到上述的spring-boot-dependencies-1.5.9.RELEASE.pom文件里查找。再次运行dependency:tree:
[INFO] +- org.springframework.boot:spring-boot-starter-web:jar:1.5.9.RELEASE:compile...[INFO] +- org.springframework.boot:spring-boot-starter-jetty:jar:1.5.9.RELEASE:compile[INFO] | +- org.eclipse.jetty:jetty-servlets:jar:9.4.7.v20170914:compile[INFO] | | +- org.eclipse.jetty:jetty-continuation:jar:9.4.7.v20170914:compile[INFO] | | +- org.eclipse.jetty:jetty-http:jar:9.4.7.v20170914:compile[INFO] | | +- org.eclipse.jetty:jetty-util:jar:9.4.7.v20170914:compile[INFO] | | \- org.eclipse.jetty:jetty-io:jar:9.4.7.v20170914:compile[INFO] | +- org.eclipse.jetty:jetty-webapp:jar:9.4.7.v20170914:compile[INFO] | | +- org.eclipse.jetty:jetty-xml:jar:9.4.7.v20170914:compile[INFO] | | \- org.eclipse.jetty:jetty-servlet:jar:9.4.7.v20170914:compile[INFO] | | \- org.eclipse.jetty:jetty-security:jar:9.4.7.v20170914:compile[INFO] | | \- org.eclipse.jetty:jetty-server:jar:9.4.7.v20170914:compile[INFO] | +- org.eclipse.jetty.websocket:websocket-server:jar:9.4.7.v20170914:compile[INFO] | | +- org.eclipse.jetty.websocket:websocket-common:jar:9.4.7.v20170914:compile[INFO] | | | \- org.eclipse.jetty.websocket:websocket-api:jar:9.4.7.v20170914:compile[INFO] | | +- org.eclipse.jetty.websocket:websocket-client:jar:9.4.7.v20170914:compile[INFO] | | | \- org.eclipse.jetty:jetty-client:jar:9.4.7.v20170914:compile[INFO] | | \- org.eclipse.jetty.websocket:websocket-servlet:jar:9.4.7.v20170914:compile[INFO] | | \- javax.servlet:javax.servlet-api:jar:3.1.0:compile[INFO] | +- org.eclipse.jetty.websocket:javax-websocket-server-impl:jar:9.4.7.v20170914:compile[INFO] | | +- org.eclipse.jetty:jetty-annotations:jar:9.4.7.v20170914:compile[INFO] | | | +- org.eclipse.jetty:jetty-plus:jar:9.4.7.v20170914:compile[INFO] | | | +- javax.annotation:javax.annotation-api:jar:1.2:compile[INFO] | | | +- org.ow2.asm:asm:jar:5.1:compile[INFO] | | | \- org.ow2.asm:asm-commons:jar:5.1:compile[INFO] | | | \- org.ow2.asm:asm-tree:jar:5.1:compile[INFO] | | +- org.eclipse.jetty.websocket:javax-websocket-client-impl:jar:9.4.7.v20170914:compile[INFO] | | \- javax.websocket:javax.websocket-api:jar:1.0:compile[INFO] | \- org.mortbay.jasper:apache-el:jar:8.0.33:compile
可看到tomcat已被替换为了jetty。
注意:spring-boot 2.5.4 以上版本默认网络服务器由tomcat变成了netty,这个时候配置根目录可以使用:
spring:application:name: monitor-serverwebflux:base-path: /web
spring-boot-maven-plugin
spring-boot-maven-plugin为Spring Boot Maven插件,提供了:
- 把项目打包成一个可执行的超级JAR(uber-JAR),包括把应用程序的所有依赖打入JAR文件内,并为JAR添加一个描述文件,其中的内容能让你用
java -jar来运行应用程序。 - 搜索
public static void main()方法来标记为可运行类。
官方文档
全部文档:Spring Boot Reference Documentation
maven仓库:https://mvnrepository.com/
应用部署参考其中的 “How-to” Guides

若有收获,就点个赞吧
0 人点赞
