Spring Batch提供了多种监听器Listener,用于在任务处理过程中触发我们的逻辑代码。常用的监听器根据粒度从粗到细分别有:Job级别的监听器JobExecutionListener、Step级别的监听器StepExecutionListener、Chunk监听器ChunkListener、ItemReader监听器ItemReadListener、ItemWriter监听器ItemWriteListener和ItemProcessor监听器ItemProcessListener等。具体可以参考下表:
| 监听器 | 具体说明 |
|---|---|
| JobExecutionListener | 在Job开始之前(beforeJob)和之后(aflerJob)触发 |
| StepExecutionListener | 在Step开始之前(beforeStep)和之后(afterStep)触发 |
| ChunkListener | 在 Chunk 开始之前(beforeChunk),之后(afterChunk)和错误后(afterChunkError)触发 |
| ItemReadListener | 在 Read 开始之前(beforeRead>,之后(afterRead)和错误后(onReadError)触发 |
| ItemProcessListener | 在 Processor 开始之前(beforeProcess),之后(afterProcess)和错误后(onProcessError)触发 |
| ItemWriterListener | 在 Writer 开始之前(beforeWrite),之后(afterWrite)和错误后(onWriteError)触发 |
框架搭建
新建一个Spring Boot项目,版本为2.2.4.RELEASE,artifactId为spring-batch-listener,项目结构如下图所示:

剩下的数据库层的准备,项目配置,依赖引入和Spring Batch入门文章中的框架搭建步骤一致,这里就不再赘述。
监听器演示
每种监听器都可以通过两种方式使用:
- 接口实现;
- 注解驱动。
先来看看通过实现接口的方式使用监听器。在cc.mrbird.batch包下新建listener包,然后在该包下新建MyJobExecutionListener,实现JobExecutionListener接口:
@Componentpublic class MyJobExecutionListener implements JobExecutionListener {@Overridepublic void beforeJob(JobExecution jobExecution) {System.out.println("before job execute: " + jobExecution.getJobInstance().getJobName());}@Overridepublic void afterJob(JobExecution jobExecution) {System.out.println("after job execute: " + jobExecution.getJobInstance().getJobName());}}
上面实现的两个方法很直观了,触发时机分别为任务执行前和任务执行后。
接着看看如何使用注解驱动使用监听器。在listener包下新建MyStepExecutionListener:
@Componentpublic class MyStepExecutionListener {@BeforeSteppublic void breforeStep(StepExecution stepExecution) {System.out.println("before step execute: " + stepExecution.getStepName());}@AfterSteppublic void afterStep(StepExecution stepExecution) {System.out.println("after step execute: " + stepExecution.getStepName());}}
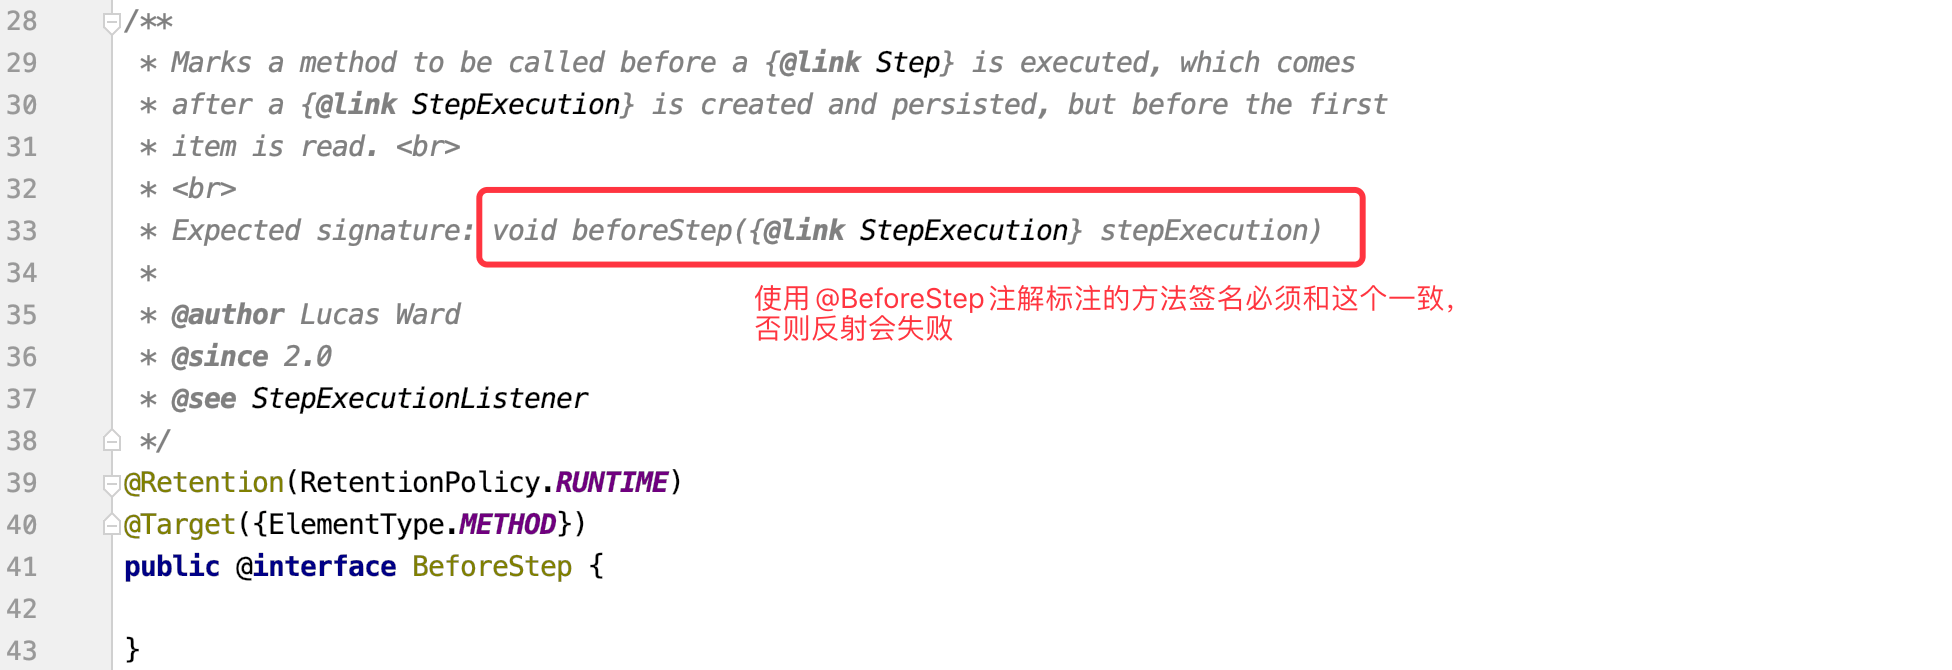
通过注解的方式不需要实现接口,而是在对应的方法上通过诸如@BeforeStep、@AfterStep等注解标注即可,不过方法的签名必须符合注解的要求,否则会反射失败。比如,查看@BeforeStep的源码:

监听器的创建大致就这两种姿势了,下面的例子不在详细说明,直接贴代码。
在listener包下继续创建MyChunkListener、MyItemReaderListener、MyItemProcessListener和MyItemWriterListener。
MyChunkListener:
@Componentpublic class MyChunkListener implements ChunkListener {@Overridepublic void beforeChunk(ChunkContext context) {System.out.println("before chunk: " + context.getStepContext().getStepName());}@Overridepublic void afterChunk(ChunkContext context) {System.out.println("after chunk: " + context.getStepContext().getStepName());}@Overridepublic void afterChunkError(ChunkContext context) {System.out.println("before chunk error: " + context.getStepContext().getStepName());}}
MyItemReaderListener:
@Componentpublic class MyItemReaderListener implements ItemReadListener<String> {@Overridepublic void beforeRead() {System.out.println("before read");}@Overridepublic void afterRead(String item) {System.out.println("after read: " + item);}@Overridepublic void onReadError(Exception ex) {System.out.println("on read error: " + ex.getMessage());}}
MyItemProcessListener:
@Componentpublic class MyItemProcessListener implements ItemProcessListener<String, String> {@Overridepublic void beforeProcess(String item) {System.out.println("before process: " + item);}@Overridepublic void afterProcess(String item, String result) {System.out.println("after process: " + item + " result: " + result);}@Overridepublic void onProcessError(String item, Exception e) {System.out.println("on process error: " + item + " , error message: " + e.getMessage());}}
MyItemWriterListener:
@Componentpublic class MyItemWriterListener implements ItemWriteListener<String> {@Overridepublic void beforeWrite(List<? extends String> items) {System.out.println("before write: " + items);}@Overridepublic void afterWrite(List<? extends String> items) {System.out.println("after write: " + items);}@Overridepublic void onWriteError(Exception exception, List<? extends String> items) {System.out.println("on write error: " + items + " , error message: " + exception.getMessage());}}
准备好这些监听器后,我们在cc.mrbird.batch包下新建job包,然后在该包下新建ListenerTestJobDemo:
@Componentpublic class ListenerTestJobDemo {@Autowiredprivate JobBuilderFactory jobBuilderFactory;@Autowiredprivate StepBuilderFactory stepBuilderFactory;@Autowiredprivate MyJobExecutionListener myJobExecutionListener;@Autowiredprivate MyStepExecutionListener myStepExecutionListener;@Autowiredprivate MyChunkListener myChunkListener;@Autowiredprivate MyItemReaderListener myItemReaderListener;@Autowiredprivate MyItemProcessListener myItemProcessListener;@Autowiredprivate MyItemWriterListener myItemWriterListener;@Beanpublic Job listenerTestJob() {return jobBuilderFactory.get("listenerTestJob").start(step()).listener(myJobExecutionListener).build();}private Step step() {return stepBuilderFactory.get("step").listener(myStepExecutionListener).<String, String>chunk(2).faultTolerant().listener(myChunkListener).reader(reader()).listener(myItemReaderListener).processor(processor()).listener(myItemProcessListener).writer(list -> list.forEach(System.out::println)).listener(myItemWriterListener).build();}private ItemReader<String> reader() {List<String> data = Arrays.asList("java", "c++", "javascript", "python");return new simpleReader(data);}private ItemProcessor<String, String> processor() {return item -> item + " language";}}class simpleReader implements ItemReader<String> {private Iterator<String> iterator;public simpleReader(List<String> data) {this.iterator = data.iterator();}@Overridepublic String read() {return iterator.hasNext() ? iterator.next() : null;}}
上面代码我们在相应的位置配置了监听器(配置chunk监听器的时候,必须配置faultTolerant())。
启动项目,控制台日志打印如下:
2020-03-09 17:08:34.439 INFO 20165 --- [ main] o.s.b.c.l.support.SimpleJobLauncher : Job: [SimpleJob: [name=listenerTestJob]] launched with the following parameters: [{}]before job execute: listenerTestJob32020-03-09 17:08:34.495 INFO 20165 --- [ main] o.s.batch.core.job.SimpleStepHandler : Executing step: [step]before step execute: stepbefore chunk: stepbefore readafter read: javabefore readafter read: c++before process: javaafter process: java result: java languagebefore process: c++after process: c++ result: c++ languagebefore write: [java language, c++ language]java languagec++ languageafter write: [java language, c++ language]after chunk: stepbefore chunk: stepbefore readafter read: javascriptbefore readafter read: pythonbefore process: javascriptafter process: javascript result: javascript languagebefore process: pythonafter process: python result: python languagebefore write: [javascript language, python language]javascript languagepython languageafter write: [javascript language, python language]after chunk: stepbefore chunk: stepbefore readafter chunk: stepafter step execute: step2020-03-09 17:08:34.546 INFO 20165 --- [ main] o.s.batch.core.step.AbstractStep : Step: [step] executed in 51msafter job execute: listenerTestJob32020-03-09 17:08:34.566 INFO 20165 --- [ main] o.s.b.c.l.support.SimpleJobLauncher : Job: [SimpleJob: [name=listenerTestJob]] completed with the following parameters: [{}] and the following status: [COMPLETED] in 105ms
从上面的运行结果我们可以看出:
- 证实了
chunk(2)表示每一批处理2个数据块; - Step里的执行顺序是read -> process -> writer。
聚合监听器
每种监听器可以通过对应的聚合类组合在一起,比如有多个JobExecutionListener,则可以使用CompositeJobExecutionListener聚合它们。上面介绍的这几种监听器都有与之对应的CompositeXXXListener聚合类,这里只演示CompositeJobExecutionListener,剩下的以此类推。
在job包下新建CompositeJobExecutionListenerJobDemo:
@Componentpublic class CompositeJobExecutionListenerJobDemo {@Autowiredprivate JobBuilderFactory jobBuilderFactory;@Autowiredprivate StepBuilderFactory stepBuilderFactory;@Beanpublic Job compositeJobExecutionListenerJob() {return jobBuilderFactory.get("compositeJobExecutionListenerJob").start(step()).listener(compositeJobExecutionListener()).build();}private Step step() {return stepBuilderFactory.get("step").tasklet((contribution, chunkContext) -> {System.out.println("执行步骤....");return RepeatStatus.FINISHED;}).build();}private CompositeJobExecutionListener compositeJobExecutionListener() {CompositeJobExecutionListener listener = new CompositeJobExecutionListener();// 任务监听器1JobExecutionListener jobExecutionListenerOne = new JobExecutionListener() {@Overridepublic void beforeJob(JobExecution jobExecution) {System.out.println("任务监听器One,before job execute: " + jobExecution.getJobInstance().getJobName());}@Overridepublic void afterJob(JobExecution jobExecution) {System.out.println("任务监听器One,after job execute: " + jobExecution.getJobInstance().getJobName());}};// 任务监听器2JobExecutionListener jobExecutionListenerTwo = new JobExecutionListener() {@Overridepublic void beforeJob(JobExecution jobExecution) {System.out.println("任务监听器Two,before job execute: " + jobExecution.getJobInstance().getJobName());}@Overridepublic void afterJob(JobExecution jobExecution) {System.out.println("任务监听器Two,after job execute: " + jobExecution.getJobInstance().getJobName());}};// 聚合listener.setListeners(Arrays.asList(jobExecutionListenerOne, jobExecutionListenerTwo));return listener;}}
启动项目,控制台日志打印如下:
2020-03-09 17:26:47.533 INFO 20310 --- [ main] o.s.b.c.l.support.SimpleJobLauncher : Job: [SimpleJob: [name=compositeJobExecutionListenerJob]] launched with the following parameters: [{}]任务监听器One,before job execute: compositeJobExecutionListenerJob任务监听器Two,before job execute: compositeJobExecutionListenerJob2020-03-09 17:26:47.603 INFO 20310 --- [ main] o.s.batch.core.job.SimpleStepHandler : Executing step: [step]执行步骤....2020-03-09 17:26:47.660 INFO 20310 --- [ main] o.s.batch.core.step.AbstractStep : Step: [step] executed in 57ms任务监听器Two,after job execute: compositeJobExecutionListenerJob任务监听器One,after job execute: compositeJobExecutionListenerJob2020-03-09 17:26:47.693 INFO 20310 --- [ main] o.s.b.c.l.support.SimpleJobLauncher : Job: [SimpleJob: [name=compositeJobExecutionListenerJob]] completed with the following parameters: [{}] and the following status: [COMPLETED] in 129ms
除了本文介绍的这几个监听器外,还有一些和异常处理相关的监听器,会在后续的文章中提到。

