转自:Shiro系列七:Realm
Realm:域,Shiro从从Realm获取安全数据(如用户、角色、权限),就是说SecurityManager要验证用户身份,那么它需要从Realm获取相应的用户进行比较以确定用户身份是否合法;也需要从Realm得到用户相应的角色和权限进行验证用户是否能进行操作;可以把Realm看成DataSource,即安全数据源。如我们之前的ini配置方式将使用org.apache.shiro.realm.text.IniRealm。
org.apache.shiro.realm.Realm接口如下:
String getName(); //返回一个唯一的Realm名字boolean supports(AuthenticationToken token); //判断此Realm是否支持此TokenAuthenticationInfo getAuthenticationInfo(AuthenticationToken token) throws AuthenticationException; //根据Token获取认证信息
自定义 Realm

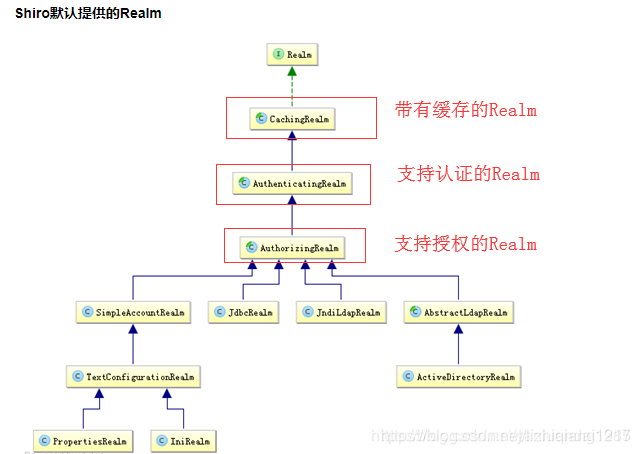
自定义 Realm 只需要继承AuthorizingRealm,就能够继承到认证与授权功能。AuthorizingRealm继承了 AuthenticatingRealm(即身份验证),而且也间接继承了 CachingRealm(带有缓存实现)。 其中主要默认实现如下:
1、org.apache.shiro.realm.text.IniRealm:[users]部分指定用户名/密码及其角色;[roles]部分指定角色即权限信息;
2、org.apache.shiro.realm.text.PropertiesRealm: user.username=password,role1,role2指定用户名/密码及其角色;role.role1=permission1,permission2指定角色及权限信息;
3、org.apache.shiro.realm.jdbc.JdbcRealm:通过sql查询相应的信息,如“select password from users where username = ?”获取用户密码,“select password, password_salt from users where username = ?”获取用户密码及盐;“select role_name from user_roles where username = ?”获取用户角色;“select permission from roles_permissions where role_name = ?”获取角色对应的权限信息;也可以调用相应的api进行自定义sql;
public class DefaultRealm extends AuthorizingRealm {//授权方法protected AuthorizationInfo doGetAuthorizationInfo(PrincipalCollection principalCollection) {return null;}//认证方法protected AuthenticationInfo doGetAuthenticationInfo(AuthenticationToken token)throws AuthenticationException {return null;}}
多 Realm 的配置
1、再创建一个 AuthenticatingRealm 的子类 SecondRealm。
public class SecondRealm extends AuthenticatingRealm {@Overrideprotected AuthenticationInfo doGetAuthenticationInfo(AuthenticationToken token) throws AuthenticationException {System.out.println("[SecondReaml] doGetAuthenticationInfo");//1. 把 AuthenticationToken 转换为 UsernamePasswordTokenUsernamePasswordToken upToken = (UsernamePasswordToken) token;//2. 从 UsernamePasswordToken 中来获取 usernameString username = upToken.getUsername();//3. 调用数据库的方法, 从数据库中查询 username 对应的用户记录System.out.println("从数据库中获取 username: " + username + " 所对应的用户信息.");//4. 若用户不存在, 则可以抛出 UnknownAccountException 异常if("unknown".equals(username)){throw new UnknownAccountException("用户不存在!");}//5. 根据用户信息的情况, 决定是否需要抛出其他的 AuthenticationException 异常.if("monster".equals(username)){throw new LockedAccountException("用户被锁定");}//6. 根据用户的情况, 来构建 AuthenticationInfo 对象并返回. 通常使用的实现类为: SimpleAuthenticationInfo//以下信息是从数据库中获取的.// 1). principal: 认证的实体信息. 可以是 username, 也可以是数据表对应的用户的实体类对象.Object principal = username;// 2). credentials: 密码.Object credentials = null;if("admin".equals(username)){credentials = "ce2f6417c7e1d32c1d81a797ee0b499f87c5de06";}else if("user".equals(username)){credentials = "073d4c3ae812935f23cb3f2a71943f49e082a718";}// 3). realmName: 当前 realm 对象的 name. 调用父类的 getName() 方法即可String realmName = getName();// 4). 盐值.ByteSource credentialsSalt = ByteSource.Util.bytes(username);SimpleAuthenticationInfo info = new SimpleAuthenticationInfo("secondRealmName", credentials, credentialsSalt, realmName);return info;}public static void main(String[] args) {String hashAlgorithmName = "SHA1";Object credentials = "123456";Object salt = ByteSource.Util.bytes("admin");;int hashIterations = 1024;Object result = new SimpleHash(hashAlgorithmName, credentials, salt, hashIterations);System.out.println(result);}}
2、在Spring配置文件中配置 ShiroRealm 和 SecondRealm 两个 Realm。
<!--将认证器 Authenticator 配置到 SecurityManager 中--><bean id="securityManager" class="org.apache.shiro.web.mgt.DefaultWebSecurityManager"><property name="cacheManager" ref="cacheManager"/><property name="authenticator" ref="authenticator"></property></bean><!-- 配置认证器 Authenticator --><bean id="authenticator" class="org.apache.shiro.authc.pam.ModularRealmAuthenticator"><property name="realms"><list><ref bean="jdbcRealm"/><ref bean="secondRealm"/></list></property></bean><!--配置 Realm,直接配置实现了 org.apache.shiro.realm.Realm 接口的 bean--><bean id="jdbcRealm" class="com.atguigu.shiro.realms.ShiroRealm"><property name="credentialsMatcher"><bean class="org.apache.shiro.authc.credential.HashedCredentialsMatcher"><property name="hashAlgorithmName" value="MD5"></property><property name="hashIterations" value="1024"></property></bean></property></bean><bean id="secondRealm" class="com.atguigu.shiro.realms.SecondRealm"><property name="credentialsMatcher"><bean class="org.apache.shiro.authc.credential.HashedCredentialsMatcher"><property name="hashAlgorithmName" value="SHA1"></property><property name="hashIterations" value="1024"></property></bean></property></bean>
补充:
在之前我们在配置SecurityManager时,把Realm作为一个属性直接配置在SecurityManager中。
<bean id="securityManager" class="org.apache.shiro.web.mgt.DefaultWebSecurityManager"><property name="cacheManager" ref="cacheManager"/><property name="realm" ref="jdbcRealm"/></bean>
那么在多Realm我们也可以直接将Realm配置到SecurityManager中,而不需要在Authenticator中配置。这样配置的原因是shiro在授权时需要使用 SecurityManager 的 realms 属性。
<bean id="securityManager" class="org.apache.shiro.web.mgt.DefaultWebSecurityManager"><property name="cacheManager" ref="cacheManager"/><property name="authenticator" ref="authenticator"></property><property name="realms"><list><ref bean="jdbcRealm"/><ref bean="secondRealm"/></list></property></bean><bean id="authenticator" class="org.apache.shiro.authc.pam.ModularRealmAuthenticator"></bean>
思考:既然没有在Authenticator中配置Realm,那么Authenticator是怎么将认证委托给Realm的?

查看源码得知:在shiro初始化时,Realm被设置到了Authenticator中。
认证策略
SecurityManager 接口继承了 Authenticator,另外还有一个 ModularRealmAuthenticator实现,其委托给多个Realm 进行验证,验证规则通过 AuthenticationStrategy 接口指定。
1、AuthenticationStrategy 接口的默认实现:
FirstSuccessfulStrategy:只要有一个 Realm 验证成功即可,只返回第 一个 Realm 身份验证成功的认证信息,其他的忽略;
AtLeastOneSuccessfulStrategy:只要有一个Realm验证成功即可,和 FirstSuccessfulStrategy 不同,将返回所有Realm身份验证成功的认证信 息;
AllSuccessfulStrategy:所有Realm验证成功才算成功,且返回所有 Realm身份验证成功的认证信息,如果有一个失败就失败了。
ModularRealmAuthenticator 默认是 AtLeastOneSuccessfulStrategy 策略。
2、在Spring配置文件中修改认证策略
<bean id="authenticator" class="org.apache.shiro.authc.pam.ModularRealmAuthenticator"><property name="authenticationStrategy"><bean class="org.apache.shiro.authc.pam.AllSuccessfulStrategy"></bean></property></bean>

