理解 stream 在 Node.js 平台中的重要作用
缓冲模式与流模式
- buffer mode(缓冲模式):系统会把某份资源传来的所有数据,都先收集到一个缓冲区里,直到操作完成后,系统会把这些数据当作一个整块,传回给调用方
- 流模式:系统只要从资源方收到数据,就立即发给消费者,让它能够尽快处理这些数据
流模式的优点:
- 空间上占据的内存较少
- 时间上占用 CPU 时钟周期较少
- 便于组合
流模式在空间占用方面的优势
V8 引擎对缓冲区的尺寸是有限制的用缓冲模式的 API 把文件压缩成 GZIP 格式
```typescript import { promises as fs } from ‘fs’ import { gzip } from ‘zlib’ import { promisify } from ‘util’ const gzipPromise = promisify(gzip)
const filename = process.argv[2]
async function main () {
const data = await fs.readFile(filename)
const gzippedData = await gzipPromise(data)
await fs.writeFile(${filename}.gz, gzippedData)
console.log(‘File successfully compressed’)
}
main()
<a name="r9Dqa"></a>### 用流模式的 API 把文件压缩成 GZIP 模式```typescriptimport { createReadStream, createWriteStream } from 'fs'import { createGzip } from 'zlib'const filename = process.argv[2]createReadStream(filename).pipe(createGzip()).pipe(createWriteStream(`${filename}.gz`)).on('finish', () => console.log('File successfully compressed'))
流模式在处理时间方面的优势
下面是一个利用流模式把文件压缩上传到远程的程序。
服务器端:
import { createServer } from 'http'import { createWriteStream } from 'fs'import { createGunzip } from 'zlib'import { basename, join } from 'path'const server = createServer((req, res) => {const filename = basename(req.headers['x-filename'])const destFilename = join('received_files', filename)console.log(`File request received: ${filename}`)req.pipe(createGunzip()).pipe(createWriteStream(destFilename)).on('finish', () => {res.writeHead(201, { 'Content-Type': 'text/plain' })res.end('OK\n')console.log(`File saved: ${destFilename}`)})})server.listen(3000, () => console.log('Listening on http://localhost:3000'))
req 是个 stream 对象,每收到一小块数据,都可以立即压缩这块数据并将其写入磁盘。
服务器端的代码,会用 basename 来处理收到的这份文件名,以便将文件名里面的路径部分全部删去。从安全的角度看,这样做可以保证相关文件总能保存到我们自己的 received_files 目录下,而不会保存到别的什么地方。假如不用 basename 处理文件名,恶意用户就有可能专门构造一项请求,把服务器端的系统文件覆盖掉,从而给服务器注入恶意代码。比如,如果有人故意让 filename 所表示的文件名变成 /usr/bin/node,这种情况下,攻击者实际上可以让服务器的 node.js 解释器替换成任意文件。
客户端:
import { request } from 'http'import { createGzip } from 'zlib'import { createReadStream } from 'fs'import { basename } from 'path'const filename = process.argv[2]const serverHost = process.argv[3]const httpRequestOptions = {hostname: serverHost,port: 3000,path: '/',method: 'PUT',headers: {'Content-Type': 'application/octet-stream','Content-Encoding': 'gzip','X-Filename': basename(filename)}}const req = request(httpRequestOptions, (res) => {console.log(`Server response: ${res.statusCode}`)})createReadStream(filename).pipe(createGzip()).pipe(req).on('finish', () => {console.log('File successfully sent')})
处理一份文件经历的环节:
- 客户端从文件系统中读取数据
- 客户端压缩数据
- 客户端把数据发给服务器
- 服务器端从客户端接收数据
- 服务器端解压缩数据
- 服务器端把数据写入磁盘
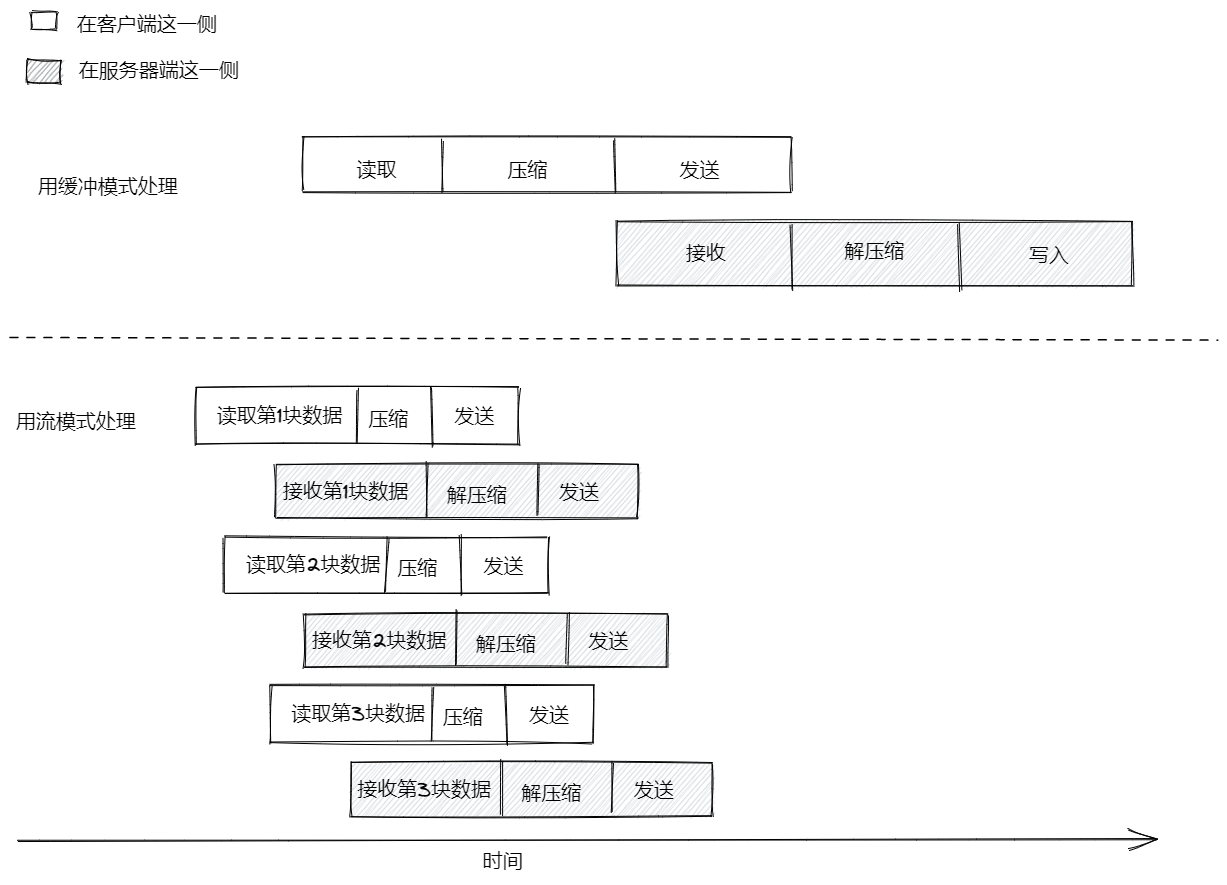
- 缓冲模式中,整个流程完全按先后顺序执行,下一个步骤的执行必须等待上一个步骤执行结束
- 流模式下的生产线,只要收到第一块数据,就立刻开始运作。同时,只要下一块数据能够使用,它就立刻开启一条平行的生产线,并把那块数据放到那条生产线上处理,而不用等待前面的数据块处理完毕。因为对每块数据所做的处理都是异步任务,所以这些任务在 Node.js 平台里,完全能够平行地运行。
stream 之间的组合
组合方式可以将多个处理环节连接起来,使得每个环节只需要负责把一项功能实现好就行。 但是管道中的后一个 stream 对象,必须支持前一个 stream 对象所产生的那种数据。
stream 知识点
流对象的体系结构
流对象的四种基本抽象类:
- Readable
- Writable
- Duplex
- Transform
每个 stream 类的对象,本身都是一个 EventEmitter 实例。所以,流对象实际上可以触发多种事件(end、finish、error 等)
流对象的操作模式:
- 二进制模式(Binary mode):以 chunk(块)的形式串流数据,这种模式可以用来处理缓冲或字符串
- 对象模式(Object mode):以对象序列的形式串流数据(这意味着基本能够处理任何一种 JavaScript 值)
Readable 流(可读流)
Readable 流表示的是数据源。在 Node.js 平台中,这样的流用 Readable 这个抽象类来实现,该类位于 stream 模块中。通过流对象读取数据
non-flowing (非流动模式,也叫 paused — 暂停模式)
从 Readable 流中读取数据的默认模式。
该模式下,可以给流对象注册监听器,以监听 readable 事件,一旦发生这样的事件,说明有数据可以读取。此时,可以通过一个循环结构,反复读取数据,直到把内部缓冲区里的数据读完为止。这种读取操作,是通过 read() 方法(同步操作)实现的,该方法会从内部缓冲区里面同步地读取数据,并返回一个 Buffer 对象,以代表读到的这块数据。
我们还可以给 read () 方法传入 size 参数,以指定这次读取操作应该读取的数据量。这种做法在实现网络协议或解析特定格式的数据时很有用。process.stdin.on('readable', () => {let chunkconsole.log('New data available')while ((chunk = process.stdin.read()) !== null) {console.log(`Chunk read (${chunk.length} bytes): "${chunk.toString()}"`)}}).on('end', () => console.log('End of stream'))
如果 Readable 流在二进制模式运作,可以在流对象上调用 setEncoding(encoding)方法,并给 encoding 参数传入一种有效的编码格式,例如 utf8,这样就不用读取 Buffer 对象,可以直接读取字符串。 在面对 UTF-8 格式的文本数据时,使用这种方法读取,可以让流对象自动处理由多个字节所构成的字符,并适当地安排缓冲,以防止某个字符的那些字节,分别切割到两个数据块里面。即流对象在这种情况下所产生的每块数据,都是一条有效的 UTF-8 字节序列。 setEncoding 这个方法可以在同一个 Readable 流上面调用多次,即使已经开始从这个数据流中获取数据,也可以调用。流对象会自动切换编码,以处理接下来的数据块。 流里面的数据,本身没有所谓编码,只不过是一种二进制的数据,至于指定编码是指我们可以把流所产生的这些二进制数据,按照某一套标准解读成字符。
flowing (流动模式)
不通过 read () 方法提取数据,而是等着流对象把数据推送到 data 监听器里,只要流对象拿到数据,就会推送过来。
process.stdin.on('data', (chunk) => {console.log('New data available')console.log(`Chunk read (${chunk.length} bytes): "${chunk.toString()}"`)}).on('end', () => console.log('End of stream'))
异步迭代器
Readable 流本身是一种异步迭代器(async iterator)
async function main () {for await (const chunk of process.stdin) {console.log('New data available')console.log(`Chunk read (${chunk.length} bytes): "${chunk.toString()}"`)}console.log('End of stream')}main()
实现自己的 Readable 流
- 必须从 stream 模块里继承 Readable 原型
- 必须在自己的这个具体类中,给 _read() 方法提供实现代码
readable._read(size)
- _read() 中必须通过 push () 操作,向内部缓冲区填入数据
readable.push(chunk)
read() 是给流对象的消费方使用的,而 _read() 方法则是我们在定制 stream 字类时必须自己实现的一个方法,这个方法不应该由消费方直接调用。 习惯上,如果某个方法的名称以下划线开头,说明该方法不对外开放。
import { Readable } from 'stream'import Chance from 'chance'const chance = new Chance()export class RandomStream extends Readable {constructor (options) {super(options)this.emittedBytes = 0}_read (size) {// 利用 chance 库生成一个长度为 size 的随机字符串const chunk = chance.string({ length: size })// 把字符串推入内部缓冲区// 如果推入的是字符串,必须在第二个参数指定编码方案this.push(chunk, 'utf8')this.emittedBytes += chunk.length// 让这个流对象有百分之五的概率得以终止if (chance.bool({ likelihood: 5 })) {// 以 null 为参数,会给内部缓冲区推入 EOF (文件结束符),表示这条数据流至此结束this.push(null)}}}
options 参数本身是个对象,具有以下属性:
- encoding 属性:表示流对象按照什么样的编码标准,把缓冲区中的数据转化成字符串。默认值为 null
- objectMode 属性:标志对象模式是否启用,默认值为 false
- highWaterMark 属性:表示内部缓冲区的数据上限,如果数据所占的字节数已经达到该上限,那么这个流对象就不应该再从数据源中读取数据了。默认值为 16KB
调用 push () 的时候,应该检查返回值是不是 false,如果是,说明正在接收数据的这个流对象,其缓冲区中的数据量已经触碰了 highWaterMark 所表示的上限,这时候不应该继续往里面添加数据。
import { RandomStream } from './random-stream.js'const randomStream = new RandomStream()randomStream.on('data', (chunk) => {console.log(`Chunk received (${chunk.length} bytes): ${chunk.toString()}`)}).on('end', () => {console.log(`Produced ${randomStream.emittedBytes} bytes of random data`)})
简化版的定制方案
把一个包含 read() 方法的对象传给 options 参数即可
import { Readable } from 'stream'import Chance from 'chance'const chance = new Chance()let emittedBytes = 0const randomStream = new Readable({read (size) {const chunk = chance.string({ length: size })this.push(chunk, 'utf8')emittedBytes += chunk.lengthif (chance.bool({ likelihood: 5 })) {this.push(null)}}})randomStream.on('data', (chunk) => {console.log(`Chunk received (${chunk.length} bytes): ${chunk.toString()}`)}).on('end', () => {console.log(`Produced ${emittedBytes} bytes of random data`)})
用 iterable 做数据源以构建 Readable 流
import { Readable } from 'stream'const mountains = [{ name: 'Everest', height: 8848 },{ name: 'K2', height: 8611 },{ name: 'Kangchenjunga', height: 8586 },{ name: 'Lhotse', height: 8516 },{ name: 'Makalu', height: 8481 }]const mountainsStream = Readable.from(mountains)mountainsStream.on('data', (mountain) => {console.log(`${mountain.name.padStart(14)}\t${mountain.height}m`)})
在这种情况下,就算我们通过 Readable 流来读取这个数组,也没办法发挥流对象在节省内存用量方面的优势,因为它所读取的数组,已经提前加载到内存里面了。 所以建议数据还是一块一块地加载比较好。在面对比较庞大的数据源时,应该使用原生的流方案,例如 fs.createReadStream,或是自己来定制流对象,就算要使用 Readable.from,也应该考虑拿那种惰性的(即等用到的时候再去获取的) iterable 当数据源,例如生成器,迭代器、异步迭代器等。
Writable 流(可写流)
Writable 流表示数据目标,即能够写入或容纳数据的地方。
向 stream 中写入数据
使用 write 方法
writable.write(chunk, [encoding], [callback])
- encoding 可选,chunk 为 string 时,默认为 utf-8,chunk 为 Buffer 时,该参数会被系统忽略
- callback 可选
让 Writable 流知道已经没有数据需要写入时,可以调用 end 方法
writable.end([chunk], [encoding], [callback])
import { createServer } from 'http'import Chance from 'chance'const chance = new Chance()const server = createServer((req, res) => {res.writeHead(200, { 'Content-Type': 'text/plain' }) // ①while (chance.bool({ likelihood: 95 })) { // ②res.write(`${chance.string()}\n`) // ③}res.end('\n\n') // ④// 在系统把所有数据都写入底层 socket 时触发res.on('finish', () => console.log('All data sent'))})server.listen(8080, () => {console.log('listening on http://localhost:8080')})
backpressure (拥堵)
Node.js 平台的流,写入数据的速度可能比消耗数据的速度快,造成性能瓶颈或拥堵。
应对手段:流对象把写入的数据先放入缓冲区,让写入数据的用户如果不知道这种情况,还是持续写入数据,造成累积的数据持续增加。所以 writable.write 方法在内部缓冲区触碰 highWaterMark 上限时,返回 false,表明此时不应该继续写入数据。这套机制称为 backpressure (防拥堵机制)。
但这套机制不是强制性的,即用户仍可以继续写入数据。
import { createServer } from 'http'import Chance from 'chance'const chance = new Chance()const server = createServer((req, res) => {res.writeHead(200, { 'Content-Type': 'text/plain' })function generateMore () { // ①while (chance.bool({ likelihood: 95 })) {const randomChunk = chance.string({ length: (16 * 1024) - 1 }) // ②const shouldContinue = res.write(`${randomChunk}\n`)// shouldContinue 为 false 时,说明内部缓冲区已满if (!shouldContinue) {console.log('back-pressure')return res.once('drain', generateMore)}}res.end('\n\n')}generateMore()res.on('finish', () => console.log('All data sent'))})server.listen(8080, () => {console.log('listening on http://localhost:8080')})
实现 Writable 流
继承 Writable 类,并实现 _write() 方法
import { Writable } from 'stream'import { promises as fs } from 'fs'import { dirname } from 'path'import mkdirp from 'mkdirp-promise'export class ToFileStream extends Writable {constructor (options) {super({ ...options, objectMode: true })}_write (chunk, encoding, cb) {mkdirp(dirname(chunk.path)).then(() => fs.writeFile(chunk.path, chunk.content)).then(() => cb()).catch(cb)}}
调用超类的构造器,初始化相关的内部状态,将 objectMode 设置为 true 以便从默认的二进制模式切换到对象模式。Writable 还支持的选项:
- highWaterMark:内部缓冲区的数据上限,默认为 16KB
- decodeStrings:表示对象在把数据传给 _write 方法之前,如果发现数据是 String,需不需要先将数据转为二进制的 Buffer 再传。在对象模式下,系统会忽略这个选项。默认值为 true
简化版的定制方案
```typescript import { Writable } from ‘stream’ import { promises as fs } from ‘fs’ import { dirname, join } from ‘path’ import mkdirp from ‘mkdirp-promise’
const tfs = new Writable({ objectMode: true, write (chunk, encoding, cb) { mkdirp(dirname(chunk.path)) .then(() => fs.writeFile(chunk.path, chunk.content)) .then(() => cb()) .catch(cb) } })
tfs.write({ path: join(‘files’, ‘file1.txt’), content: ‘Hello’ }) tfs.write({ path: join(‘files’, ‘file2.txt’), content: ‘Node.js’ }) tfs.write({ path: join(‘files’, ‘file3.txt’), content: ‘streams’ }) tfs.end(() => console.log(‘All files created’))
<a name="AyDgZ"></a>## Duplex 流(双工流/读写流)既是 Readable 流,又是 Writable 流,可以描述那种既充当数据来源,又充当数据目标的实体,例如 network socket(网络套接字)。<a name="mS6hT"></a>## Transform 流(传输流)> Transform 流(传输流)是一种特殊的 Duplex 流,专门用来转换数据。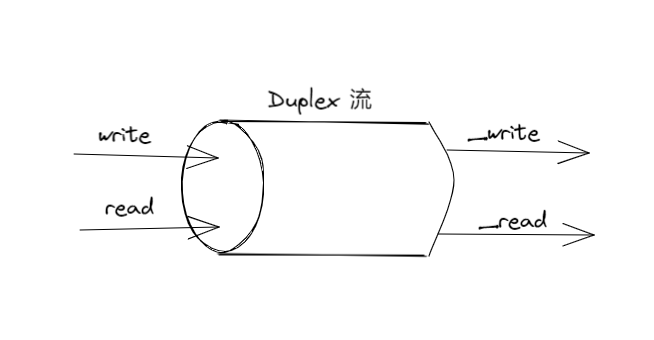<br />对于简单的 Duplex 流,从中读取的数据与写入其中的数据之间没有直接联系,对于流对象本身,并不关心这两种数据之间有没有关系。<br />以 TCP socket 为例,它只需要知道自己可以给远端发送数据,并从远端接收数据即可,至于发出去的数据与收到的数据之间是什么关系,并不需要它来操心。<br />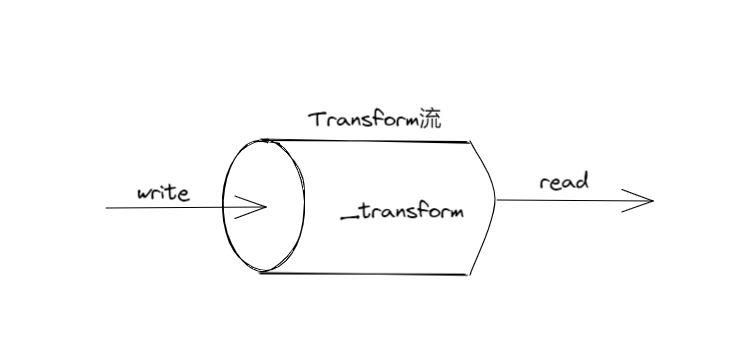<br />Transform 流是特殊的 Duplex 流,它会对自己从 Writable 端收到的每一块数据都做出转换,并让用户可以从 Readable 端读取到转换后的数据。<a name="Vz3V4"></a>### 实现 Transform 流定制一个 Transform 流,可以把数据里面的某一个字符串,全部替换成另一个字符串```typescriptimport { Transform } from 'stream'export class ReplaceStream extends Transform {constructor (searchStr, replaceStr, options) {super({ ...options })this.searchStr = searchStrthis.replaceStr = replaceStrthis.tail = ''}// 类似于 Writable 流的 _write() 方法_transform (chunk, encoding, callback) {const pieces = (this.tail + chunk).split(this.searchStr)const lastPiece = pieces[pieces.length - 1]const tailLen = this.searchStr.length - 1this.tail = lastPiece.slice(-tailLen)pieces[pieces.length - 1] = lastPiece.slice(0, -tailLen)// 将数据推送到内部缓冲区以供读取this.push(pieces.join(this.replaceStr))callback()}// 系统会在整条数据流即将结束时触发_flush (callback) {this.push(this.tail)callback()}}
简化版的定制方案
import { Transform } from 'stream'const searchStr = 'World'const replaceStr = 'Node.js'let tail = ''const replaceStream = new Transform({defaultEncoding: 'utf8',transform (chunk, encoding, cb) {const pieces = (tail + chunk).split(searchStr)const lastPiece = pieces[pieces.length - 1]const tailLen = searchStr.length - 1tail = lastPiece.slice(-tailLen)pieces[pieces.length - 1] = lastPiece.slice(0, -tailLen)this.push(pieces.join(replaceStr))cb()},flush (cb) {this.push(tail)cb()}})replaceStream.on('data', chunk => console.log(chunk.toString()))replaceStream.write('Hello W')replaceStream.write('orld!')replaceStream.end()
通过 Transform 流实现过滤(data filtering)与聚合(data aggregation)
- Transform filter:有条件地调用 this.push,只让符合条件的数据进入管道的下一个环节
- Streaming aggregation:在 _transform 里面处理数据,并把目前已经处理的这一部分结果累积起来,等到所有数据处理完之后,在 _flush 里面调用一次 this.push ,以推送最终的结果 ```typescript import { createReadStream } from ‘fs’ import { createGunzip } from ‘zlib’ import parse from ‘csv-parse’ import { FilterByCountry } from ‘./filter-by-country.js’ import { SumProfit } from ‘./sum-profit.js’
const csvParser = parse({ columns: true })
// A small difference from the code presented in the book is that // here we have gzipped the data to keep the download size of the repository // as small as possible. For this reason we added an extra step that decompresses // the data on the fly. The final result doesn’t change createReadStream(‘data.csv.gz’) .pipe(createGunzip()) .pipe(csvParser) .pipe(new FilterByCountry(‘Italy’)) .pipe(new SumProfit()) .pipe(process.stdout)
```typescript// filter-by-country.jsimport { Transform } from 'stream'export class FilterByCountry extends Transform {constructor (country, options = {}) {// objectMode 设为 true,说明处理的不是二进制,而是一个个对象options.objectMode = truesuper(options)this.country = country}_transform (record, enc, cb) {if (record.country === this.country) {// 数据进入到管道的下一个环节this.push(record)}cb()}}
// sum-profit.jsimport { Transform } from 'stream'export class SumProfit extends Transform {constructor (options = {}) {options.objectMode = truesuper(options)this.total = 0}_transform (record, enc, cb) {this.total += Number.parseFloat(record.profit)cb()}_flush (cb) {// 在所有数据处理完时,进行数据转换,并推送出去this.push(this.total.toString())cb()}}
PassThrough 流
特殊的 Transform 流,不会对输出的数据块做任何转换
作用:
- 观察数据的流动情况
- 实现 late piping 与惰性的 stream 模式
观察数据的流动情况
构造一个 PassThrough 实例,针对 data 事件注册监听器,把这个实例安排在管道的某一点上 ```typescript import { PassThrough } from ‘stream’
let bytesWritten = 0
const monitor = new PassThrough()
monitor.on(‘data’, (chunk) => {
bytesWritten += chunk.length
})
monitor.on(‘finish’, () => {
console.log(${bytesWritten} bytes written)
})
monitor.write(‘Hello!’) monitor.end()
实际使用上,不会直接给 monitor 写入数据,而是像下安排在管道的某一点上```typescriptcreateReadStream(filename).pipe(createGzip()).pipe(monitor).pipe(createWriteStream(`${filename}.gz`))
使用定制的 Transform 流也能实现相同的效果,但是你必须把收到的数据块按照原样尽快推送出去,即不能修改也不能延迟。而使用 PassThrough 方案,这一点系统会自行保证。
Late piping (先把流交给 API,然后再将其安排到管道中)
如果你想先用某个流对象把 API 调用起来,然后再从其中读取数据或是给其中写入数据,那么可以把一个 PassThrough 流交给这个 API,稍后再将这个 PassThrough 安排在管道中的相应位置上面。
import axios from 'axios'export function upload (filename, contentStream) {return axios.post('http://localhost:3000',contentStream,{headers: {'Content-Type': 'application/octet-stream','X-Filename': filename}})}
如果想在文件上传前,对文件流做一些处理,如压缩或加密数据。或者想做数据转换操作,以异步方法安排 upload 函数调用起来后再去执行,怎么做?
import { createReadStream } from 'fs'import { createBrotliCompress } from 'zlib'import { PassThrough } from 'stream'import { basename } from 'path'import { upload } from './upload.js'const filepath = process.argv[2] // ①const filename = basename(filepath)const contentStream = new PassThrough() // ②upload(`${filename}.br`, contentStream) // ③.then((response) => {console.log(`Server response: ${response.data}`)}).catch((err) => {console.error(err)process.exit(1)})createReadStream(filepath) // ④.pipe(createBrotliCompress()).pipe(contentStream)
创建一个 PassThrough 实例做占位符,等到把 API 调用起来后,可以将该实例安排在管道的末端, 让真正提供数据的那些流对象,最终能够把数据交给它,进而给 API 所取用。
这段代码在执行的时候,会调用 upload 函数,从而尽快启动上传流程,但直到我们把管道搭建好之后,数据才会流动到 upload 里面。我们构建的这条管道,会在数据处理结束后关闭,从而让 upload 函数知道,它所要上传的内容就是这些,没有其他内容需要上传了。
更加优雅的代码:
import axios from 'axios'import { PassThrough } from 'stream'export function createUploadStream (filename) {const connector = new PassThrough()axios.post('http://localhost:3000',connector,{headers: {'Content-Type': 'application/octet-stream','X-Filename': filename}}).catch((err) => {connector.emit(err)})return connector}
import { createReadStream } from 'fs'import { pipeline } from 'stream'import { basename } from 'path'import { createUploadStream } from './upload.js'const filepath = process.argv[2]const filename = basename(filepath)pipeline(createReadStream(filepath),createUploadStream(filename),(err) => {if (err) {console.error(err)process.exit(1)}console.log('File uploaded')})
这段代码用 PassThrough 流做 connector(连接器),它会返回一个流对象,使得调用方可以根据自己的需要,来决定什么时候应该向这个流对象推送数据,从而让这些数据能够通过该对象,流入需要读取数据的那个函数。
lazy stream(惰性流)
一般来说,只要创建 stream 实例,就有可能促使系统执行一些开销很大的初始化操作(例如打开一份文件、开启一个 socket,或者开始与数据库建立连接等等),即使我们还没开始使用这个 stream,系统也会先做这些操作。这意味着,如果我们只是想先把多个流对象创建出来,后面再使用,系统执行的这些初始化操作也显得太早了。
遇到开销比较大的初始化操作,可以使用 lazystream 这个库针对实际的 stream 实例创建代理(proxy),只有当我们真正开始通过代理来使用数据的时候,才会把目标 stream 给创建出来。
用管道连接流对象
import { ReplaceStream } from './replace-stream.js'process.stdin.pipe(new ReplaceStream(process.argv[2], process.argv[3])).pipe(process.stdout)
流(尤其是文本流)是一种通用的接口,所有的流之间,几乎都能通过管道组合连接起来。
两个流通过 pipe 方法连接起来,会形成吸附(suction)效应,使得数据能够从 readable 流自动进入 writable 流,没必要再调用 read 或 write,不用再担心 backpressure(数据拥堵)问题,因为系统会自动处理。
处理管道中的错误
import { createGzip, createGunzip } from 'zlib'import { Transform, pipeline } from 'stream'const uppercasify = new Transform({transform (chunk, enc, cb) {this.push(chunk.toString().toUpperCase())cb()}})pipeline(process.stdin,createGunzip(),uppercasify,createGzip(),process.stdout,(err) => {if (err) {console.error(err)process.exit(1)}})
pipeline 工具函数会把参数列表中的这些流对象串联起来,并针对每个流对象都注册适当的 error 监听器与 close 监听器,这样子无论管道中哪个环节出现错误,系统都能够正确地销毁所有的流。最后一个 cb 参数会在整个管道结束时触发。
用 stream 实现异步控制流模式(asynchronous control flow)
顺序执行
默认情况下,stream 是按照先后顺序处理数据的。
利用一条或多条 stream 对象,很容易就能按先后顺序迭代一系列异步任务
import { createWriteStream, createReadStream } from 'fs'import { Readable, Transform } from 'stream'export function concatFiles (dest, files) {return new Promise((resolve, reject) => {const destStream = createWriteStream(dest)Readable.from(files) // ①.pipe(new Transform({ // ②objectMode: true,transform (filename, enc, done) {const src = createReadStream(filename)src.pipe(destStream, { end: false })src.on('error', done)src.on('end', done) // ③}})).on('error', reject).on('finish', () => { // ④destStream.end()resolve()})})}
在通过 pipe() 方法串接的时候,要指定 { end: false } 选项,不让系统在这条 Readable 结束的时候,自动关掉串在它后面的 Writable 流
无序的平行执行
用 stream 实现无序的平行执行
import { Transform } from 'stream'export class ParallelStream extends Transform {constructor (userTransform, opts) {super({ objectMode: true, ...opts })this.userTransform = userTransformthis.running = 0this.terminateCb = null}_transform (chunk, enc, done) {this.running++this.userTransform(chunk,enc,this.push.bind(this),this._onComplete.bind(this) // 这个才是实际关闭本项任务的地方)// 通知 Transform 流,本次变换已经结束done()}// 系统在即将终止当前 stream 时触发该方法_flush (done) {if (this.running > 0) {this.terminateCb = done} else {done()}}// 每项异步任务完成时触发该方法_onComplete (err) {this.running--if (err) {return this.emit('error', err)}if (this.running === 0) {this.terminateCb && this.terminateCb()}}}
通过 ParallelStream 类可以创建出能够平行地执行任务的流。但没办法保证这些异步操作的完成顺序以及它们给这条 stream 推送执行结果的顺序,肯定与我们启动这些任务时所依照的顺序相同。
- 二进制流不适合做平行处理,数据需要顺序性
- 对象流适合某些场合
无序且带有并发上限的平行执行模式
大量连接会影响系统性能,为了控制负载量与资源使用量,必须给平行任务设定并发上限 ```typescript import { Transform } from ‘stream’
export class LimitedParallelStream extends Transform { constructor (concurrency, userTransform, opts) { super({ …opts, objectMode: true }) this.concurrency = concurrency // 表示并发上限 this.userTransform = userTransform this.running = 0 this.continueCb = null this.terminateCb = null }
_transform (chunk, enc, done) { this.running++ this.userTransform( chunk, enc, this.push.bind(this), this._onComplete.bind(this) ) if (this.running < this.concurrency) { done() // 没到并发数时,可以让系统继续安排下一个任务 } else { // 让正在运行的任务,在其运行完毕时尽快触发该 done this.continueCb = done } }
_flush (done) { if (this.running > 0) { this.terminateCb = done } else { done() } }
_onComplete (err) { this.running— if (err) { return this.emit(‘error’, err) }
// 如果存在 continueCb,即说明到达上限,尽快触发const tmpCb = this.continueCbthis.continueCb = nulltmpCb && tmpCb()if (this.running === 0) {this.terminateCb && this.terminateCb()}
} }
<a name="adFwx"></a>## 有序的平行执行> 需要把每项任务所给到的数据先放到缓冲区里排列好<a name="Y8kGw"></a># 管道模式<a name="MOqUT"></a>## 组合 stream- 组合后的 stream,可以当成一个黑盒来使用,用户无需了解这个黑盒内部的管道,具体是怎么搭建起来的- 组合后的 stream,只需要挂接一个事件监听器,就可以处理整条管道中的错误,不用给管道中的每个流对象都注册这样的监听器```typescriptimport { createGzip, createGunzip } from 'zlib'import { createCipheriv, createDecipheriv, scryptSync } from 'crypto'import pumpify from 'pumpify' // 能够把几个流组合成一个新的 streamfunction createKey (password) {return scryptSync(password, 'salt', 24)}export function createCompressAndEncrypt (password, iv) {const key = createKey(password)const combinedStream = pumpify(createGzip(),createCipheriv('aes192', key, iv))combinedStream.iv = ivreturn combinedStream}export function createDecryptAndDecompress (password, iv) {const key = createKey(password)return pumpify(createDecipheriv('aes192', key, iv),createGunzip())}
拆分 stream(fork 模式)
同一个 Readable 流,可以分别与多个 Writable 流相连,从而实现 fork(分支/拆分)操作。 让程序能够对同一份数据,分别做出不同的转换,或者根据某项标准,把源数据划分到不同的组里。
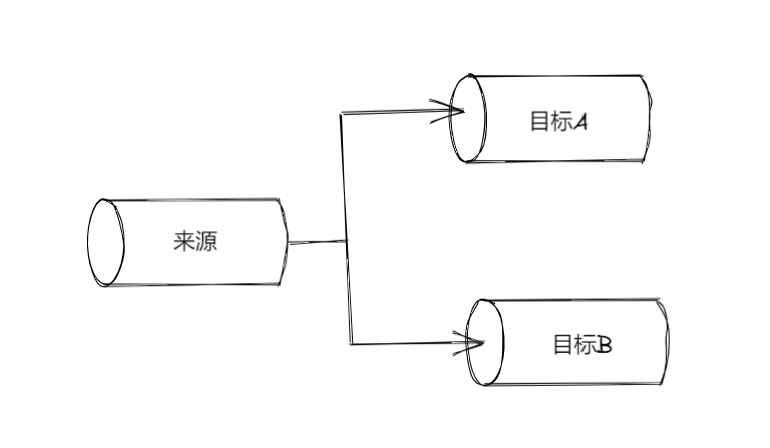
// 让同一个程序生成多种校验和import { createReadStream, createWriteStream } from 'fs'import { createHash } from 'crypto'const filename = process.argv[2]const sha1Stream = createHash('sha1').setEncoding('hex')const md5Stream = createHash('md5').setEncoding('hex')const inputStream = createReadStream(filename)inputStream.pipe(sha1Stream).pipe(createWriteStream(`${filename}.sha1`))inputStream.pipe(md5Stream).pipe(createWriteStream(`${filename}.md5`))
- inputStream 结束后,md5Stream 与 shalStream 也会自动结束
- 两条流处理的是同一份数据,所以在其中一条中如果对数据执行了操作,产生了副作用,会影响到另外一条流
- 数据从 inputStream 流出的速度,会跟分支里面最慢的那一支相同
- 如果在各分支已经开始消耗源 stream 的数据之后,又给源 stream 挂接新的分支,称为异步构建管道(async piping),新挂接的分支,只能接收源 stream 在你挂接之后所产生的那些数据。如果你不想让新分支错过之前的数据,可以先挂一个 PassThrough 实例上去,把位置占住,这样就算其他分支想要开始从源 stream 中获取数据,也必须等这个 PassThrough 一起做才行,于是 PassThrough 背后那个真正的分支,就不会因为其他分支先开始处理而错过数据了。容易产生 backpressure 问题。
合并 stream(merge 模式)
merge (合并/归并)是与 fork (分支/拆分) 相反的操作,它把多个 Readable 流分别跟同一个 Writable 流拼接
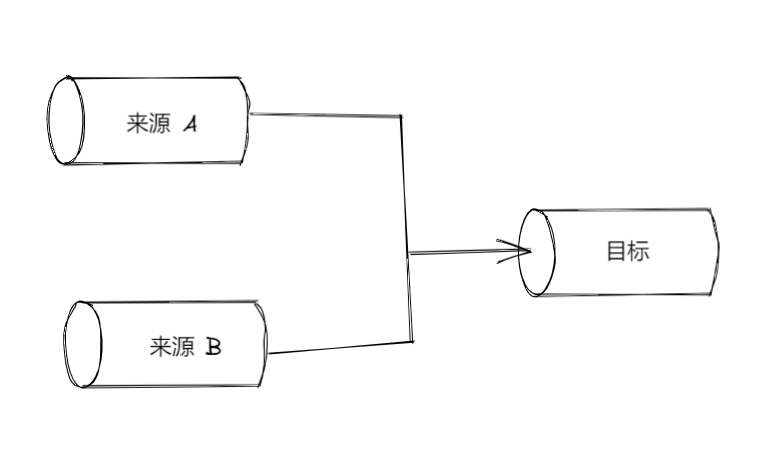
需要注意的问题:end 事件的触发时机。系统默认采用 { end: true } 选项来拼接,只要任何一条源 stream 结束,系统会自动让目标 stream 也随之结束,这经常导致程序出错,因为如果还有其他的源 stream 尚未结束,那么这些 stream 可能会给已经终止的这个目标 stream 里面继续写入内容
解决办法:在把多个源 stream 分别与同一个目标 stream 相拼接时指定{ end: false } 选项,在把所有的源 stream 都读取完毕后,对目标 stream 明确调用 end() 方法
import { createReadStream, createWriteStream } from 'fs'import split from 'split'const dest = process.argv[2]const sources = process.argv.slice(3)const destStream = createWriteStream(dest)let endCount = 0for (const source of sources) {const sourceStream = createReadStream(source, { highWaterMark: 16 })sourceStream.on('end', () => {if (++endCount === sources.length) {destStream.end()console.log(`${dest} created`)}})sourceStream.pipe(split((line) => line + '\n')).pipe(destStream, { end: false })}
多路复用与解多路复用(mux/demux模式)
把多个源 stream 的数据纳入同一个共享通道(shared channel),该通道里面的数据,在逻辑上依然能够跟产生这块数据的源 stream 对应起来,等数据到达通道另一端的时候,将其重新分割,让每块数据都能够流到与源 stream 相对应的通道里面。
- 多路复用(multiplexing):把多条 stream 组合到一起,让它们能够沿着一条 stream 传输数据
- 解多路复用(demultiplexing):把同一条 stream 里面承载的数据,按照来源重新分流到不同的通道中
构建一款远程的日志记录器
该程序中的共享媒介是一条 TCP 连接,利用 packet switching(数据包交换)技术实现多路复用,这项技术会把有待传递的数据封装成 packer(数据包),同时让封装者能够在包里标注一些 meta information(元信息),以确定这个数据包的身份,从而正确地实现多路复用、路由、流向控制以及受损数据检测等功能。
客户端 —— 多路复用 ```typescript import { fork } from ‘child_process’ import { connect } from ‘net’
function multiplexChannels (sources, destination) { let openChannels = sources.length
// 针对每个源 stream 为 readable 事件注册监听器 for (let i = 0; i < sources.length; i++) { sources[i] .on(‘readable’, function () { // ① let chunk while ((chunk = this.read()) !== null) {
// 封装数据包,1个字节表示通道 ID,4个字节表示数据块大小const outBuff = Buffer.alloc(1 + 4 + chunk.length) // ②outBuff.writeUInt8(i, 0)outBuff.writeUInt32BE(chunk.length, 1)chunk.copy(outBuff, 5)console.log(`Sending packet to channel: ${i}`)destination.write(outBuff) // 写入目标通道}}).on('end', () => { // ④if (--openChannels === 0) {destination.end()}})
} }
const socket = connect(3000, () => { // ① const child = fork( // ② process.argv[2], process.argv.slice(3), { silent: true } // 让子进程不继承父进程的 stdout 与 stderr ) multiplexChannels([child.stdout, child.stderr], socket) // ③ })
服务端 —— 解多路复用```typescriptimport { createWriteStream } from 'fs'import { createServer } from 'net'function demultiplexChannel (source, destinations) {let currentChannel = nulllet currentLength = nullsource.on('readable', () => { // ①let chunk// 没有通道 ID,读取 1 字节if (currentChannel === null) { // ②chunk = source.read(1)currentChannel = chunk && chunk.readUInt8(0)}if (currentLength === null) { // ③chunk = source.read(4)currentLength = chunk && chunk.readUInt32BE(0)if (currentLength === null) {return null}}chunk = source.read(currentLength) // ④if (chunk === null) {return null}console.log(`Received packet from: ${currentChannel}`)// 将读取到的数据写入与数据来源相对应的目标通道destinations[currentChannel].write(chunk) // ⑤currentChannel = nullcurrentLength = null}).on('end', () => { // ⑥// 关闭源 stream 后,把所有的目标通道关闭destinations.forEach(destination => destination.end())console.log('Source channel closed')})}const server = createServer((socket) => {const stdoutStream = createWriteStream('stdout.log')const stderrStream = createWriteStream('stderr.log')demultiplexChannel(socket, [stdoutStream, stderrStream])})server.listen(3000, () => console.log('Server started'))
对象流的多路复用与解多路复用
处理对象流与其他流的最大区别在于,系统每次传输的是一个完整的对象,而不像文本流或二进制流那样,传输的有可能只是整套数据中的某个片段。
所以在处理对象流的多路复用时,只需要记录每个对象的 channel ID(通道 ID)即可,而不用记录该对象所对应的数据是多少字节。解多路复用时,只需根据这个 ID,把对象路由到正确的目标 stream 即可,不用优先考虑这个对象所对应的数据总量。

