资料
简单的使用方法参考上篇笔记
hexo-theme-material Github 地址
hexo-theme-material 中文文档
hexo-theme-material Icon 图标库
- 展示图

正文
详细的简单的方法这里便不再赘述,可看上面的文档自行操作,这里只记录一下较为复杂的东西,切记要照着上面的顶部文档操作完了之后才可以看下面的操作,不然的话直接操作可能会出错
创建页面的步骤,这里以 about 页面为例
- 命令行 ``` hexo new page about
执行上述命令之后在项目的资源目录 `source` 下便有了 `about` 目录,内部还会自动的创建一个 `index.md` 文件可供编辑,结构如下图> 2. 之后在 `material` 目录下的 `_config.yml` 配置文件中,设置 `about` 页面的路径即可,具体设置如下> <br />这里的 `icon` 的值可以去顶部资料资源的 `icon` 图标库中查看3. 刷新页面进行查看,这里的前提是已启动了服务 `hexo server`> #### 创建新的笔记以及在顶部添加相应的 `tags` 和 `categorise`1. 命令行
hexo new post testdemo
执行上述命令之后,在项目的 `source -> _posts` 目录下会新建一个 `testdemo.md` 文件,这个就是我们写内容的 `markdown` 文件<br />2. 下面简单写下示例的文件
这个是一个测试的页面
3. 之后刷新页面即可,需要注意的是如下所示这些的页面都是需要相互的对应的设置的> # 福利时间到了,技术的目的是为了使这个世界变得更加的美好。[github 源码](https://github.com/sunxiaochuan/blogapp)# 更新 2018.5.19## 增加一个本地搜索的功能> [文档地址](https://material.viosey.com/docs/#/config_services?id=%E6%9C%AC%E5%9C%B0%E6%90%9C%E7%B4%A2)1. 使用本地搜索需要安装 [hexo-generator-search](https://github.com/PaicHyperionDev/hexo-generator-search) 插件。
yarn add hexo-generator-search
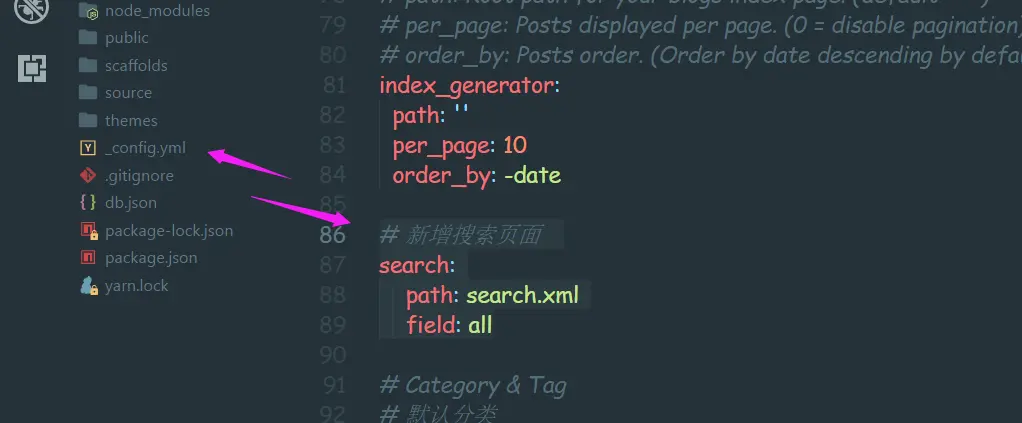
2. 在站点配置文件中新增如下的代码片段
新增搜索页面
search: path: search.xml field: all
```

若有收获,就点个赞吧
0 人点赞
