- 1. vue-cli 构建项目
- 2. 项目模板中使用 less 方法
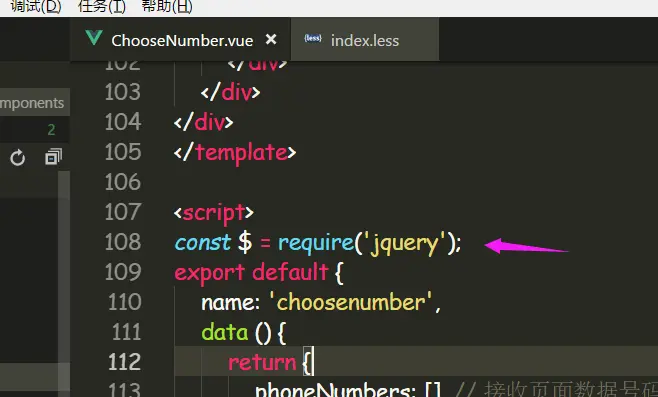
- 3. 在 router 下的路由文件里设置格式,将页面上路由中默认显示的
#/给去掉 - 4. 引入 jquery
- 5. :class 使用表达式
- 6. DOM 事件修饰符
- 7. vue 使用 clipboard 实现复制功能
- 8. 解决 vue-resource 的跨越问题
- 9. vue-router 单页之间如何在 js 中跳转
- 10. vuex 实现组件之间数据的传递
- 11. .eslintrc.js 文件 rules 增加设置
- 12. vue 表单操作
- 13. 解决使用 vux 组件库时 与 rem 设置冲突带来的问题
- 15. vue-router spa (单页)需要的 nginx 配置,防止出现 404 的情况
- 16. 与后台 API 进行通信时,
Content-Type请求文本格式未统一带来的问题 - 17. 清除
.vue文件在 vscode 编辑器中格式化时默认添加的分号和双引号的规则 - 18. 之前的删掉了,等待更新中……
##19. 给vue挂载全局方法 - 20.
axios不兼容 ie 的问题解决 - bootstrap 的 modal 模块为例">21. 组件封装,这里以 bootstrap 的 modal 模块为例
- 22. 在
router -> index.js按需引入模块,优化SPA页面的性能 - 23. 在
Vue上挂载vux库中的LoadingPlugin组件 - 24. 解决:使用
axios默认发送的是application/json;charset=UTF-8这种格式的数据后台无法读取的问题 - 25. 化繁为简的Watchers
- 26. 父子组件通信 — 子组件可以调用父组件的方法
- 27. 父子组件通信 — 子组件可动态获取父组件的数据
- 28. vue 多页面开发分页组件 有搜索功能
- 29.
Vue在.vue文件的样式style标签中使用background:url()引入图片 - 30. 页面加载数据之前增加
loading动画 - 31. 封装一个
axios的通用方法 - 32. 满足:点击当前元素时,其子元素不会被点中,且还会执行回调事件—修改当前样式
- 33. 子页面中在接口请求的时候,需要主页面
App.vue中请求到的接口的返回值,特殊情况下会出现 Bug - 34.
router-link导航接收并传递全部的url参数 - 35. 项目增加权限
- 36. 使用
beforeRouteLeave销毁组件,实现组件的实时化 - 37. 使用官方提供的
component,根据条件循环判断使用不同的组件 - 官方配置 在配置文件中
vue.config.js引入样式预处理器共享的全局变量。">38. 基于vue-cli脚手架 官方配置 在配置文件中vue.config.js引入样式预处理器共享的全局变量。 - 39.
el-input使用@keyup.enter无效 - 40.
el-table使用toggleAllSelection方法无效 - 41.
el-select选中之后,数据无法回显 - 42. 父组件使用
v-model传值给子组件,实现子组件可以同步更新父组件的v-model绑定的值 - 43 当使用
v-for循环生成dom时,当需要再增加ref属性时,获取组件时需要加一个下标[0]
1. vue-cli 构建项目
命令行
# 全局安装 vue-cli$ npm install --global vue-clif# 创建一个基于 webpack 模板的新项目$ vue init webpack your-project-name# 安装依赖,走你$ npm install# 进入项目$ cd your-project-name# 开发版本打包并运行$ npm run dev# 线上环境整个项目打包 生成 dist 可以直接部署到服务器上的文件夹npm run build
2. 项目模板中使用 less 方法
原文地址 vue-cli 构建的项目默认是不支持 less 的,需要自己添加。
首先安装 less 和 less-loader ,在项目目录下运行如下命令
# npm安装$ npm install less less-loader --save-dev# 或者使用 yarn$ yarn add less less-loader --dev
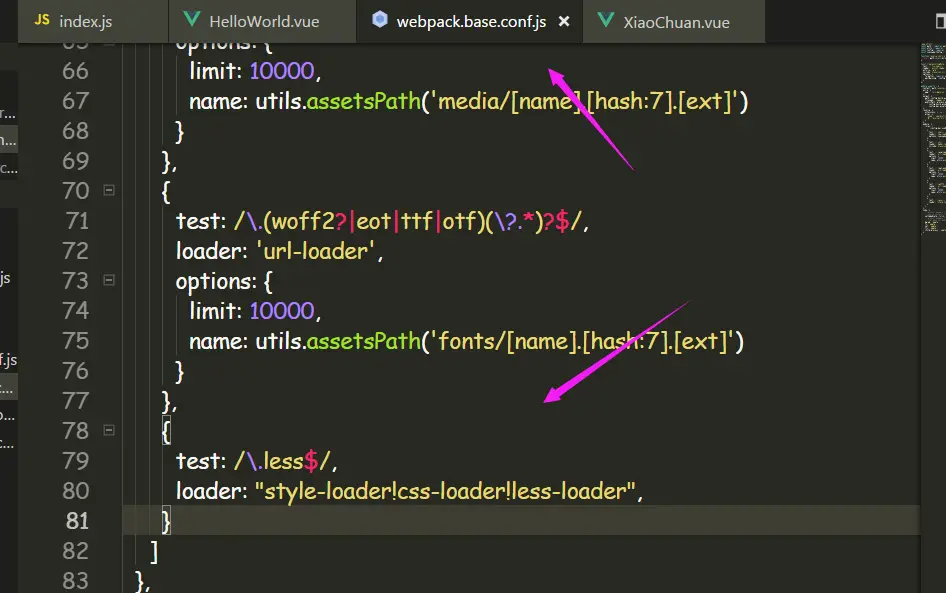
安装成功后,打开
build/webpack.base.conf.js,在 module.exports = 的对象的 module.rules 后面添加一段:module.exports = {// 此处省略无数行,已有的的其他的内容module: {rules: [// 此处省略无数行,已有的的其他的规则{test: /\.less$/,loader: "style-loader!css-loader!less-loader",}]}}
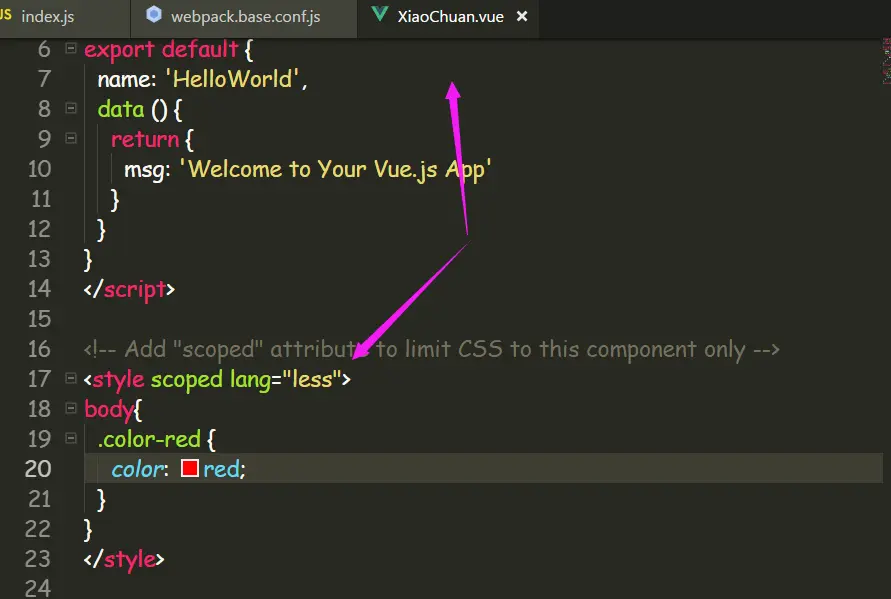
最后在代码中的 style 标签中 加上 lang=”less” 属性即可
<style scoped lang="less"></style>
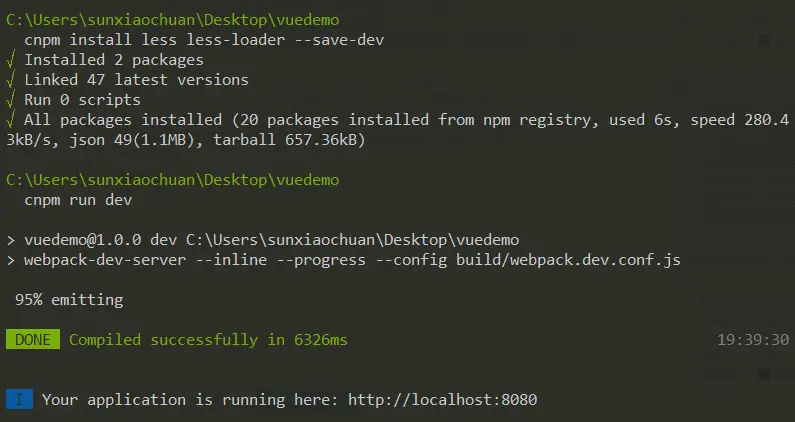
之后在项目中测试是否成功
npm install less less-loader --save-devnpm run dev
在浏览其中打开相应页面,这个页面是
/根页面点击跳转过来的子路由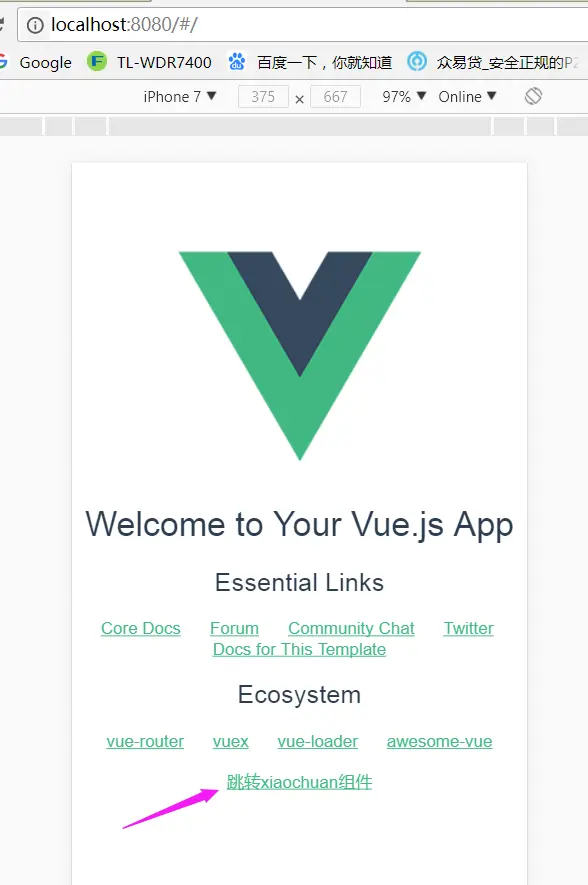
 可以看到样式编译成功了 哦耶~
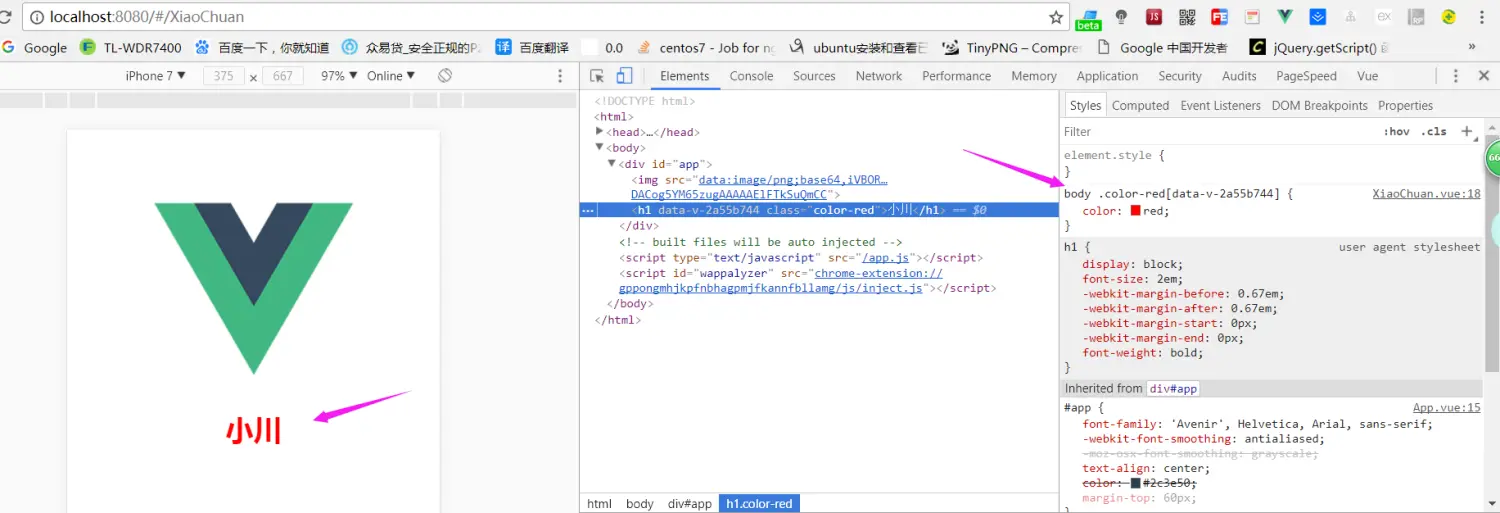
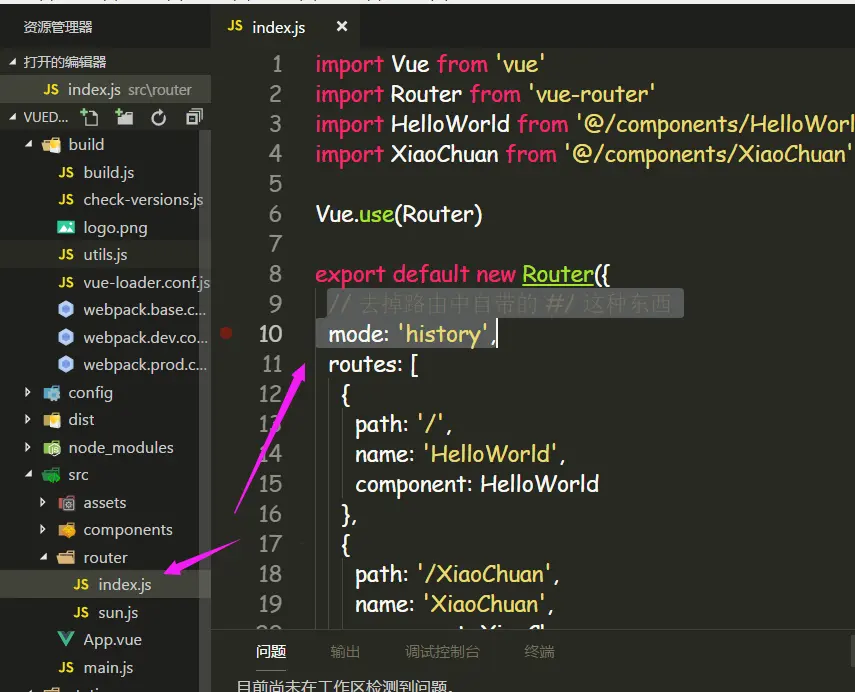
3. 在 router 下的路由文件里设置格式,将页面上路由中默认显示的
#/给去掉
// 去掉路由中自带的 #/ 这种东西mode: 'history',
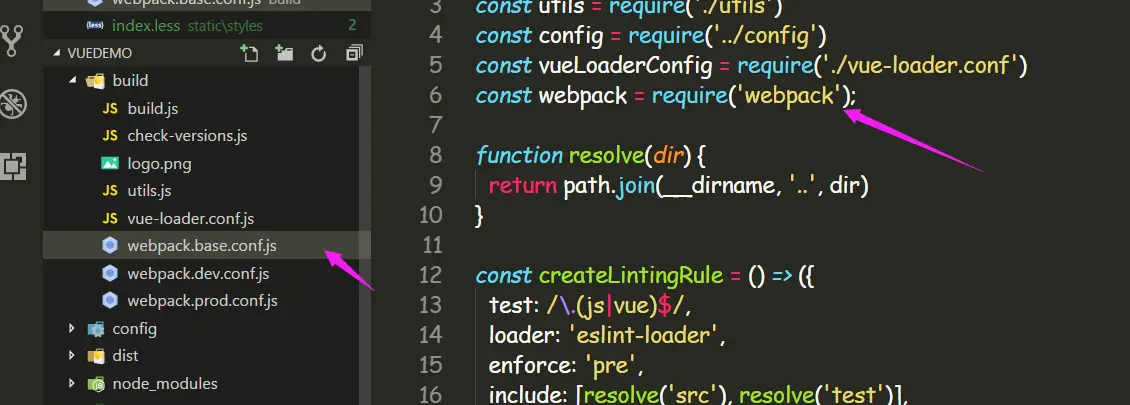
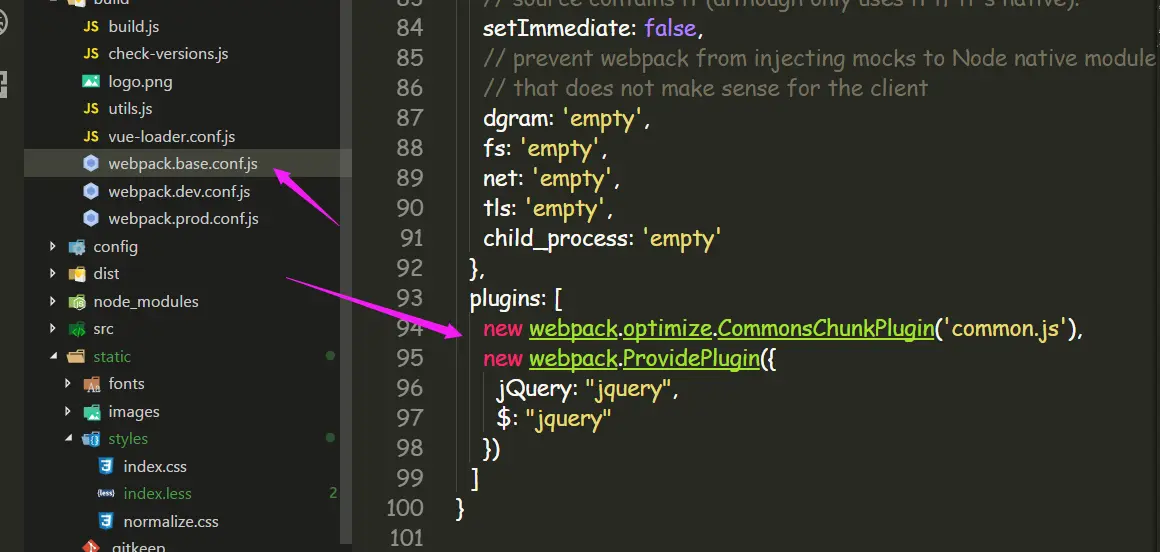
// 先在顶部引入 webpackconst webpack = require('webpack')// plugins 中添加new webpack.ProvidePlugin({'window.jQuery': 'jquery', // 为了兼容其他的插件jQuery: 'jquery',$: 'jquery'})
:class="{'想要改变的类名': 判断条件}
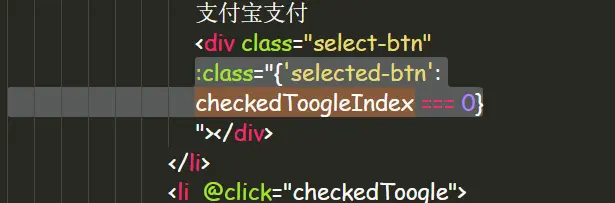
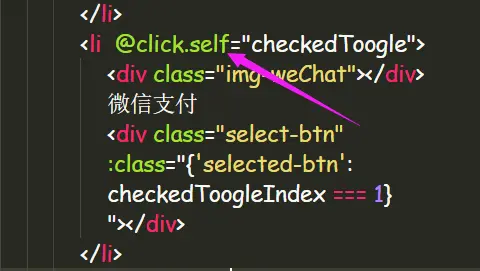
<!-- 阻止单击事件继续传播 --><a v-on:click.stop="doThis"></a><!-- 提交事件不再重载页面 --><form v-on:submit.prevent="onSubmit"></form><!-- 修饰符可以串联 --><a v-on:click.stop.prevent="doThat"></a><!-- 只有修饰符 --><form v-on:submit.prevent></form><!-- 添加事件监听器时使用事件捕获模式 --><!-- 即元素自身触发的事件先在此处处理,然后才交由内部元素进行处理 --><div v-on:click.capture="doThis">...</div><!-- 只当在 event.target 是当前元素自身时触发处理函数 --><!-- 即事件不是从内部元素触发的 --><div v-on:click.self="doThat">...</div>
示例,如下图所示,这样写的话点击了 li 内部的元素的话不会影响 li 的 click 的点击事件
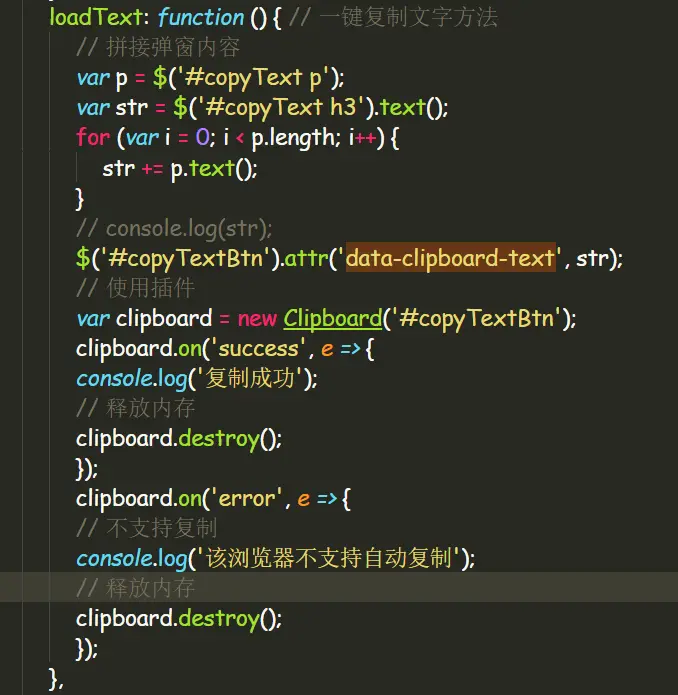
7. vue 使用 clipboard 实现复制功能
安装依赖 clipboard.js
npm install clipboard --save
在需要使用的地方 require 引用
var clipboard = require('clipboard');
在页面加载后调用该方法即可
8. 解决 vue-resource 的跨越问题
我这里是 vue-cli 基于 webpack 的项目(注意:在修改了 proxyTable 之后需要在命令行中
npm run dev重新运行下项目,否则是不会有效果的呀~)错误信息
Request header field Content-Type is not allowed by Access-Control-Allow-Headers in preflight response.
解决方法:
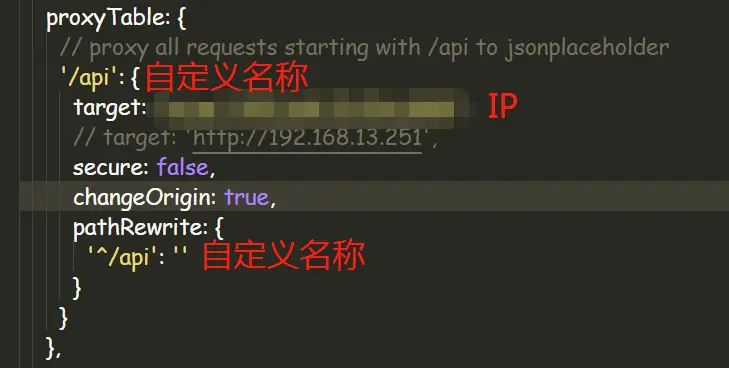
先找到对应的配置 js 文件中的 proxyTable
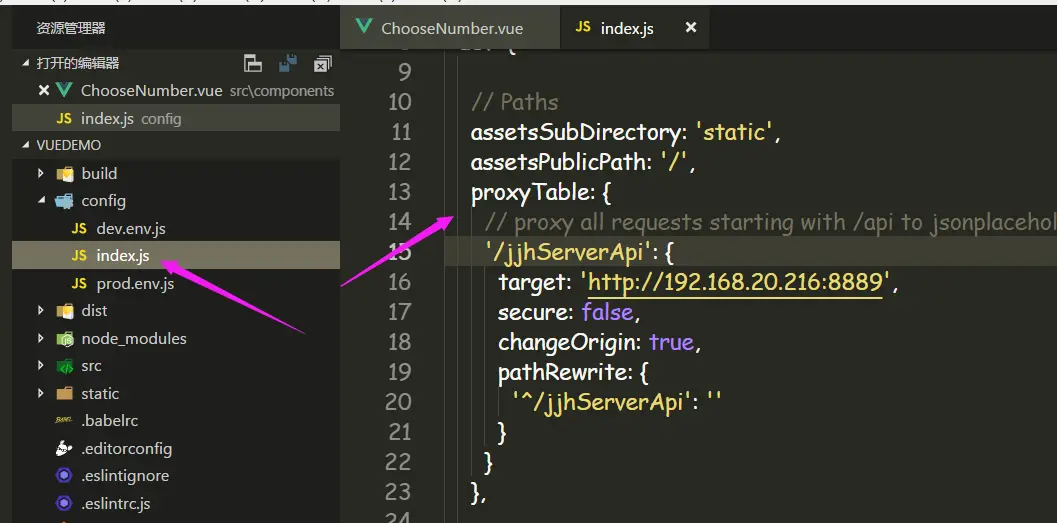 修改相应的配置
 再在 main.js 中配置 vue-resource 的格式,不配置的话是无法向后台传递参数的
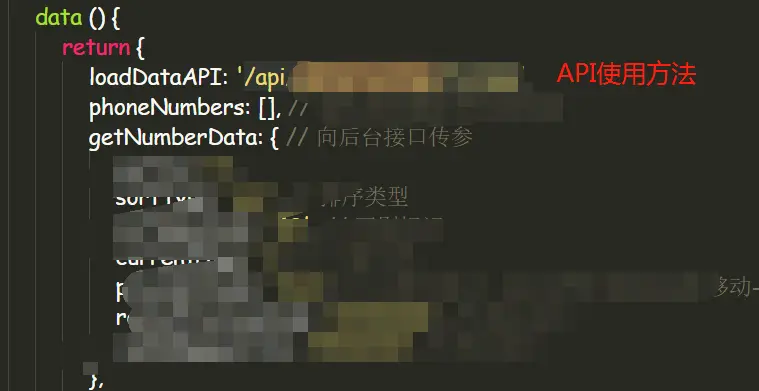
 在 vue 文件中的使用
data 中绑定相应的静态配置
在 vue 文件中的使用
data 中绑定相应的静态配置
 methods 增加相应的方法
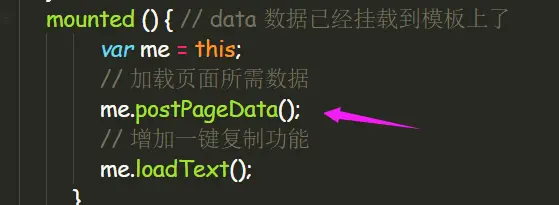
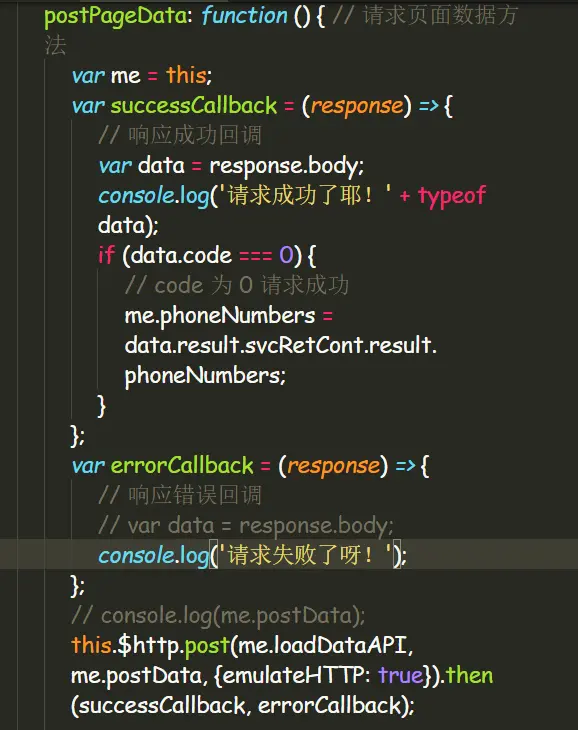 mouted 在 data 数据挂载到实例对象的时候 ,请求页面数据,实现页面的正常显示
9. vue-router 单页之间如何在 js 中跳转
三种写法
// 字符串this.$router.push('/home/first')// 对象this.$router.push({ path: '/home/first' })// 命名的路由this.$router.push({ name: 'home', params: { userId: wise }})

10. vuex 实现组件之间数据的传递
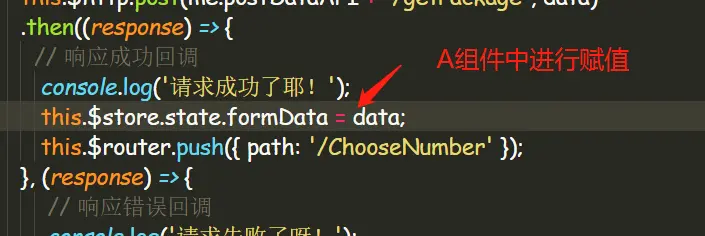
根据 state 可以实时的获取到数据 原文地址
安装
npm install vuex --save
在 src 文件夹中新建一个 stroe 文件夹,并在目录下新建一个 index.js 文件(已有的话请忽略),index.js 文件编辑如下
import Vue from 'vue';import Vuex from 'vuex';Vue.use(Vuex);let store = new Vuex.Store({state: {formData: {} // 企业提交数据表单对象}});export default store;
在 src 目录下的 main.js 文件中引入 vuex 文件,并在实例化时添加配置
import Vue from 'vue';import App from './App';import router from './router';import store from './store'; // 引入 vuexVue.config.productionTip = false;Vue.http.options.emulateJSON = true;/* eslint-disable no-new */new Vue({el: '#app',router,store, // 需要在添加components: { App },template: '<App/>'});
之后就可以直接在需要的组件中直接引用,引用具体示例如下
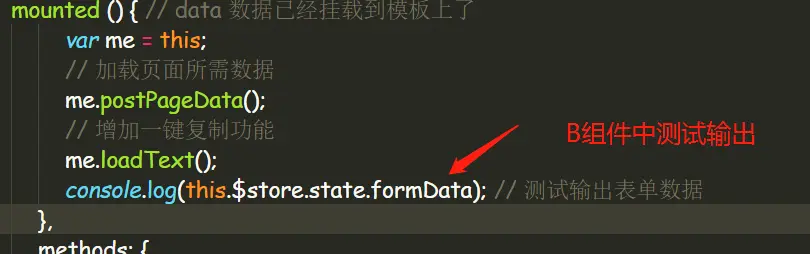 控制台成功输出

11. .eslintrc.js 文件 rules 增加设置
12. vue 表单操作
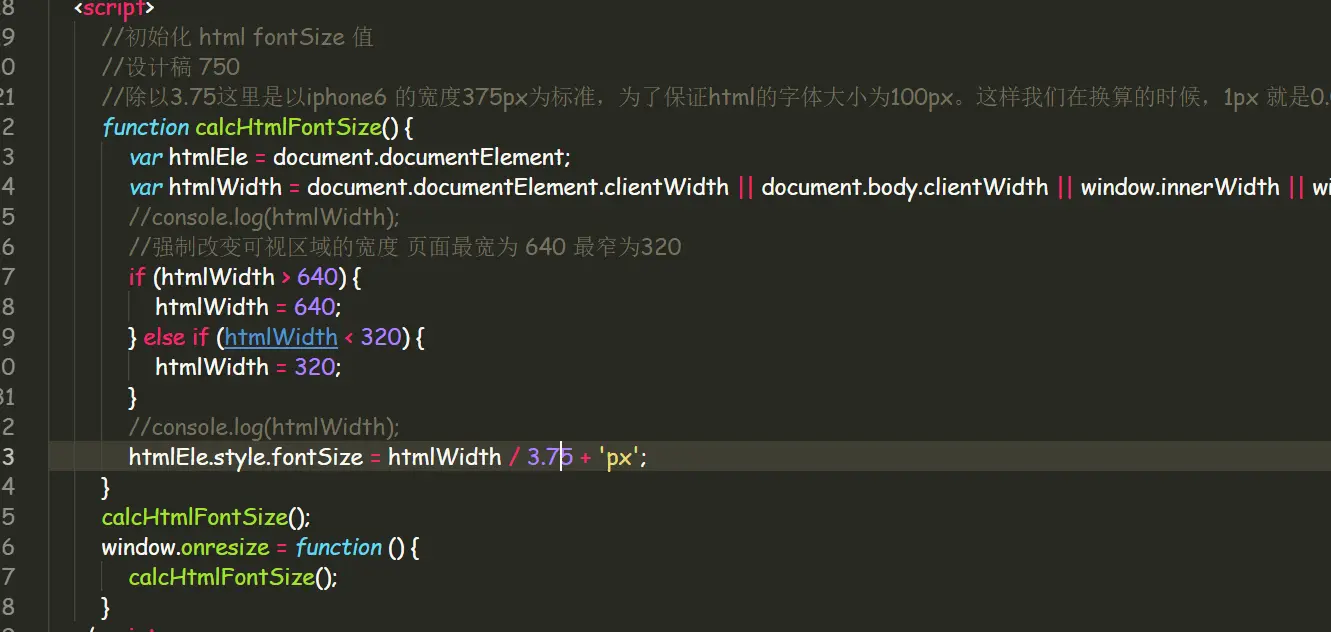
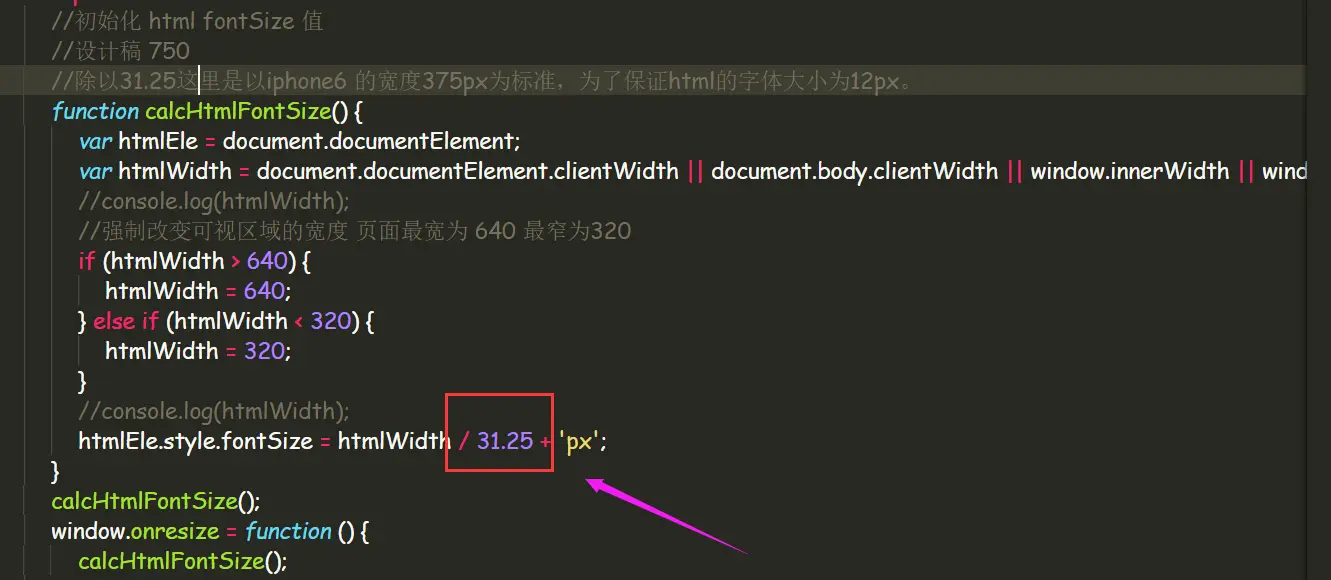
13. 解决使用 vux 组件库时 与 rem 设置冲突带来的问题
思路
将之前 rem 计算的数值
html font-size: "100px",改到12px,之后连锁的将 less 中计算和引用的的值也改下,之后就可以了,尽量做到少量的修改即可将之前的 js 计算 rem 数值脚本修改相应的数值
 改过之后的
改过之后的
修改 less
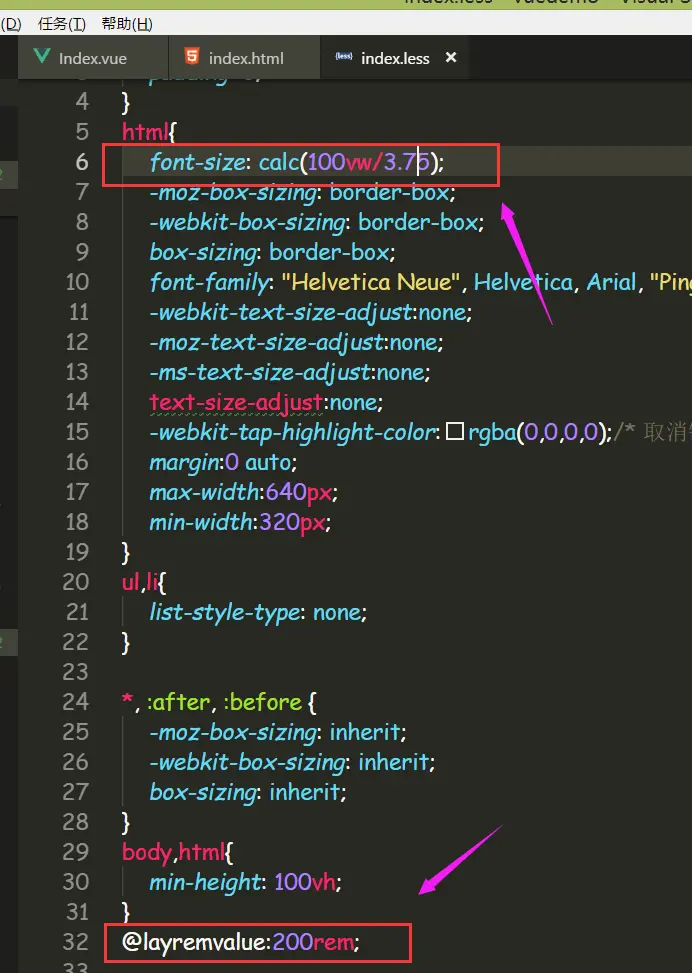 改过之后的
改过之后的
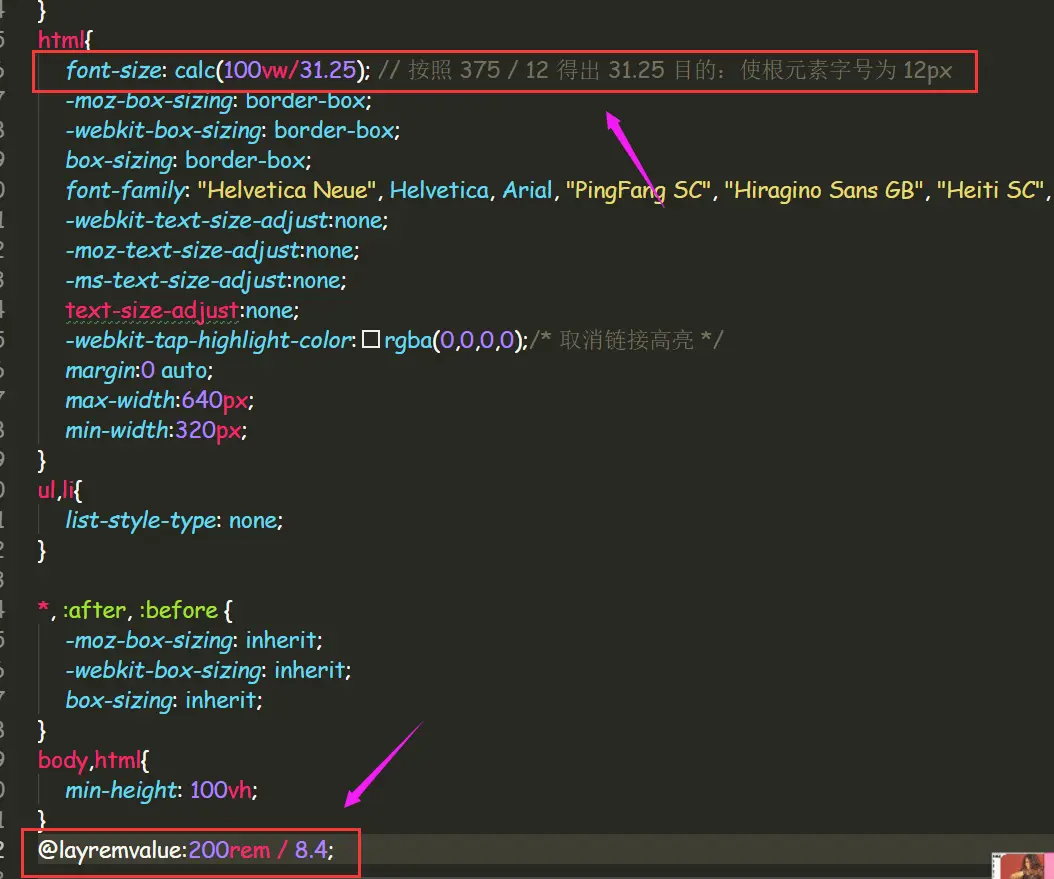
之后就可以是 rem 和 vux 基本正常了
##14. 通过 watch 动态的监测路由跳转(跳转时)和 APP.vue 中设置 created 方法实时监测 path (刷新时),来实现 header 文字的改变- header.vue
watch: {'$route' (to, from) {// 检测路由改变 header 内容if (to.name === 'Index') {this.$store.state.PageTitle = '预约领号';this.$store.state.isShowBack = false;} else if (to.name === 'PreferentialDescription') {this.$store.state.PageTitle = '优惠说明';this.$store.state.isShowBack = true;} else if (to.name === 'RuleIntroduction') {this.$store.state.PageTitle = '规则简介';this.$store.state.isShowBack = true;} else if (to.name === 'ReservationSuccess') {this.$store.state.PageTitle = '预约排号';this.$store.state.isShowBack = true;}}}
15. vue-router spa (单页)需要的 nginx 配置,防止出现 404 的情况
官方文档
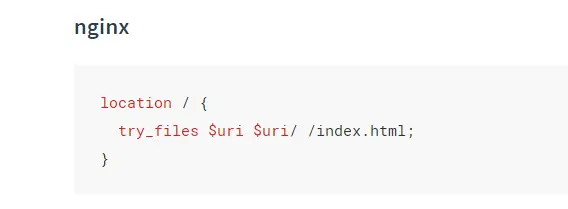 照着上方的图将代码复制至服务器的 nginx.config 配置文件即可
ssh 远程登录服务器
ssh username@ipaddressenter your password
查找服务器中的 nginx 相关目录,我这边是 nginx 服务器
whereis nginx

/etc/nginx这个是 nginx 相关配置的目录/usr/share/nginx是静态文件的目录进入 html 目录,这个就是默认的存放项目文件的目录

修改 nginx 默认的配置文件
# 首先进入配置文件目录cd /etc/nginxls# 查看配置文件cat nginx.config# 复制一份原始的配置文件cp nginx.config nginx.config.back# 按照上面 vue-router 的需求修改配置文件vi nginx.config# 进入编辑状态I# 修改文件location / {try_files $uri $uri/ /index.html;}# 之后保存并退出esc:wq# 再次查看是否已修改成功cat nginx.config# 重载 nginx 配置文件(必须重载,不然修改的是不会生效的!)nginx -s reload
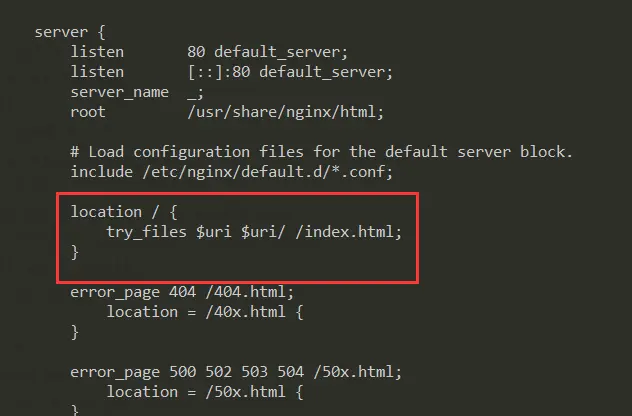
上面的步骤操作完成之后便解决了 vue-router spa 带来的刷新页面 404 的问题了,哦耶~
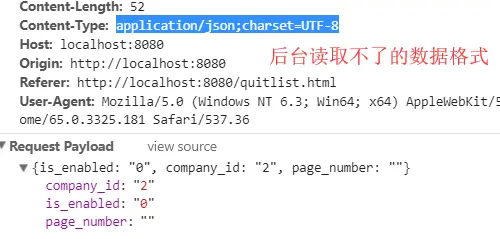
16. 与后台 API 进行通信时,Content-Type 请求文本格式未统一带来的问题
问题截图
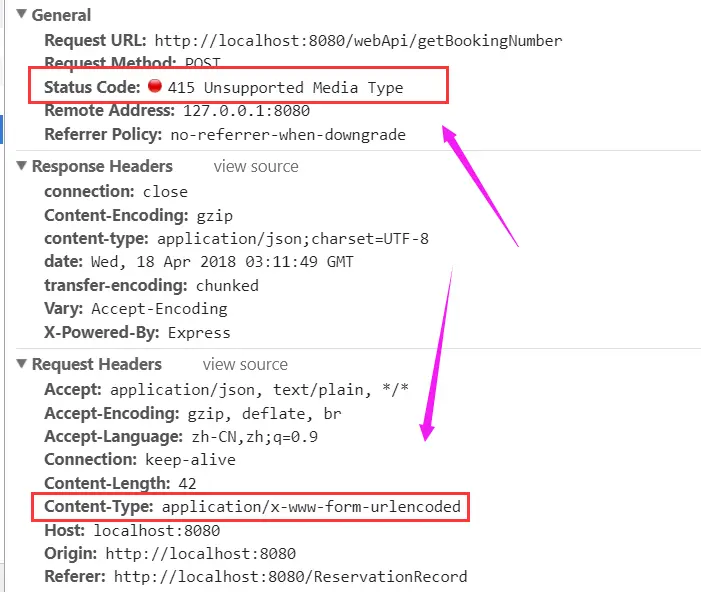 后台返回 415 Unsupported Media Type
对于当前请求的方法和所请求的资源,请求中提交的实体并不是服务器中所支持的格式,因此请求被拒绝。
后台返回 415 Unsupported Media Type
对于当前请求的方法和所请求的资源,请求中提交的实体并不是服务器中所支持的格式,因此请求被拒绝。产生错误的原因:
这里使用的是
post请求,后台的请求文本格式为Content-Type:application/json;charset=UTF-8但是这里使用的是默认的Content-Type:application/x-www-form-urlencoded所以造成的此次错误解决方法
在提交数据之前使用
JSON的stringify方法将数据转换为 json 格式的文本即可,如下图所示 JSON.stringiy()
JSON.stringify() 方法是将一个JavaScript值(对象或者数组)转换为一个 JSON字符串,如果指定了replacer是一个函数,则可以替换值,或者如果指定了replacer是一个数组,可选的仅包括指定的属性。
JSON.stringiy()
JSON.stringify() 方法是将一个JavaScript值(对象或者数组)转换为一个 JSON字符串,如果指定了replacer是一个函数,则可以替换值,或者如果指定了replacer是一个数组,可选的仅包括指定的属性。17. 清除
.vue文件在 vscode 编辑器中格式化时默认添加的分号和双引号的规则问题
因为
vue-cli项目创建后会默认的增加.eslintrc.jseslint 规则文件来帮助我们更好的统一代码的规范性,但是现在的趋势是省略javascript代码书写时在末尾添加的分号,但是 vscode 编辑器因为装了vetur这个插件,所以还是会像之前的那样默认追加,使得项目报 eslint 语法的错误,单双引号也是相同的问题解决方法
先安装扩展插件
Prettier - Code formatter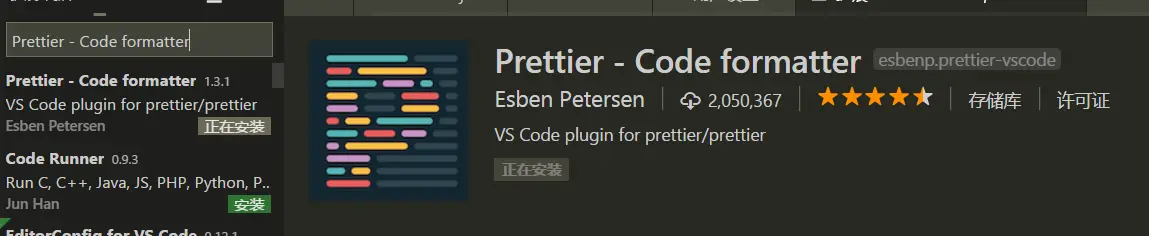 之后在顶部菜单栏依次操作:【文件】->【首选项】->【设置】->【用户设置】
最后增加下面的规则代码片段
之后在顶部菜单栏依次操作:【文件】->【首选项】->【设置】->【用户设置】
最后增加下面的规则代码片段
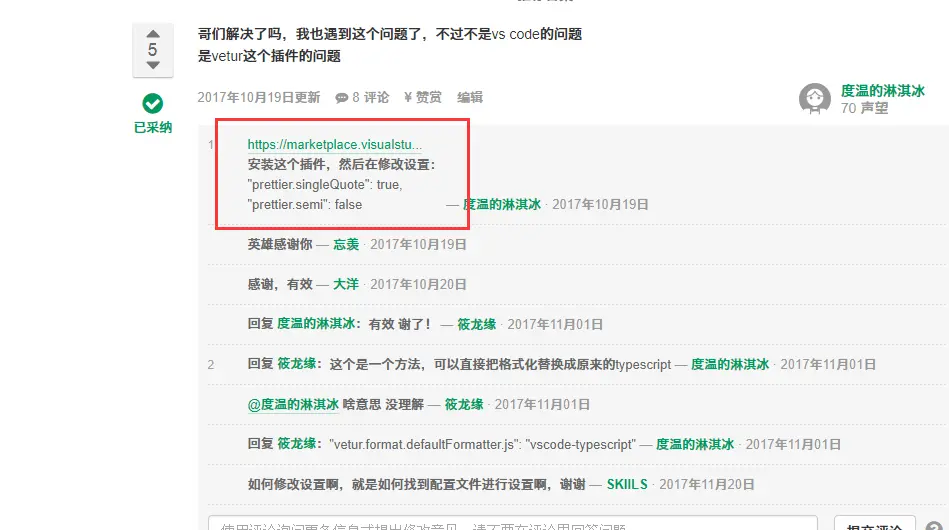
"prettier.singleQuote": true,"prettier.semi": false
18. 之前的删掉了,等待更新中……
##19. 给 vue 挂载全局方法
找到
main.js文件进行编辑,这里以axios为例演示import Vue from 'vue'import axios from 'axios'Vue.prototype.axios = axios
使用方法 某个
.vue文件的sccript中如下编辑Vue.axios.post('url', { name: '' }).then(response => {console.log(response)}).catch(response => {console.log(response)}).finally(() => (me.loading= false));
20.
axios不兼容 ie 的问题解决问题描述
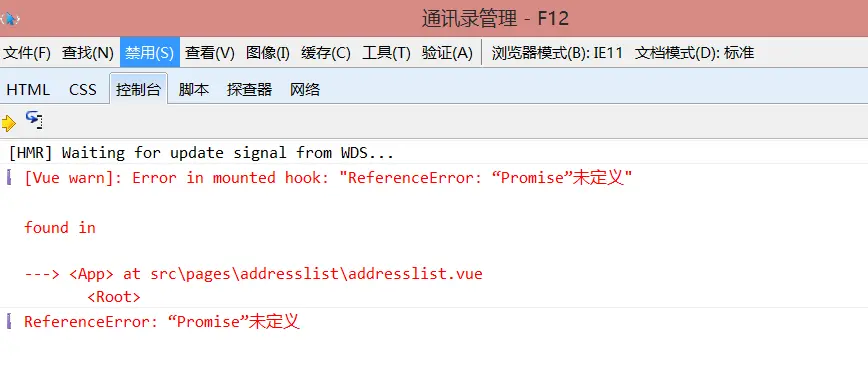 在 IE 浏览器下会报 “Promise”未定义” 的错误
资料
解决方法
使用 babel-polyfill 这个包
装包
yarn add babel-polyfill --dev
之后在
main.js文件中引入包即可import 'babel-polyfill'

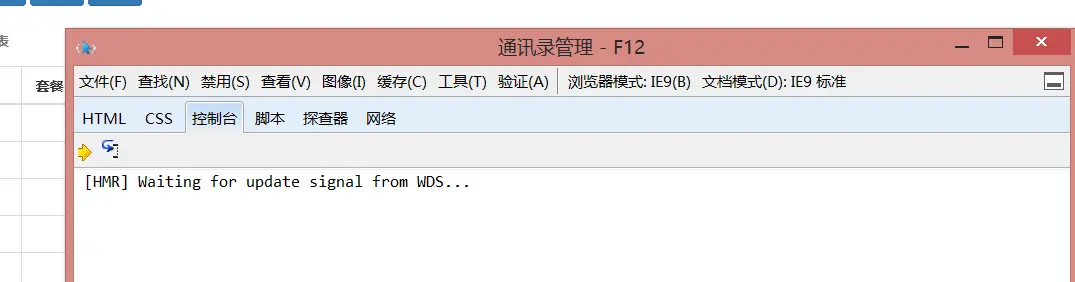
测试可兼容至 IE8+
更新 优化进阶 已经过测试
参考文章里面有详细的解释:babel-polyfill使用与性能优化 目的是为了打包出更小的体积,下图是使用新方法打包出的体积,用上面的方法打包出来是
2.64MB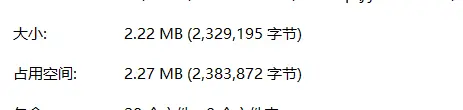
解决方法 将之前引入的
babel-polyfill换成core-js/es6/promise这个是vue-cli脚手架就有的包无需再装了import 'core-js/es6/promise' // 解决 axios 兼容 IE 问题

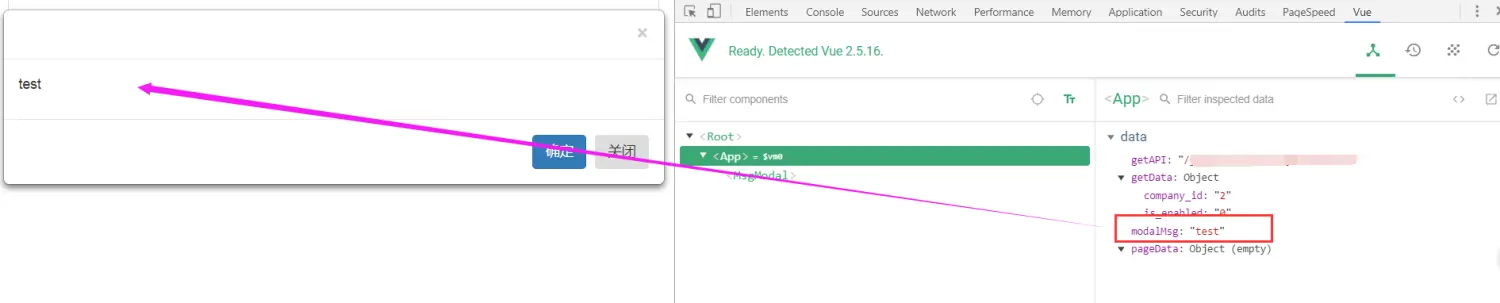
21. 组件封装,这里以 bootstrap 的 modal 模块为例
先写组件,在
src -> components目录下新建一个文件夹msgmodal -> index.vue,编辑如下<template><!-- 弹窗 --><div class="modal fade" tabindex="-1" role="dialog" id="myModal"><div class="modal-dialog" role="document"><div class="modal-content"><div class="modal-header"><!-- <h5 class="modal-title"></h5> --><button type="button" class="close" data-dismiss="modal" aria-label="Close"><span aria-hidden="true">×</span></button></div><div class="modal-body"><p>{{ modalMsg }}</p></div><div class="modal-footer"><button type="button" class="btn btn-primary" data-dismiss="modal">确定</button><button type="button" class="btn btn-secondary" data-dismiss="modal">关闭</button></div></div></div></div></template><script>export default {name: 'MsgModal', // 定义的组件名称 使用时写法:msg-modalprops: ['modalMsg'] // 定义的与父级通信的属性值 使用时写法:modal-msg}</script><style scoped></style>
在具体的
.vue文件使用组件,方法如下,这里是用的动态绑定的方法传递属性的值<!-- template --><!-- 弹窗 --><msg-modal :modal-msg="modalMsg"></msg-modal>// scriptimport MsgModal from '@/components/msgmodal'export default{name:'App',components: { MsgModal },data () {return {// 弹窗信息 在执行操作时使用modalMsg: ''}}}
测试,已实现可以实时更新内容了
22. 在
router -> index.js按需引入模块,优化SPA页面的性能源码
import Vue from 'vue'import Router from 'vue-router'import VueResource from 'vue-resource'// import index from '@/index'// import companyapply from '@/companyapply'// import choosenumber from '@/choosenumber'// import statelist from '@/statelist'Vue.use(Router)Vue.use(VueResource)export default new Router({// 去掉路由中自带的 #/ 这种东西mode: 'history',routes: [{path: '/',name: 'index',component: () => import('@/index')},{path: '/companyapply',name: 'companyapply',component: () => import('@/companyapply')},{path: '/choosenumber',name: 'choosenumber',component: () => import('@/choosenumber')},{path: '/statelist',name: 'statelist',component: () => import('@/statelist')}]})
23. 在
Vue上挂载vux库中的LoadingPlugin组件main.js// The Vue build version to load with the `import` command// (runtime-only or standalone) has been set in webpack.base.conf with an alias.import Vue from 'vue'import { LoadingPlugin } from 'vux' // 引入 looding 组件import App from './App'import store from './store' // 引入 vueximport router from './router'Vue.config.productionTip = falseVue.http.options.emulateJSON = trueVue.use(LoadingPlugin) // 挂载 loading 组件/* eslint-disable no-new */new Vue({el: '#app',router,store, // 需要在添加components: { App },template: '<App/>'})
.vue文件中具体的使用示例:// loadingthis.$vux.loading.show({text: '数据提交中})// 隐藏 loadingthis.$vux.loading.hide()
24. 解决:使用
axios默认发送的是application/json;charset=UTF-8这种格式的数据后台无法读取的问题后台需要的是
application/x-www-form-urlencoded这样的数据格式 参考地址问题截图
需要的格式截图
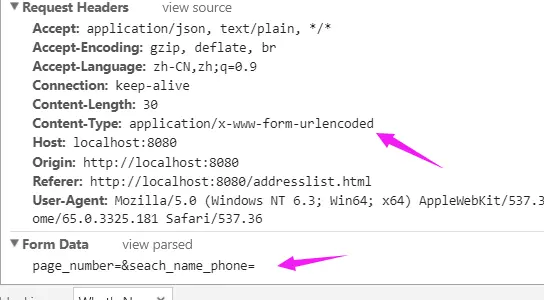
解决方法
场景还原:
created(){this.fetchPostList()},watch: {searchInputValue(){this.fetchPostList()}}
组件创建的时候我们获取一次列表,同时监听input框,每当发生变化的时候重新获取一次筛选后的列表这个场景很常见,有没有办法优化一下呢?
招式解析:
首先,在watchers中,可以直接使用函数的字面量名称;其次,声明immediate:true表示创建组件时立马执行一次。
watch: {searchInputValue:{handler: 'fetchPostList',immediate: true}}
26. 父子组件通信 — 子组件可以调用父组件的方法
实现思路
使用
this.$emit()以下示例为分页组件,下面只是将主要的部分代码贴出父组件
<template><!-- 分页 --><pagination @updatePageData="loadPageData"></pagination></template><script>export default{methods:{loadPageData:function(){// do something}}}<script>
上面代码的说明
@updatePageData="loadPageData":传递方法时前面使用@;updatePageData是给子组件使用的 父组件loadPageData方法的别名子组件
export default{methods:{pageGo:function(){const me = this// 调用父组件方法me.$emit('updatePageData')}}}
27. 父子组件通信 — 子组件可动态获取父组件的数据
问题描述
由于父组件的数据是动态获取的,而子组件初始化时如果获取不到数据就
Game Over实现思路
使用
props传数据 ;watch监听数据 以下示例为分页组件,下面只是将主要的部分代码贴出父组件
<template><!-- 分页 --><pagination :parentPageData="pageGetData"></pagination></template><script>export default{data(){return{pageGetData:[]}},methods:{getData:function(){// ajax 请求之后改变 pageGetData 的数据}}}<script>
上面代码的说明
:parentPageData="pageGetData"传递方法前面使用:;parentPageData是给子组件使用的 父组件pageGetData数据的别名子组件
export default{props:['parentPageData'], // 父组件数据 别名watch:{// 监听父组件数据变化实时更新数据parentPageData:{handler: 'loadPageList',immediate: true}},methods:{// 加载页面数据loadPageList:function(){// do something}}}
28. vue 多页面开发分页组件 有搜索功能
29. Vue 在 .vue 文件的样式 style 标签中使用 background:url() 引入图片
参考资料 vue 背景图引入
- 示例代码片段
<style scoped>.loading {position: fixed;left: 0;top: 0;background: url('~@/assets/img/loading-ball.svg') center center no-repeat #fff;width: 100vw;height: 100vh;z-index: 1000;}</style>
30. 页面加载数据之前增加
loading动画
31. 封装一个 axios 的通用方法
思路
自定义一个函数,将其挂载到
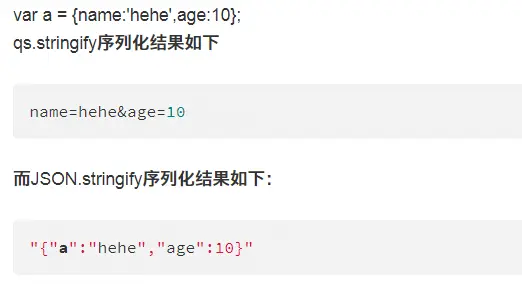
Vue对象的prototype上面,方便在页面使用,因为axios一般得和qs模块配合使用 qs 使用参考地址
在
main.js文件中挂载自定义方法import Vue from 'vue'import 'babel-polyfill' // 解决 axios 兼容 IE 问题import qs from 'qs' // 解决 axios 数据提交格式与后台不一致的问题 -> name=hehe&age=10import axios from 'axios'// import router from './router'import '@/assets/css/common.css'import App from './index.vue'Vue.config.productionTip = false/*** 自定义一个方法封装 axios 请求,并将其挂载至 Vue 原型链* @param {string} url axios 请求的地址* @param {string} dataJson axios 向请求地址发送的 json 数据* @param {function} sucessFn axios 成功回调函数* @param {function} errorFn axios 失败回调函数*/Vue.prototype.axiosFn = function(url, dataJson, sucessFn, errorFn) {axios.post(url, qs.stringify(dataJson)).then(response => {console.log(response)sucessFn()}).catch(error => {console.log(error)errorFn()})}/* eslint-disable no-new */new Vue({el: '#app',// router,components: { App },template: '<App/>'})
具体的使用就不写了,只需要在调用方法
axiosFn时给其传相应的参数即可
32. 满足:点击当前元素时,其子元素不会被点中,且还会执行回调事件—修改当前样式
思路:
现在的需求是有一个列表,每个列表元素也是一个有子元素的嵌套元素,点击列表的每个子元素时给当前列表添加类名 正常使用官网提供的 事件处理 — Vue.js 文档,无法实现想要的效果,因为点击传递的
$event是当前点击的事件,target无法只得到列表的每个元素,相对其子元素而言就是父级元素 以前解决该方法的时候使用的是较为笨的方法:判断target元素,将其强行指向列表元素这样子新方法
给每个列表元素里面的子元素设置
css属性pointer-events: none;,这样的话也无需给@click添加什么修饰符即可实现需求
33. 子页面中在接口请求的时候,需要主页面 App.vue 中请求到的接口的返回值,特殊情况下会出现 Bug
错误重现
 顶部是公用的导航组件,数据在
 App.vue中请求,之后存进store中去,因为是keep-alive,所以正常情况下顶部的数据在第一个页面载入时便会储存到store中,但是如果是第二个页面(因为只有这个页面会需要上面的联系电话的数据)ctrl+f5强制刷新后,store中的数据会被清空,这样如果在子页面请求时没有及时的将主页面中请求到的数据联系电话存入store中的话,便会出现子页面请求时获取联系电话字段为空的情况,主要就是因为请求是同步发生的,加载的延迟很低,应该是主页面请求完成之后子页面再请求这样子。解决
bug后的源码示例App.vue文件<template lang="pug">#app.header-box(v-loading="layoutHeaderLoading")LayoutHeader.nav-boxLayoutNavkeep-alive.router-view(v-if="loadGuestRecord")router-view</template><script>import LayoutNav from "@/components/LayoutNav";import LayoutHeader from "@/components/LayoutHeader";import { layoutHeader } from "@/api";export default {components: { LayoutNav, LayoutHeader },data() {return {// 是否加载 loadinglayoutHeaderLoading: false,// 顶部 header 数据对象headerInformation: {},// 解决 “联系电话”未储存到 store 中,所产生的 bugloadGuestRecord: true};},created() {const me = this;me.getPageData();},watch: {$route(to, from) {const me = this;// 对路由变化作出响应...to.path === "/guestRecord" &&!me.$store.getters.getMobile &&(me.loadGuestRecord = false);}},methods: {/*** 获取顶部 header 数据*/getPageData() {const me = this;me.layoutHeaderLoading = true;layoutHeader.getCusUserInfo().then(resolve => {console.log(resolve);resolve.data.code === 200 &&(me.headerInformation = resolve.data.data);me.$store.commit("updateMobile", me.headerInformation.mobile);}).catch(error => {console.log(error);}).finally(() => {me.layoutHeaderLoading = false;!me.loadGuestRecord && (me.loadGuestRecord = true);});}}};</script>
解决思路,解释上面的代码
主要是
顶部的全局请求.then( 单页请求 )这个样子的,下面是具体的实施方案: 在主页面 data 中增加一个布尔变量,默认为true,用它来指令是否 v-if 加载子页面 router-view ,watch.$route 中判断路由以及其他条件,为否 布尔变量 = false,再在主页面的请求中 .finally( 布尔变量 = true )
34. router-link 导航接收并传递全部的 url 参数
先说思路:
在主页面
App.vue文件中,接收所有的参数并将其传递给nav导航源码示例:
主文件
App.vue<template lang="pug">#app.header-box(v-loading="layoutHeaderLoading")LayoutHeader(:header-information="headerInformation").nav-boxLayoutNav(:url-query="urlQuery")keep-alive.router-view(v-if="loadGuestRecord")router-view</template><script>import LayoutNav from "@/components/LayoutNav";import LayoutHeader from "@/components/LayoutHeader";import { layoutHeader } from "@/api";export default {components: { LayoutNav, LayoutHeader },data() {return {// 是否加载 loadinglayoutHeaderLoading: false,// 顶部 header 数据对象headerInformation: {},// 接受页面的所有参数,并将其赋值到 router-link 参数上面urlQuery: {}};},created() {const me = this;me.getPageData();},watch: {$route(to, from) {const me = this;me.urlQuery = to.query;}}};</script>
组件
LayoutNav.vue<template lang="pug">nav.navul.nav-listli.nav-item(v-for="(item,index) in routers" :key="item.id")router-link(:to="{ name: item.link, query: urlQuery }").nav-iconi(:class="item.icon")h3.nav-title {{ item.name }}</template><script>import { routers } from "./config.json";export default {name: "layoutNav",props: {urlQuery: Object},data() {return {routers: routers};}};</script>
35. 项目增加权限
- 思路:
- 首先做的项目是从别的项目中跳转过来的,所以有
权限的需求 - 判断权限的主要步骤:
- 先增加一个
401无权限页面 - 注册一个全局前置守卫
- 在守卫中判断加密字符是否一致,路由跳转至相应的页面去
- 在
App.vue文件中,使用全局的组件时,增加一个布尔变量控制是否展示组件,默认为false展示组件,true是不展示组件,如果watch.$route.to.path === "/401",这个布尔变量便为true
- 先增加一个
36. 使用 beforeRouteLeave 销毁组件,实现组件的实时化
代码
// 导航离开该组件的对应路由时调用 [可以访问组件实例 `this`] https://router.vuejs.org/zh/guide/advanced/navigation-guards.html#%E7%BB%84%E4%BB%B6%E5%86%85%E7%9A%84%E5%AE%88%E5%8D%ABbeforeRouteLeave(to, from, next) {// 销毁组件,避免通过 vue-router 再次进入时,仍是上次的 history 缓存的状态this.$destroy(true);next();}
37. 使用官方提供的
component,根据条件循环判断使用不同的组件代码(其中
van相关的组件使用方法请查看 vant 官网)<template lang="pug">.integrated-queryvan-tabs(v-model="tabActive" color="#39a0ff" line-width="40" sticky)van-tab(v-for="item in tabTitleList" :key="item.value" :title="item.name" :name="item.value")component(:is="item.value")</template><script>export default {name: "integratedQuery",components: {Overview: () => import("./components/Overview"),Product: () => import("./components/Product"),Accounting: () => import("./components/Accounting"),Order: () => import("./components/Order"),Assets: () => import("./components/Assets"),Discount: () => import("./components/Discount"),Invoice: () => import("./components/Invoice"),VirtualNetwork: () => import("./components/VirtualNetwork")},data() {return {tabTitleList: [{name: "总览",value: "overview"},{name: "产品",value: "product"},{name: "账务",value: "accounting"},{name: "订单",value: "order"},{name: "资产",value: "assets"},{name: "优惠",value: "discount"},{name: "发票",value: "invoice"},{name: "虚拟网",value: "virtual-network"}],tabActive: "overview"};},}</script>
38. 基于
vue-cli脚手架 官方配置 在配置文件中vue.config.js引入样式预处理器共享的全局变量。配置方式
module.exports = {/*** css 相关配置*/css: {loaderOptions: {stylus: {import: "~@/common/stylus/mixin.styl"}}}}
39.
el-input使用@keyup.enter无效需要添加
.native修饰符代码示例
el-input(placeholder="请输入内容" v-model="dataListQuery.queryKey" size="small" clearable @keyup.enter.native="getDataList(leftTreeSelect.id)")
40.
el-table使用toggleAllSelection方法无效需要在函数中,增加一个参数
true代码示例
this.$refs.dialogTable.toggleAllSelection(true)
41.
el-select选中之后,数据无法回显需求描述
目前是有一个弹窗,内部有一个表格,表格内部的每一条数据都是可以单独编辑的,有
input也有select
问题描述
当我选中维表或者账期下拉选项之后,相对
v-model绑定的数据字段已经成功更新了,但是在el-select组件中显示不出来字典相应的文本问题解决
经过几个小时的反复试验,最终确定是由于我绑定的数据字段,并不是在数据初始化时(接口获取的时候)定义的,所导致的字段无法及时更新的问题。
下面简单描述下我具体的错误方式:
接口获取完数据,我并没有在这个时候增加一些需要初始化的字段,而是选择在将接口数据赋值给弹窗子组件的
form之后,再在弹窗子组件中进行了字段的初始化,由于我每次赋值都是使用的ES6对象解构赋值的方式,所以最终导致解构出的变量已经不是最初始赋值时的对象,也就无法同步更新form表单中的数据。 所以最终的解决方法就是,在接口获取完数据,当时就增加一些初始化必要的字段。
42. 父组件使用 v-model 传值给子组件,实现子组件可以同步更新父组件的 v-model 绑定的值
参考资料
具体实现的主要代码
父组件
<template lang="pug">.contentchild-el(v-model="data")</template><script>import "childEl" from "./components"export default {components: {childEl},data() {return {data: ""}}}</script>
子组件
<template lang="pug">.content.text(@click="handleClick") {{ data }}</template><script>export default {model: {prop: "data",event: 'change'},props: {data: {type: String,default: ""}},methods: {handleClick() {this.$emit("change", "测试文本")}}}</script>
43 当使用
v-for循环生成dom时,当需要再增加ref属性时,获取组件时需要加一个下标[0]
- 代码
//- 组件容器.tab-content(v-for='item in navListData', :key='item.value').tab-bar {{ item.name }}component(:is='item.value', :ref='item.value')
const componentsList = ['Overview', 'Volume', 'Industry', 'Monographic']componentsList.forEach((element) => {const component = this.$refs[`${element}`]console.log(component)component && component.length && component[0].getPageData(this.pagePostData)})

若有收获,就点个赞吧
0 人点赞
