- 首先在桌面新建一个 webpacktest 文件夹
- 打开命令行工具,进入 webpacktest 文件夹中 ``` cd Desktop cd webpacktest
3. 安装 webpack
//先在全局安装 cnpm install webpack -g //再在项目中安装 cnpm install webpack —save-dev
4. 在项目中新建一个 webpack.config.js 文件<br />编辑 webpack.config.js 文件
var webpack = require(‘webpack’); console.log(webpack);//测试 webpack 是否安装成功
5. 在命令行中运行,查看输出是否成功<br />node webpack.config.js> 输出如下图所示的一个对象 即表示成功了<br />6. 接下来就是引入比较核心的东西
var webpack = require(‘webpack’); //最核心的模块,所有的东西都要在这里面进行 module.exports = {
}
7. 接下来就要建网站了,一般是通过这样的形式:在项目中新建 src 和 build 文件夹<br />文件是在 src 文件夹中编辑然后 build 到 build 文件夹中 上线上的是 build 文件夹<br />文件结构如下> src -> stylesheets -> index.css<br />src -> scripts -> app.js<br />src -> scripts -> index.js<br />src -> index.html<br />build -> stylesheets<br />build -> scripts8. 开始编辑文件<br />index.js
var s = function(data) { //console.warn 向web 控制台输出一条警告信息 console.warn(data); } //切记这里要按照模块的规范一样将要导出的东西导出,这里我们将函数 s 导出去了 module.exports.fn = s;
app.js
var index = require(‘./index.js’); index.fn(‘init index’);
index.html
<!DOCTYPE html>
Hello Webpack
index.css
body{ background: black; color: green; }
webpack.config.js
var webpack = require(‘webpack’); // console.log(webpack);//测试 webpack 是否安装成功
//最核心的模块,所有的东西都要在这里面进行 module.exports = { //配置入口资源 //它的值可以是对象也可以是单一的一个 entry:dirname + ‘src/scripts/app.js’, //配置编译后的资源 //将编译后的资源放到哪去 output:{ path:dirname + ‘build/scripts’, //hash 表示的是:平常的 index.js 编译后就变成了 index.assxx.js filename:’[name]-[hash].js’ } }
9. 在命令行中 webpacktest 目录下运行程序
webpack
显示如下图所示代表执行成功了> 10. 到项目中的 build -> scripts 文件夹中查看会发现多了一个编译后的 .js 文件
/**/ (function(modules) { // webpackBootstrap /**/ // The module cache /**/ var installedModules = {}; /**/ /**/ // The require function /**/ function webpack_require(moduleId) { /**/ /**/ // Check if module is in cache /**/ if(installedModules[moduleId]) { /**/ return installedModules[moduleId].exports; /**/ } /**/ // Create a new module (and put it into the cache) /**/ var module = installedModules[moduleId] = { /**/ i: moduleId, /**/ l: false, /**/ exports: {} /**/ }; /**/ /**/ // Execute the module function /**/ modules[moduleId].call(module.exports, module, module.exports, webpack_require); /**/ /**/ // Flag the module as loaded /**/ module.l = true; /**/ /**/ // Return the exports of the module /**/ return module.exports; /**/ } /**/ /**/ /**/ // expose the modules object (webpack_modules) /**/ webpack_require.m = modules; /**/ /**/ // expose the module cache /**/ webpack_require.c = installedModules; /**/ /**/ // define getter function for harmony exports /**/ webpack_require.d = function(exports, name, getter) { /**/ if(!webpack_require.o(exports, name)) { /**/ Object.defineProperty(exports, name, { /**/ configurable: false, /**/ enumerable: true, /**/ get: getter /**/ }); /**/ } /**/ }; /**/ /**/ // getDefaultExport function for compatibility with non-harmony modules /**/ webpack_require.n = function(module) { /**/ var getter = module && module.esModule ? /**/ function getDefault() { return module[‘default’]; } : /**/ function getModuleExports() { return module; }; /**/ webpackrequire.d(getter, ‘a’, getter); /**/ return getter; /**/ }; /**/ /**/ // Object.prototype.hasOwnProperty.call /**/ webpackrequire.o = function(object, property) { return Object.prototype.hasOwnProperty.call(object, property); }; /**/ /**/ // webpackpublicpath /**/ webpackrequire.p = “”; /**/ /**/ // Load entry module and return exports /**/ return webpackrequire(__webpack_require.s = 0); /**/ }) /**/ /**/ ([ / 0 / /*/ (function(module, exports, __webpack_require) {
var index = webpack_require(1); index.fn(‘init index’);
// }), / 1 / // (function(module, exports) {
var s = function(data) { //console.warn 向web 控制台输出一条警告信息 console.warn(data); } //切记这里要按照模块的规范一样将要导出的东西导出,这里我们将函数 s 导出去了 module.exports.fn = s;
// }) /*/ ]);
11. 这个时候需要在 html 中将这个编译过后的 .js 文件引过来,需要安装一个包 html-webpack-plugin> 参考链接:[https://www.npmjs.com/package/html-webpack-plugin](https://www.npmjs.com/package/html-webpack-plugin)
npm install html-webpack-plugin —save-dev
12. 配置插件 plugins<br />编辑 webpack.config.js 文件
var webpack = require(‘webpack’); var HtmlWebpackPlugin = require(‘html-webpack-plugin’); // console.log(webpack);//测试 webpack 是否安装成功
//最核心的模块,所有的东西都要在这里面进行 module.exports = { //配置入口资源 //它的值可以是对象也可以是单一的一个 entry: dirname + ‘/src/scripts/app.js’, //配置编译后的资源 //将编译后的资源放到哪去 output: { path: dirname + ‘/build’, //hash 表示的是:平常的 index.js 编译后就变成了 index.assxx.js filename: ‘scripts/[name]-[hash].js’ }, plugins: [ new HtmlWebpackPlugin({ // Also generate a test.html filename: ‘index.html’, template: __dirname + ‘/src/index.html’ }) ] }
13. 命令行中执行
webpack
> 结果如下图所示,证明成功了<br />14. 此时去查看 build 文件夹,会发现多了一个 index.html 文件
<!DOCTYPE html>
Hello Webpack
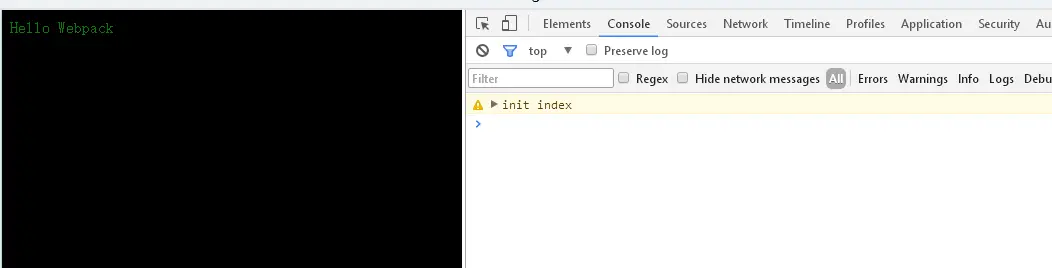
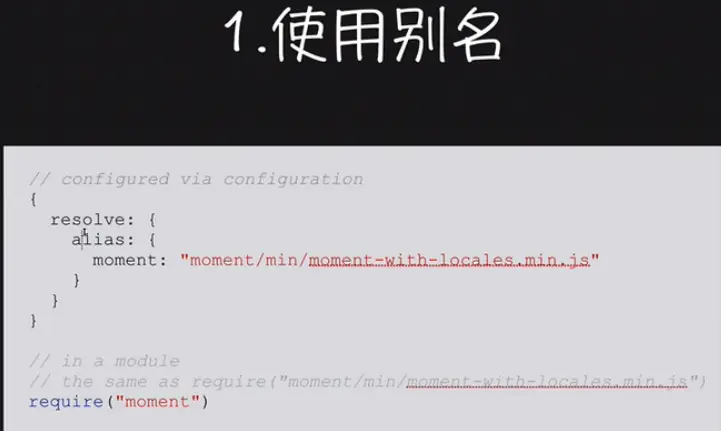
在浏览器中打开 index.html 页面 会如下图显示> 15. 配置别名 resolve<br />编辑 webpack.config.js 文件
var webpack = require(‘webpack’); var HtmlWebpackPlugin = require(‘html-webpack-plugin’); // console.log(webpack);//测试 webpack 是否安装成功
//最核心的模块,所有的东西都要在这里面进行 module.exports = { //配置入口资源 //它的值可以是对象也可以是单一的一个 entry: dirname + ‘/src/scripts/app.js’, //配置编译后的资源 //将编译后的资源放到哪去 output: { path: dirname + ‘/build’, //hash 表示的是:平常的 index.js 编译后就变成了 index.assxx.js filename: ‘scripts/[name]-[hash].js’ }, plugins: [ new HtmlWebpackPlugin({ // Also generate a test.html filename: ‘index.html’, template: __dirname + ‘/src/index.html’ }) ], resolve:{ extensions:[‘.js’,’.css’] } }
然后修改 app.js 文件第一行
var index = require(‘./index’);
将 build ->scripts 中的两个编译后的 .js 文件删掉<br />再在命令行中执行程序
webpack
如下图所示即表示成功了> 16. 接下来开始引入 css 文件<br />编辑 app.js 文件
var index = require(‘./index’); require(‘../stylesheets/index’); index.fn(‘init index’);
此时运行程序
webpack
会报如下所示的错误> <br />这个报错是因为对 css 文件编译失败了需要另一个 loader17. 资源处理 module 模块<br />css 处理后实际上会被打包到 js 里编辑 webpack.config.js 文件
var webpack = require(‘webpack’); var HtmlWebpackPlugin = require(‘html-webpack-plugin’); // console.log(webpack);//测试 webpack 是否安装成功
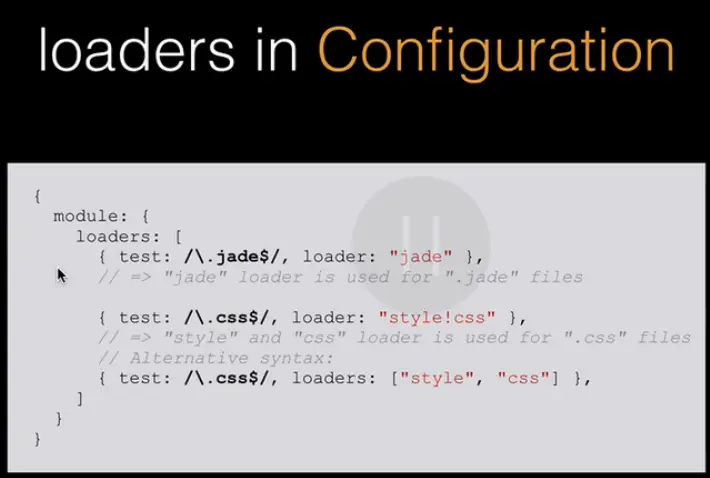
//最核心的模块,所有的东西都要在这里面进行 module.exports = { //配置入口资源 //它的值可以是对象也可以是单一的一个 entry: dirname + ‘/src/scripts/app.js’, //配置编译后的资源 //将编译后的资源放到哪去 output: { path: dirname + ‘/build’, //hash 表示的是:平常的 index.js 编译后就变成了 index.assxx.js filename: ‘scripts/[name]-[hash].js’ }, //配置插件 plugins: [ new HtmlWebpackPlugin({ // Also generate a test.html filename: ‘index.html’, template: __dirname + ‘/src/index.html’ }) ], //资源处理 module: { loaders: [{ //后面是正则匹配所有已 css 结尾的文件 test: /.css$/, //这里要装两个 loader 两个loader 之间的 感叹号是联合起来 loader: ‘style-loader!css-loader’ }] }, //配置扩展名 resolve: { extensions: [‘.js’, ‘.css’] } }
此时运行程序
webpack
会报出如下图所示的错误> <br />这个错是因为我们并没有安装所使用的 loader接下来进行安装两个 loader
cnpm install css-loader —save cnpm install style-loader —save
装完之后在执行
webpack
``` 如下图所示表示成功了
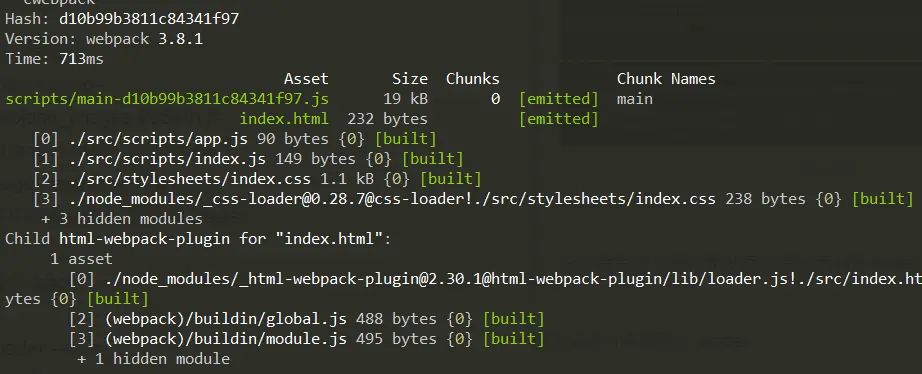
此时在浏览器中打开 build -> index.html 文件,css js 什么的就都有了
- 总结:
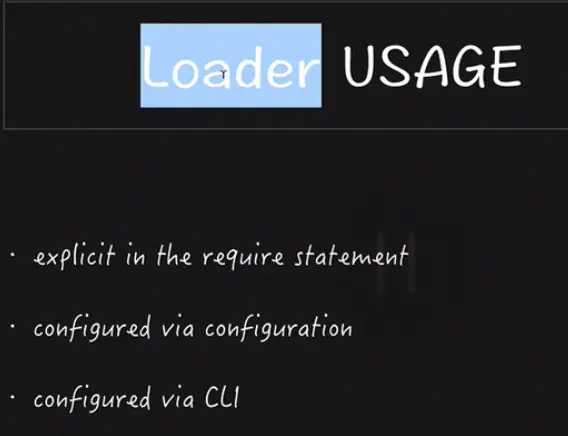
loader 的用法
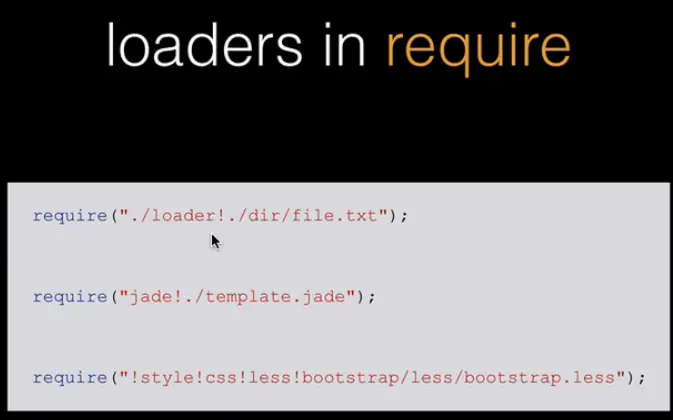
- 用 require 的方式
- 在 webpack.config.js 文件中配置
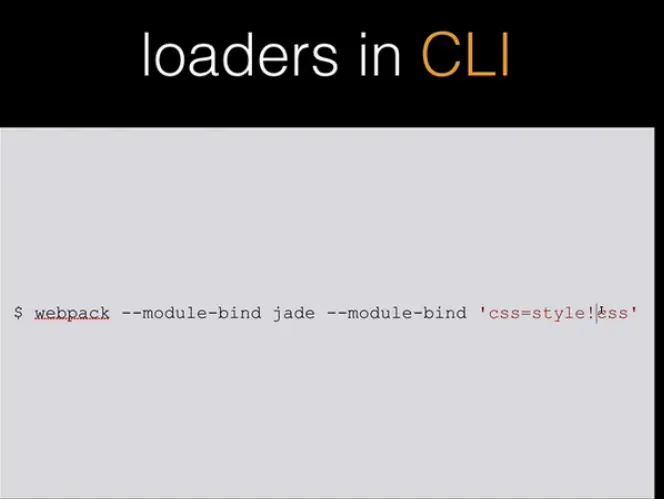
- 通过命令行的方式
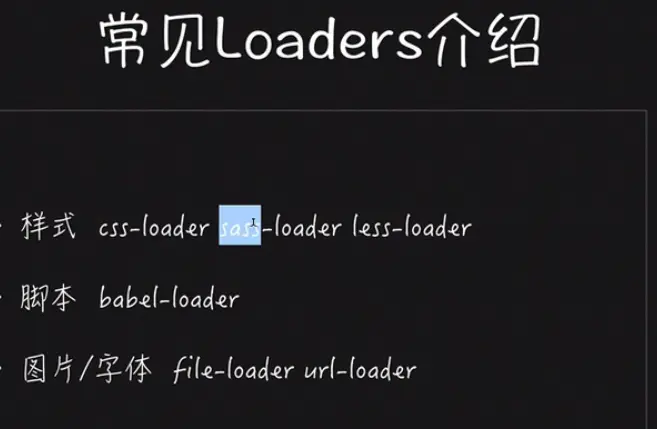
常见的 loader
- webpack 使用优化
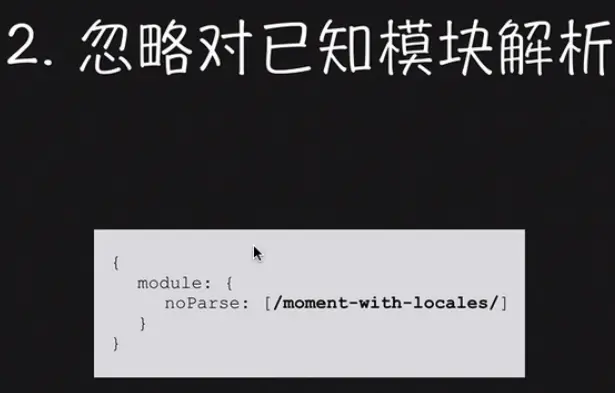
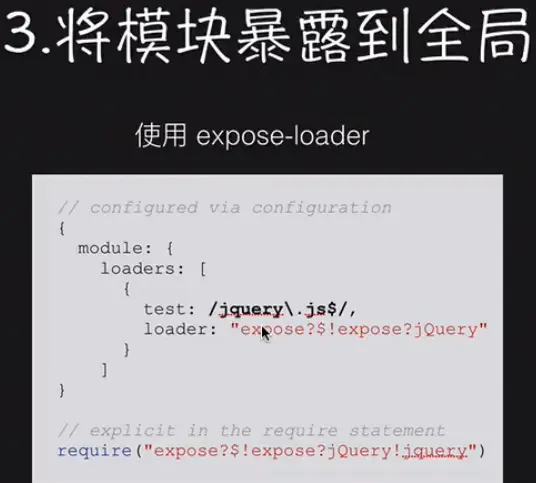

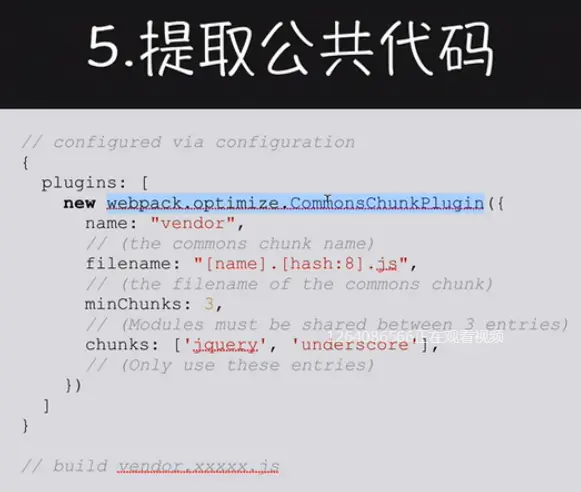
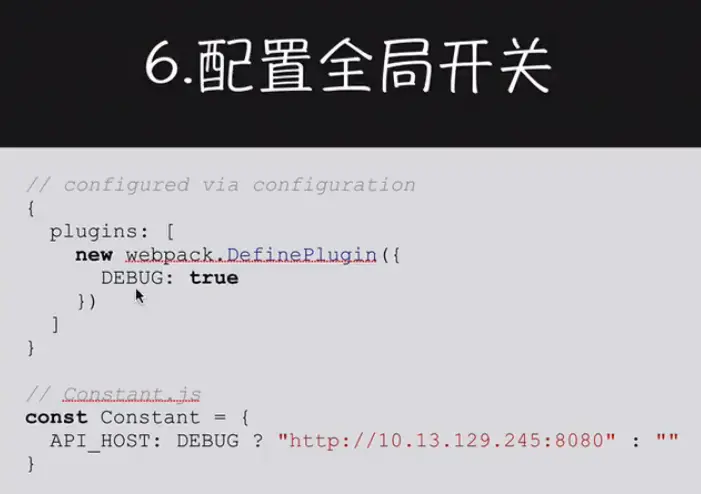
webpack 主要的就是 webpack.config.js 中五个模块的配置。
参考链接:http://webpack.github.io/ webpack 官网
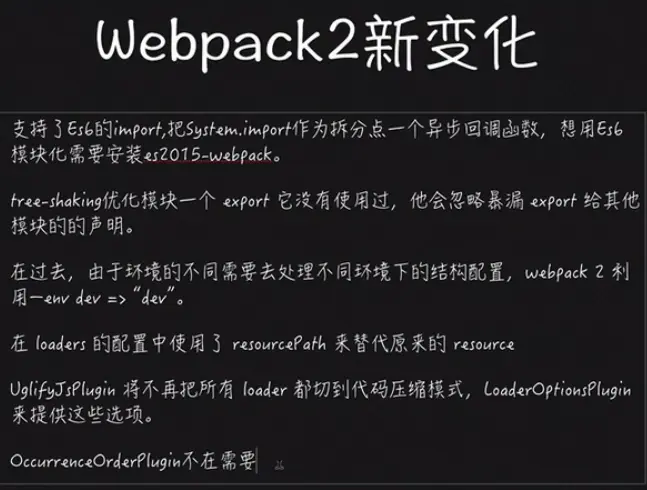
webpack 2

若有收获,就点个赞吧
0 人点赞
