React 是一个用于构建用户界面的 JavaScript 库,它只负责应用的视图层,帮助开发人员构建快速且交互式的 web 应用程序。
1 基本使用
1.1 创建虚拟 DOM:
React.createElement(component, props, ...children)- JSX (第一种方式的语法糖) ```jsx // 1.创建虚拟DOM const VDOM1 = React.createElement( ‘h1’, { id: ‘title’ }, React.createElement(‘span’, {}, ‘Hello,React1’) );
const VDOM2 = (
Hello,React2
);// 2.渲染虚拟DOM ReactDOM.render(VDOM2, document.getElementById(‘root’));
虚拟DOM打印:<br />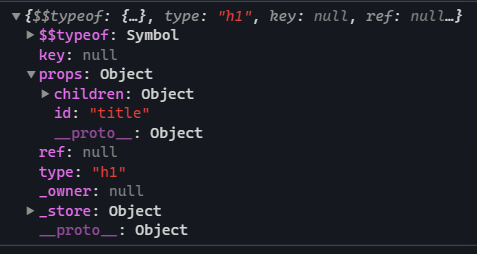<a name="nZCgs"></a>## 1.2 JSX1. 定义虚拟 DOM 时,不要写引号。2. 标签中混入** JS 表达式**时要用`{}`。3. 样式的类名指定不要用 class,要用 `className`。4. 内联样式,要用 `style={{key:value}}` 的形式去写。5. 只有一个根标签6. 单标签必须闭合7. 会自动展开数组8. 标签首字母1. 若小写字母开头,则将该标签转为 html 中同名元素,若 html 中无该标签对应的同名元素,则报错2. 若大写字母开头,react 就去渲染对应的组件,若组件没有定义,则报错。```jsxconst myId = '0001';const myData = 'React';const data = ['Angular', 'React', 'Vue'];const VDOM3 = (<div><h2 className="title" id={myId.toLowerCase()}><span style={{ color: 'red', fontSize: '29px' }}>{myData.toUpperCase()}</span></h2><ul>{data.map((item, index) => {return (<li key={index}>{index}:{item}</li>);})}</ul><input type="text" /></div>);
if 语句以及 for 循环不是 JavaScript 表达式,所以不能在 JSX 中直接使用 表达式:
- a
- a+b
- fn()
- arr.map()
- function test(){}
语句:
- if(){}
- for(){}
- switch(){}
1.3 组件化
- 组件名必须首字母大写
只能有一个根元素,必须有结束标签
函数式组件
function MyComponent1() {//此处的this是undefined,因为babel编译后开启了严格模式console.log(this);return <h2>我是用函数定义的组件(适用于【简单组件】的定义)</h2>;}
类式组件
class MyComponent2 extends React.Component {render() {//render是放在哪里的?—— MyComponent的原型对象上,供实例使用。//render中的this是谁?—— MyComponent的实例对象 <=> MyComponent组件实例对象。console.log('render中的this:', this);return <h2>我是用类定义的组件(适用于【复杂组件】的定义)</h2>;}}
渲染类组件标签的基本流程
创建组件实例对象,调用 render 得到虚拟DOM,解析为真实DOM,插入到页面
- 渲染组件
ReactDOM.render(<MyComponent/>, document.getElementById('root'));
1.4 组件实例三大属性
state
state 是组件对象最重要的属性, 值是对象(可以包含多个 key-value 的组合),不能直接修改或更新
- 组件中 render 方法中的 this 为组件实例对象
组件自定义的方法中 this 为 undefined,如何解决?
- 强制绑定 this: 通过函数对象的 bind()
箭头函数
class Toggle extends React.Component {constructor(props) {super(props);this.state = {isToggleOn: true};// 为了在回调中使用 `this`,this.handleClick = this.handleClick.bind(this);}handleClick() {this.setState(prevState => ({isToggleOn: !prevState.isToggleOn}));}render() {return (<button onClick={this.handleClick}>{this.state.isToggleOn ? 'ON' : 'OFF'}</button>);}}
使用箭头函数 ```jsx export default class Toggle extends React.Component { state = { isHot: false, wind: ‘微风’ };
// 箭头函数 changeWeather = () => { const isHot = this.state.isHot; this.setState({ isHot: !isHot }); }; render() { const { isHot, wind } = this.state; return (
<h1 onClick={this.changeWeather}>今天天气很{isHot ? '炎热' : '凉爽'},{wind}</h1>
); } }
this指向问题:```jsxclass Cat {sayThis () {console.log(this); // 这里的 `this` 指向谁?}exec (cb) {cb(); // 回调函数 没有显示调用者指向 undefined}render () {this.exec(this.sayThis);}}const tom = new Cat();tom.render(); // undefined// ES6 的 class 语法,自动地使用严格模式,非严格模式下指向全局对象// 当你使用 onClick={this.handleClick}来绑定事件监听函数的时候,// handleClick 函数实际上会作为回调函数,传入 addEventListener()
class Demo {constructor() {this.name = 'demo';}handleClick1 = () => {console.log(this.name);};handleClick2() {console.log(this.name);}}const demo = new Demo();const fn1 = demo.handleClick1;const fn2 = demo.handleClick2;console.log(demo.handleClick1()); // democonsole.log(demo.handleClick2()); // democonsole.log(fn1()); // democonsole.log(fn2()); // this undefined
class 中的方法如果是普通函数方法,该方法会绑定在构造函数的原型上 但是如果方式是箭头函数方法,该方法会绑定实例上
props
- 通过标签属性从组件外向组件内传递变化的数据
- 注意: 组件内部不要修改 props 数据,单向数据流 ```jsx import React from ‘react’;
export default class Person extends React.Component { constructor(props) { //构造器是否接收props,是否传递给super,取决于是否希望在构造器中通过this访问props super(props); console.log(‘constructor’, this.props); }
//对标签属性进行类型、必要性的限制 static propTypes = { name: PropTypes.string.isRequired, //限制name必传,且为字符串 sex: PropTypes.string, //限制sex为字符串 age: PropTypes.number, //限制age为数值 };
//指定默认标签属性值 static defaultProps = { sex: ‘男’, //sex默认值为男 age: 18, //age默认值为18 };
render() { const { name, age, sex } = this.props; //props是只读的 return (
- 姓名:{name}
- 性别:{sex}
- 年龄:{age + 1}
//渲染组件到页面
ReactDOM.render(
对 props 中的属性值进行类型限制和必要性限制:- ~~propTypes ~~方式已弃用```jsxPerson.propTypes = {name: React.PropTypes.string.isRequired,age: React.PropTypes.number}
- 使用 prop-types 库进限制(需要引入 prop-types 库)
import PropTypes from 'prop-types';Person.propTypes = {name: PropTypes.string.isRequired,age: PropTypes.number.}
refs
refs 提供了一种方式,允许我们访问 DOM 节点或在 render 方法中创建的 React 元素。
React.createRef()
class MyComponent extends React.Component {constructor(props) {super(props);this.myRef = React.createRef();}render() {return <div ref={this.myRef} />;}}
回调形式
class CustomTextInput extends React.Component {constructor(props) {super(props);this.textInput = null;this.setTextInputRef = element => {this.textInput = element;};}render() {// 使用 `ref` 的回调函数将 text 输入框 DOM 节点的引用存储到 React// 实例上(比如 this.textInput)return (<div><inputtype="text"ref={this.setTextInputRef}/></div>);}}
如果 ref 回调函数是以内联函数的方式定义的,在更新过程中它会被执行两次,第一次传入参数 null,然后第二次会传入参数 DOM 元素。这是因为在每次渲染时会创建一个新的函数实例,所以 React 清空旧的 ref 并且设置新的。通过将 ref 的回调函数定义成 class 的绑定函数的方式可以避免上述问题,但是大多数情况下它是无关紧要的。
String 类型的 Refs
例如ref="textInput"。可以通过this.refs.textInput 来访问 DOM 节点。不建议使用它,因为 string 类型的 refs 存在 一些问题。它已过时并可能会在未来的版本被移除。
事件处理
- 通过
onXxx属性指定事件处理函数(注意大小写)
- React 使用的是自定义(合成)事件, 而不是使用的原生DOM事件 —————— 为了更好的兼容性
- React 中的事件是通过事件委托方式处理的(委托给组件最外层的元素) ————————为了的高效
- 通过 event.target 得到发生事件的DOM元素对象 ——————————不要过度使用ref
1.5 受控组件
在一个受控组件中,表单数据是由 React 组件来管理的。另一种替代方案是使用非受控组件,这时表单数据将交由 DOM 节点来处理。
非受控组件
class Login extends React.Component{handleSubmit = (event)=>{event.preventDefault() //阻止表单提交const {username,password} = thisalert(`你输入的用户名是:${username.value},你输入的密码是:${password.value}`)}render(){return(<form onSubmit={this.handleSubmit}>用户名:<input ref={c => this.username = c} type="text" name="username"/>密码:<input ref={c => this.password = c} type="password" name="password"/><button>登录</button></form>)}}
受控组件
class Login extends React.Component {//初始化状态state = {username: '', //用户名password: '' //密码}//保存用户名到状态中saveUsername = (event) => {this.setState({ username: event.target.value })}//保存密码到状态中savePassword = (event) => {this.setState({ password: event.target.value })}//表单提交的回调handleSubmit = (event) => {event.preventDefault() //阻止表单提交const { username, password } = this.statealert(`你输入的用户名是:${username},你输入的密码是:${password}`)}render() {return (<form onSubmit={this.handleSubmit}>用户名:<input onChange={this.saveUsername} type="text" name="username" />密码:<input onChange={this.savePassword} type="password" name="password" /><button>登录</button></form>)}}
2 声明周期
生命周期的三个阶段(旧)
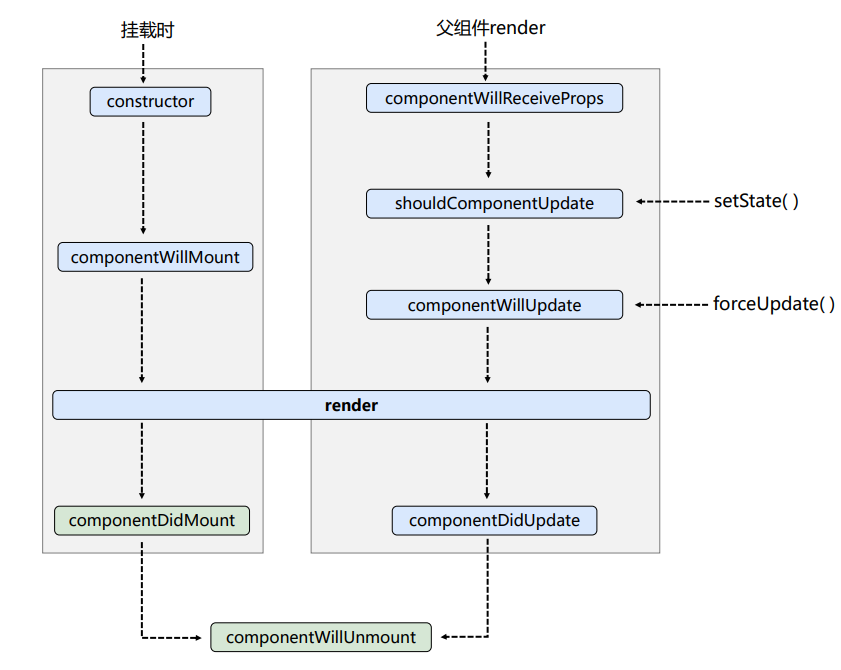
1.初始化阶段: 由 ReactDOM.render()触发—-初次渲染
- constructor()
componentWillMount()- render()
- componentDidMount()
2.更新阶段: 由组件内部this.setSate()或父组件重新 render 触发
a. shouldComponentUpdate()
b. ~~componentWillUpdate() ~~ // 组件将要更新的钩子
c. render()
d. componentDidUpdate() // 组件更新完毕的钩子
- 卸载组件: 由
ReactDOM.unmountComponentAtNode()触发
a. componentWillUnmount()
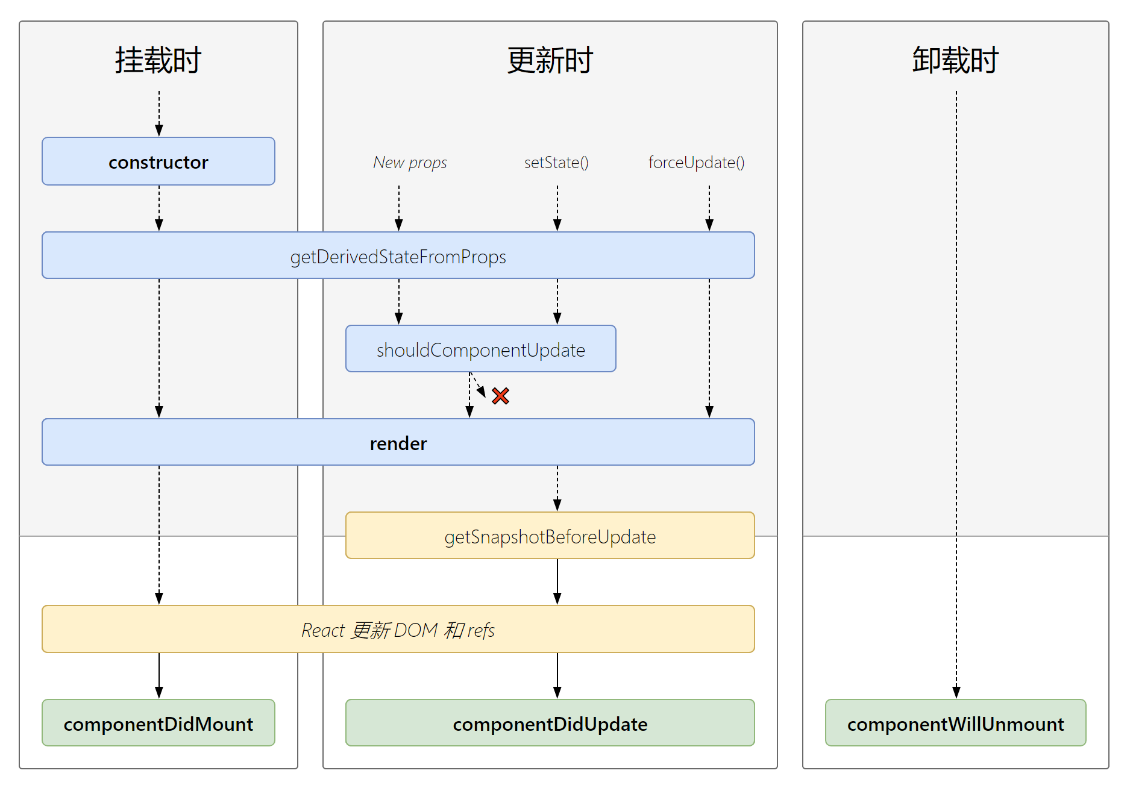
生命周期的三个阶段(新)
 1. 初始化阶段: 由
 ReactDOM.render()触发—-初次渲染
a. constructor()
b. getDerivedStateFromProps 若state的值在任何时候都取决于props,那么可以使用
c. render()
d. componentDidMount() : 组件挂载完毕的钩子,一般在这个钩子中做一些初始化的事,例如:开启定时器、发送网络请求、订阅消息
更新阶段: 由组件内部
this.setSate()或父组件重新 render 触发
a. getDerivedStateFromProps
b. shouldComponentUpdate() 控制组件更新的“阀门”
c. render()
d. getSnapshotBeforeUpdate 在更新之前获取快照
c. componentDidUpdate() 组件更新完毕的钩子卸载组件: 由
ReactDOM.unmountComponentAtNode()触发componentWillUnmount(): 组件将要卸载的钩子,一般在这个钩子中做一些收尾的事,例如:关闭定时器、取消订阅消息
shouldComponentUpdate(){console.log('Count---shouldComponentUpdate');return true}
重要的勾子:
- render:初始化渲染或更新渲染调用
- componentDidMount:开启监听, 发送 ajax 请求
- componentWillUnmount:做一些收尾工作, 如: 清理定时器
即将废弃的勾子:
- componentWillMount
- componentWillReceiveProps
- componentWillUpdate
3 setState
setState(stateChange, [callback])-——-对象式的setState
- stateChange为状态改变对象(该对象可以体现出状态的更改)
callback是可选的回调函数, 它在状态更新完毕、界面也更新后(render调用后)才被调用
<br />`setState(updater, [callback])-`-----函数式的setState
updater 为返回stateChange对象的函数。
- updater 可以接收到state和props。
- callback 是可选的回调函数, 它在状态更新、界面也更新后(render调用后)才被调用。
总结:
1.对象式的setState是函数式的setState的简写方式(语法糖)
2.使用原则:
(1).如果新状态不依赖于原状态 ===> 使用对象方式
(2).如果新状态依赖于原状态 ===> 使用函数方式
(3).如果需要在setState()执行后获取最新的状态数据,要在第二个callback函数中读取
4 Hooks
Hooks 是React 16.8.0版本增加的新特性/新语法,可以让你在函数组件中使用 state 以及其他的 React 特性
三个常用的Hook
- State Hook:
React.useState() - Effect Hook:
React.useEffect() - Ref Hook:
React.useRef()
State Hook
- State Hook让函数组件也可以有 state 状态, 并进行状态数据的读写操作
- 语法:
const [xxx, setXxx] = React.useState(initValue) useState()说明:参数: 第一次初始化指定的值在内部作缓存<br /> 返回值: 包含2个元素的数组, 第1个为内部当前状态值, 第2个为更新状态值的函数
setXxx()2种写法:setXxx(newValue): 参数为非函数值, 直接指定新的状态值, 内部用其覆盖原来的状态值setXxx(value => newValue): 参数为函数, 接收原本的状态值, 返回新的状态值, 内部用其覆盖原来的状态值
Effect Hook
Effect Hook 可以让你在函数组件中执行副作用操作(用于模拟类组件中的生命周期钩子)
React中的副作用操作:
- 发ajax请求数据获取
- 设置订阅 / 启动定时器
手动更改真实DOM
useEffect(() => {// 在此可以执行任何带副作用操作return () => { // 在组件卸载前执行// 在此做一些收尾工作, 比如清除定时器/取消订阅等}}, [stateValue]) // 如果指定的是[], 回调函数只会在第一次render()后执行
可以把 useEffect Hook 看做如下三个函数的组合:
componentDidMount()
- componentDidUpdate()
- componentWillUnmount()
Ref Hook
- Ref Hook 可以在函数组件中存储/查找组件内的标签或任意其它数据
- 语法:
const refContainer = useRef() - 作用:保存标签对象,功能与
React.createRef()一样
5 组件通信方式总结
几种通信方式:
- props:
- children props
- render props
- 消息订阅-发布:pubs-sub、event等等
- 集中式管理:redux、dva等等
- context: 生产者-消费者模式
最佳实践:
- 父子组件:props
- 兄弟组件:消息订阅-发布、集中式管理
- 祖孙组件(跨级组件):消息订阅-发布、集中式管理、context(开发用的少,封装插件用的多)
6 路由
下载:npm install react-router-dom
5.1.1 路由基本使用
// App.jsimport React from 'react';import { BrowserRouter as Router, Route, Link } from 'react-router-dom';function Index() {return <div>首页</div>;}function News() {return <div>新闻</div>;}function App() {return (<Router><div><Link to="/index">首页</Link><Link to="/news">新闻</Link></div><div><Route path="/index" component={Index}/><Route path="/news" component={News}/></div></Router>);}
5.1.2 路由嵌套
function News(props) {return (<div><div><Link to={`${props.match.url}/company`}>公司新闻</Link><Link to={`${props.match.url}/industry`}>行业新闻</Link></div><div><Route path={`${props.match.path}/company`} component={CompanyNews} /><Route path={`${props.match.path}/industry`} component={IndustryNews}/></div></div>);}function CompanyNews() {return <div>公司新闻</div>}function IndustryNews() {return <div>行业新闻</div>}
5.1.3 路由传参
import url from 'url';class News extends Component {constructor(props) {super(props);this.state = {list: [{id: 1,title: '新闻1'}, {id: 2,title: '新闻2'}]}}render() {return (<div><div>新闻列表组件</div><ul>this.state.list.map((item, index) => {return (<li key={index}><Link to={`/detail?id=${item.id}`}>{item.title}</Link></li>);})</ul></div>);}}class Detail extends Component {constructor(props) {super(props);}const { query } = url.parse(this.props.location.search, true);console.log(query); // {id: 1}render() {return <div>新闻详情</div>}}
5.1.4 路由重定向
import { Redirect } from 'react-router-dom';class Login extends Component {render() {if (this.state.isLogin) {return <Redirect to="/"/>}}}

若有收获,就点个赞吧
0 人点赞
