一.掌握源码目录的结构
- .circleci 持续集成
- benchmarks 性能评测
- dist 输出目录
- examples 案例
- flow flow声明文件
- packages vue中的包
- scripts 工程化
- src 源码目录
- test 测试相关
- types ts声明文件
src下的目录
├─compiler # 编译的相关逻辑│ ├─codegen│ ├─directives│ └─parser├─core # vue核心代码│ ├─components # vue中的内置组件 keep-alive│ ├─global-api # vue中的全局api│ ├─instance # vue中的核心逻辑│ ├─observer # vue中的响应式原理│ ├─util│ └─vdom # vue中的虚拟dom模块├─platforms # 平台代码│ ├─web # web逻辑 - vue│ │ ├─compiler│ │ ├─runtime│ │ ├─server│ │ └─util│ └─weex # weex逻辑 - app│ ├─compiler│ ├─runtime│ └─util├─server # 服务端渲染模块├─sfc # 用于编译.vue文件└─shared # 共享的方法和常量
二.打包流程
"build": "node scripts/build.js","build:ssr": "npm run build -- web-runtime-cjs,web-server-renderer","build:weex": "npm run build -- weex",
核心是使用node执行 scripts/build.js,通过传递参数来实现不同的打包结果,这里的—代表后面的内容是参数。
build.js
既然是打包,那我们肯定要找到打包的入口点,所以这里的关键就是查找打包的入口!
// 1.获取不同的打包的配置let builds = require('./config').getAllBuilds()// 2.根据执行打包时的参数进行过滤if (process.argv[2]) {const filters = process.argv[2].split(',')builds = builds.filter(b => {return filters.some(f => b.output.file.indexOf(f) > -1 || b._name.indexOf(f) > -1)})} else {// 默认不打包weex相关代码builds = builds.filter(b => {return b.output.file.indexOf('weex') === -1})}// 3.进行打包build(builds)
不同的打包配置指的是:
web / weex 不同的平台
这里我们不关注 weex,web 指代的就是我们常用的 vue
Runtime only / Runtime + compiler 是否带编译模块
带有 compiler 的会将模板转化成 render 函数
CommonJS / es / umd 打包出不同模块规范
umd模块是整合了CommonJS和AMD两个模块定义规范的方法,当不支持时两种模块时会将其添加到全局变量中
打包入口
src/platforms/web/entry-runtime.jssrc/platforms/web/entry-runtime-with-compiler.js
我们可以通过打包的配置找到我们需要的入口,这两个区别在于是否涵盖 compiler 逻辑,我们在开发时一般使用的是 entry-runtime,可以减小 vue 的体积,但是同样在开发时也不能再使用 template,.vue文件中的template是通过 vue-loader 来进行编译的,和我们所说的 compiler 无关。
new Vue({template:`<div></div>`})
这样的 template 必须要使用带 compiler 的入口才能进行模板的解析
三.入口分析
这里为了剖析vue完整的代码,我们就来分析带有 compiler 的文件。
我们观察这两个入口的文件不难发现他们都引入了 runtime/index.js
entry-runtime-with-compiler.js
import Vue from './runtime/index' // 1.引入运行时代码const mount = Vue.prototype.$mount; // 2.获取runtime中的$mount方法Vue.prototype.$mount = function (el,hydrating) { // 3. 重写$mount方法el = el && query(el)const options = this.$optionsif (!options.render) { // 4.没有render方法就进行编译操作let template = options.templateif(template){ // 5.将模板编译成函数const { render, staticRenderFns } = compileToFunctions(template, {outputSourceRange: process.env.NODE_ENV !== 'production',shouldDecodeNewlines,shouldDecodeNewlinesForHref,delimiters: options.delimiters,comments: options.comments}, this)options.render = render // 6.将render函数放到options中}// todo...}return mount.call(this, el, hydrating) // 7.进行挂载操作}export default Vue
带有compiler 的文件仅仅是对 $mount 方法进行了重写,增添了将 template 变成 render 函数的功能
四.Vue的构造函数
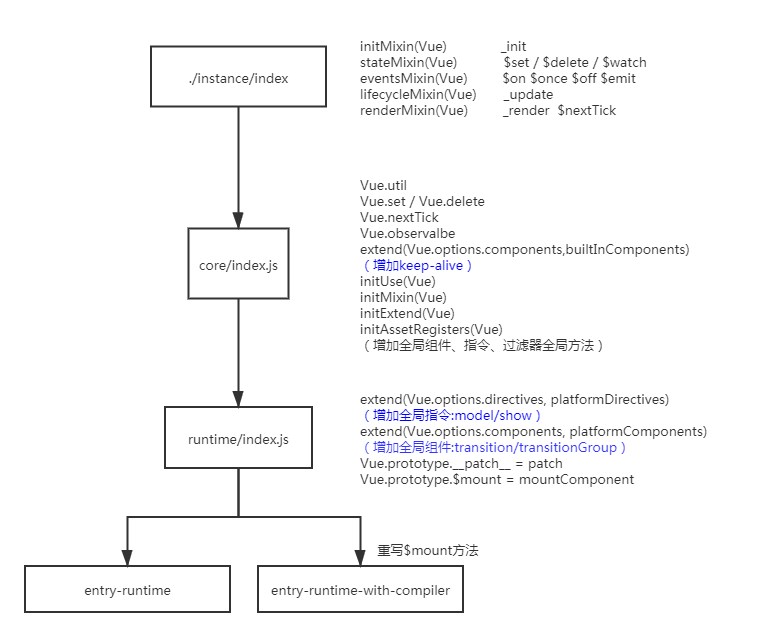
instance/index.js 真正的Vue的构造函数,并在Vue的原型上扩展方法
- core/index.js 增加全局API方法
- runtime/index.js 扩展$mount方法及平台对应的代码

若有收获,就点个赞吧
0 人点赞
