1. 调试环境搭建
- 下载代码
- 使用安装依赖
yarn 修改
package.json,dev命令中添加--sourcemap"dev": "node scripts/dev.js --sourcemap"
执行编译
yarn dev,生成结果的路径:packages\vue\dist\vue.global.js- 可使用
packages\vue\examples,也可以自己编写 html,引入上面生成vue.global.js文件,结合chrome 浏览器进行调试。 ```html
{{message}}
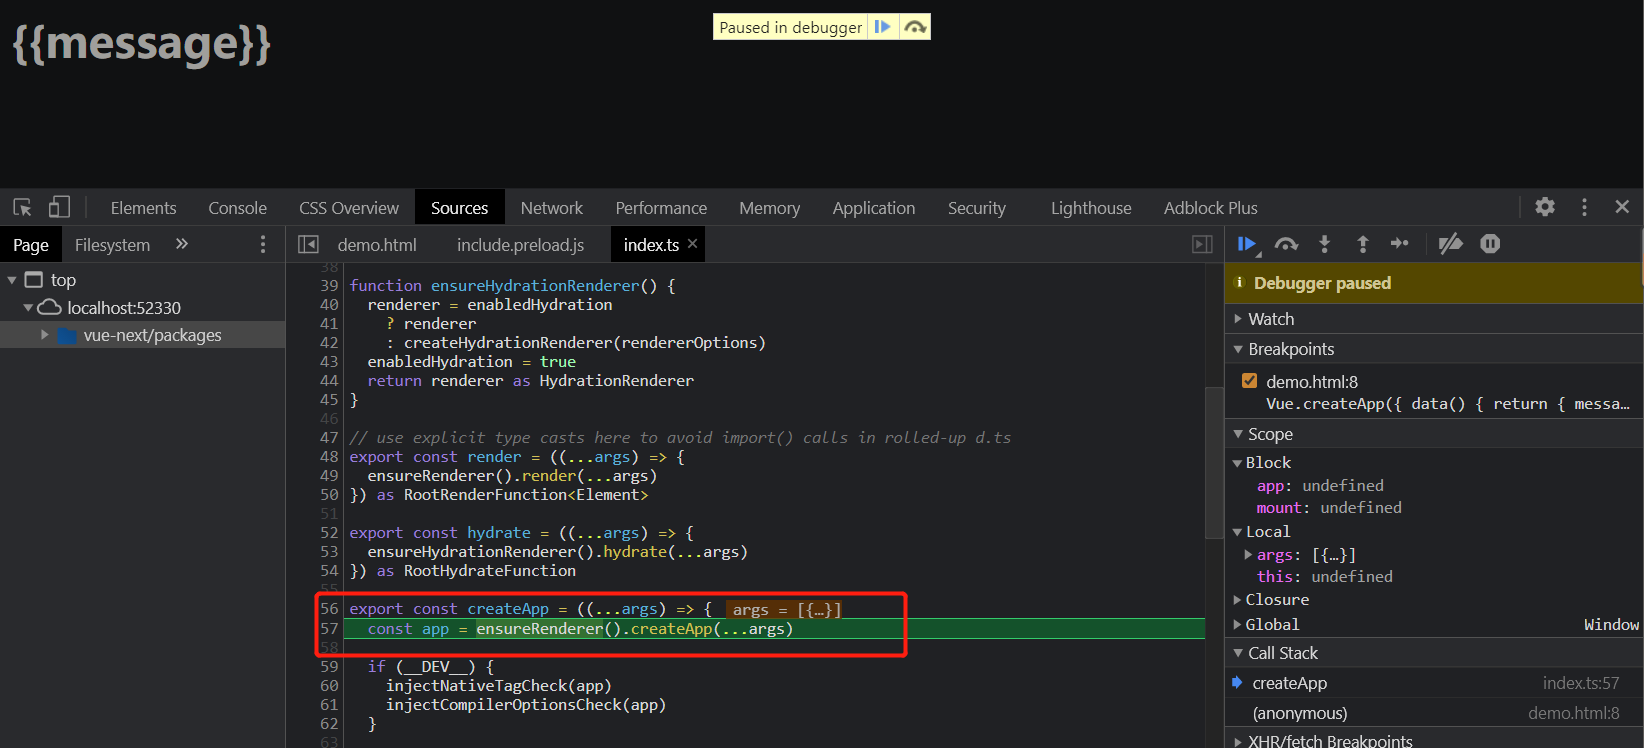<a name="sinzf"></a># 2. 总览<a name="i9B01"></a>## 2.1 目录源码在package文件夹内,采用了[monorepo](https://en.wikipedia.org/wiki/Monorepo) 管理项目<br />- compiler-core 核心编译逻辑- compiler-dom 针对浏览器平台编译逻辑- compiler-sfc 针对单文件组件编译逻辑- compiler-ssr 针对服务端渲染编译逻辑- runtime-core 运行时核心- runtime-dom 运行时针对浏览器的逻辑- runtime-test 浏览器外完成测试环境仿真- reactivity 响应式逻辑- template-explorer 模板浏览器- server-renderer 服务器端渲染- share 公用方法- vue 代码入口,整合编译器和运行时包的依赖关系:<br />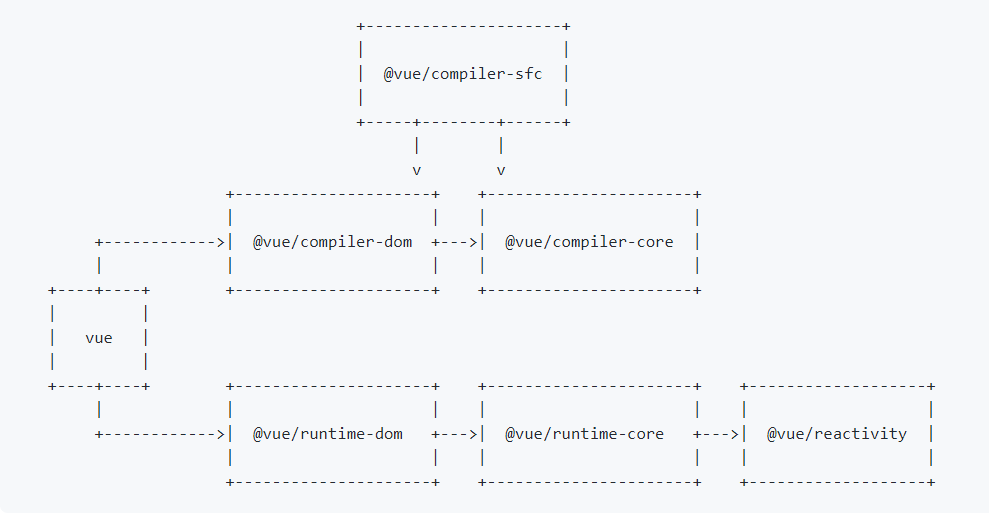<a name="WLdVk"></a>## 2.2 Vue基本原理Vue主要包含三大件:- 响应式模块:主要是创建响应式的数据对象,观察这些数据的改变。- 编译模块:将 template 模板编译到 render 函数- 渲染模块:分为三个部分- render 阶段:调用 render 函数返回虚拟DOM- mount 阶段:将虚拟DOM挂载到页面元素上- patch 阶段:将新旧的虚拟阶段进行比较,更新网页变化的部分简单描述下大体流程就是:1. 将 template 编译成 render 函数,然后使用响应式模块将数据进行初始化2. 调用 render函数返回虚拟 dom,调用 mount 方法进行,创建web页面3. 如果响应式数据发生变化,会再次调用渲染函数,创建新的虚拟 dom,执行 patch 操作,更新 web 页面本文主要介绍渲染部分的内容<a name="NUmFX"></a># 3. 源码分析<a name="Xqpgz"></a>## 3.1 ceateApp方法```javascriptimport { createApp } from 'vue'const app = createApp({})
调用ceateApp()返回一个应用实例,这其实是一个入口函数:
// 位置:runtime-dom/index.tsconst createApp = ((...args) => {// 创建 app 对象const app = ensureRenderer().createApp(...args)const { mount } = app// 重写 mount 方法app.mount = (containerOrSelector) => {// ...}return app})
可见createApp内部就创建了一个 app 对象,且提供了mount方法。
进一步深入到内部:
ensureRenderer()用来创建一个一个渲染器对象:
// 渲染相关的一些配置,比如更新属性的方法,操作 DOM 的方法const rendererOptions = extend({ patchProp, forcePatchProp }, nodeOps)// 延时创建渲染器,当用户只依赖响应式包的时候,可以通过 tree-shaking 移除核心渲染逻辑相关的代码let rendererfunction ensureRenderer() {return renderer || (renderer = createRenderer(rendererOptions))}function createRenderer(options) {return baseCreateRenderer(options)}function baseCreateRenderer(options) {function render(vnode, container) {// 组件渲染的核心逻辑}return {render,hydrate,createApp: createAppAPI(render, hydrate)}}
hydrate为 SSR 相关参数先忽略,继续查看createAppAPI方法:
function createAppAPI(render) {// createApp createApp 方法接受的两个参数:根组件的对象和 propsreturn function createApp(rootComponent, rootProps = null) {const app = {...// 创建默认APP配置const context = createAppContext()const installedPlugins = new Set()let isMounted = false_component: rootComponent,_props: rootProps,_container: null,_context: context,...use() {...},mixin() {...},component() {...},directive() {...},// 重点看mount函数mount(rootContainer) {if (!isMounted) {// 创建根组件的 vnodeconst vnode = createVNode(rootComponent, rootProps)// store app context on the root VNode.vnode.appContext = context// 利用渲染器渲染 vnoderender(vnode, rootContainer)isMounted = trueapp._container = rootContainerreturn vnode.component!.proxy}}unmount() {...},provide() {...}}//返回app实例return app}
3.2 mount 方法
我们在使用createApp({ ... }).mount('#app')的mount方法,不是直接执行上面的app实例里的mount方法,其是属于runtime-core包,是一个标准的可跨平台的组件流程。
mount方法在rumtime-dom包里的createApp()方法里进行了重写,这是针对web平台,其他平台也可以对app.mount 进行重写以实现不同平台的渲染逻辑。
app.mount = (containerOrSelector) => {// 标准化容器const container = normalizeContainer(containerOrSelector)if (!container) returnconst component = app._component// 如组件对象没有定义 render 函数和 template 模板,那就取DOM里面原本内容当作模版if (!isFunction(component) && !component.render && !component.template) {component.template = container.innerHTML}// 挂载前清空容器内容container.innerHTML = ''// 真正的挂载,执行app.mount方法return mount(container)}
normalizeContainer方法:可以传字符串选择器或者 DOM 对象字符串选择器,最终也会 DOM 对象,作为最终挂载的容器。
3.3 创建和渲染VNode
3.3.1 创建
VNode的概念应该都不陌生,就是Virtual DOM,其实就是JavaScript对象描述DOM:
<div><MyComponent /></div>
const elementVNode = {tag: 'div',data: null,children: {tag: MyComponent,data: null}}
回到app.mount方法,其中主要做了两件事,创建 VNode和渲染VNode
先来看创建VNode:
const vnode = createVNode(rootComponent, rootProps)
createVNode的函数如下:
function createVNode(type, props = null,children = null) {// 处理 props 相关逻辑,标准化 class 和 styleif (props) {...}// 对 vnode 类型信息编码const shapeFlag = isString(type)? 1 /* ELEMENT */: isSuspense(type)? 128 /* SUSPENSE */: isTeleport(type)? 64 /* TELEPORT */: isObject(type)? 4 /* STATEFUL_COMPONENT */: isFunction(type)? 2 /* FUNCTIONAL_COMPONENT */: 0const vnode = {type,props,shapeFlag,// 一些其他属性}// 标准化子节点,把不同数据类型的 children 转成数组或者文本类型normalizeChildren(vnode, children)return vnode}
上述代码的流程为:
- 对 props 做标准化处理
- 对 VNode 的类型信息编码
- 创建 VNode 对象,标准化子节点 children 。
- 返回VNode
3.3.2 渲染
再回到app.mount方法 ,创建完VNode,接下来是渲染VNode:
// 创建根组件的 vnodeconst vnode = createVNode(rootComponent, rootProps)// 利用渲染器渲染 vnoderender(vnode, rootContainer)
查看render方法:
// 位置:runtime-core/renderer.tsconst render = (vnode, container) => {if (vnode == null) {// 销毁组件if (container._vnode) {unmount(container._vnode, null, null, true)}} else {// 创建或者更新组件patch(container._vnode || null, vnode, container)}// 缓存 vnode 节点,表示已经渲染container._vnode = vnode}
主要是查看pach方法:
const patch = (n1, n2, container, anchor = null, parentComponent = null, parentSuspense = null, isSVG = false, optimized = false) => {// 如果存在新旧节点, 且新旧节点类型不同,则销毁旧节点if (n1 && !isSameVNodeType(n1, n2)) {...}const { type, shapeFlag } = n2// 先通过type来判断选择处理方法switch (type) {case Text:// 处理文本节点breakcase Comment:// 处理注释节点breakcase Static:// 处理静态节点breakcase Fragment: //Vue3新增// 处理 Fragment 元素breakdefault:// 通过 shapeFlag编码判断if (shapeFlag & 1 /* ELEMENT */) {// 处理普通 DOM 元素processElement(n1, n2, container, anchor, parentComponent, parentSuspense, isSVG, optimized)}else if (shapeFlag & 6 /* COMPONENT */) {// 处理组件processComponent(n1, n2, container, anchor, parentComponent, parentSuspense, isSVG, optimized)}else if (shapeFlag & 64 /* TELEPORT */) {// 处理 TELEPORT,Vue3新增}else if (shapeFlag & 128 /* SUSPENSE */) {// 处理 SUSPENSE,Vue3新增}}}
patch接受的前 3 个参数:
- n1 表示老的 VNode,为 null 时即为第一次挂载
- n2 表示新的 VNode节点
- container 为被挂载的DOM容器
处理组件
我们先查看处理组件的processComponent:
const processComponent = (n1, n2, container, anchor, parentComponent, parentSuspense, isSVG, optimized) => {if (n1 == null) {// 挂载组件mountComponent(n2, container, anchor, parentComponent, parentSuspense, isSVG, optimized)}else {// 更新组件updateComponent(n1, n2, parentComponent, optimized)}}
如果 n1 为 null,则执行挂载组件的逻辑,否则执行更新组件的逻辑。
先看mountComponent
const mountComponent = (initialVNode, container, anchor, parentComponent, parentSuspense, isSVG, optimized) => {// 创建组件实例const instance = (initialVNode.component = createComponentInstance(initialVNode, parentComponent, parentSuspense))// 设置组件实例setupComponent(instance)// 设置并运行带副作用的渲染函数setupRenderEffect(instance, initialVNode, container, anchor, parentSuspense, isSVG, optimized)}
这个函数主要是创建和设置组件实例,设置并运行带副作用的渲染函数setupRenderEffect:
const setupRenderEffect = (instance, initialVNode, container, anchor, parentSuspense, isSVG, optimized) => {// create reactive effect for renderinginstance.update = effect(function componentEffect() {if (!instance.isMounted) {// beforeMount hookif (bm) { invokeArrayFns(bm) }// 渲染组件生成subTree的vnodeconst subTree = (instance.subTree = renderComponentRoot(instance))// 把子树 subTree挂载到 container 中patch(null, subTree, container, anchor, instance, parentSuspense, isSVG)// 保留渲染生成的子树根 DOM 节点initialVNode.el = subTree.el// mounted hookif (m) {queuePostRenderEffect(m, parentSuspense)}instance.isMounted = true}else {// 更新组件...patch(prevTree, nextTree,hostParentNode(prevTree.el),getNextHostNode(prevTree),instance,parentSuspense,isSVG)...}}, prodEffectOptions)}
effect函数为数据响应式相关的函数,这个可以查看Vue3的reactive办理,所谓副作用函数可以理解为当组件使用的数据发生变化时,effect传入的渲染函数会被重新执行,来触发组件的更新。
更新的核心逻辑是传入新旧VNode执行patch函数,其就是找出新旧VNode的不同,并找到合适的方式更新DOM。其中用到了大名鼎鼎的DOM diff算法,这里就先不讲了。
处理DOM
处理普通 DOM元素的processElement和processComponent的逻辑相同,n1为null时挂载,不为时更新。
const processElement = (n1, n2, container, anchor, parentComponent, parentSuspense, isSVG, optimized) => {isSVG = isSVG || n2.type === 'svg'if (n1 == null) {//挂载元素节点mountElement(n2, container, anchor, parentComponent, parentSuspense, isSVG, optimized)}else {//更新元素节点patchElement(n1, n2, parentComponent, parentSuspense, isSVG, optimized)}}
查看mountElement:
const mountElement = (vnode, container, anchor, parentComponent, parentSuspense, isSVG, optimized) => {// 创建 DOM 元素节点,其实就是 document.createElementel = vnode.el = hostCreateElement(vnode.type, isSVG, props && props.is)if (props) {// 处理 props,比如 class、style、event 等属性...}if (shapeFlag & 8 /* TEXT_CHILDREN */) {// 处理子节点是纯文本的情况,其实就是 el.textContent = texthostSetElementText(el, vnode.children)}else if (shapeFlag & 16 /* ARRAY_CHILDREN */) {// 处理子节点是数组的情况mountChildren(vnode.children, el, null, parentComponent, parentSuspense, isSVG && type !== 'foreignObject', optimized || !!vnode.dynamicChildren)}// 把创建的 DOM 元素节点挂载到 container 上hostInsert(el, container, anchor)}
该函数主要做了:
- 创建 DOM 元素节点
- 处理 props
- 处理 children
- 挂载 DOM 元素到 container 上。
其中,如果子节点是数组,则执行 mountChildren方法:
const mountChildren = (children, container, anchor, parentComponent, parentSuspense, isSVG, optimized, start = 0) => {for (let i = start; i < children.length; i++) {// 预处理 childconst child = (children[i] = optimized ? cloneIfMounted(children[i]) : normalizeVNode(children[i]))// 递归 patch 挂载 childpatch(null, child, container, anchor, parentComponent, parentSuspense, isSVG, optimized)}}
patch是递归调用的, 通过这种深度优先遍历树的方式,我们就可以构造完整的 DOM 树,完成组件的渲染和更新。
新特性介绍
在patch方法中,先通过type和shareFlag来判断选择处理VNode,其中有几个新常量,这里简单做个说明:
Fragment
<template><div>Hello</div><div>World</div></template>
Vue2是没法这样创建组件,必须被一个标签包裹。而Vue3是可以的,生成的VNode是只有flag,没有tag的
const elementVNode = {flags: VNodeFlags.FRAGMENT,tag: null,....}
Teleport
Teleport 提供了一种干净的方法,允许我们控制在 DOM 中哪个父节点下呈现 HTML
<!-- to 属性就是目标位置 --><teleport to="#teleport-target"><div>test</div></teleport>
这个标签的作用是当你在进行一个异步加载时,可以先提供一些静态组件作为显示内容,然后当异步加载完毕时再显示。
<Suspense><template #default><UserProfile /></template><template #fallback><div>Loading...</div></template></Suspense>
3.4 Vue3的编译优化
Vue 是首先通过编译是把templete编译成render函数,然后再通过渲染生成DOM。
Vue3做到了在编译阶段对静态模板的分析,编译生成了 Block tree。Block tree 是一个将模版基于动态节点指令切割的嵌套区块,每个区块内部的节点结构是固定的。每个区块只需要追踪自身包含的动态节点。
还对diff算法进行重写,充分利用编译时的信息,使得性能得到了极大的提升。
官方的在线调试模板工具:https://vue-next-template-explorer.netlify.app/
Vue3还做了很多方面的优化,这里就不多介绍了(太菜,还看不懂)。
4.总结
本文主要介绍了Vue3 组件初始化以及渲染的过程,主要探究Vue源码的一个大体流程,对于响应式模块、编译器没有进行介绍,以后有时间进行整理,关于Vue3的新特性和优化以及对应的原理还需要时间进行学习和消化。
BTW:为更好的理解Vue的一个大体原理,根据一些课程和文章,写了一个mini-vue3的demo
https://github.com/mewcoder/codebase/blob/main/mini-vue3/index.html
最后来张图,拥抱Vue3吧!

若有收获,就点个赞吧
0 人点赞
