Vue Router 是 Vue.js 官⽅的路由管理器。它和 Vue.js 的核⼼深度集成,让构建单⻚⾯应⽤变得易如反 掌。
使用
安装: vue add router
核⼼步骤:
步骤⼀:使⽤vue-router插件,router.js
import Router from 'vue-router'Vue.use(Router)
步骤⼆:创建Router实例,router.js
export default new Router({routes: [//一个个对象{ path: '/home', component: Home },{ path: '/about', component: About }]})
步骤三:在根组件上添加该实例,main.js
import router from './router'new Vue({router,}).$mount("#app");
步骤四:添加路由视图,App.vue
<router-view></router-view>
导航
<router-link to="/">Home</router-link><router-link to="/about">About</router-link>
1.全局钩子
beforeEach (to,from,next) 路由改变前调用 :常用验证用户权限
参数:
- to :即将要进入的目标路由对象 f
- rom:当前正要离开的路由对象
next:路由控制参数
- next():如果一切正常,则调用这个方法进入下一个钩子
- next(false):取消导航(即路由不发生改变)
- next(‘/login’):当前导航被中断,然后进行一个新的导航
- next(error):如果一个Error实例,则导航会被终止且该错误会被传递给 router.onError ()
// 在用户未能验证身份时重定向到 /loginrouter.beforeEach((to, from, next) => {if (to.name !== 'Login' && !isAuthenticated) next({ name: 'Login' })else next()})
afterEach (to,from)路由改变后的钩子
常用 自动让页面返回最顶端
- 用法相似,少了next参数
router.afterEach((to, from) => {// ...})
2.路由配置中的导航钩子
beforeEnter (to,from,next) 这些守卫与全局前置守卫的方法参数是一样的
const router = new VueRouter({routes: [{path: '/foo',component: Foo,beforeEnter: (to, from, next) => {// ...}}]})
3.组件内的钩子函数
beforeRouteEnter (to,from,next)
- 该组件的对应路由被 comfirm 前调用。
- 此时实例还没被创建,所以不能获取实例(this)
beforeRouteUpdate (to,from,next)
- 当前路由改变,但改组件被复用时候调用
- 该函数内可以访问组件实例(this)
beforeRouteLeave (to,from,next)
- 当导航离开组件的对应路由时调用。
- 该函数内可以访问获取组件实例(this)
``javascript
beforeRouteEnter (to, from, next) {
next(vm => {
// 通过
vm` 访问组件实例 }) }
beforeRouteUpdate (to, from, next) {
// just use this
this.name = to.params.name
next()
}
beforeRouteLeave (to, from, next) { const answer = window.confirm(‘Do you really want to leave? you have unsaved changes!’) if (answer) { next() } else { next(false) } }
<a name="AZZ9J"></a>## 4.路由监测变化监听到路由对象发生变化,从而对路由变化做出响应```javascriptconst user = {template: '<div></div>',watch: {'$route.query.id' {// 请求个人描述}}}
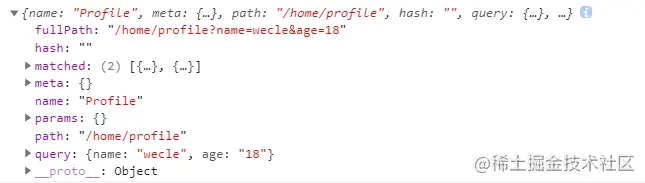
$route
$route 是“路由信息对象”,包括 path,params,hash,query,fullPath,matched,name 等路由信息参数。
**$route.path**字符串,对应当前路由的路径,总是解析为绝对路径,如 “/order”。**$route.params**一个 key/value 对象,包含了 动态片段 和 全匹配片段, 如果没有路由参数,就是一个空对象。**$route.query**一个 key/value 对象,表示 URL 查询参数。 例如,对于路径 /foo?user=1,则有$route.query.user为1, 如果没有查询参数,则是个空对象。**$route.hash**当前路由的 hash 值 (不带 #) ,如果没有 hash 值,则为空字符串。**$route.fullPath**完成解析后的 URL,包含查询参数和 hash 的完整路径。**$route.matched**数组,包含当前匹配的路径中所包含的所有片段所对应的配置参数对象。**$route.name**当前路径名字
//第1种path:'/list/:id' 对应从this.$route.params.id获取 刷新不丢失//第2种this.$router.push({path: '/list',query: {id:'xx'}})对应从this.$route.query.id获取 url会变为: /list?id='xx'//第3种this.$router.push({name: 'list',// 要使用name,params不能与path同时存在,也可以只写path,如第1种情况params: {id:'xx'}})对应从this.$route.params.id获取 url不变
$router
$router 是“路由实例”对象,即使用 new VueRouter创建的实例,包括了路由的跳转方法,钩子函数等。
export default{methods:{goToMenu(){this.$router.go(-1)//跳转到上一次浏览的页面this.$router.replace('/menu')//指定跳转的地址this.$router.replace({name:'menuLink'})//指定跳转路由的名字下this.$router.push('/menu')//通过push进行跳转this.$router.push({ name: 'user', params: { userId: '123' }})// 带查询参数,变成 /register?plan=privatethis.$router.push({ path: 'register', query: { plan: 'private' }})}}}S
**$router.push**和**$router.replace**的区别:
- 使用push方法的跳转会向 history 栈添加一个新的记录,当我们点击浏览器的返回按钮时可以看到之前的页面。
- 使用replace方法不会向 history 添加新记录,而是替换掉当前的 history 记录,即当replace跳转到的网页后,‘后退’按钮不能查看之前的页面。
Hash和History
History
window.history 提供了两类API,一类是go(), back(), forward()这种定位到某个浏览历史的记录上;
另外一类是pushState(), replaceState()这种,是操作历史记录的接口(添加和替换历史记录栈)。
history mode就是使用 pushState() 和 replaceState() 来实现前端路由,通过这两个方法改变url,页面不会重新刷新。
使用这两个方法更改 url 后,会触发popstate事件,监听 popstate 事件,实现前端路由。
window.addEventListener('popstate', function(e) { alert('url 更新') });
当我们访问同域下不同的url时,就能触发popstate事件
Hash
hash mode下的url都有一个特点,就是url里面带’#’号, 如:https://www.baidu.com/#/view1。 ‘#’号后面就是hash值。
同样的,改变hash值也不会向服务器发出请求,因此也就不会刷新页面。
每次hash值发生改变的时候,会触发hashchange事件。
通过监听hashchange事件,实现前端路由。

若有收获,就点个赞吧
0 人点赞
