- Introduction
- Start to Program with mBlock 5
- Extensions
- FAQ and More Information
- 1. [ICON] LED panel [PORT] shows image [FACE_PANEL] for [TIME] secs
- 2. [ICON] LED panel [PORT] shows image [FACE_PANEL]
- 3. [ICON]LED panel [PORT] shows image [FACE_PANEL] at x: [X] y: [Y]
- 4. [ICON]LED panel [PORT] shows text [TEXT]
- 5. [ICON]LED panel [PORT] shows text [TEXT] at x: [X] y: [Y]
- 6. [ICON]LED panel [PORT] shows number [NUMBER]
- 7. [ICON] LED panel [PORT] shows time [NUMBER1]:[NUMBER2]
- 8. [ICON] seven-segments [PORT] display number [NUMBER]
- 9. [ICON] LED panel [PORT] clears screen
- 10. [ICON]LED [LED_POSTION] shows color [COLOR] for [TIME] secs
- 11. [ICON]LED [LED_POSTION] shows color [COLOR]
- 12. [ICON]turn on [LED_POSTION] light with color red [R] green [G] blue [B]
- 13. [ICON]play note [NOTE] for [BEAT] beats
- 14. [ICON]play sound at frequency of [HZ] Hz for [TIME] secs
- 15. [ICON]move forward at power [POWER]% for [TIME] secs
- 16. [ICON]move backward at power [POWER] % for [TIME] secs
- 17. [ICON] turn left at power [POWER] % for [TIME] secs
- 18. [ICON] turn right at power [POWER] % for [TIME] secs
- 19. [ICON] [MOVE_DIRECTION] at power [POWER] %
- 20. [ICON]left wheel turns at power [POWER_LEFT] %,right wheel at power [POWER_RIGHT] %
- 21. [ICON] stop moving
- 22. [ICON] light sensor [PORT] light intensity
- 23. [ICON]ultrasonic sensor [PORT] distance(cm)
- 24. [ICON]line follower sensor [PORT] value
- 25. [ICON] line follower sensor [PORT] detects [LINEFOLLOW_STATE] being [BLACK_WHITE] ?
- 26. [ICON]when on-board button [OPTION]?
- 27. [ICON] IR remote [REMOTE_KEY] pressed?
- 28. [ICON]send IR message [MESSAGE]
- 29. [ICON] IR message received
- 30. [ICON] timer
- 31. [ICON] reset timer
- 32. when mBot(mcore) starts up
- 33. when on-board button [IS_PRESS]
Introduction
As an entry-level robot for STEAM education, mBot allows you to have fun with programming learning and teaching. With a screwdriver and step-by-step instructions, children can build their own robot from scratch and enjoy the fun of hands-on creation. The building process provides a perfect opportunity to introduce kids to the basics of robotic machinery and electronic parts. They can easily get started with block-based programming to play with mBot.
The following figure shows the components of the control board of mBot.
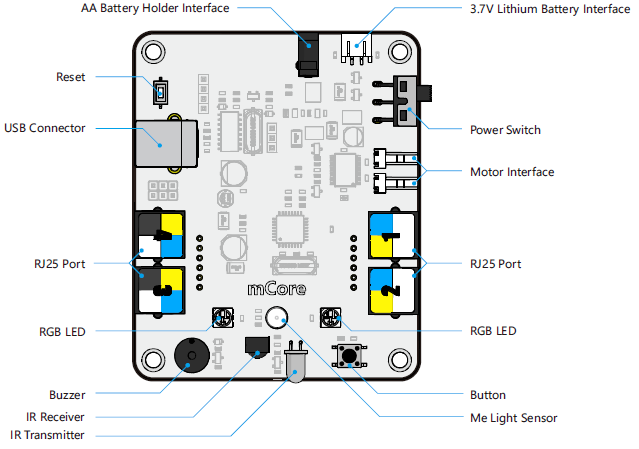
mBot provides three default operation modes. For details, visit http://docs.makeblock.com/mbot/en/tutorials/preset-modes.html.
Start to Program with mBlock 5
You can connect mBot to mBlock 5 by using a USB cable or Bluetooth 4.0. For details, visit http://docs.makeblock.com/mbot/en/tutorials/connect.html.
Extensions
mBlock 5 provides multiple extensions for mBot, including Light Sound, Maker’s Platform, and Servo Pack. By adding extensions, you use more functions of mBot.
The following uses the Light Sound extension as an example to describe how to add an extension.
1. Select and click + extension at the bottom of the Blocks area.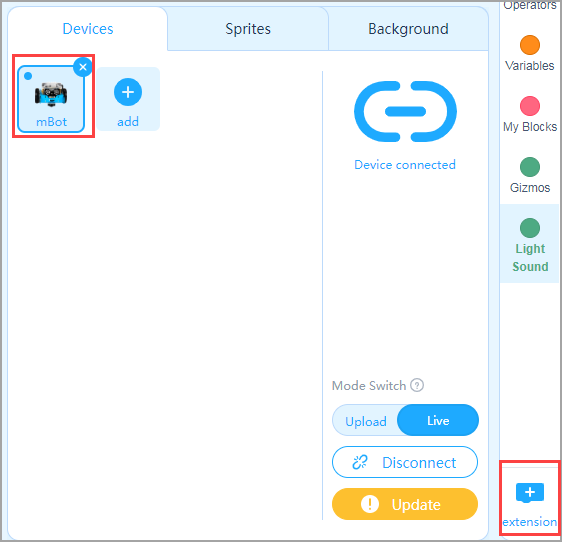
2. On the Extension center page that appears, click + Add at the bottom of the Light Sound extension.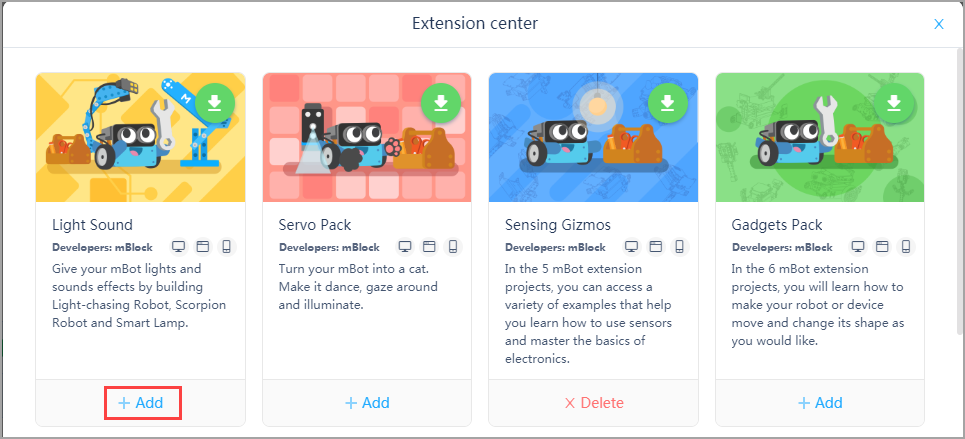
3. Return to the editing page. The Light Sound blocks are displayed in the Blocks area.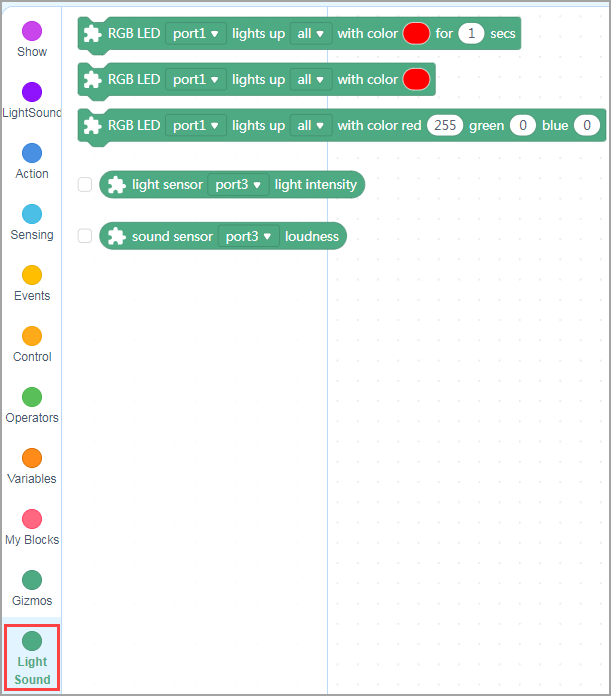
FAQ and More Information
For FAQs, more cases, and further help, see the mBot online help at http://docs.makeblock.com/mbot/en/.
1. [ICON] LED panel [PORT] shows image [FACE_PANEL] for [TIME] secs

Displays the specified image on the display panel connected to the specified port of mBot for the specified period of time in seconds
How to Use
mBot provides four ports that can be connected to display panels.
Click the drop-down list box to select the one to which the display panel is connected. Click the image and time to define the ones you want. The following shows the default settings.
Alternatively, you can put a reporter block of the numeric type into it, for example:
Example
When you press the space key, the display panel connected to port 1 of mBot displays the specified image for one second.
2. [ICON] LED panel [PORT] shows image [FACE_PANEL]

Displays the specified image on the display panel connected to the specified port of mBot
How to Use
mBot provides four ports that can be connected to display panels.
Click the drop-down list box to select the one to which the display panel is connected.
Click the image to define the one you want. The following shows the default settings.
Example
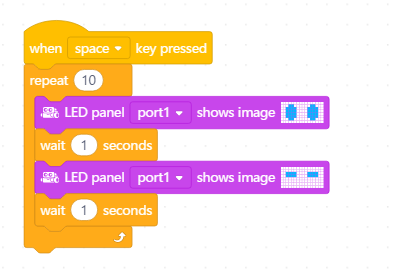
When you press the space key, the display panel connected to port 1 of mBot displays the two images alternately at the interval of one second.
3. [ICON]LED panel [PORT] shows image [FACE_PANEL] at x: [X] y: [Y]

Displays the specified image in the specified position of the display panel connected to the specified port of mBot
How to Use
mBot provides four ports that can be connected to display panels.
Click the default port to select the one to which the display panel is connected. Click the image and coordinates to define the ones you want. The following shows the default settings.
Note: The display panel is a matrix panel of 8 (0–7) × 16 (0–15) points. The value of x indicates the number of horizontal offset points. A positive value indicate right offset, and a negative one indicates left offset. The value of y indicates the number of vertical offset points. A positive value indicates downward offset, and a negative one indicates upward offset.
For example, if the image is designed as follows:
when you use the block , setting the x and y values, the image is displayed in the following position on the display panel:
Setting range of x: –15 – +15
Setting range of y: –7 – +7
Alternatively, you can put reporter blocks into them, for example:
Example
When you press the space key, the display panel connected to port 1 of mBot displays the specified image in the position (0,0).
4. [ICON]LED panel [PORT] shows text [TEXT]

Displays the specified text on the display panel connected to the specified port of mBot
How to Use
mBot provides four ports that can be connected to display panels.
Click the default port to select the one to which the display panel is connected. Click the text to define the one you want. The following shows the default settings.
Alternatively, you can put a reporter block into it, for example:
Example
When you press the space key, the display panel connected to port 1 of mBot displays the text hello.
5. [ICON]LED panel [PORT] shows text [TEXT] at x: [X] y: [Y]

Displays the specified text in the specified position of the display panel connected to the specified port of mBot
How to Use
mBot provides four ports that can be connected to display panels.
Click the default port to select the one to which the display panel is connected. Click the text and coordinates to define the ones you want. The following shows the default settings.
Note: The display panel is a matrix panel of 8 (0–7) × 16 (0–15) points. The value of x indicates the number of horizontal offset points. A positive value indicate right offset, and a negative one indicates left offset. The value of y indicates the number of vertical offset points. A positive value indicates downward offset, and a negative one indicates upward offset.
Setting range of x: –15 – +15
Setting range of y: –7 – +7
Alternatively, you can put reporter blocks into them, for example:
Example
When you press the space key, the display panel connected to port 1 of mBot displays hello in the position (0,0).
6. [ICON]LED panel [PORT] shows number [NUMBER]

Displays the specified number on the display panel connected to the specified port of mBot
How to Use
mBot provides four ports that can be connected to display panels.
Click the default port to select the one to which the display panel is connected. Click the number to define the one you want. The following shows the default settings.
Alternatively, you can put a reporter block into it, for example:
Example
When you press the space key, the display panel connected to port 1 of mBot displays the number 2048.
7. [ICON] LED panel [PORT] shows time [NUMBER1]:[NUMBER2]

Displays the specified time on the display panel connected to the specified port of mBot
How to Use
mBot provides four ports that can be connected to display panels.
Click the default port to select the one to which the display panel is connected. Click the time to define the one you want.
Alternatively, you can put reporter blocks into them, for example:
Example
When you press the space key, the display panel connected to port 1 of mBot displays the time 15:30.
8. [ICON] seven-segments [PORT] display number [NUMBER]

9. [ICON] LED panel [PORT] clears screen

Turns off the display panel connected to the specified port of mBot
How to Use
mBot provides four ports that can be connected to display panels.
Click the default port to select the one to which the display panel is connected.
Example
When you press the space key, the display panel connected to port 1 of mBot is turned off.
10. [ICON]LED [LED_POSTION] shows color [COLOR] for [TIME] secs

Lights up the specified LED(s) in the specified color for the specified period of time in seconds
How to Use
This block provides three options: all LEDs, the left LED, and the right LED.
Click the default option to select the LED(s). Click the color and time to define the ones you want. The following shows the default settings.
Example
When you press the space key, all the LEDs on mBot are lit up in red for one second.
11. [ICON]LED [LED_POSTION] shows color [COLOR]

Lights up the specified LED(s) in the specified color.
How to Use
This block provides three options: all LEDs, the left LED, and the right LED.
Click the default option to select the LED(s). Click the color to define the one you want. The following shows the default settings.
Example
When you click the space key, all the LEDs on mBot are lit up in red.
12. [ICON]turn on [LED_POSTION] light with color red [R] green [G] blue [B]

Lights up the specified LED(s) in the specified color that is the combination of the specified intensity of red, green, and blue
How to Use
This block provides three options: all LEDs, the left LED, and the right LED.
Click the default option to select the LED(s). Click the color values to define the ones you want. The following shows the default settings.
Note: The intensity of red, green, and blue ranges from 0 to 255.
Example
When you press the space key, all the LEDs on mBot are lit up in red.
13. [ICON]play note [NOTE] for [BEAT] beats

Plays the specified note for the specified number of beats
How to Use
Currently, the block provides 44 notes. Click the default note to select the one you want.
Click the number of beats to define the one you want. The following shows the default settings.
Example
When you press the space key, mBot plays the note C4 for 0.25 beats.
14. [ICON]play sound at frequency of [HZ] Hz for [TIME] secs

Plays a sound at the specified frequency for the specified period of time in seconds
How to Use
Click the default frequency and time to set the ones you want. The following shows the default settings.
Note: The sound playing frequency of mBot ranges from 20 to 20,000 Hz.
Example
When you press the space key, mBot plays the sound at the frequency of 700 Hz for 1 second.
15. [ICON]move forward at power [POWER]% for [TIME] secs

Moves mBot forward at the specified power for the specified period of time
How to Use
The speed of mBot is positively related to the absolute value of the power.
Click the default power and time to set the ones you want. The following shows the default settings.
Note: The setting range of power is –100 to +100. A negative value indicates moving reversely.
Example
When you press the space key, mBot moves forward at the power of 50% for one second.
16. [ICON]move backward at power [POWER] % for [TIME] secs

Moves mBot backward at the specified power for the specified period of time
How to Use
The speed of mBot is positively related to the absolute value of the power.
Click the default power and time to set the ones you want. The following shows the default settings.
Note: The setting range of power is –100 to +100. A negative value indicates moving reversely.
Example
When you press the space key, mBot moves backward at the power of 50% for one second.
17. [ICON] turn left at power [POWER] % for [TIME] secs

Turns mBot left at the specified power for the specified period of time
How to Use
The speed of mBot is positively related to the absolute value of the power.
Click the default power and time to set the ones you want. The following shows the default settings.
Note: The setting range of power is –100 to +100. A negative value indicates moving reversely.
Example
When you press the space key, mBot turns left at the power of 50% for one second.
18. [ICON] turn right at power [POWER] % for [TIME] secs

Turns mBot right at the specified power for the specified period of time
How to Use
The speed of mBot is positively related to the absolute value of the power.
Click the default power and time to set the ones you want. The following shows the default settings.
Note: The setting range of power is –100 to +100. A negative value indicates moving reversely.
Example
When you press the space key, mBot turns right at the power of 50% for one second.
19. [ICON] [MOVE_DIRECTION] at power [POWER] %

Moves mBot at the specified power in the specified direction
How to Use
This block provides four direction options, namely forward, backward, left, and right. Click the default direction to select the one you want.
The speed of mBot is positively related to the absolute value of the power. Click the default power to set the one you want. The following shows the default settings.
Note: The setting range of power is –100 to +100. A negative value indicates moving reversely.
Example
When you press the space key, mBot moves forward at the power of 50%.
20. [ICON]left wheel turns at power [POWER_LEFT] %,right wheel at power [POWER_RIGHT] %

Turns the left wheel and right wheel of mBot at the specified power
How to Use
The turning speed of mBot’s wheels is positively related to the absolute value of the power.
Click the default power to set the one you want. The following shows the default settings of this block.
Note: The setting range of power is –100 to +100. A negative value indicates moving reversely.
Example
When you click the space key, the left wheel of mBot turns at the power of 50%, and the right one turns at the power of 40%.
21. [ICON] stop moving

Stops the motion of mBot
How to Use
No parameter or information is required to use this block. You can drag it to the Scripts area to use it directly.
Example
After you press the space key, mBot moves forward at the power of 50% for 10 seconds and then stops moving.
22. [ICON] light sensor [PORT] light intensity

Reports the light intensity sensed by the specified light sensor
How to Use
The preceding figure shows the position of mBot’s light sensor. It detects the intensity of ambient light. The value ranges from 0 to 1000, exposed to sunlight (> 500), in the evening (0–100), and in indoor lighting (100–500).
mBot is equipped with an on-board light sensor and provides two ports that can be connected to light sensors.
Click the default light sensor to select the one you want. The following shows the default setting.
Note: This is a reporter block that must be used in combination with another block requiring data. It cannot be used independently.
Example
When you press the space key, the display panel connected to port 1 of mBot displays the light intensity sensed by the on-board light sensor.
23. [ICON]ultrasonic sensor [PORT] distance(cm)

Reports the distance of an obstacle sensed by the specified ultrasonic sensor
How to Use
An ultrasonic sensor can be used to detect distance. The precision is 1 cm and the detection distance ranges from 3 cm to 400 cm.
mBot provides four ports that can be connected to ultrasonic sensors.
Click the default port to select the one to which the ultrasonic sensor is connected. The following shows the default setting.
Note: This is a reporter block that must be used in combination with another block requiring data. It cannot be used independently.
Example
When you press the space key, the display panel connected to port 1 of mBot displays the distance of an obstacle sensed by the ultrasonic sensor connected to port 3.
24. [ICON]line follower sensor [PORT] value

Reports the value of the specified line follower sensor
How to Use
With the detection range of 1 cm to 2 cm, a line follower sensor includes two sub-sensors, each consisting of an infrared emitter and receiver.
Depending on whether the infrared receiver receives reflected infrared signals, the line follower sensor may output one of the following four values:
0: Neither of sub-sensors 1 and 2 have received signals
1: Sub-sensor 1 has not received signals, and sub-sensor 2 has
2: Sub-sensor 1 has received signals, and sub-sensor 2 has not
3: Both sub-sensors 1 and 2 have received signals
The infrared receiver may receive no reflected infrared signals because the line follower sensor runs on a black surface or the object to be detected is out of the detection range; and it may receive the signals because the sensor runs on a white or light-color surface.
mBot provides 4 ports that can be connected line follower sensors.
Click the default port to select the one to which the specified line follower sensor is connected. The following shows the default setting.
Note: This is a reporter block that must be used in combination with another block requiring data. It cannot be used independently.
Example
When you press the space key, the display panel connected to port 1 of mBot displays the value of the line follower sensor connected to port 2.
25. [ICON] line follower sensor [PORT] detects [LINEFOLLOW_STATE] being [BLACK_WHITE] ?

Determines whether the color detected in the specified direction by the specified line follower sensor is the one you specify
How to Use
A line follower sensor detects colors through emitting and receiving infrared signals, and the detection range is 1 cm to 2 cm.
mBot provides 4 ports that can be connected to line follower sensors.
Click the default port to select the one to which the line follower sensor is connected.
Click the direction and color to define the ones you want. The following shows the default settings.
Note: This is a Boolean block that contains a condition. Use it in combination with another block that requires a condition.
Example
After you press the space key, mBot stops moving if the line follower sensor connected to port 2 detects that the leftside is black.
26. [ICON]when on-board button [OPTION]?

Determines whether the on-board button of mBot is pressed
How to Use
mBot is equipped with a programmable button on the main board, as shown in the preceding figure. You can program the button to implement various effects.
This block provides two state options for the button, namely pressed and released.
Click the default state to select the one you want. The following shows the default setting.
Note: This is a Boolean block that contains a condition. Use it in combination with another block that requires a condition.
Example
After you press the space key, all LEDs of mBot are lit up in red if you press the on-board button.
27. [ICON] IR remote [REMOTE_KEY] pressed?

Determines whether the specified button of the IR control is pressed
How to Use
mBot is delivered with an IR control that is equipped with multiple buttons.
Click the default button to select the target button. The following shows the default setting.
Note: This is a Boolean block that contains a condition. Use it in combination with another block that requires a condition.
Example
After you press the space key, the display panel connected to port 1 of mBot displays the text hello if you press button A of the IR control.
28. [ICON]send IR message [MESSAGE]

Sends the specified IR message
How to Use
mBot sends IR messages with its IR transmitter.
Click the default message to set the one you want to send. The following shows the default setting.
Example
When you press the space key, mBot sends the IR message hello.
29. [ICON] IR message received

Reports the received IR message
How to Use
mBot receives IR messages with its IR receiver.
This is a reporter block that must be used in combination with another block requiring data. It cannot be used independently.
Example
When you press the space key, the display panel connected to port 1 of mBot displays the IR message that mBot receives.
30. [ICON] timer

Reports the count value of the timer
How to Use
The timer starts to count from 0 each time the mBot is powered on. This block reports the duration mBot runs this time.
This is a reporter block that must be used in combination with another block requiring data. It cannot be used independently.
Example
When you press the space key, the display panel connected to port 1 of mBot displays the duration mBot runs this time.
31. [ICON] reset timer

Resets the timer of mBot to Zero
How to Use
The timer of mBot starts to count from zero each time mBot is powered on.
You can use this block to reset the timer, making it start to count from zero again.
Example
When you press the space key, the timer of mBot is reset and starts to count from zero again.
32. when mBot(mcore) starts up

Starts to execute the subsequent block(s) when mBot is turned on
How to Use
This is a hat block that activates a script. It is placed on top of other blocks.
This block can be used only in the Upload mode.
Example
Upload the program to mBot and then turn mBot off. All the LEDs of mBot are lit up in red when you turn on mBot again.
33. when on-board button [IS_PRESS]

Starts to execute the subsequent block(s) when the on-board button of mBot is pressed
How to Use
This is a hat block that activates a script. It is placed on top of other blocks.
This block can be used only in the Live mode.
Example
When you press the on-board button of mBot, all LEDs of mBot are lit up in red.

若有收获,就点个赞吧
0 人点赞
