- 1. quad rgb sensor [index] L1, R1’s [inputMenu_1] status is [inputMenu_2] ?
- 2. quad rgb sensor [index] L1, R1’s [inputMenu_1] status (0~3)
- 3.quad rgb sensor [index] [inputMenu_1] status is [inputMenu_2] ?
- 4. quad rgb sensor [index] [inputMenu_1] status (0~15)
- 5. quad rgb sensor [index] probe[inputMenu_2] detected [inputMenu_3] ?
- 6. quad rgb sensor [index] probe[inputMenu_2] detected [inputMenu_3]
- 7. quad rgb sensor [index] deviation (-100~100)
- 8. quad rgb sensor [index] sets fill light color of line-following to [fieldMenu_3]
- 9. quad rgb sensor [index] turn off fill light
1. quad rgb sensor [index] L1, R1’s [inputMenu_1] status is [inputMenu_2] ?

Determines whether probes R1 and L1 on the quad RGB sensor detect the line, background, or specified color
How to use
The quad RGB sensor can detect colors on the surface of an object, and you can use it to help robots follow lines.
It is equipped with four probes, defined as probes R2, R1, L1, and L2, as shown in the following figure.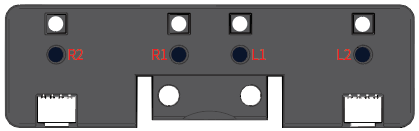
Detection range: 5–15 (mm) from the object to be detected
The number in this block indicates the place of a quad RGB sensor among the ones connected to CyberPi. As shown in the following figure, the number 1 indicates the first quad RGB sensor connected, 2 indicates the second one, and so on.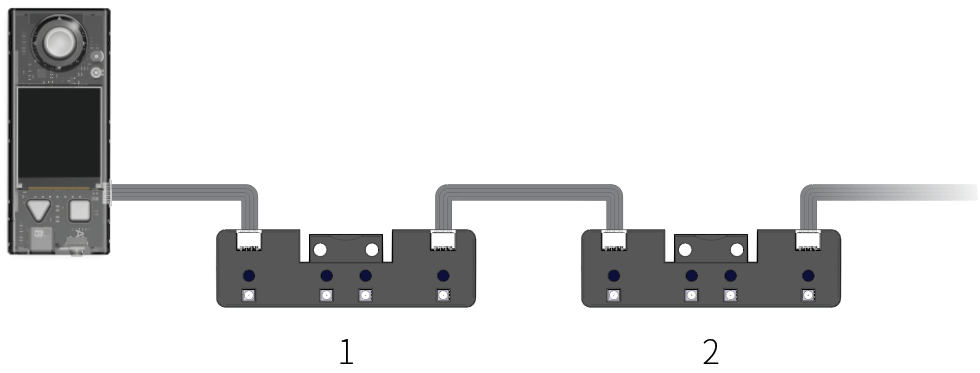
Note: This is a Boolean block that contains a condition. Use it in combination with another block that requires a condition.
Click to select an item you want to detect from the drop-down list box. You can select the line, background, or one of the colors.
The state values range from 0 to 3, equivalent to the binary numbers 00 to 11. The following figure shows how a detection result is expressed by a binary number.

Example
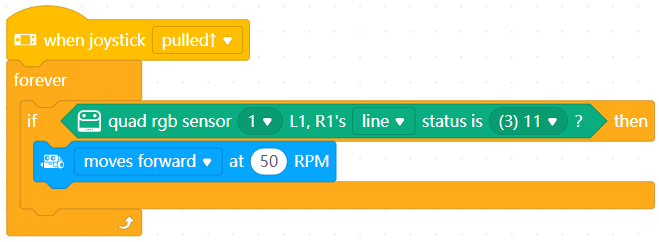
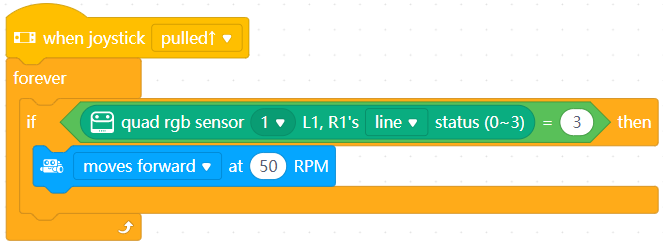
After you upload the program to CyberPi of mBot2, when you move the joystick up, mBot2 moves forward if both L1 and R1 detect a line.
Note: In the state value (3)11, both the binary bits are 1 (true), indicating that both L1 and R1 detect a line.
2. quad rgb sensor [index] L1, R1’s [inputMenu_1] status (0~3)

Reports whether probes R1 and L1 on the quad RGB sensor detect the line, background, or specified color
How to use
This is a reporter block that must be used in combination with another block requiring data.
Click to select an item you want to detect from the drop-down list box. You can select the line, background, or one of the colors.
The state values range from 0 to 3, equivalent to to the binary numbers 00 to 11, as described in the following:
0: 00
1: 01
2: 10
3: 11
The following figure shows how a detection result is expressed by a binary number.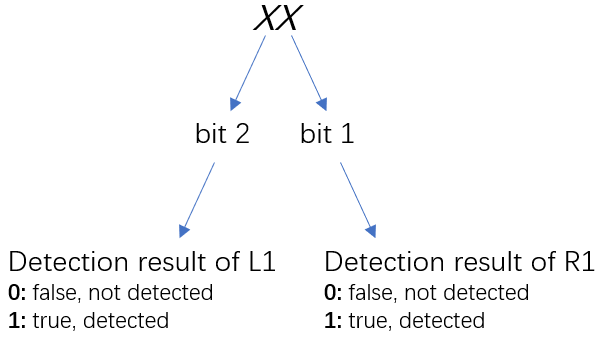
Example
After you upload the program to CyberPi of mBot2, when you move the joystick up, mBot2 moves forward if both L1 and R1 detect a line.
Note: The state value 3 is equivalent to the binary number 11. Both the binary bits are 1 (true), indicating that both L1 and R1 detect a line.
3.quad rgb sensor [index] [inputMenu_1] status is [inputMenu_2] ?

Determines whether the four probes on the quad RGB sensor detect the line, background, or specified color
How to use
The quad RGB sensor can detect colors on the surface of an object, and you can use it to help robots follow lines.
It is equipped with four sensing elements, defined as probes R2, R1, L1, and L2, as shown in the following figure.
Detection range: 5–15 (mm) from the object to be detected
Note: This is a Boolean block that contains a condition. Use it in combination with another block that requires a condition.
Click to select an item you want to detect from the drop-down list box. You can select the line, background, or one of the colors.
The state values range from 0 to 15, equivalent to the binary numbers 0000 to 1111. The following figure shows how a detection result is expressed by a binary number.
Example
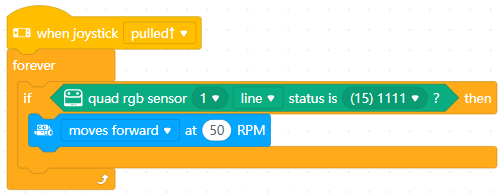
After you upload the program to CyberPi of mBot2, when you move the joystick up, mBot2 moves forward if all of L2, L1, R1, and R2 detect a line.
Note: In the state value (15)1111, all the four binary bits are 1 (true), indicating that all of L2, L1, R1, and R2 detect a line.
4. quad rgb sensor [index] [inputMenu_1] status (0~15)

Reports whether the four probes on the quad RGB sensor detect the line, background, or specified color
How to use
This is a reporter block that must be used in combination with another block requiring data.
Click to select an item you want to detect from the drop-down list box. You can select the line, background, or one of the colors.
The state values range from 0 to 15, equivalent to to the binary numbers 0000 to 1111, as described in the following:
0: 0000
1: 0001
2: 0010
3: 0011
4: 0100
5: 0101
6: 0110
7: 0111
8: 1000
9: 1001
10: 1010
11: 1011
12: 1100
13: 1101
14: 1110
15: 1111
The following figure shows how a detection result is expressed by a binary number.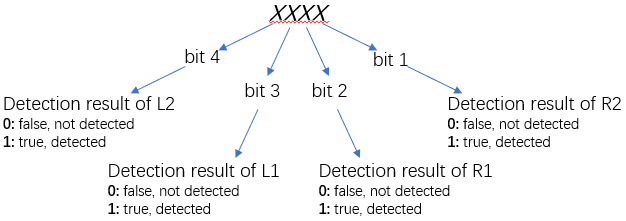
Example
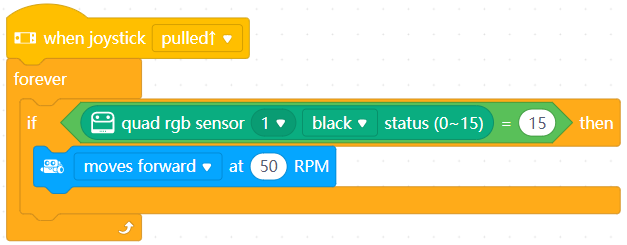
After you upload the program to CyberPi of mBot2, when you move the joystick up, mBot2 moves forward if all of L2, L1, R1, and R2 detect a line.
Note: The state value 15 is equivalent to the binary number 1111. All the four binary bits are 1 (true), indicating that all of L2, L1, R1, and R2 detect a line.
5. quad rgb sensor [index] probe[inputMenu_2] detected [inputMenu_3] ?

Determines whether the specified probe on the quad RGB sensor detects a line, background, or the specified color
How to use
Quad RGB Sensor is equipped with four probes, defined as follows:
Click to select a quad RGB sensor and light sensor, and select the line, background, or the color. By default, the quad RGB sensor detects dark lines on a light-colored background.
Example

After you press the up arrow key, mBot2 moves forward if probe R2 detects a line and keeps turning left if R2 detects no line.
6. quad rgb sensor [index] probe[inputMenu_2] detected [inputMenu_3]

Reports the value of the specified item detected by the specified probe on the quad RGB sensor
How to use
Quad RGB Sensor is equipped with four probes, defined as follows:
The light sensors can be used to detect the following items:
- R, G, or B value of an object
- Gray scale of an object
- Ambient light intensity
- Color
Click to select a quad RGB sensor and probe and select an item.
You can select the check box on the left of this block to see the value of the item detected by the probe of the quad RGB sensor.
This is a reporter block that must be used in combination with another block requiring data.
Example

After you press the space key, the LEDs on CyberPi are lit up in a color that changes with the color detected by probe R2 of the quad RGB sensor.
7. quad rgb sensor [index] deviation (-100~100)
Reports how much the quad RGB sensor deviates from the line to be followed
How to use
Click to select a quad RGB sensor from the drop-down list box.
Value range of the deviation: –100 to +100
The value –100 indicates that the quad RGB sensor is on the left of the line to be followed.
Example
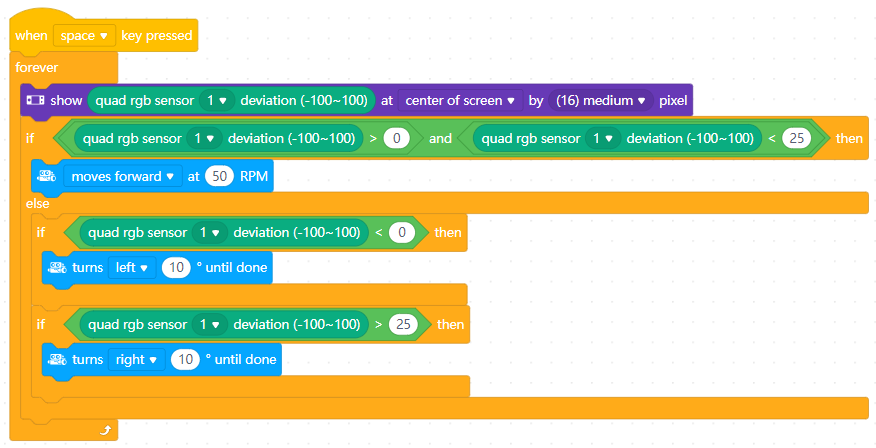
After you press the space key, the display on CyberPi displays how much Quad RGB Sensor deviates from the line to be followed, and mBot2 moves forward and turns left or right based on the conditions.
8. quad rgb sensor [index] sets fill light color of line-following to [fieldMenu_3]

Sets the fill lights of the quad RGB sensor to the specified color
How to use
The light of the fill lights on the quad RGB sensor is visible, which significantly reduces the interference of the ambient light.
You can set the color of the fill lights by using this block or by long-pressing the butto on the sensor.
Note:
- You need to change the color of the fill lights in some application scenarios. For details, see “Line detection scenarios.”
- The quad RGB sensor can detect colors regardless of what color the fill lights is.
- Long-pressing the button on the sensor may change the color of the fill lights you set by using this block.
Example

After you upload the program to CyberPi, mBot2 moves forward. If probes L1 and R1 detect the red color, the color of the fill lights is set to green; and if the yellow color is detected, the color of the fill lights is set to blue.
9. quad rgb sensor [index] turn off fill light
Turns off the fill lights of the quad RGB sensor
How to use
You can use this block to turn off the fill lights. After being turned off, the fill lights are lit up automatically when another block is used for line, background, or color detection.
Example
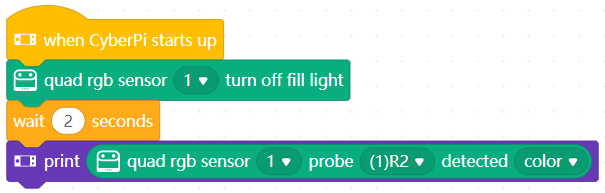
After you upload the program to CyberPi, the fill lights of the quad RGB sensor are turned off and then are lit up in two seconds.

若有收获,就点个赞吧
0 人点赞
