- Introduction
- Start programming
- Add extensions
- More help
- 2. play[file_name]until done
- 3. play[file_name]
- 4. start recording
- 5. stop recording
- 6. play recording until done
- 7. play recording
- 8. play note[number_1]for[number_2]beat
- 9. play[fieldMenu_1]for [number_3]beat
- 10. increase audio speed by [number_1]%
- 11. set audio speed to[number_1]%
- 12. audio speed
- 13. increase volume by[number_1] %
- 14. set volume to[number_1] %
- 15. volume(%)
- 16. play buzzer at [number_1]Hz for [number_2]secs
- 17. play buzzer at [number_2]Hz
- 18. stop all sounds
- 19. play LED animation[LED_animation]until done
- 20. display[ledRing]
- 21. roll[led_number]LEDs rightwards
- 22. LED[fieldMenu_1]displays [color_1]for [number_3]secs
- 23. LED[fieldMenu_1]displays[color_1]
- 24. LED[fieldMenu_1]displays R[r] G[g] B[b] for[number_5]secs
- 25. LED[fieldMenu_1]displays R [r] G [g] B [b]
- 26. increase LED brightness by [number_1] %
- 27. set brightness to [number_1] %
- 28. turn off LED[fieldMenu_1]
- 29. LED brightness(%)
- 30. print[string_2] and move to a newline
- 31. print[string_2]
- 32. set print size to [inputMenu_1]
- 33. show label [fieldMenu_1] [string_2] at [fieldMenu_2] by[inputMenu_4]pixel
- 34. show label [fieldMenu_1] [string_2]at x[number_2] y[number_3]by[inputMenu_4]pixel
- 35. line chart, add data[number_1]
- 36. line chart, set spacing to [number_3] pixel
- 37. bar chart, add data[number_1]
- 38. table, input[string_3] at row[fieldMenu_1], column[fieldMenu_2]
- 39. set brush color[color_1]
- 40. set brush color to R [number_1] G [number_2] B [number_3]
- ">41. screen towards[fieldMenu_1]

- 42. clear screen
- ">43. control[spriteMenu_1]to follow CyberPi with sensitivity[GRADE]

- 44. [tilt]?
- 45. [tilt]detected?
- 46. shaking strength
- 47. waving direction (°)
- 48. waving speed
- 49. [rotation]angle (°)
- 50. motion sensor[axis]acceleration(m/s²)
- 51. angle speed around [axis]axis(°/s)
- 52. rotated angle around [axis]axis (°)
- 53. reset rotated angle around[axis]axis
- 54. reset yaw angle
- 55. joystick[fieldMenu_1]?
- 56. joystick [fieldMenu_1]counts
- 57. reset joystick [fieldMenu_1]counts
- 58. button[fieldMenu_1]pressed?
- 59. button[fieldMenu_1]press counts
- 60. reset button[fieldMenu_1]press counts
- 61. loudness
- 62. ambient light intensity
- 63. timer(s)
- 64. reset timer
- 65. hostname
- 66. [fieldMenu_1]
- 67. broadcast message [message] on LAN
- 68. broadcast message[message]with value[value]on LAN
- 69. when receiving[message]boadcast on LAN
- 70. LAN broadcast [message]value received
- 71. connect to Wi-Fi[ssid] password [wifipassword]
- 72. network connected?
- 73. speak[fieldMenu_1][string_2]
- 74. recognize[fieldMenu_1] [number_2]secs
- 75. speech recognition result
- 76. translate[string_1] into[fieldMenu_2]
- 77. send user cloud broadcast[message]
- 78. send user cloud broadcast [message]with value [value]
- 79. when receiving user cloud broadcast[message]
- 80. user cloud broadcast[message]value received
- 81. [LOCATION] [WEATHER_TYPE]
- 82. air quality[METEOROLOGICAL] [aq_type]
- 83. [LOCATION] [sun_move_type] [time_type]
- 84. get [fieldMenu_1]’s [fieldMenu_2]
- 85. [ICON]when CyberPi starts up
- 86. [image_1]when joystick [fieldMenu_2]
- 87. [image_1]when button[fieldMenu_2]pressed
- 88. [image_1]when CyberPi[tilt]
- 89. [image_1]when[tilt]detected
- 90. [image_1]when[fieldMenu_2]value [fieldMenu_3][number_3]
- 91. [image_1]restart CyberPi
- 92. insert code [string_1]
- 93. read[string_2] in[fieldMenu_1]
Introduction
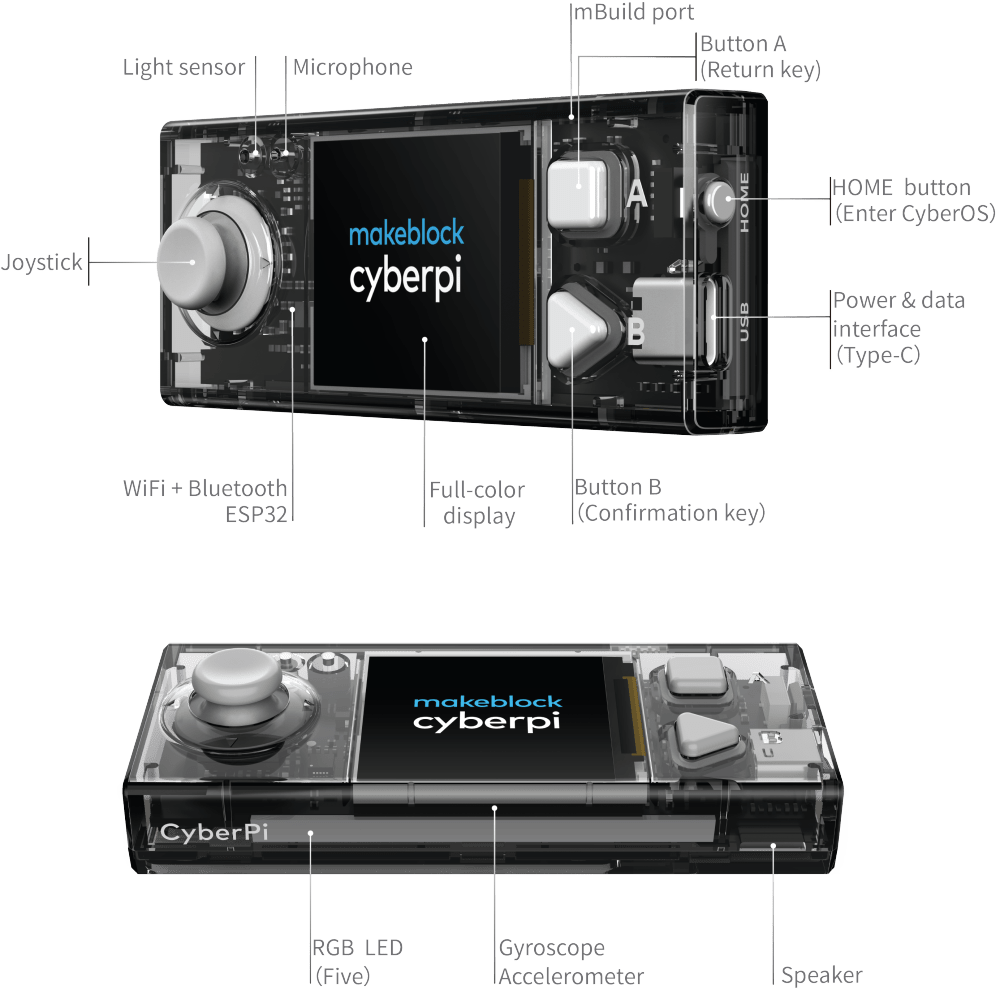
CyberPi is a main control board developed independently by Makeblock. With the compact structure and built-in interfaces, it can be easily extended. It supports mBlock 5 and mBlock-Python Editor; is applicable to multiple education scenarios including large-class teaching, community teaching, and online/offline education & training; covers multiple teaching fields including coding, makers, and robots; and thus can meet the diversified education needs, such as AI, IoT, data science, and UI design.
Start programming
- Use a Type-C USB data cable to connect CyberPi to your computer.

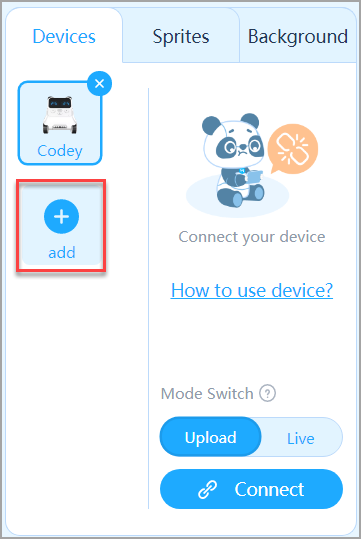
- In mBlock 5, click + add to add CyberPi from the device library.
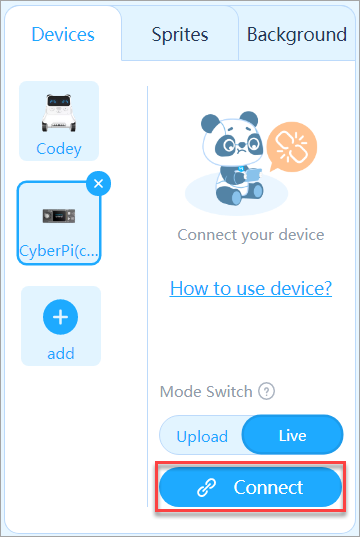
- Click Connect to connect your CyberPi to mBlock 5.
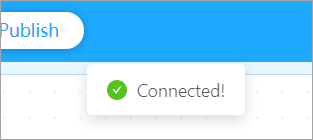
After your CyberPi is connected, mBlock 5 displays a message indicating successful
connection.
- Choose a program execution mode, Live or Upload.
mBlock 5 provides two program execution modes, Live and Upload. You can click to switch to modes.
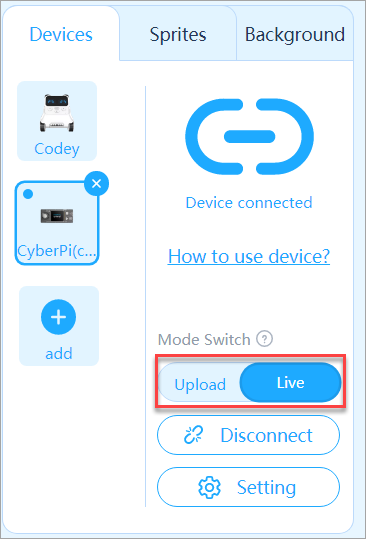
Upload mode: In Upload mode, you need to upload the compiled program to the device. After being successfully uploaded, the program can still run properly on the device when the device is disconnected from mBlock 5.
Live mode: In Live mode, you can view the program execution effect in real time, which facilitates the debugging of the program. In this mode, you must keep the device connected to mBlock 5. If they are disconnected, the program cannot be executed.
Now, you can start to have fun with programming!
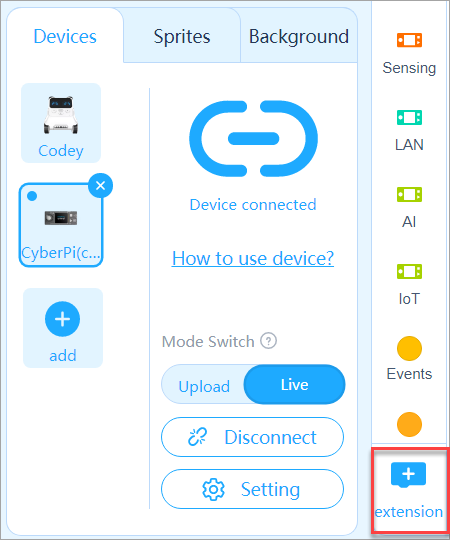
Add extensions
CyberPi supports abundant extensions, including various mBuild sensors, upload mode broadcast. Click + extension in the blocks area to add an extension from the extension center.
More help
For the user manual of CyberPi series products and operation guide of CyberPi, see CyberPi Series User Manual and CyberPi Operation Guide.
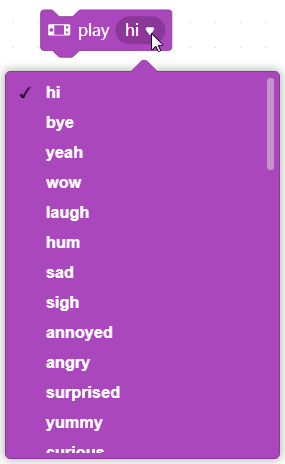
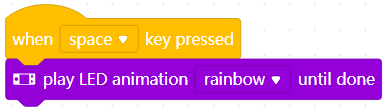
2. play[file_name]until done

Plays the specified sound until the playing ends
How to Use
When this block is executed, the subsequent blocks are executed after the playing ends.
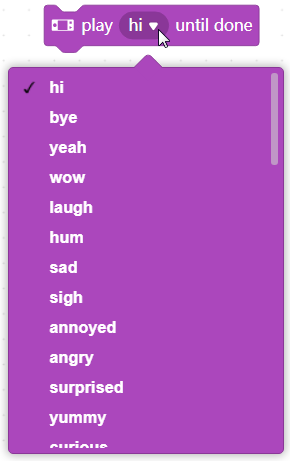
Click to select the sound to be played from the drop-down list box.
Example
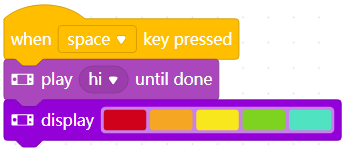
When you press the space key, CyberPi says “Hi” and then lights up the LEDs.
3. play[file_name]

Plays the specified sound
How to Use
Click to select the sound to be played from the drop-down list box.
Example
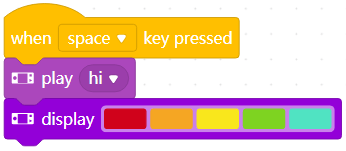
When you press the space key, CyberPi says “Hi” while lighting up the LEDs.
4. start recording

Starts to record sounds
How to use
When this block is executed, CyberPi starts to record sounds until the stop recording block is executed or the recording exceeds 10 seconds. The recorded file is stored in RAM, and so the recorded file is lost if CyberPi is power off.
Example
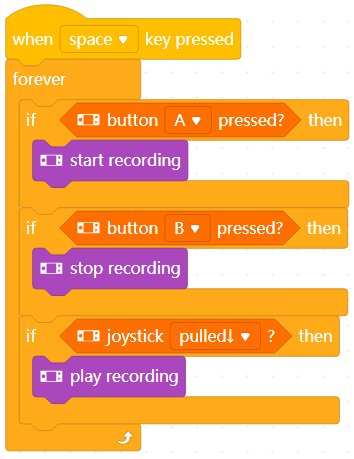
In Live mode, press the space key, and then press button A on CyberPi to record sounds; press button B to stop the recording; and move the joystick down to play the sounds recorded.
5. stop recording

Stops the recording
How to use
This block needs to be used in combination with the start recording block.
When it is executed, CyberPi stops the recording.
Example

In Live mode, press the space key, and then press button A on CyberPi to record sounds; press button B to stop the recording; and move the joystick down to play the sounds recorded.
6. play recording until done

Plays the recorded sounds until the playing ends
How to use
When this block is executed, the subsequent blocks are executed after the playing ends.
Example
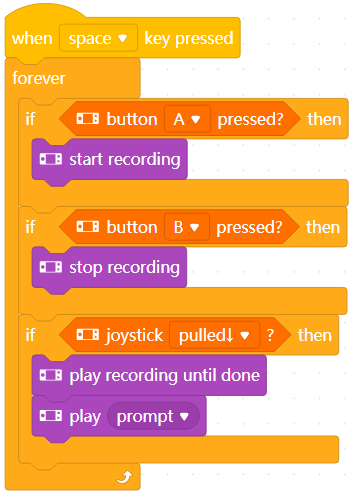
In Live mode, press the space key, and then press button A on CyberPi to record sounds; press button B to stop the recording; and move the joystick down to play the sounds recorded. After the playing ends, the prompt sound is played.
7. play recording

Plays the recorded sounds
How to use
When this block is executed, CyberPi plays the recorded sounds.
Example

In Live mode, press the space key, and then press button A on CyberPi to record sounds; press button B to stop the recording; and move the joystick down to play the sounds recorded.
8. play note[number_1]for[number_2]beat

Plays the specified piano note for the specified beats
How to use
You can use this block to compile and play music. When this block is executed, the subsequent blocks are executed after the playing ends.
note: frequency of the sound to be played, set by using Musical Instrument Digital Interface (MIDI) codes.
Setting range: 0–132
The following figure shows the relationship between MIDI codes and notes.

beat: duration a note is to be played
Setting range: beat > 0
At general playing speed, one beat equals one second.
Example
In Live mode, when you press the space key, CyberPi plays the piano note.
For more details, see the example “Twinkle, Twinkle, Little Start” in mBlock 5.
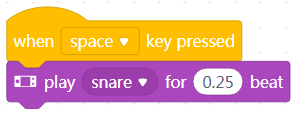
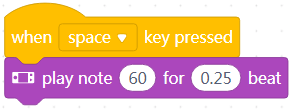
9. play[fieldMenu_1]for [number_3]beat

Plays the specified sound for the specified beats
How to use
Click to select a sound.
beat: duration a sound is to be played
Setting range: beat > 0
At general playing speed, one beat equals one second.
Example
In Live mode, when you press the space key, CyberPi plays the sound of snare.
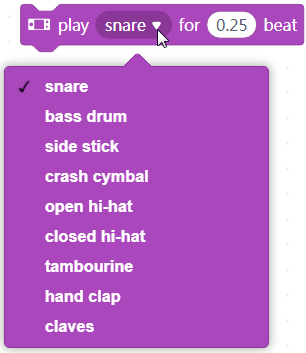
10. increase audio speed by [number_1]%

Changes the playing speed of CyberPi’s speaker
How to use
Click to set the percentage by which the playing speed is to be changed, where the percentage refers to the percentage of the normal playing speed.
The value you set must be an integer. A negative value indicates decreasing, and a positive one indicatesincreasing.
Example
In Live mode, after you press the space key, CyberPi plays the piano note twice, and the playing speed for the second time is higher.
11. set audio speed to[number_1]%

Sets the playing speed of CyberPi’s speaker
How to use
Click to set the playing speed of the speaker.
The value you set indicates the percentage of the normal playing speed.
Example
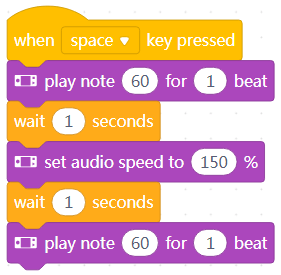
In Live mode, after you press the space key, CyberPi plays the piano note twice, and the playing speed for the second time is higher.
12. audio speed

Reports the current playing speed of CyberPi’s speaker
How to use
You can select the check box on the left of this block to see the playing speed on the stage.
The value 100 (%) indicates the normal playing speed.
This is a reporter block that must be used in combination with another block requiring data.
Example
Use this block in combination with a Display block.
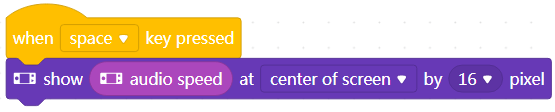
In Live mode, when you press the space key, CyberPi displays the playing speed in the center of its screen.
13. increase volume by[number_1] %

Changes the playing volume of CyberPi’s speaker
How to use
Click to set the percentage by which the volume is to be changed.
The value you set must be an integer. A negative value indicates decreasing, and a positive one indicates increasing.
Example

In Live mode, after you press the space key, CyberPi plays the piano note twice, and the playing volume for the second time is higher.
14. set volume to[number_1] %

Sets the playing volume of CyberPi’s speaker
How to use
Click to set the playing volume of the speaker.
Example
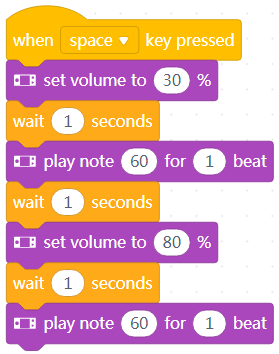
In Live mode, after you press the space key, CyberPi plays the piano note twice, and the playing volume for the second time is higher.
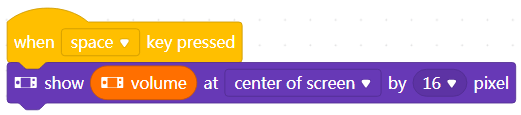
15. volume(%)

Reports the current playing volume of CyberPi’s speaker
How to use
You can select the check box on the left of this block to see the playing volume on the stage.
This is a reporter block that must be used in combination with another block requiring data.
Example
Use this block in combination with a Display block.
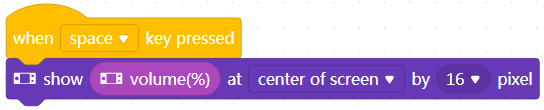
In Live mode, when you press the space key, CyberPi displays the playing volume in the center of its screen.
16. play buzzer at [number_1]Hz for [number_2]secs

Plays a sound at the specified frequency for the specified period
How to use
Click to set the frequency and time.
Setting range of the frequency: 20–5000 Hz
To protect your ears, no sound is made if the frequency is out of the range. Your ears may get hurt if you listen to high-frequency sounds for a long period.
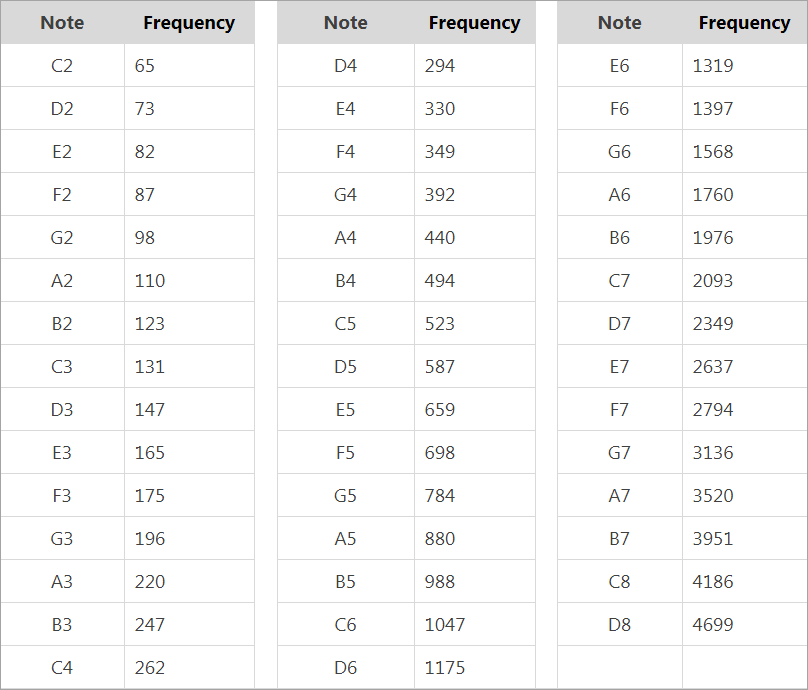
You can also change music by setting the frequency, refer to the notes and their corresponding frequencies, as shown in the following figure.

Example
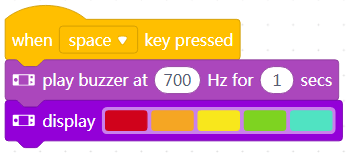
In Live mode, when you press the space key, CyberPi plays a sound for one second, and then lights up the on-board LEDs.
17. play buzzer at [number_2]Hz

Plays a sound at the specified frequency
How to use
Click to set the frequency.
Setting range of the frequency: 20–5000 Hz
To protect your ears, no sound is made if the frequency is out of the range. Your ears may get hurt if you listen to high-frequency sounds for a long period.
You can also change music by setting the frequency, refer to the notes and their corresponding frequencies, as shown in the following figure.
Example
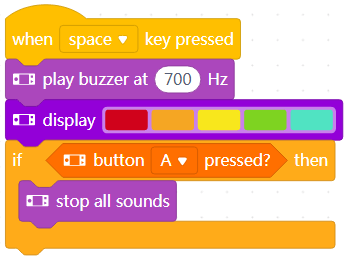
In Live mode, when you press the space key, CyberPi plays a sound and lights up the on-board LEDs at the same time, and the playing of the sound stops only after you press button A on CyberPi.
18. stop all sounds

Stops the playing of all sounds
How to use
This block is used to stop all the sounds played by CyberPi’s speaker.
Example
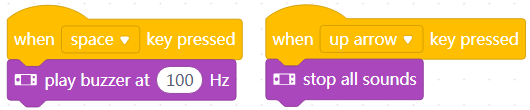
In Live mode, when you press the space key, CyberPi keeps making a sound; and when you press the arrow key ↑, CyberPi stops all the sounds.
19. play LED animation[LED_animation]until done

Displays the specifid LED animation until the display ends
How to use
When this block is executed, the subsequent blocks are executed after the display ends.
Click to select an LED animation from the drop-down list box.
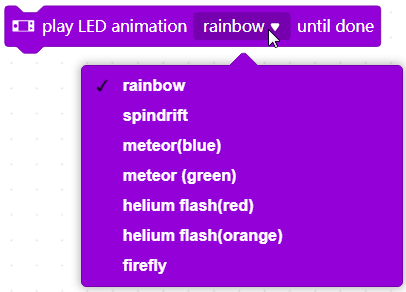
Example
In Live mode, when you press the space key, the LEDs on CyberPi display the entire rainbow animation.
20. display[ledRing]

Lights up CyberPi’s on-board LEDs in the specified color(s)
How to use
Click to set the color(s) of the LEDs.
Select a color and then click an LED.
The LED is set to the selected color.
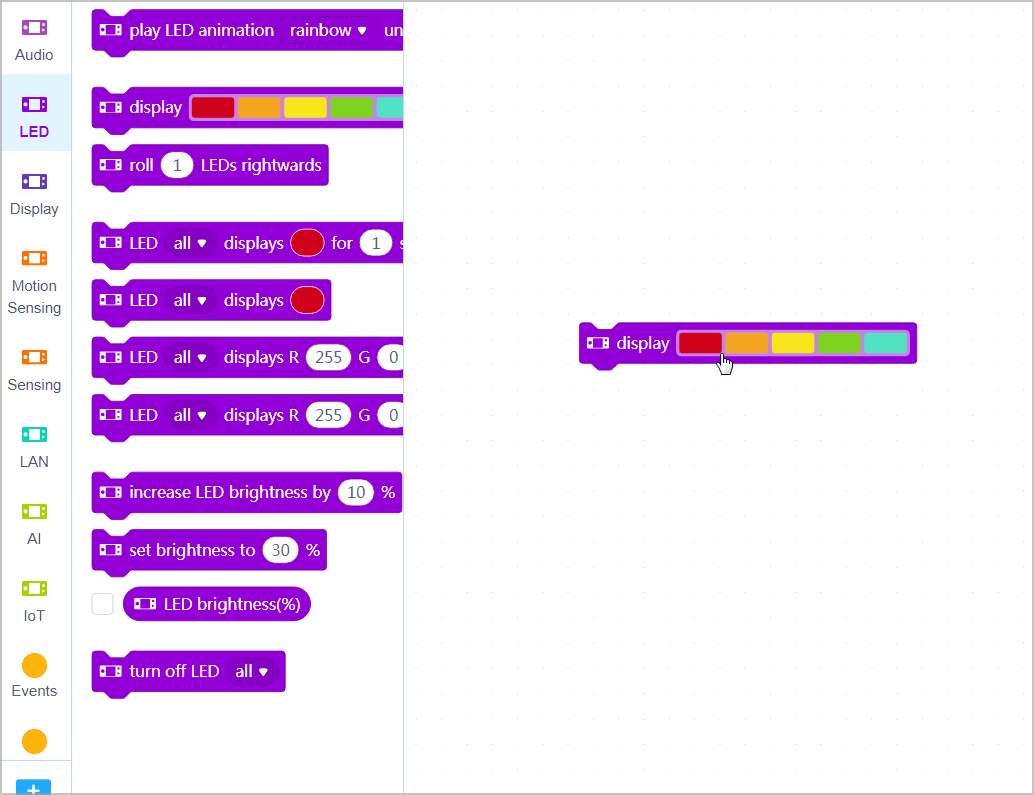
Example
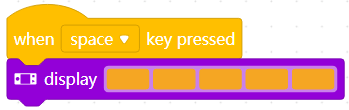
In Live mode, when you press the space key, the LEDs on CyberPi are lit up in orange.
21. roll[led_number]LEDs rightwards

Makes the colors of the LEDs roll from left to right by the specified number of positions
How to use
CyberPi is equipped with five LEDs, and each is assigned a position.
Example
In Live mode, when you press the space key, the LEDs are lit up in the colors you set; and then when you press button A on CyberPi, the colors of the LEDs roll from left to right by one position.
22. LED[fieldMenu_1]displays [color_1]for [number_3]secs

Lights up the specified LED(s) in the specified color for the specified period
How to use
Click to set the LED(s), color, and time.
You can select all LEDs or one specified LED. The numbers 1 to 5 indicate the positions of the LEDs, as shown in the following figure.

Example
In Live mode, when you press the space key, the first LED on CyberPi is lit up in red for one second.
23. LED[fieldMenu_1]displays[color_1]

Lights up the specified LED(s) in the specified color
How to use
Click to set the LED(s) and color.
You can select all LEDs or one specified LED. The numbers 1 to 5 indicate the positions of the LEDs, as shown in the following figure.

Example
In Live mode, when you press the space key, the first LED on CyberPi is lit up in red.
24. LED[fieldMenu_1]displays R[r] G[g] B[b] for[number_5]secs

Lights up the specified LED(s) in the specified color that is the combination of the specified intensity of red, green, and blue for the specified period
How to Use
Click to set the LED(s), color, and time.
You can select all LEDs or one specified LED. The numbers 1 to 5 indicate the positions of the LEDs, as shown in the following figure.

Intensity range of red, green, and blue: 0–255
Example

In Live mode, when you press the space key, all the LEDs on CyberPi are lit up in red for one second.
25. LED[fieldMenu_1]displays R [r] G [g] B [b]

Lights up the specified LED(s) in the specified color that is the combination of the specified intensity of red, green, and blue
How to Use
Click to set the LED(s) and color.
You can select all LEDs or one specified LED. The numbers 1 to 5 indicate the positions of the LEDs, as shown in the following figure.

Intensity range of red, green, and blue: 0–255
Example
In Live mode, when you press the space key, all the LEDs on CyberPi are lit up in red.
26. increase LED brightness by [number_1] %

Changes the brightness of CyberPi’s LEDs
How to use
Click to set the percentage by which the brightness is to be changed.
The value you set must be an integer. A negative value indicates decreasing, and a positive one indicates increasing.
Example
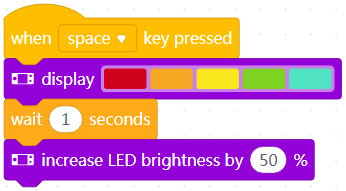
In Live mode, after you press the space key, the LEDs onCyberPi are lit up in the specified colors, and the brightness increases in one second.
27. set brightness to [number_1] %

Sets the brightness of CyberPi’s LEDs
How to use
Click to set the brightness of the LEDs.
Example
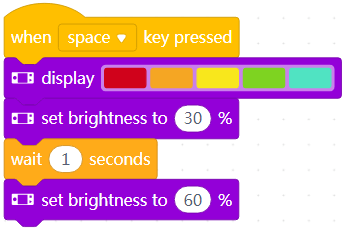
In Live mode, after you press the space key, the LEDs onCyberPi are lit up in the specified colors, and the brightness increases in one second.
28. turn off LED[fieldMenu_1]

Turns off the specified LED(s) on CyberPi
How to use
This block is used to turn off the specified LED(s) on CyberPi.
You can select all LEDs or one specified LED. The numbers 1 to 5 indicate the positions of the LEDs, as shown in the following figure.

Example
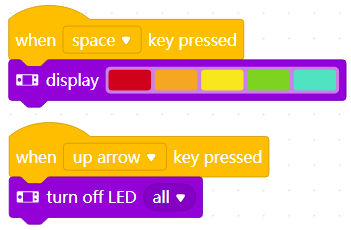
In Live mode, when you press the space key, the LEDs on CyberPi are lit up in the specified colors; and when you press the arrow key ↑, all the LEDs go out.
29. LED brightness(%)

Reports the current brightness of CyberPi’s LEDs
How to use
You can select the check box on the left of this block to see the brightness on the stage.
This is a reporter block that must be used in combination with another block requiring data.
Example

Use this block in combination with a Display block.
In Live mode, when you press the space key, CyberPi displays the brightness of the LEDs in the center of its screen.
30. print[string_2] and move to a newline

Displays texts on CyberPi’s screen with forced line breaks
How to use
Click to input the text to be displayed.
When this block is executed, a forced line break is inserted after the current text is displayed, and the next text is displayed on a new line.
Example
In Live mode, when you press the space key, the texts are displayed on CyberPi’s screen with forced line breaks, as shown in the following figure.
31. print[string_2]

Displays texts on CyberPi’s screen with automatic line breaks
How to use
Click to input the text to be displayed.
When this block is executed, texts are displayed on the same line, and when a line is full, the texts are continued on new lines.
Example
In Live mode, when you press the space key, the texts are displayed on CyberPi’s screen with automatic line breaks, as shown in the following figure.
32. set print size to [inputMenu_1]

Displays the specified text at the specified size on the screen of CyberPi
How to use
Click to select a font size from the drop-down list box.
Example
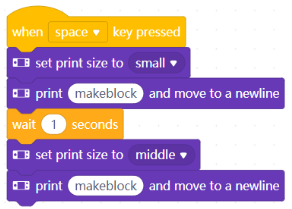
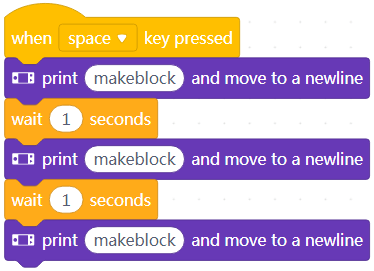
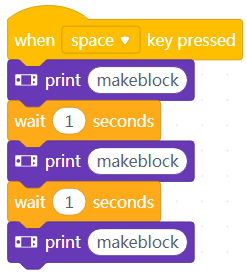
After you press the space key, CyberPi displays “makeblock”, and one second later, CyberPi displays “makeblock” in two lines and the size of all the texts are enlarged.
Note: CyberPi can’t display texts at two different sizes at a time.
33. show label [fieldMenu_1] [string_2] at [fieldMenu_2] by[inputMenu_4]pixel

Displays the specified text at the specified size in the specified position
How to use
You can display multiple texts on the screen by setting labels for them. A maximum of eight texts can be displayed.
Click to select a label, position, and font size from the drop-down list boxes, and enter a text.
Examples
Example 1
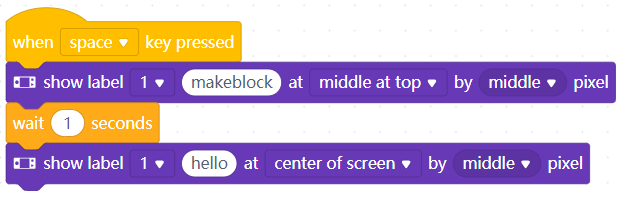
After you press the space key, makeblock is displayed on the screen and disappears in one second, and then hello is displayed.
Example 2
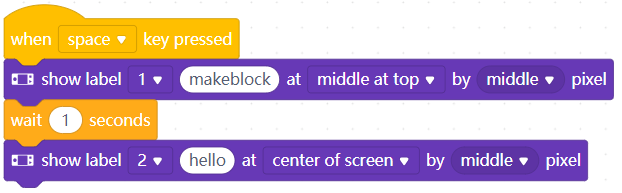
After you press the space key, makeblock is displayed on the screen, and one second later, hello is also displayed.
34. show label [fieldMenu_1] [string_2]at x[number_2] y[number_3]by[inputMenu_4]pixel

Displays the specified text at the specified size in the specified position (x,y)
How to use
You can display multiple texts on the screen by setting labels for them. A maximum of eight texts can be displayed.
Click to select a label and font size from the drop-down list boxes, and enter a text and the coordinates.
Note: The anchor point of the text is the top-left point, and therefore the coordinates you set is those of the top-left point of the text.
Examples
Example 1
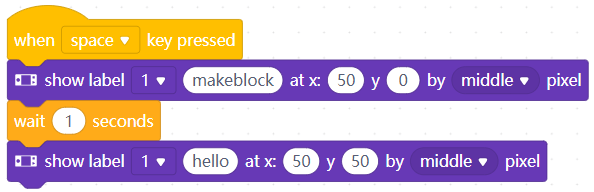
After you press the space key, makeblock is displayed on the screen and disappears in one second, and then hello is displayed.
Example 2
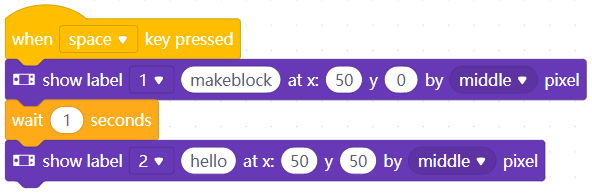
After you press the space key, makeblock is displayed on the screen, and one second later, hello is also displayed.
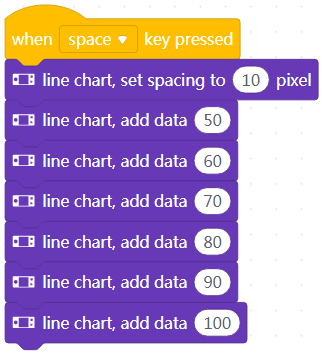
35. line chart, add data[number_1]

Adds a piece of data and displays a line chart on CyberPi’s screen
How to use
Data setting range: 0–100
If a value to be input exceeds the setting range, rescale all the original data to be within the setting range.
For example, you can rescale the values 200, 300, and 400 to 20, 30, and 40, respectively.
This block is used to add one piece of data at a time. You can use this block multiple times to add multiple pieces of data.
Example
In Live mode, when you press the space key, a line chart is displayed on CyberPi’s screen.
36. line chart, set spacing to [number_3] pixel

Sets the spacing between data points in a line chart
How to use
Spacing setting range: 0–128
For example, the following figures show the line charts with the same data but different data point spacings.
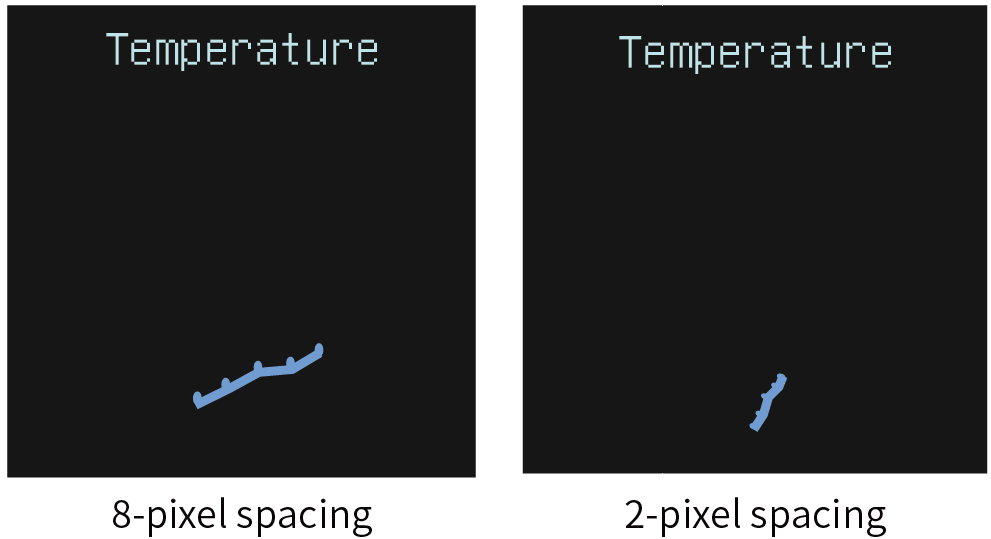
Example
In Live mode, when you press the space key, a line chart is displayed on CyberPi’s screen.
You can change the shape of the line chart by changing the spacing.
37. bar chart, add data[number_1]

Adds a piece of data and displays a bar chart on CyberPi’s screen
How to use
Data setting range: 0–100
If a value to be input exceeds the setting range, rescale all the original data to be within the setting range.
For example, you can rescale the values 200, 300, and 400 to 20, 30, and 40, respectively.
This block is used to add one piece of data at a time. You can use this block multiple times to add multiple pieces of data.
Note: To add multiple pieces of data in a bar chart, you need to set multiple brush colors to draw multiple data bars.
Example
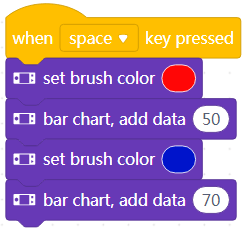
In Live mode, when you press the space key, a bar chart with two data bars is displayed on CyberPi’s screen.
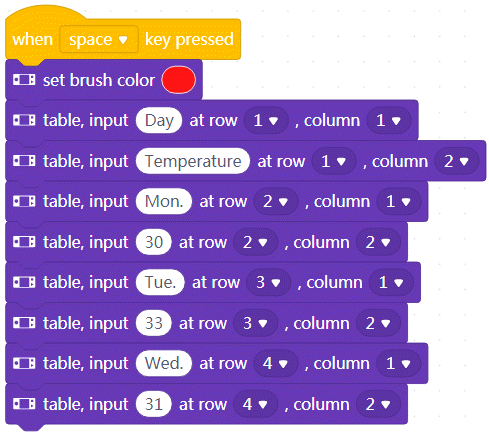
38. table, input[string_3] at row[fieldMenu_1], column[fieldMenu_2]

Adds a piece of data and displays a table on CyberPi’s screen
How to use
A maximum table of 4 (rows) × 3 (columns) is supported.
Click to set the row, column, and the content to be input.
Define a cell by setting the row and column.
When the content to be displayed in a cell is too long, it keeps scrolling to the right in the cell.
You can input texts into the table.
Example
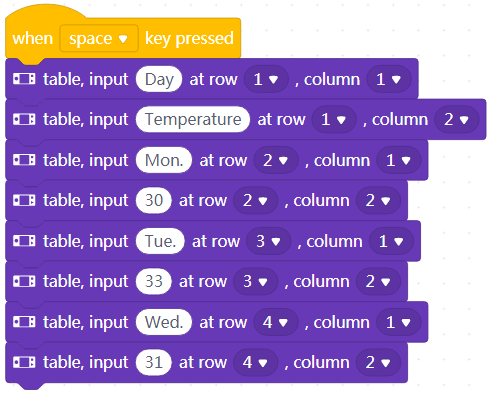
In Live mode, when you press the space key, a 4 × 2 table is displayed on CyberPi’s screen.
39. set brush color[color_1]

Sets the color of the brush
How to use
The brush here is used to draw line charts, bar charts, and tables. By setting the color of the brush, you can draw a line chart with different colors of lines, a bar chart with differnt colors of columns, and a table with the specified font color.
Click to set the color of the brush.
Example
Example 1
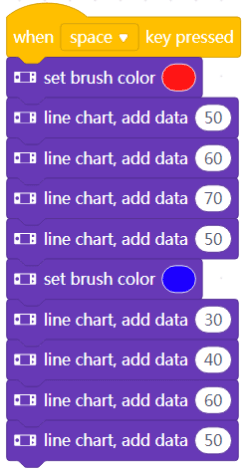
In Live mode, when you press the space key, a line chart with two different colors of lines is displayed on CyberPi’s screen.
Example 2
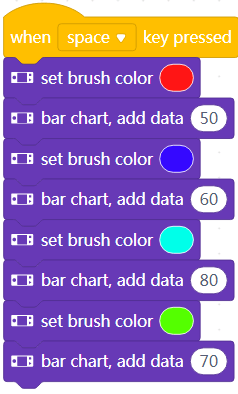
In Live mode, when you press the space key, a bar chart with four different colors of bars is displayed on CyberPi’s screen.
Example 3
In Live mode, when you press the space key, a table with the font color of red is displayed on CyberPi’s screen.
40. set brush color to R [number_1] G [number_2] B [number_3]

Sets the brush to the color that is the combination of the specified intensity of red, green, and blue
How to use
The brush here is used to draw line charts, bar charts, and tables. By setting the color of the brush, you can draw a line chart with different colors of lines, a bar chart with differnt colors of columns, and a table with the specified font color.
Click to set the intensity of red, green, and blue.
Intensity setting range: 0–255
Example
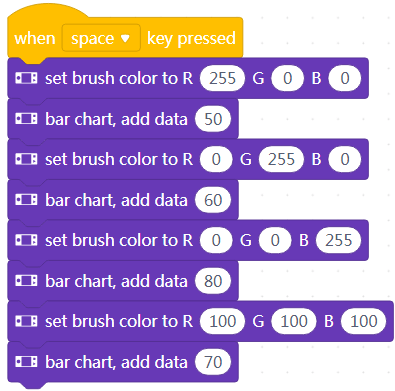
In Live mode, when you press the space key, a bar chart with four different colors of bars is displayed on CyberPi’s screen.
41. screen towards[fieldMenu_1]
Sets CyberPi’s screen to the specified displaying direction
How to use
With this block, you can rotate the displaying direction of CyberPi’s screen. Four direciton options are provided, as shown in the following:
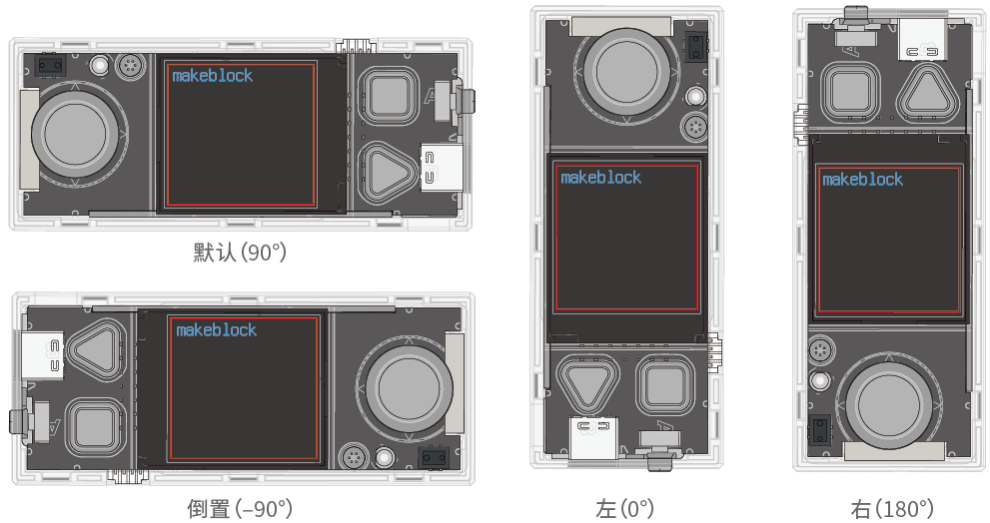
Example
In Live mode, when you press the space key, CyberPi displays “Hello” on its screen, as shown in the following figure.
42. clear screen

Clears CyberPi’s screen
How to use
To display information on CyberPi’s screen, you need to use this block to clear the screen first. Otherwise, the information may be superimposed on the information displayed before.
Example

In Live mode, when you press the space key, CyberPi displays “makeblock” on its screen and then clears the screen before displaying “Hello.”
43. control[spriteMenu_1]to follow CyberPi with sensitivity[GRADE]
Makes the specified sprite follow CyberPi with the specified sensitivity
How to use
This block recognizes all the sprites on the stage. Click to select a sprite from the drop-down list box
For how to add a sprite, see Add a Sprite.
Click to select a sensitivity from the drop-down list box.
A higher sensitivity indicates that the sprite responds more quickly to the motion of CyberPi.
Example

In Live mode, when you press the space key, the plane on the stage moves as you move CyberPi.
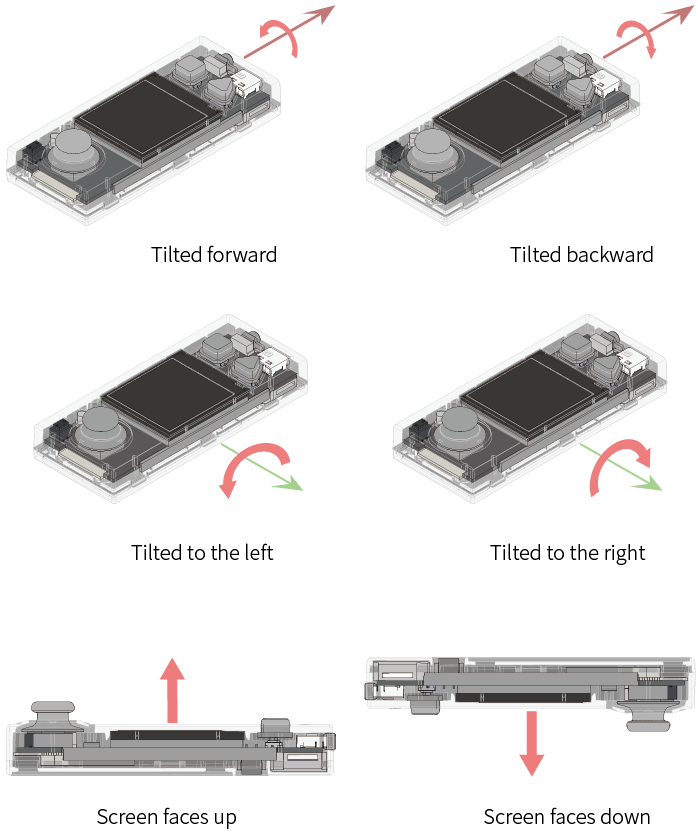
44. [tilt]?

Determines whether CyberPi is placed in the specified posture
How to use
Click to select a posture from the drop-down list box.
The following figure shows the postures defined for CyberPi.
This is a Boolean block that contains a condition. Use it in combination with another block that requires a condition.
Example
In Live mode, after you press the space key, the LEDs on CyberPi are lit up when you tilt CyberPi forward and turned off when you place it in another posture.
45. [tilt]detected?

Determines whether CyberPi is the specified motion state
How to use
Click to select a motion state from the drop-down list box.
The following figure shows the motion states defined for CyberPi.

This is a Boolean block that contains a condition. Use it in combination with another block that requires a condition.
Example
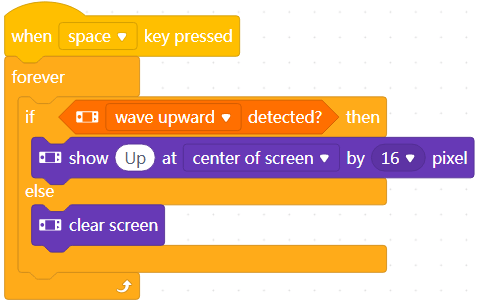
In Live mode, after you press the space key, CyberPi displays Up on its screen when you wave it up and clears the screen when you stop waving it up.
46. shaking strength

Reports how strong CyberPi is shaken
How to use
The shaking strength is positively related to the shaking frequency and amplitude.
Value range: 0–100
You can select the check box on the left of this block to see the shaking strength on the stage.
This is a reporter block that must be used in combination with another block requiring data.
Example

Use this block in combination with Display blocks.
In Live mode, after you press the space key, CyberPi displays the shaking strength in the center of its screen when you shake it and clears the screen when you stop shaking it.
47. waving direction (°)

Reports the direction in which CyberPi is waved
How to use
The waving direction is defined by angle, as shown in the following figure.
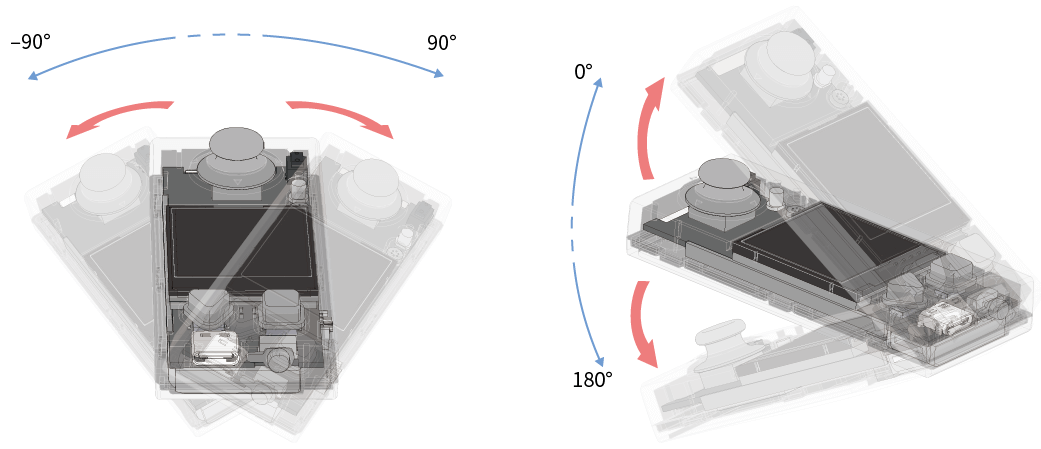
Value range: –179 to +180, in degrees (°)
You can select the check box on the left of this block to see the waving direction on the stage.
This is a reporter block that must be used in combination with another block requiring data.
Example
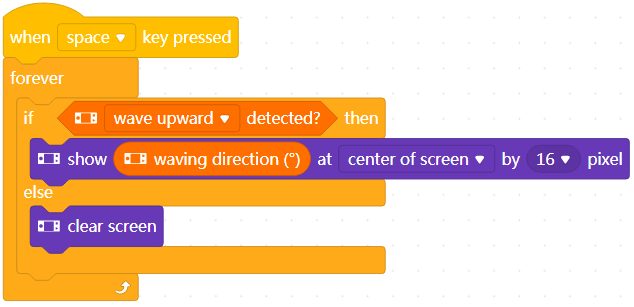
Use this block in combination with Display blocks.
In Live mode, after you press the space key, CyberPi displays the waving direction in the center of its screen when you wave it up and clears the screen when you stop waving it.
48. waving speed

Reports the speed at which CyberPi is waved
How to use
Value range: 0–100
You can select the check box on the left of this block to see the waving speed on the stage.
This is a reporter block that must be used in combination with another block requiring data.
Example
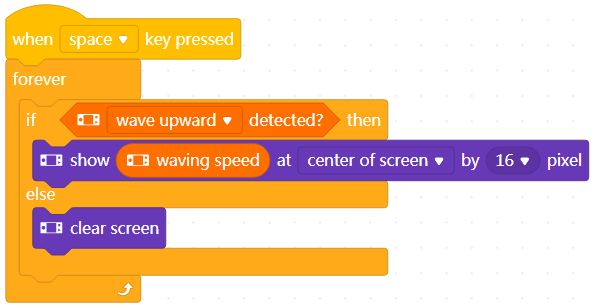
Use this block in combination with Display blocks.
In Live mode, after you press the space key, CyberPi displays the waving speed in the center of its screen when you wave it up and clears the screen when you stop waving it.
49. [rotation]angle (°)

Reports the angle of the specified posture
How to use
Click to select a posture from the drop-down list box.
The pitch, roll, and yaw angles are defined as follows.
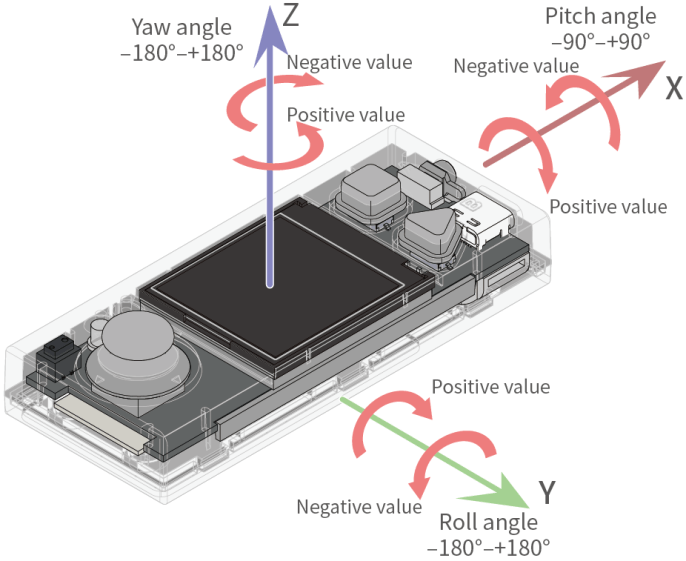
Value ranges:
Pitch angle: –90 to +90, in degrees
Roll angle: –180 to +180, in degrees
Yaw angle: –180 to +180, in degrees
You can select the check box on the left of this block to see the angle of the posture on the stage.
This is a reporter block that must be used in combination with another block requiring data.
Example
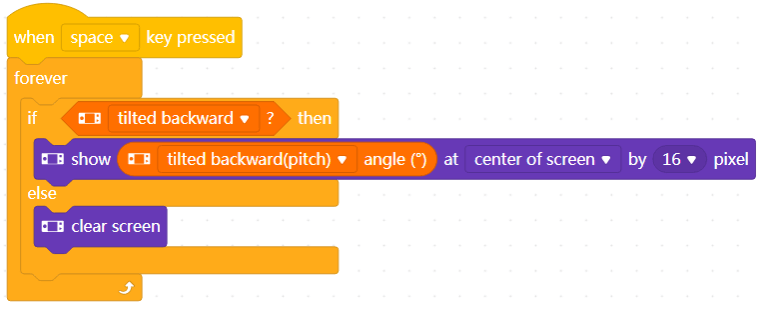
Use this block in combination with Display blocks.
In Live mode, after you press the space key, CyberPi displays the posture angle in the center of its screen when you tilts it backward and clears the screen when you stop tilting it.
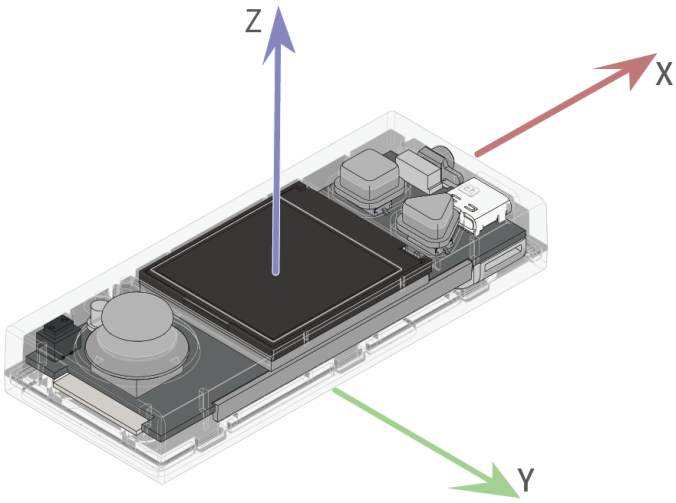
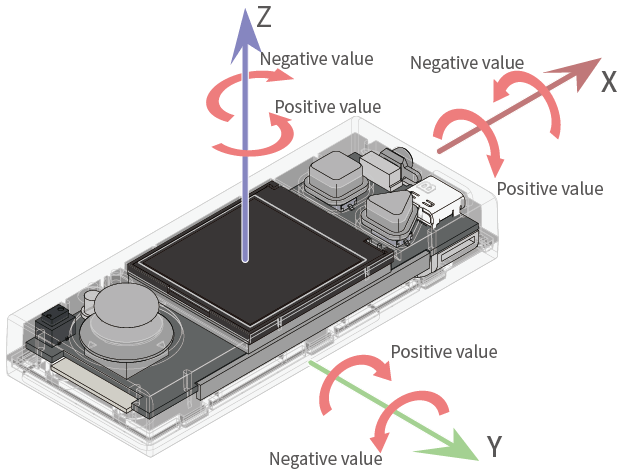
50. motion sensor[axis]acceleration(m/s²)

Reports the acceleration of CyberPi on the specified axis
How to use
Click to select an axis from the drop-down list box.
CyberPi is equipped with a motion sensor that can detects the acceleration of CyberPi on the x-, y-, and z-axis.
Note that the accelerometer measures Earth’s gravity. When CyberPi is placed on a desk, the output of the accelerometer on the z-axis is –9.8m/s² (1g = 9.8m/s²).
The axes are defined as follows.

You can select the check box on the left of this block to see the acceleration on the stage.
This is a reporter block that must be used in combination with another block requiring data.
Example
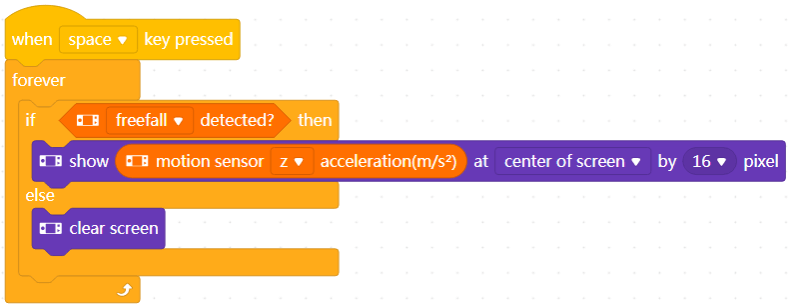
Use this block in combination with Display blocks.
In Live mode, after you press the space key, CyberPi displays the acceleration on the z-aixs in the center of its screen when it falls down and clears the screen when you hold it.
Note: When CyberPi falls down, let it land on a soft surface or catch it with your hand to prevent damage to CyberPi.
51. angle speed around [axis]axis(°/s)

Reports the angular speed at which CyberPi is rotated around the specified axis
How to use
Click to select an axis from the drop-down list box.
The axes are defined as follows.
Value range: –500 to +500, in degrees/second ()
You can select the check box on the left of this block to see the angular speed on the stage.
This is a reporter block that must be used in combination with another block requiring data.
Example
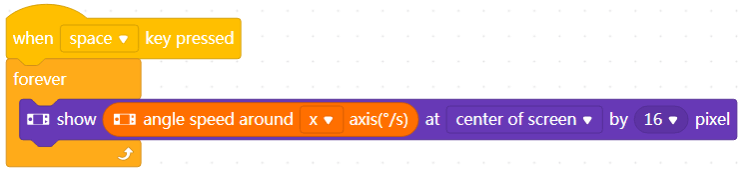
Use this block in combination with a Display block.
In Live mode, after you press the space key, CyberPi displays the angular speed of CyberPi around the x-axis in the center of its screen when you rotates it around the x-axis.
52. rotated angle around [axis]axis (°)

Reports the angle CyberPi is rotated around the specified axis
How to use
Click to select an axis from the drop-down list box.
The axes and angles are defined as follows.
You can select the check box on the left of this block to see the angle on the stage.
This is a reporter block that must be used in combination with another block requiring data.
Example
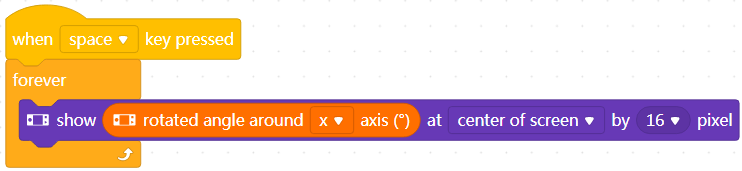
Use this block in combination with a Display block.
In Live mode, after you press the space key, CyberPi displays the angle in the center of its screen when you rotates it around the x-axis.
53. reset rotated angle around[axis]axis

Resets the angle CyberPi is rotated around the specified axis (axes) to zero
How to use
Click to select all the axes or an axis from the drop-down list box.
The axes are defined as follows.

After this block is executed, the angle CyberPi is rotated around the specified axis is counted from zero.
Example
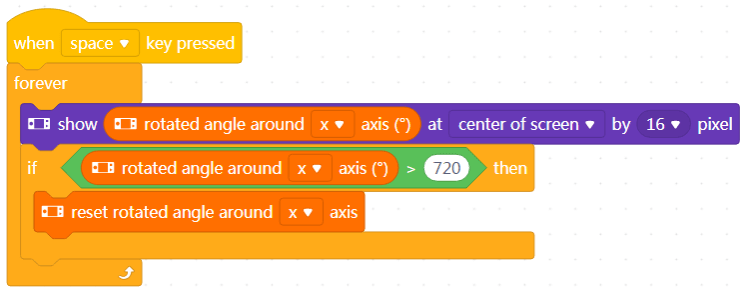
Use this block in combination with a Display block.
In Live mode, after you press the space key, CyberPi displays the angle in the center of its screen when you rotates it around the x-axis. When the angle is greater than 720, it is reset to zero and counted again.
54. reset yaw angle

Resets the yaw angle of CyberPi to zero
How to use
The yaw angle is defined as follows.
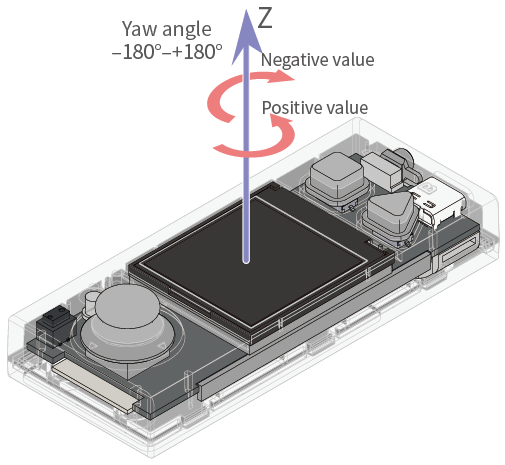
After this block is executed, the yaw angle of CyberPi is counted from zero.
Example
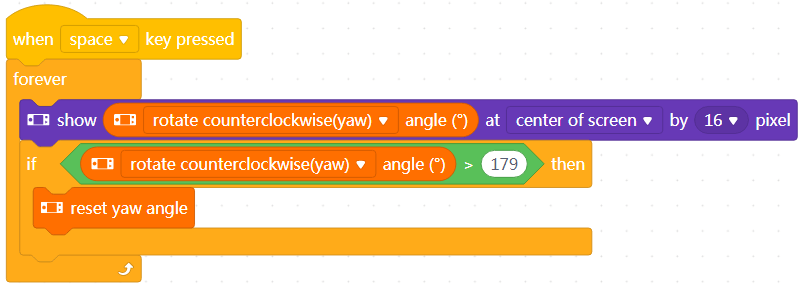
Use this block in combination with a Display block.
In Live mode, after you press the space key, CyberPi displays the yaw angle in the center of its screen when you rotates it around the z-axis. When the angle is greater than 179, it is reset to zero and counted again.
55. joystick[fieldMenu_1]?

Determines whether the joystick is moved in the specified direction
How to use
CyberPi is equipped with a joystick that can be moved in five directions.

Click to select a direction from the drop-down list box.
This is a Boolean block that contains a condition. Use it in combination with another block that requires a condition.
Example
In Live mode, after pressing the space key, you can move the joystick to display “makeblock” in different positions.
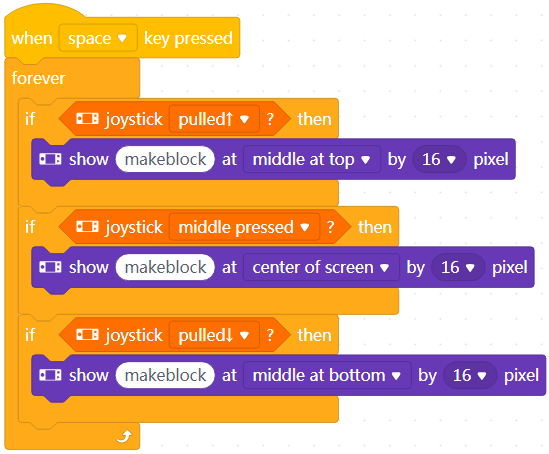
56. joystick [fieldMenu_1]counts

Reports the number of times the joystick is moved in the specified direction
How to use
CyberPi is equipped with a joystick that can be moved in five directions.
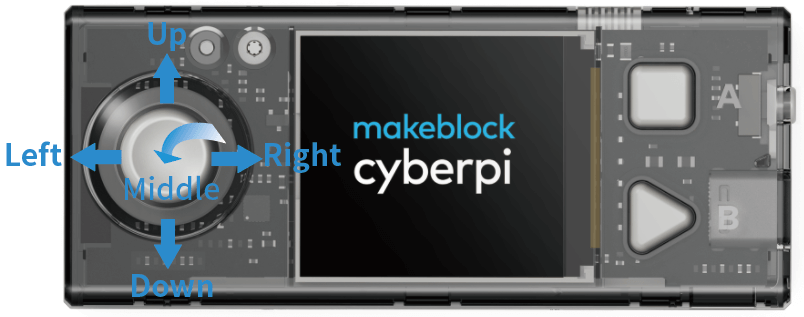
Click to select a direction from the drop-down list box.
You can select the check box on the left of this block to see the number of times on the stage.
This is a reporter block that must be used in combination with another block requiring data.
Example

With this program, CyberPi can be used as a counter.
In Live mode, after pressing the space key, repeatedly move the joystick upward. CyberPi counts from zero and displays the number of times in the center of its screen.
57. reset joystick [fieldMenu_1]counts

Resets the number of times the joystick is moved in the specified direction to zero
How to use
CyberPi is equipped with a joystick that can be moved in five directions.
Click to select a direction from the drop-down list box.
After this block is executed, the number of times the joystick is moved in the specified direction is counted from zero.
Example
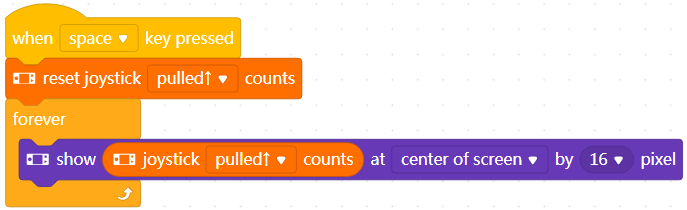
With this program, CyberPi can function as a counter.
In Live mode, after pressing the space key, repeatedly move the joystick upward. CyberPi counts from zero and displays the number of times in the center of its screen.
58. button[fieldMenu_1]pressed?

Determines whether specified button is pressed
How to use
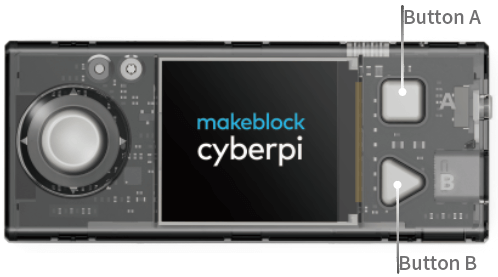
CyberPi is equipped with two buttons, A and B.

Click to select a button from the drop-down list box.
This is a Boolean block that contains a condition. Use it in combination with another block that requires a condition.
Example
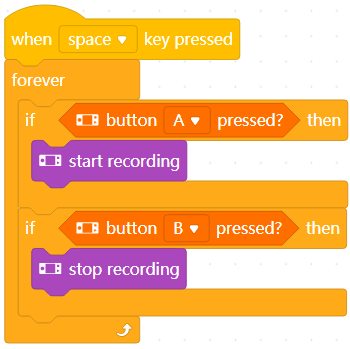
With this program, CyberPi can function as a recorder.
In Live mode, after pressing the space key, press A and B to start and stop recording.
59. button[fieldMenu_1]press counts

Reports the number of times the specified button is pressed
How to use
CyberPi is equipped with two buttons, A and B.

Click to select a button from the drop-down list box.
You can select the check box on the left of this block to see the number of times on the stage.
This is a reporter block that must be used in combination with another block requiring data.
Example

With this program, CyberPi can be used as a counter.
In Live mode, after pressing the space key, repeatedly press button A. CyberPi counts from zero and displays the number of times in the center of its screen.
60. reset button[fieldMenu_1]press counts

Resets the number of times the specified button is pressed to zero
How to use
CyberPi is equipped with two buttons, A and B.
Click to select a button from the drop-down list box.
After this block is executed, the number of times the specified button is pressed is counted from zero.
Example
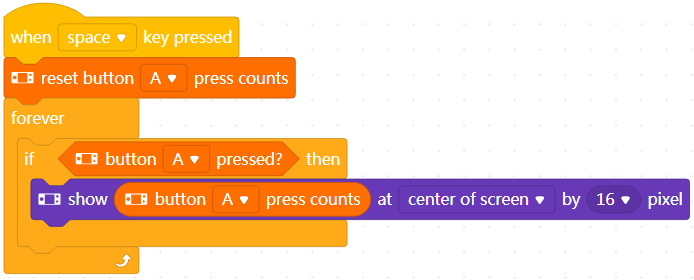
With this program, CyberPi can be used as a counter.
In Live mode, after pressing the space key, repeatedly press button A. CyberPi counts from zero and displays the number of times in the center of its screen.
61. loudness

Reports the ambient loudness detected by the microphone on CyberPi
How to use
Value range: 0–100
You can select the check box on the left of this block to see the ambient loudness on the stage.
This is a reporter block that must be used in combination with another block requiring data.
Example
Use this block in combination with a Display block.
In Live mode, when you press the space key, CyberPi displays the ambient loudness detected by the microphone in the center of its screen.
62. ambient light intensity

Reports the ambient light intensity detected by the light sensor on CyberPi
How to use
Value range: 0–100
You can select the check box on the left of this block to see the ambient light intensity on the stage.
This is a reporter block that must be used in combination with another block requiring data.
Example

Use this block in combination with a Display block.
In Live mode, when you press the space key, CyberPi displays the ambient loudness detected by the microphone in the center of its screen.
63. timer(s)

Reports the count value of the timer
How to Use
The timer starts to count from 0 each time CyberPi is powered on. This block reports the duration CyberPi runs this time.
You can select the check box on the left of this block to see the count value of the timer on the stage.
This is a reporter block that must be used in combination with another block requiring data.
Example
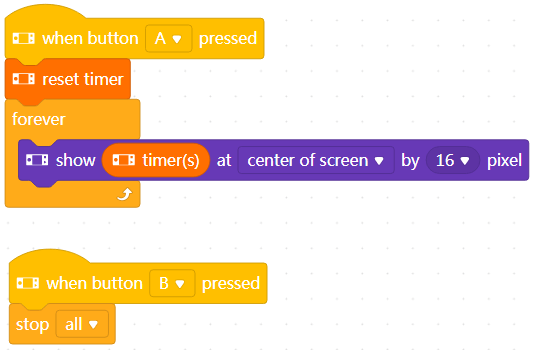
With this program, CyberPi can function as a timer.
In Live mode, when you press button A on CyberPi, CyberPi starts to count from 0 and displays the time in the center of its screen. When you press button B, CyberPi stops counting.
64. reset timer

Resets the timer to Zero
How to Use
The timer of CyberPi starts to count from zero each time CyberPi is powered on.
You can use this block to reset the timer, making it start to count from zero again.
Example

With this program, CyberPi can function as a timer.
In Live mode, when you press button A on CyberPi, CyberPi starts to count from 0 and displays the time in the center of its screen. When you press button B, CyberPi stops counting.
65. hostname

Reports the hostname of CyberPi
How to use
The default hostname of CyberPi is cyberpi.
The hostname is displayed on the UI of the CyberOS system that runs on your CyberPi. By setting device names, users can find their CyberPis or identify one another on a LAN or IoT.
You can set the hostname as follows.
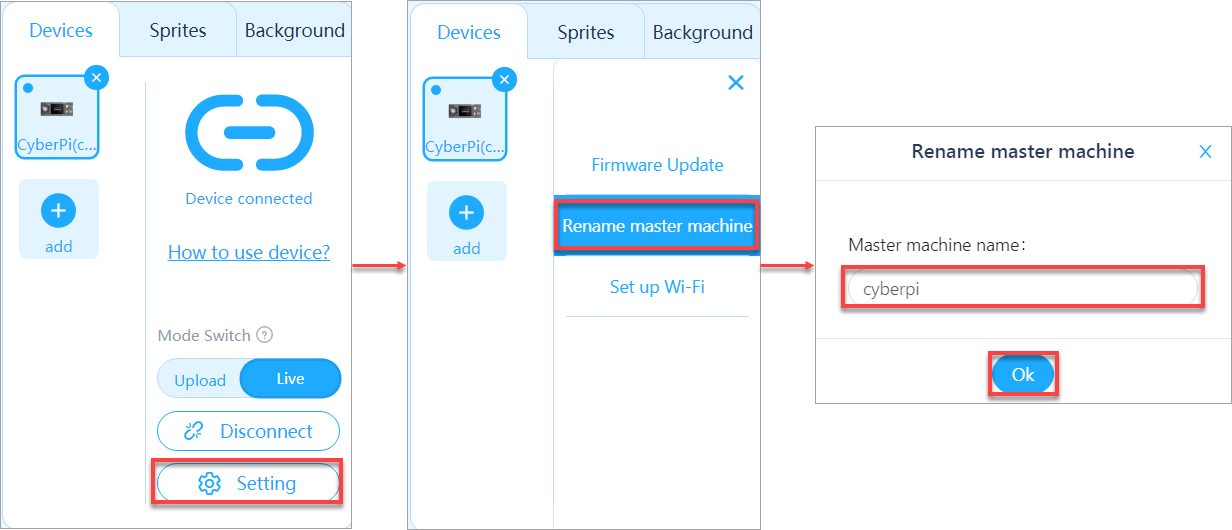
You can select the check box on the left of this block to see the hostname on the stage.
This is a reporter block that must be used in combination with another block requiring data.
Example

Use this block in combination with a Display block.
In Live mode, when you press the space key, CyberPi displays the hostname you set in the center of its screen.
66. [fieldMenu_1]

Reports information of the hardware device
How to use
With this block, you can obtain the battery level, MAC address, Bluetooth name, system language, and extension board name of CyberPi.
The battery level refers to that of the extension board connected to CyberPi, ranging from 0 to 100. Do not use this option if no extension board is connected.
The MAC address is used to connect to Wi-Fi. Note that the MAC address you obtain by using this block may be wrong if CyberPi is not connected to Wi-Fi. The output value is a 12-byte string.
The Bluetooth name refers to that broadcast by CyberPi, used for Bluetooth connection.
The system language refers to the language currently used on the CyberOS system running on CyberPi.
The extension name refers to the name of the extension board connected to CyberPi (not implemented currently).
You can select the check box on the left of this block to see the corresponding information on the stage.
This is a reporter block that must be used in combination with another block requiring data.
Example
Note: Set the Wi-Fi account and password to those available.
Compile this program in Upload mode and upload it to CyberPi.
Press button A. CyberPi starts to connect to Wi-Fi.
After the LEDs are lit up in green, press button B. CyberPi displays its MAC address on its screen.
67. broadcast message [message] on LAN

Broadcasts the specified message on the LAN
How to use
Click to set the name of the message to be broadcast.
The message broadcast by CyberPi through this block can be received by all the other devices on the same LAN.
Note:
All CyberPis on the same LAN must use the same channel for communication.
Without router connection, CyberPis use the same default channel and thus can communicate with each other on the LAN; when CyberPi is connected to a router, its channel depends on the setting of the router, which may be different from the default channel, and thus it may fail to communicate with another CyberPi that is not connected to the router.
Therefore, to ensure proper communication, if you use a router, connect all CyberPis on the same LAN to the router.
Example
The following programs enable two CyberPis to interact with each other.
CyberPi 1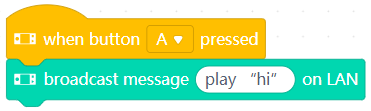
CyberPi 2
Compile the two programs in Upload mode and upload them to CyberPis 1 and 2, respectively.
Restart CyberPis 1 and 2.
Press button A on CyberPi 1. CyberPi 2 says “hi.”
68. broadcast message[message]with value[value]on LAN

Broadcasts the specified message with the specified value on the LAN
How to use
Click to set the name of the message and the value to be broadcast.
The message broadcast by CyberPi through this block can be received by all the other devices on the same LAN.
Note:
To ensure proper communication, if you use a router, connect all CyberPis on the same LAN to the router.
Example
The following programs enable two CyberPis to interact with each other.
CyberPi 1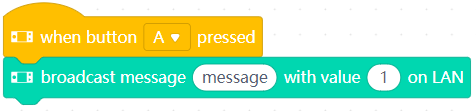
CyberPi 2
Compile the two programs in Upload mode and upload them to CyberPis 1 and 2, respectively.
Restart CyberPis 1 and 2.
Press button A on CyberPi 1.
CyberPi 2 displays the value 1 on its screen.
69. when receiving[message]boadcast on LAN

Executes the subsequent block(s) when the specified message is received
How to use
CyberPi can receive messages broadcast by other devices on the same LAN.
Note:
To ensure proper communication, if you use a router, connect all CyberPis on the same LAN to the router.
Example
The following programs enable two CyberPis to interact with each other.
CyberPi 1
CyberPi 2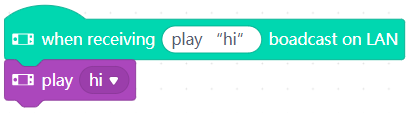
Compile the two programs in Upload mode and upload them to CyberPis 1 and 2, respectively.
Restart CyberPis 1 and 2.
Press button A on CyberPi 1. CyberPi 2 says “hi.”
70. LAN broadcast [message]value received

Reports the value received by CyberPi through the specified message
How to use
After being connected to Wi-Fi, CyberPi can receive messages and values broadcast by other devices connected to the same Wi-Fi.
You can select the check box on the left of this block to see the received value on the stage.
This is a reporter block that must be used in combination with another block requiring data.
Note:
To ensure proper communication, if you use a router, connect all CyberPis on the same LAN to the router.
Example
The following programs enable two CyberPis to interact with each other.
CyberPi 1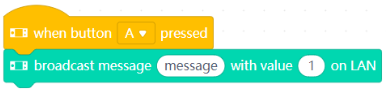
CyberPi 2
Compile the two programs in Upload mode and upload them to CyberPis 1 and 2, respectively.
Restart CyberPis 1 and 2.
Press button A on CyberPi 1.
CyberPi 2 displays the value 1 on its screen.
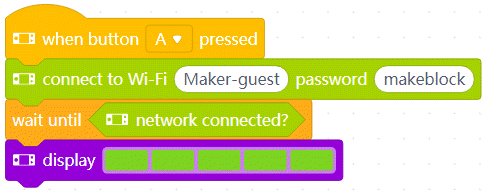
71. connect to Wi-Fi[ssid] password [wifipassword]

Connects CyberPi to the specified Wi-Fi
How to use
CyberPi is equipped with a module that supports the following functions:
- AI functions: enables CyberPi to recognize speeches and translate texts
- IoT functions: facilitates cross-network and cross-device interaction and control
Click to set the Wi-Fi account and password that are available.
Example

Compile this program in Upload mode and upload it to CyberPi.
Press button A. CyberPi starts to connect to the specified Wi-Fi.
When the LEDs are lit up in green, the connection is successful.
72. network connected?

Determines whether CyberPi has connected to Wi-Fi
How to use
This is a Boolean block that contains a condition. Use it in combination with another block that requires a condition.
Example
Compile this program in Upload mode and upload it to CyberPi.
Press button A. CyberPi starts to connect to the specified Wi-Fi.
When the LEDs are lit up in green, the connection is successful.
73. speak[fieldMenu_1][string_2]

Recognizes the specified text and reads it out loud in the recognized language
How to use
Click to enter the text to be recognized.
Example
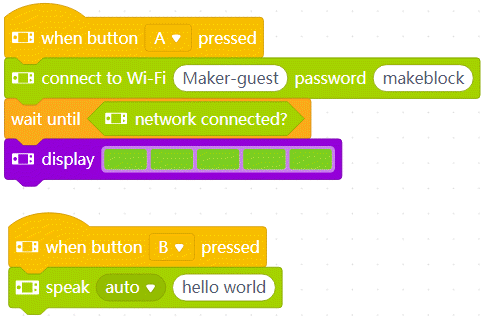
Note: Set the Wi-Fi account and password to those available.
Compile this program in Upload mode and upload it to CyberPi.
Press button A. CyberPi starts to connect to Wi-Fi.
After the LEDs are lit up in green, press button B. CyberPi says “Hello world.”
74. recognize[fieldMenu_1] [number_2]secs

Recognizes the specified language for the specified period
How to use
Click to select a language fron the drop-down list box and set the time.
Example

Note: Set the Wi-Fi account and password to those available.
Compile this program in Upload mode and upload it to CyberPi.
Press button A. CyberPi starts to connect to Wi-Fi.
After the LEDs are lit up in green, press button B and speak in English. CyberPi displays the words recognized on its screen.
75. speech recognition result

Reports the words recognized in a speech
How to use
This is a reporter block that must be used in combination with another block requiring data.
Example

Note: Set the Wi-Fi account and password to those available.
Compile this program in Upload mode and upload it to CyberPi.
Press button A. CyberPi starts to connect to Wi-Fi.
After the LEDs are lit up in green, press button B and speak in English. CyberPi displays the words recognized on its screen.
76. translate[string_1] into[fieldMenu_2]

Reports the translation of the specified text
How to use
Click to the enter the text to be translated and the target language.
Currently, this block supports only Chinese-English and English-Chinese translation.
Example
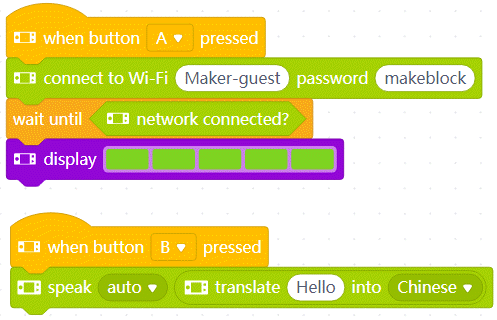
Note: Set the Wi-Fi account and password to those available.
Compile this program in Upload mode and upload it to CyberPi.
Press button A. CyberPi starts to connect to Wi-Fi.
After the LEDs are lit up in green, press button B. CyberPi says “你好.”
77. send user cloud broadcast[message]

Sends the specified user cloud message
How to use
What is a user cloud message?
With the same mBlock 5 account, user cloud messages enable cross-device and cross-project communication, that is, you can enable CyberPi to interact with other CyberPis and sprites after signing in with the same mBlock 5 account.
Before using the user cloud message function, you need to:
- Set mBlock 5 to the Upload mode
- Sign in to your mBlock 5 account
- Connect CyberPi to Wi-Fi
Click to set the name of the user cloud message to be sent.
Example
The following programs enable CyberPi to interact with a sprite.
CyberPi

Sprite

Note: Set the Wi-Fi account and password to those available.
Compile the two programs in Upload mode and upload the program to CyberPi.
Press button A. CyberPi starts to connect to Wi-Fi.
After the LEDs on CyberPi are lit up in green, press button B. CyberPi sends the user cloud message named message.
After receiving the user cloud message, the sprite moves 10 steps.
78. send user cloud broadcast [message]with value [value]

Sends the specified user cloud message and the specified value
How to use
Click to set the name of the user cloud message and the value to be sent.
Example
The following programs enable CyberPi to interact with another CyberPi.
CyberPi 1

CyberPi 2
Note: Set the Wi-Fi account and password to those available.
Compile the two programs in Upload mode and upload them to CyberPis 1 and 2, respectively.
Press button A on CyberPis 1 and 2. They start to connect to Wi-Fi.
After the LEDs on CyberPi are lit up in green, press button B on CyberPi 1. CyberPi 1 sends the user cloud message named message and the value 1.
After receiving the user cloud message, CyberPi 2 displays the value 1 on its screen.
79. when receiving user cloud broadcast[message]

Executes the subsequent block(s) when the specified user cloud message is received
How to use
After being connected to Wi-Fi, CyberPi can interact with a sprite or another CyberPi that is programmed with the same mBlock 5 account.
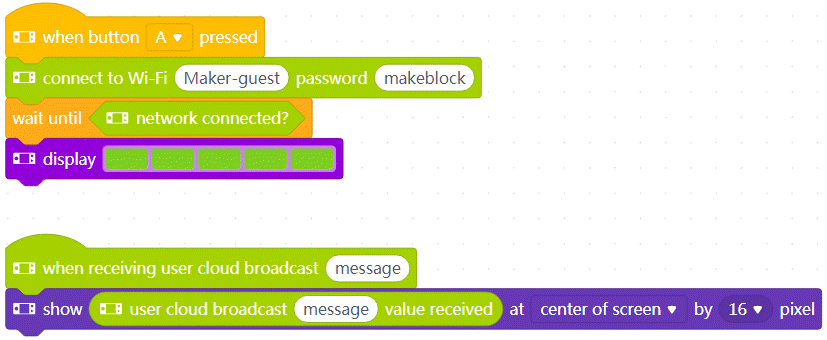
Example
The following programs enable CyberPi to interact with a sprite.
CyberPi
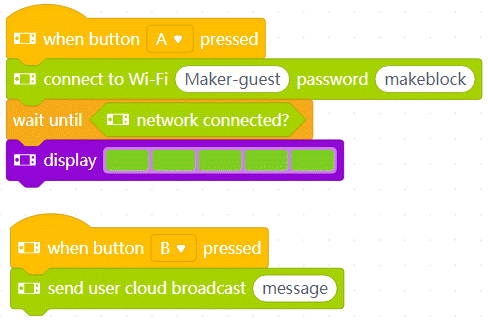
Sprite

Note: Set the Wi-Fi account and password to those available.
Compile the two programs in Upload mode and upload the program to CyberPi.
Press button A. CyberPi starts to connect to Wi-Fi.
After the LEDs on CyberPi are lit up in green, press button B. CyberPi sends the user cloud message named message.
After receiving the user cloud message, the sprite moves 10 steps.
80. user cloud broadcast[message]value received

Reports the value received through the specified user cloud message
How to use
After being connected to Wi-Fi, CyberPi can interact with a sprite or another CyberPi that is programmed with the same mBlock 5 account.
This is a reporter block that must be used in combination with another block requiring data.
Example
The following programs enable CyberPi to interact with another CyberPi.
CyberPi 1
CyberPi 2

Note: Set the Wi-Fi account and password to those available.
Compile the two programs in Upload mode and upload them to CyberPis 1 and 2, respectively.
Press button A on CyberPis 1 and 2. They start to connect to Wi-Fi.
After the LEDs on CyberPi are lit up in green, press button B on CyberPi 1. CyberPi 1 sends the user cloud message named message and the value 1.
After receiving the user cloud message, CyberPi 2 displays the value 1 on its screen.
81. [LOCATION] [WEATHER_TYPE]

Reports the specified weather condition of the specified district
How to use
Click to set the district and the weather condition you want to know about.
Example
Note: Set the Wi-Fi account and password to those available.
Compile the program in Upload mode and upload it to CyberPi.
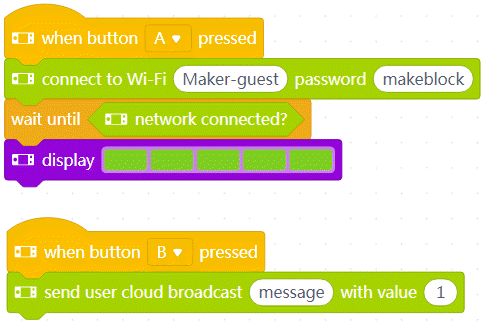
After the LEDs on CyberPi are lit up in green, press button A. CyberPi displays the highest temperature in Shenzhen on its screen.
82. air quality[METEOROLOGICAL] [aq_type]

Reports the specified weather quality condition of the specified district
How to use
Click to set the district and the weather quality condition you want to know about.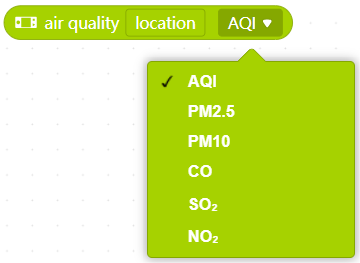
Example
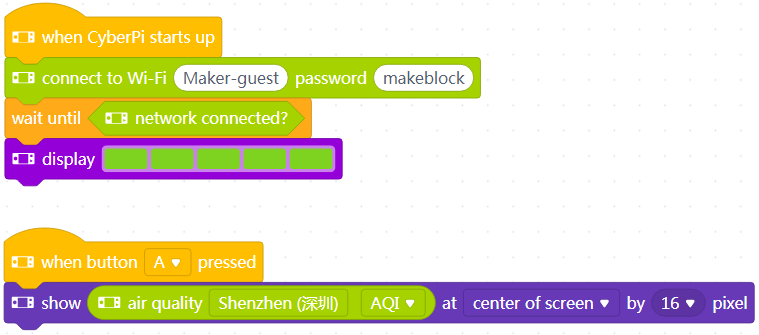
Note: Set the Wi-Fi account and password to those available.
Compile the program in Upload mode and upload it to CyberPi.
After the LEDs on CyberPi are lit up in green, press button A. CyberPi displays the air quality index (AQI) today in Shenzhen on its screen.
83. [LOCATION] [sun_move_type] [time_type]

Reports the sunrise or sunset time of the specified district
How to use
Click to set the district and the sunrise or sunset time you want to know about.
Example
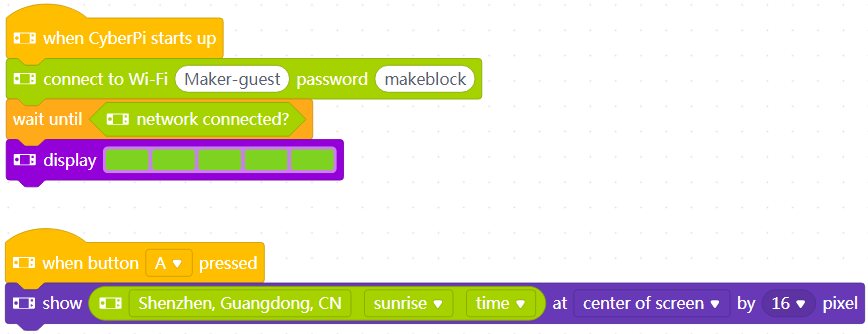
Note: Set the Wi-Fi account and password to those available.
Compile the program in Upload mode and upload it to CyberPi.
After the LEDs on CyberPi are lit up in green, press button A. CyberPi displays the sunrise time today in Shenzhen on its screen.
84. get [fieldMenu_1]’s [fieldMenu_2]

Reports the specified time information of the specified time zone (UTC)
How to use
Click to select a time zone and time item from the drop-down list boxes.
Example
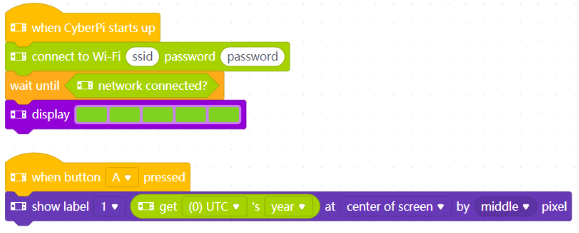
Note: Set the Wi-Fi account and password to those available.
Compile the program in Upload mode and upload it to CyberPi.
After the LEDs on CyberPi are lit up in green, press button A. CyberPi displays the year of the time zone UTC 0 on its screen.
85. [ICON]when CyberPi starts up

Executes the subsequent block(s) when CyberPi starts
How to use
This is a hat block that is always placed on top of other blocks to activate them.
Example

Note: Set the Wi-Fi account and password to those available.
Compile the program in Upload mode and upload it to CyberPi.
CyberPi automatically connects to the Wi-Fi and light up the LEDs in green when the connection is complete.
86. [image_1]when joystick [fieldMenu_2]

Executes the subsequent block(s) when the joystick is moved in the specified direction
How to use
This is a hat block that is always placed on top of other blocks to activate them.
Click to select a direction from the drop-down list box.
Example

In Live mode, each time when you move the joystick up, the number displayed on CyberPi’s screen increases by one.
87. [image_1]when button[fieldMenu_2]pressed

Executes the subsequent block(s) when the specified button is pressed
How to use
This is a hat block that is always placed on top of other blocks to activate them.
Click to select a button from the drop-down list box.
Example

In Live mode, each time when you press button A, the number displayed on CyberPi’s screen increases by one.
88. [image_1]when CyberPi[tilt]

Executes the subsequent block(s) when CyberPi is placed in the specified posture
How to use
This is a hat block that is always placed on top of other blocks to activate them.
Click to select a posture from the drop-down list box.
Example

In Live mode, when you tilt CyberPi to the left, it shows the angle it is tilted on its screen.
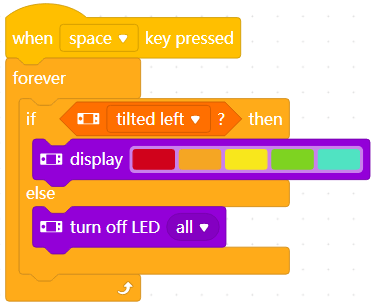
89. [image_1]when[tilt]detected

Executes the subsequent block(s) when you perform the specified action on CyberPi
How to use
This is a hat block that is always placed on top of other blocks to activate them.
Click to select an action from the drop-down list box.
Example

In Live mode, when you rotate CyberPi clockwise, it shows the angle it is rotated on its screen.
90. [image_1]when[fieldMenu_2]value [fieldMenu_3][number_3]

Executes the subsequent block(s) when the output value is greater or smaller than the specified value
How to use
This is a hat block that is always placed on top of other blocks to activate them.
CyberPi is equipped with multiple sensors, which allow it to detect light intensity, loudness, how strong it is shaken, and how long it has been running.
Click to select an output value from the drop-down list box.
Example

In Live mode, when you shade CyberPi or put it in a dark place, the LEDs are lit up in white; and when you illuminate the place where it is, the LEDs go off.
91. [image_1]restart CyberPi

Restarts CyberPi
Example
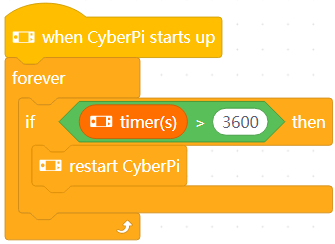
CyberPi restarts when the duration it runs exceeds 3600 seconds.
92. insert code [string_1]

Executes the specified Python code
How to use
You can enter Python code in the text box to execute it.
For Python code that can be used, see Python API Documentation for CyberPi.
Note: This block can be used only in Upload mode. Enter MicroPython code when using this block.
Example
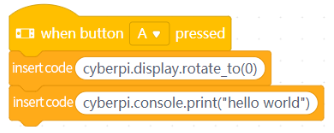
After you upload the program to CyberPi, the screen displays hello world in the direction of left (0°) when you press button A.
93. read[string_2] in[fieldMenu_1]

Reports the specified information in the specified data type
How to use
Click to select a data type from the drop-down list box and insert the reporter block that reports the information you want into this block.
Note: Select the data type that is applicable to the information to be reported. For example, the hostname is of the string type. If you select the integer type to obtain the hostname, no information is reported.
Example
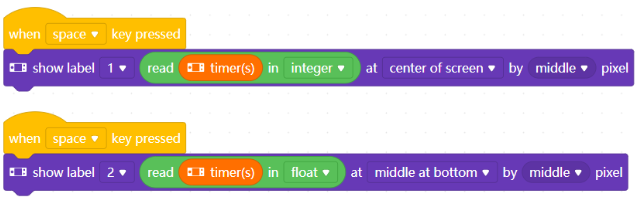
In Live mode, when you press the space key, two pieces of data are displayed on the screen. One is an integer, and the other is a floating-point number.

若有收获,就点个赞吧
0 人点赞
