- 1. science sensor [index] detected human motion?
- 2. science sensor [index] soil moisture measured
- 3. science sensor [index] resistance value between the lugs of the soil moisture sensor(kΩ)
- 4. science sensor [index] lugs of soil moisture sensor already connected?
- 5. science sensor [index]contact point being touched?
- 6. science sensor [index] resistance value reported from contact point (kΩ)
- 7. science sensor [index]air temperature(℃)
- 8. science sensor [index] air humidity (%)
- 9. science sensor [index] air pressure (Pa)
- 10. science sensor [index]estimated altitude (m)
- 11. science sensor [index] [conduction] MQ2 sensor at [sensitivity]sensitivity
- 12. science sensor [index] flammable gas value
- 13. science sensor [index] detected flammable gas?
- 14. science sensor [index] flame value
- 15. science sensor [index] detected flame?
- 16. science sensor [index] detected maget or not?
- 17. science sensor [index]current compass direction(°)
- 18. science sensor[index]magnetic flux at axis axis
- 19. science sensor[index] [conduction] calibration
1. science sensor [index] detected human motion?

Determines whether the science sensor detects the motion of a person or animal
How to use
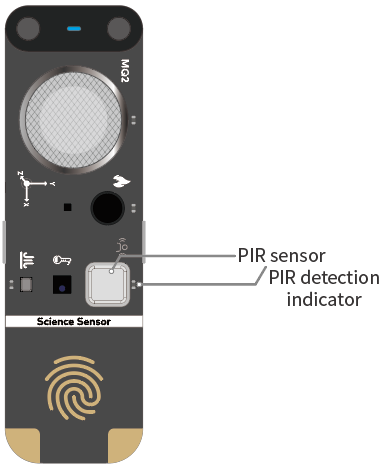
For more information about the layout and specifications of the sensing elements on the science sensor, see Science Sensor.
The PIR sensor on the science sensor can be used to detect whether a person or animal passes by.
Detection range: < 2m
Detection angle at the x-axis: 80°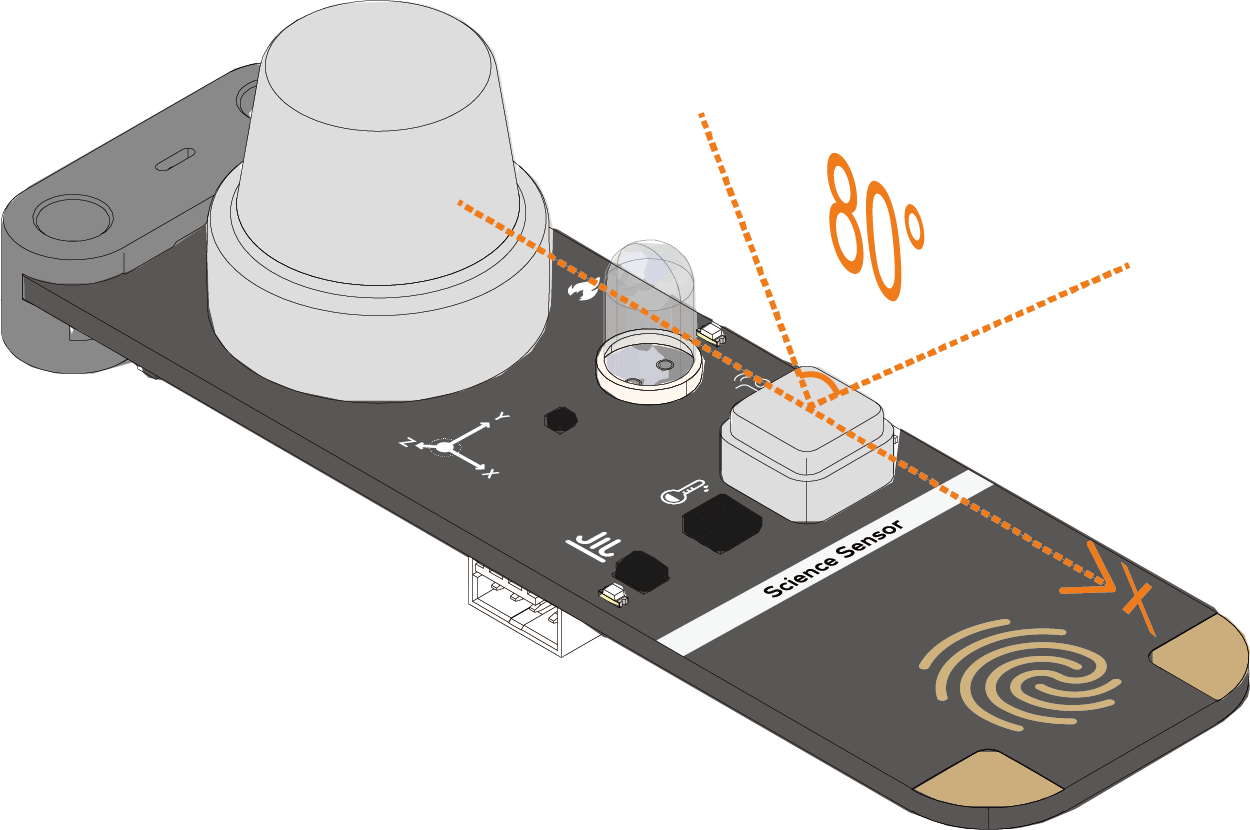
Detection angle at the y-axis: 55°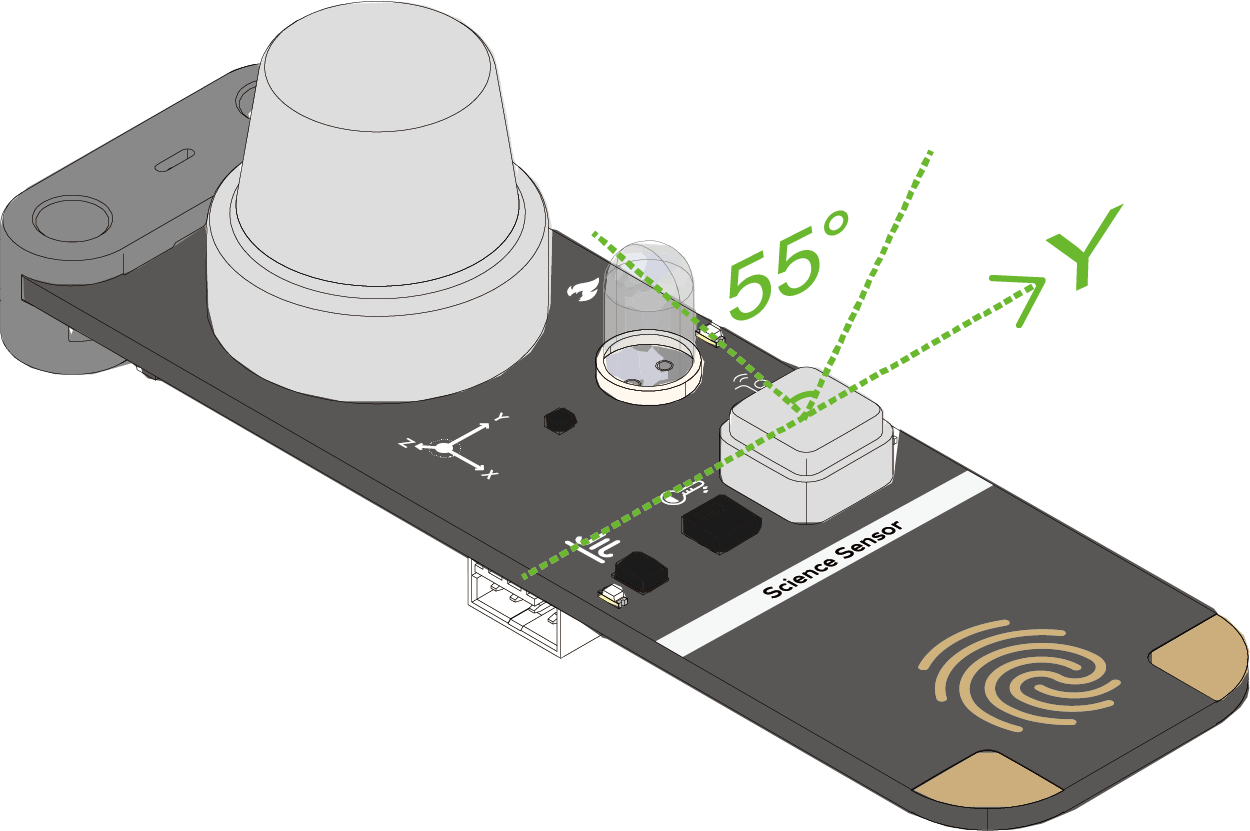
Detection duration after being triggered: 2 seconds
Example
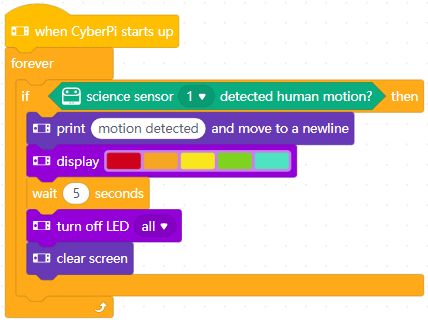
After starting CyberPi, move close to the science sensor. The screen displays “motion detected” and the LEDs are lit up.
2. science sensor [index] soil moisture measured

Reports the soil moisture detected by the science sensor
How to use
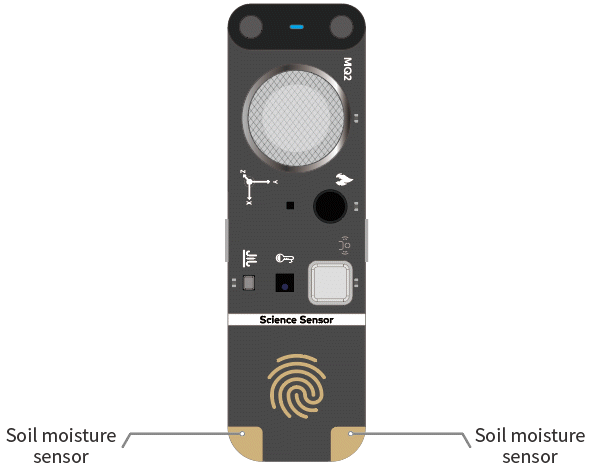
Note: When you use the science sensor to detect soil moisture, ensure that the nameplate of the science sensor is kept above the soil. Otherwise, the other sensing components may be damaged.
For more information about the layout and specifications of the sensing elements on the science sensor, see Science Sensor.
The soil moisture sensor on the science sensor can be used to detect the volumetric water content in soil.
Detection range: probing areas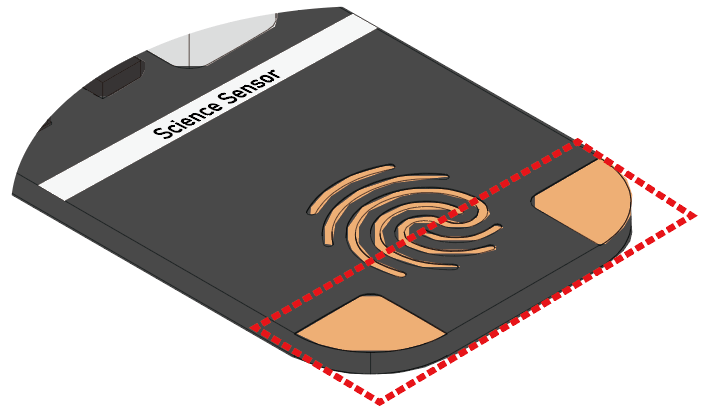
Output range: 0–100 (%RH). A greater value indicates a higher moisture content.
You can select the check box on the left of this block to see the detected moisture content on the stage.
Note: This is a reporter block that must be used in combination with another block requiring data.
Example

When you press button A on CyberPi, the detected soil moisture content is displayed on the screen.
3. science sensor [index] resistance value between the lugs of the soil moisture sensor(kΩ)

Reports the resistance (kΩ) between the two probes
How to use
Detection range: probes
Output range: 0–102200 (kΩ)
A greater value indicates a higher resistance, and thus a lower moisture content.
You can select the check box on the left of this block to see the detected resistance on the stage.
Note: This is a reporter block that must be used in combination with another block requiring data.
Example
After you press button A on CyberPi, the detected soil moisture content and resistance are displayed on the screen.
4. science sensor [index] lugs of soil moisture sensor already connected?

Determines whether electricity is conducted between the two probes
How to use
The following figure shows the two probes.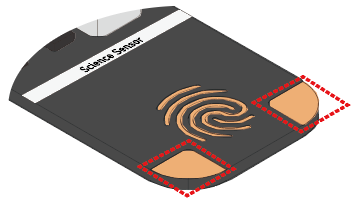
After you insert the two probes into soil, the soil becomes a conductor, enabling electricity to be conducted between the two probes.
The conductivity of the soil varies according to its moisture content. A higher moisture content indicates a higher conductivity. When the conductivity of the soil is extremely low, no electricity is conducted between the two probes.
Example
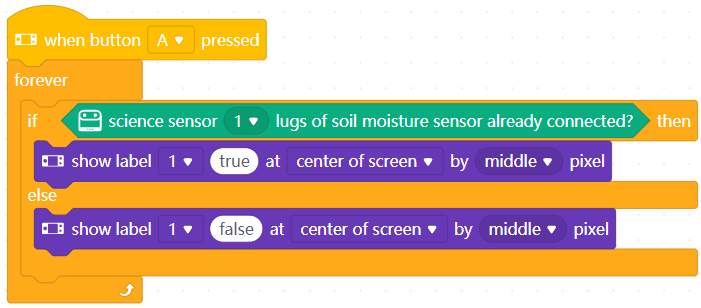
After you press button A on CyberPi, true is displayed on the screen if electricity is conducted between the two probes; and false is displayed if no electricity is conducted.
5. science sensor [index]contact point being touched?

Determines whether the touch point on the science sensor is touched
How to use
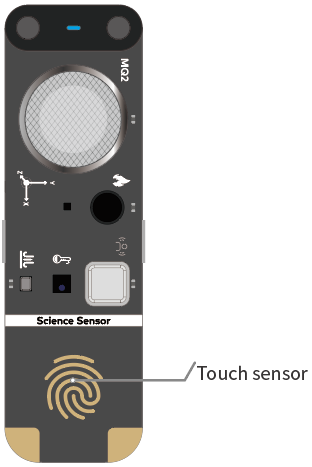
For more information about the layout and specifications of the sensing elements on the science sensor, see Science Sensor.
The touch sensor on the science sensor can be used to detect physical touch.
Detection range: area with the fingerprint pattern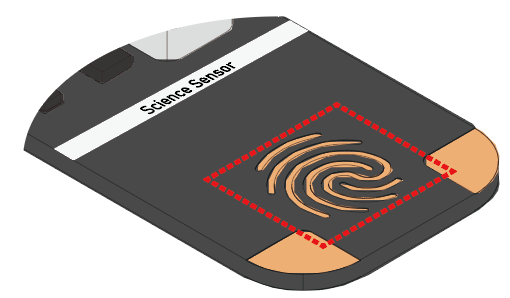
Example
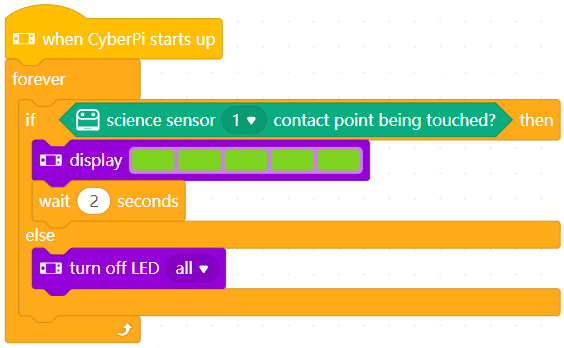
You can control the LEDs on CyberPi by touching the touch point of the science sensor.
1. After starting CyberPi, touch the touch point on the science sensor with your hand.
The LEDs on CyberPi are lit up in green.
2. Take your hand off the touch point.
The LEDs go off in 2 seconds.
6. science sensor [index] resistance value reported from contact point (kΩ)

Reports the resistance (kΩ) detected at the touch point of the science sensor
How to use
Detection range: area with the fingerprint pattern
Output range: 0–102300000 (kΩ)
When you touch the touch point with your hand, the resistance detected at the touch point varies according to the skin dryness of your hand. A greater dryness indicates a greater resistance.
You can select the check box on the left of this block to see the detected resistance on the stage.
Note: This is a reporter block that must be used in combination with another block requiring data.
Example
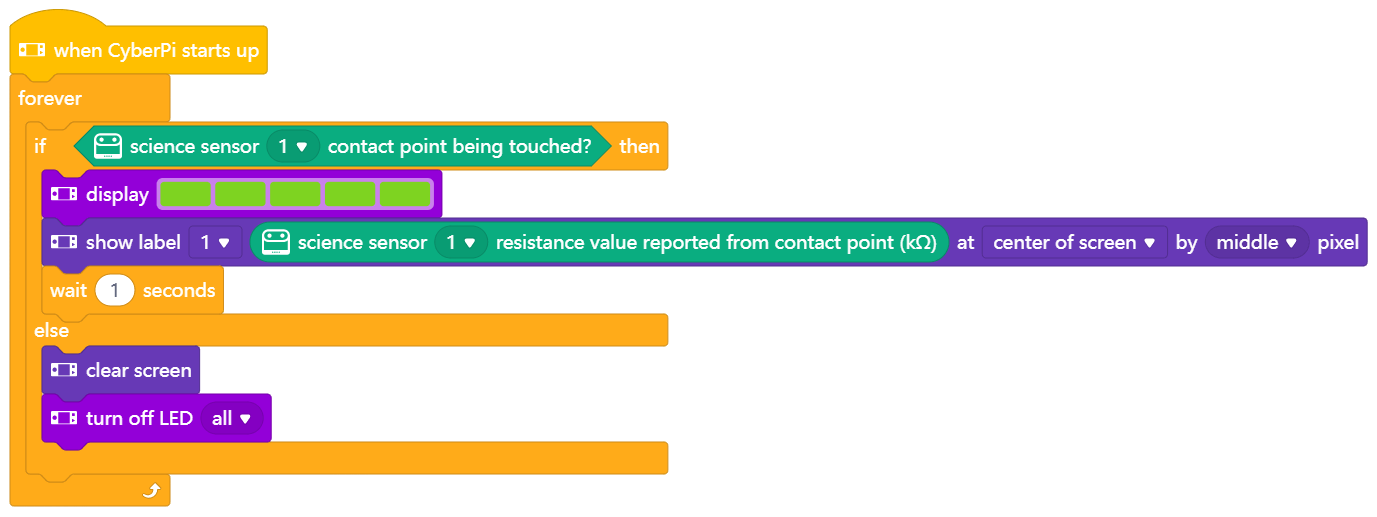
- After starting CyberPi, touch the touhc point on the science sensor with your hand.
The LEDs on CyberPi are lit up in green, and the value of the resistance detected is displayed on the screen.
2. Take your hand off the touch point.
The LEDs go off and the value on the screen disappears in one second.
7. science sensor [index]air temperature(℃)

Reports the ambient temperature detected by the science sensor
How to use
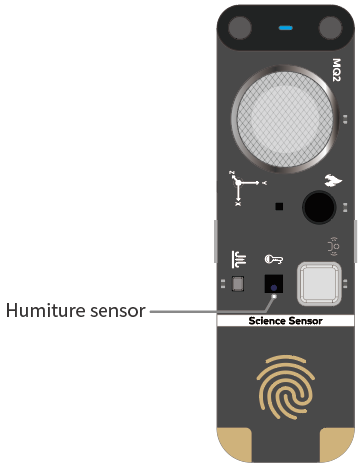
For more information about the layout and specifications of the sensing elements on the science sensor, see Science Sensor.
The humiture sensor on the science sensor can be used to detect the ambient temperature or humidity.
Temperature output range: –40°C to +125°C
Temperature error:
- ±0.5°C (in the environment of 0°C to 50°C)
- ±1°C (in the environment of –20°C to +85°C)
You can select the check box on the left of this block to see the detected ambient temperature on the stage.
Note: This is a reporter block that must be used in combination with another block requiring data.
Example

After you start CyberPi, the detected ambient temperature is displayed in the middle of the screen.
8. science sensor [index] air humidity (%)

Reports the ambient temperature detected by the science sensor
How to use
Humidity output range: 0–100%
Humidity error:
- ±3% (in the environment of 50% RH)
- ±5% (in the environment of 20% to 80% RH)
You can select the check box on the left of this block to see the detected ambient humidity on the stage.
Note: This is a reporter block that must be used in combination with another block requiring data.
Example
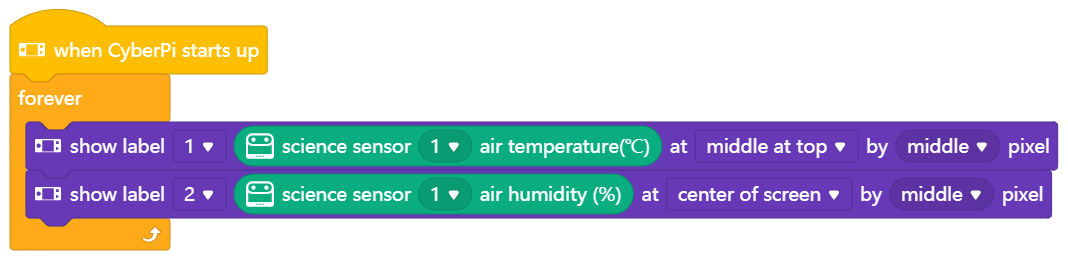
After you start CyberPi, the detected ambient temperature and humidity are on the screen.
9. science sensor [index] air pressure (Pa)

Reports the air pressure detected by the science sensor
How to use
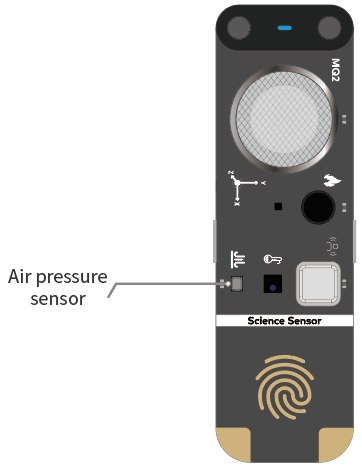
For more information about the layout and specifications of the sensing elements on the science sensor, see Science Sensor.
The air pressure sensor on the science sensor can be used to detect the air pressure, and thus the altitude can be estimated.
Air pressure output range: 300–1100 hPa
You can select the check box on the left of this block to see the detected air pressure on the stage.
Note: This is a reporter block that must be used in combination with another block requiring data.
Example
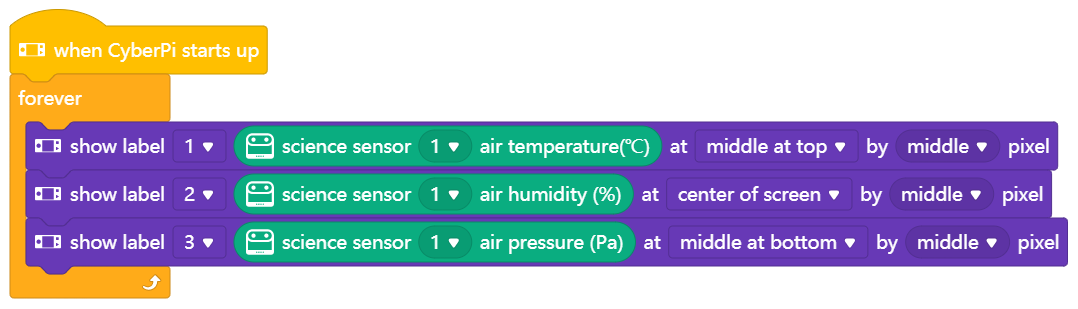
After you start CyberPi, the detected ambient temperature, humidity, and air pressure are displayed on the screen.
10. science sensor [index]estimated altitude (m)

Reports the altitude estimated by the science sensor
How to use
The air pressure sensor on the science sensor can be used to detect the air pressure, and thus the altitude can be estimated.
Altitude output range: –500 m to +6000 m
You can select the check box on the left of this block to see the estimated altitude on the stage.
Note: This is a reporter block that must be used in combination with another block requiring data.
Example
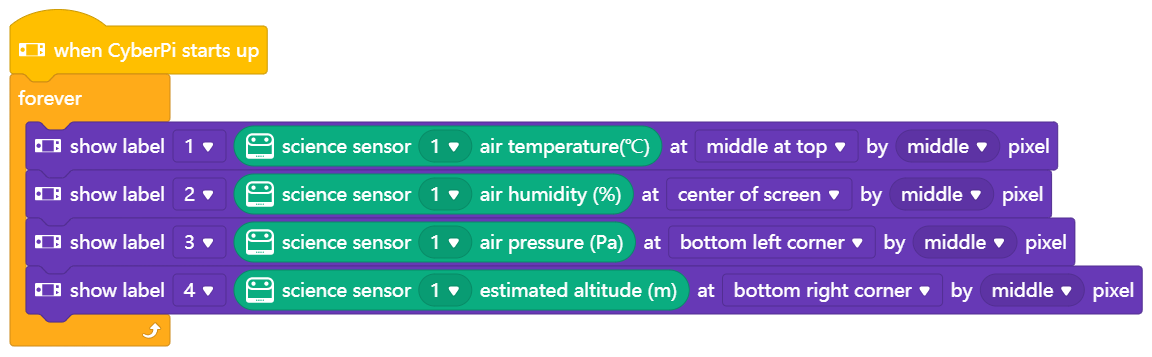
After you start CyberPi, the detected ambient temperature, humidity, and air pressure and the estimated altitude are displayed on the screen.
11. science sensor [index] [conduction] MQ2 sensor at [sensitivity]sensitivity

Turns the MQ2 gas sensor on and sets its sensitivity, or turns the MQ2 gas sensor off
How to use
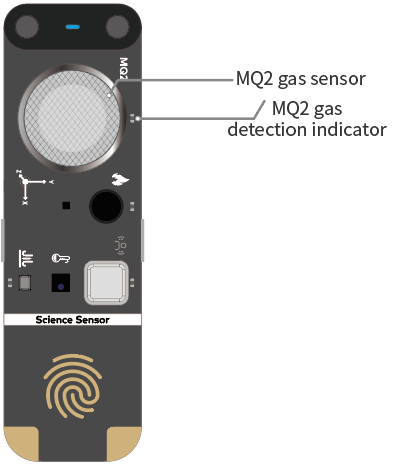
For more information about the layout and specifications of the sensing elements on the science sensor, see Science Sensor.
The MQ2 gas sensor on the science sensor can be used to detect smoke, liquefied natural gas (LNG), butane, propane, methane, alcohol, and hydrogen in the air.
Click to select a sensitivity from the drop-down list box.
Example
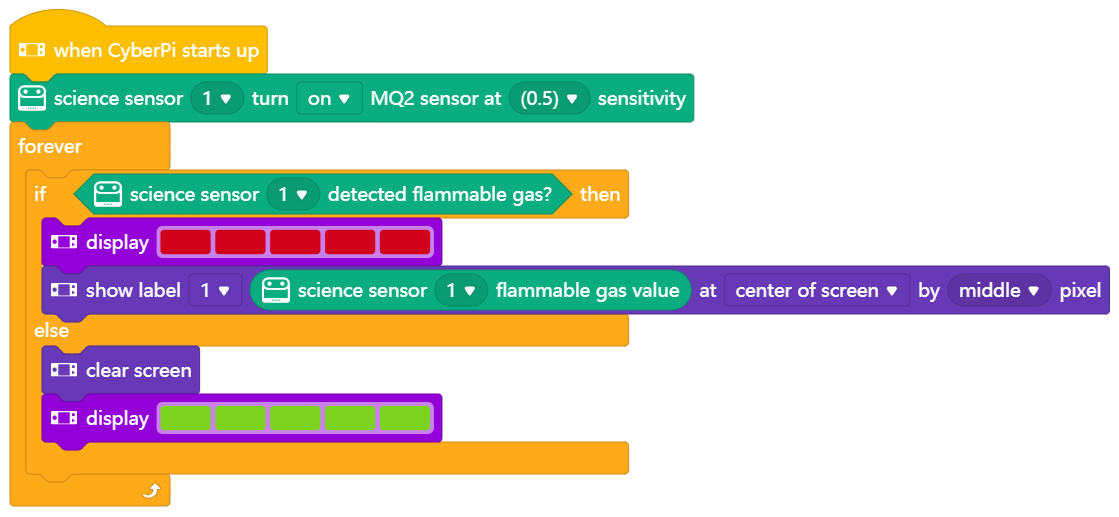
After you start CyberPi, if the MQ2 gas sensor detects a flammable gas, the LEDs on CyberPi are lit up in red and the gas concentration is displayed on the screen; if no flammable gas is detected, the LEDs are lit up in green.
12. science sensor [index] flammable gas value

Reports the concentration of the flammable gas detected by the science sensor
How to use
A flammable gas can be smoke, liquefied natural gas (LNG), butane, propane, methane, alcohol, or hydrogen in the air.
To use this block, ensure that the MQ2 gas sensor is turned on.
Gas concentration detection range: 300–10000 ppm (flammable gas)
Impedance when heated: 33Ω
Preheating energy consumption:< 950 mW
Note: The deviation may be large at the moment when the sensor is powered on. Heat it for five minutes before you use it.
Example

After you start CyberPi, if the MQ2 gas sensor detects a flammable gas, the LEDs on CyberPi are lit up in red and the gas concentration is displayed on the screen; if no flammable gas is detected, the LEDs are lit up in green.
13. science sensor [index] detected flammable gas?

Determines whether the science sensor detects a flammable gas
How to use
A flammable gas can be smoke, liquefied natural gas (LNG), butane, propane, methane, alcohol, or hydrogen in the air.
To use this block, ensure that the MQ2 gas sensor is turned on.
Note: The deviation may be large at the moment when the sensor is powered on. Heat it for five minutes before you use it.
Example

After you start CyberPi, if the MQ2 gas sensor detects a flammable gas, the LEDs on CyberPi are lit up in red and the gas concentration is displayed on the screen; if no flammable gas is detected, the LEDs are lit up in green.
14. science sensor [index] flame value

Reports the strength of the flame detected by the science sensor
How to use
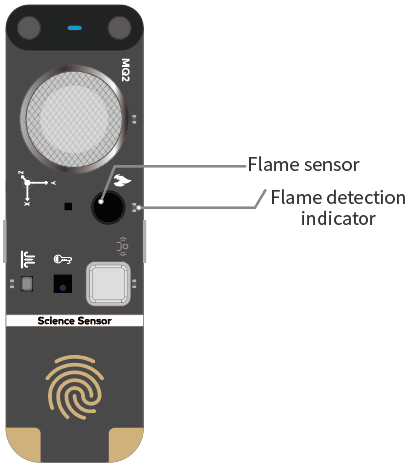
For more information about the layout and specifications of the sensing elements on the science sensor, see Science Sensor.
The flame sensor on the science sensor can be used to detect flames and their strength based on IR light.
Detection wavelength range: 600–1000nm
Flame strength range: 1–100
Note: Don’t use the sensor under the direct sunlight. The sunlight may cause severe interference.
Example

After you start CyberPi, if the flame sensor detects a flame, the LEDs on CyberPi are lit up in red and the flame strength is displayed on the screen; if no flame is detected, the LEDs are lit up in green.
15. science sensor [index] detected flame?

Determines whether the science sensor detects a flame
How to use
The flame sensor on the science sensor can be used to detect flames and their strength based on IR light.
Note: Don’t use the sensor under the direct sunlight. The sunlight may cause severe interference.
Example

After you start CyberPi, if the flame sensor detects a flame, the LEDs on CyberPi are lit up in red and the flame strength is displayed on the screen; if no flame is detected, the LEDs are lit up in green.
16. science sensor [index] detected maget or not?

Determines whether the science sensor detects a magnet
How to use
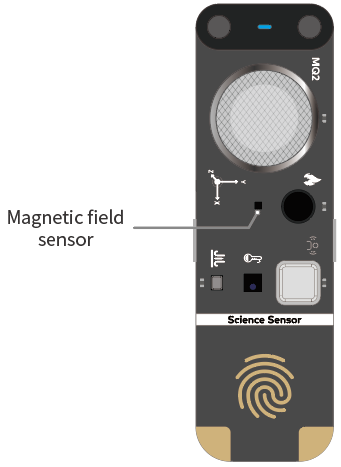
For more information about the layout and specifications of the sensing elements on the science sensor, see Science Sensor.
The magnetic field sensor on the science sensor can be used to detect magnets.
Example
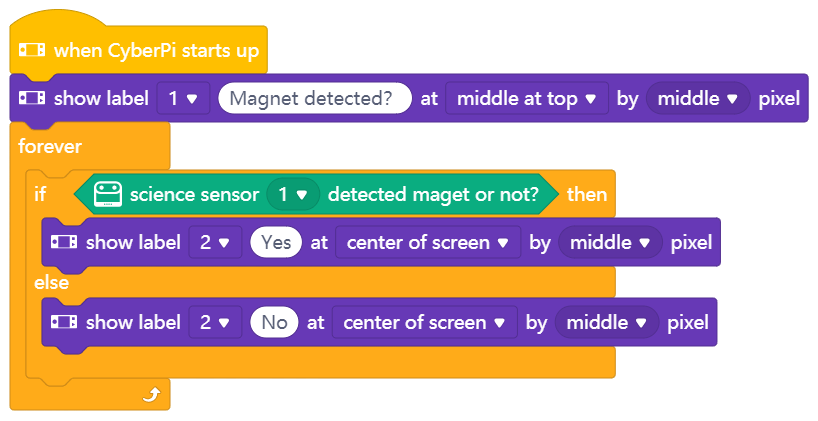
You can use the science sensor as a magnet detector.
After you start CyberPi, Yes is displayed if the science sensor detects a magnet; and No is displayed if no magnet is detected.
17. science sensor [index]current compass direction(°)

Reports the compass direction (angle) detected by the science sensor
How to use
The compass direction described in this block refers to the angle between the x-aix of the magnetic field sensor and North Pole (90°N).
Angle range: –180° to +180° (the angle 0° indicates that the sensor points at North Pole)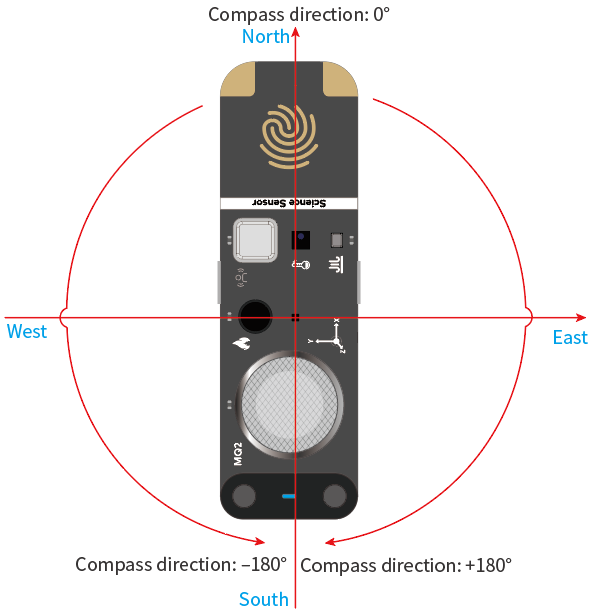
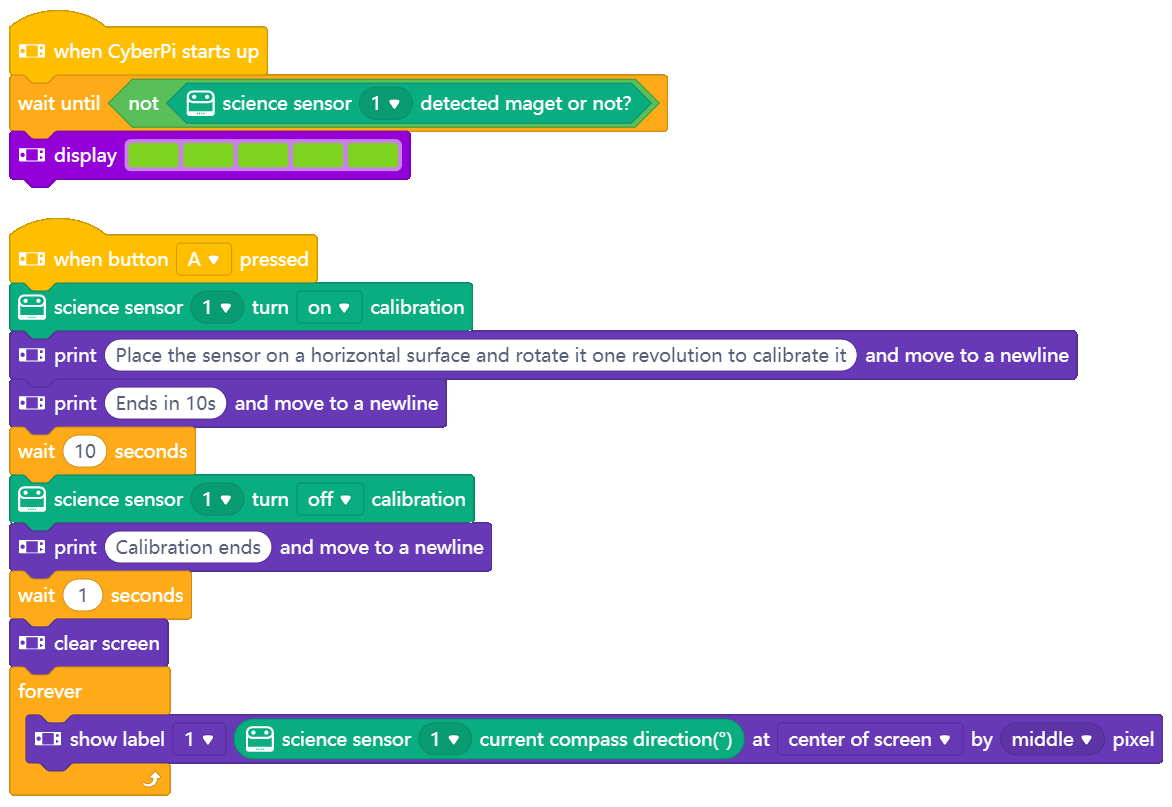
Before using the science sensor to detect the compass direction, you need to calibrate it in a non-magnetic environment as follows:
1. Use the following block to enable the calibration function.
2. Place the science sensor on a horizontal surface and rotate it one revolution.
Example

Start CyberPi in a non-magnetic environment.
After the LEDs on CyberPi are lit up in green, press button A and perform the calibration as prompted.
After the calibration is complete, the detected compass direction is displayed on the screen, and you can rotate the science sensor to find a direction you want.
Note: Place the science sensor on a horizontal surface when using it to detect the compass direction. Tilting it vertically may cause large detection errors.
18. science sensor[index]magnetic flux at axisaxis

Reports the amount (Φ/G) of the magnetic flux detected at the x-axis
How to use
The axes of the science sensor are defined as follows: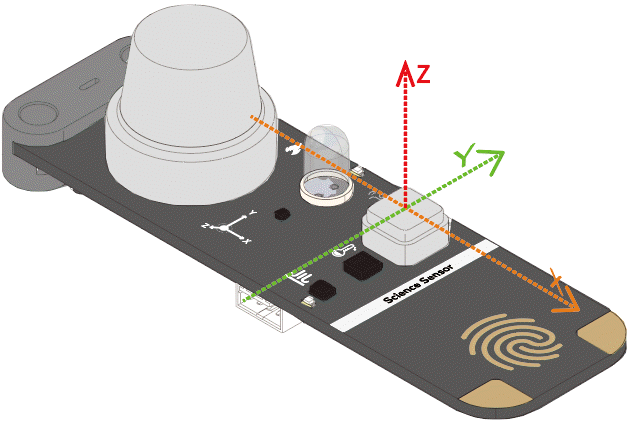
Magnetic flux range: ±30G (in gausses)
Click to select an axis.
Examle

After you start CyberPi, the amount of magnetic flux detected by the science sensor is displayed on the screen.
19. science sensor[index] [conduction] calibration

Enables or disables the function for calibrating the magnetic field sensor
How to use
Before using the science sensor to detect the compass direction, you need to calibrate it in a non-magnetic environment.
You can use this block to enable or disable the function for calibrating the magnetic field sensor.
Example
Start CyberPi in a non-magnetic environment.
After the LEDs on CyberPi are lit up in green, press button A and perform the calibration as prompted.
After the calibration is complete, the detected compass direction is displayed on the screen, and you can rotate the science sensor to find a direction you want.
Note: Place the science sensor on a horizontal surface when using it to detect the compass direction. Tilting it vertically may cause large detection errors.

若有收获,就点个赞吧
0 人点赞
