- 1. ultrasonic 2 [index] distance to an object (cm)
- 2. ultrasonic 2 [index] out of range?
- 3. ultrasonic 2 [index] sets ambient light [order] brightness to[bv] %
- 4. ultrasonic 2 [index] increases ambient light [order] brightness by [bv]%
- 5. ultrasonic 2 [index] ambient light [order] brightness
- 6. ultrasonic 2 [index] turns off ambient light [inputMenu_3]
- 7. ultrasonic 2 [index] displays emotion [emotion]
1. ultrasonic 2 [index] distance to an object (cm)

Reports the distance, detected by Ultrasonic Sensor 2, between mBot2 and the obstacle
How to use
Ultrasonic Sensor 2 can be used to detect distance.
Range of the output value: 3–300 cm. When the distance exceeds the value range, the output value is 300 by default.
Deviation: ±5%
The number in this block indicates the place of an Ultrasonic Sensor 2 among the ones connected to CyberPi. As shown in the following figure, the number 1 indicates the first Ultrasonic Sensor 2 connected, 2 indicates the second one, and so on. 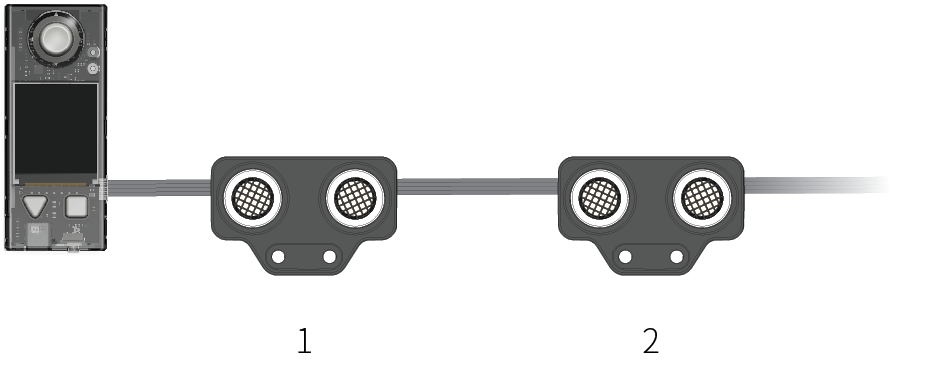
You can select the check box on the left of this block to see the distance on the stage.
Note: This is a reporter block that must be used in combination with another block requiring data.
Example
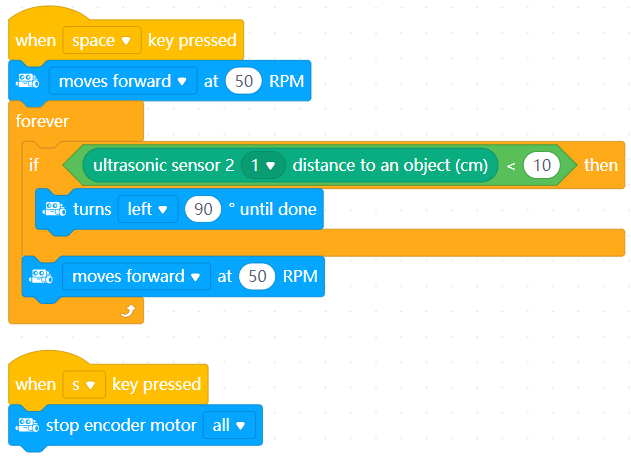
When you press the space key, mBot2 keeps moving forward; and if Ultrasonic Sensor 2 detects an obstacle that is less than 10 cm away from mBot2, mBot2 turns left 90 degrees and then keeps moving forward.
2. ultrasonic 2 [index] out of range?

Detemines whether the obstacle is out of the distance range that can be detected by Ultrasonic Sensor 2
How to Use
The distance range refers to the range of the distance that can be detected by Ultrasonic Sensor 2, that is, 3 to 300 cm.
Note: This is a Boolean block that contains a condition. Use it in combination with another block that requires a condition.
Example
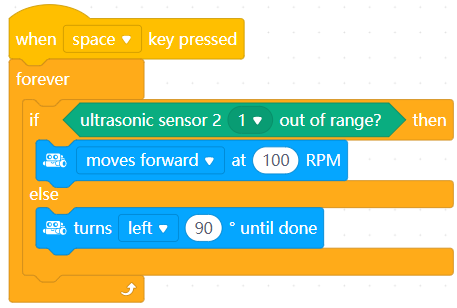
When you press the space key, mBot2 keeps moving if there is no obstacle within its detection range; and it turns left 90 degrees if any obstacle is found.
3. ultrasonic 2 [index] sets ambient light [order] brightness to[bv] %

Sets the brightness of the specified blue LED(s) on the specified Ultrasonic Sensor 2
How to use
The following figure shows the positions of the blue LEDs on Ultrasonic Sensor 2.
Click to select Ultrasonic Sensor 2 and blue LED(s) from the drop-down list boxes, and set the brightness.
Setting range of the brightness: 0–100 (%)
Example
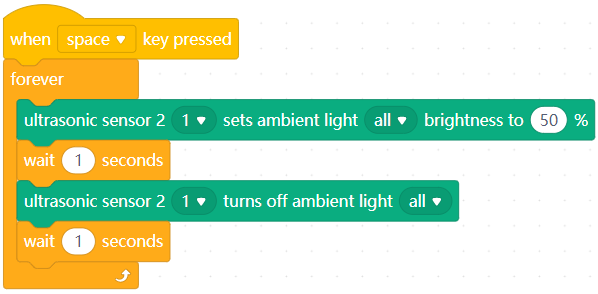
When you press the space key, the brightness of blue LED 1 on the first Ultrasonic Sensor 2 is set to 50%.
4. ultrasonic 2 [index] increases ambient light [order] brightness by [bv]%

Changes the brightness of the specified blue LED(s) on the specified Ultrasonic Sensor 2
How to use
Click to select Ultrasonic Sensor 2 and blue LED(s) from the drop-down list boxes, and set the amount by which the brightness is to be changed.
Setting range of the amount: –100 to +100 (%)
A positive value indicates increasing the brightness, and a negative one indicates reducing the brightness. If the brightness value is greater than 100% after being increased, the value 100% is used; and if it is smaller than 0% after being reduced, the value 0% is used.
Example

When you press the up arrow key, the brightness of blue LED 1 on the first Ultrasonic Sensor 2 is increased by 50%.
5. ultrasonic 2 [index] ambient light [order] brightness

Reports the brightness of the specified blue LED on the specified Ultrasonic Sensor 2
How to use
Click to select Ultrasonic Sensor 2 and a blue LED from the drop-down list boxes.
Value range of the brightness: 0–100 (%)
You can select the check box on the left of this block to see the brightness on the stage.
This is a reporter block that must be used in combination with another block requiring data.
Example

When you press the space key, the display on CyberPi displays the brightness of blue LED 1 on Ultrasonic Sensor 2.
6. ultrasonic 2 [index] turns off ambient light [inputMenu_3]

Turns off the specified blue LED(s) on the specified Ultrasonic Sensor 2
How to use
Click to select Ultrasonic Sensor 2 and a blue LED (blue LEDs) from the drop-down list boxes.
Example
After you press the space key, the blue LEDs on Ultrasonic Sensor 2 are turned on and off alternately.
7. ultrasonic 2 [index] displays emotion [emotion]

Makes the specified Ultrasonic Sensor 2 express the specified emotion
How to use
This block provides multiple emotions, expressed by changing the brightness of the blue LEDs.
Click to select an emotion from the drop-down list box.
When this block is executed, the subsequent block(s) is executed only after the emotion is completely expressed.
Example
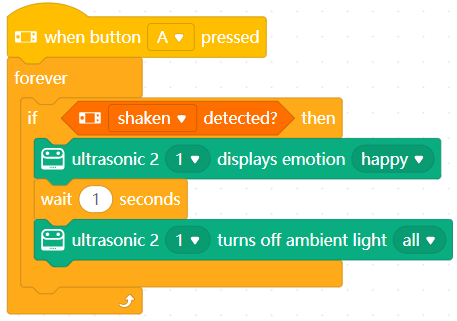
After you press button A, the Ultrasonic Sensor 2 expresses the emotion of happiness each time when you shake it.

若有收获,就点个赞吧
0 人点赞
