- Introduction
- Start to Program with mBlock 5
- Extensions
- FAQ and More Information
- 1. look up
- 2. [ICON] show image [PANEL] for [TIME] secs
- 3. [ICON] show image [PANEL]
- 4. look down
- 5. look left
- 6. look right
- 7. look around
- 8. blink
- 9. smile
- 10. yeah
- 11. naughty
- 12. proud
- 13. yummy
- 14. uh_oh
- 15. wow
- 16. hurt
- 17. sad
- 18. angry
- 19. hello
- 20. sprint
- 21. scared
- 22. shiver
- 23. dizzy
- 24. yawn
- 25. sleep
- 26. wake
- 27. yes
- 28. no
- 29. [ICON] show image [PANEL] at the x: [AXIS-X] y: [AXIS-Y]
- 30. [ICON] turn off screen
- 31. [ICON] show [STRING]
- 32. [ICON] show [STRING] until scroll done
- 33. [ICON] show [STRING] at x: [X] y: [Y]
- 34. [ICON] light up x: [X] y: [Y]
- 35. [ICON] light off x: [X] y: [Y]
- 36. [ICON] switch between light-up and light-off x: [X] y: [Y]
- 37. [ICON] x: [X] y: [Y] is it lighted up?
- 38. [ICON] RGB LED lights up [COLOR] for [TIME] secs
- 39. [ICON] RGB LED lights up [COLOR]
- 40. [ICON] set the indicator [RGB]with color value [VALUE]
- 41. [ICON] RGB LED lights off
- 42. [ICON] set Rocky’s light with color [COLORLIST]
- 43. [ICON] Rocky lights off
- 44. [ICON] play sound [SOUNDLIST]
- 45. [ICON] play sound [SOUNDLIST] until done
- 46. [ICON] stop all sounds
- 47. [ICON] play note [SOUNDNOTE] for [SOUNDBEAT] beats
- 48. [ICON] rest for [TIME] beats
- 49. [ICON] play sound at frequency of [HZ] HZ for [TIME] secs
- 50. [ICON] change volume by [VOLUME]
- 51. [ICON] set volume to [VOLUME] %
- 52. [ICON] volume
- 53. [ICON] move forward at power [POWER] % for [TIME] secs
- 54. [ICON] move backward at power [POWER] % for [TIME] secs
- 55. [ICON] turn left at power [POWER] % for [TIME] secs
- 56. [ICON] turn right at power [POWER] % for [TIME] secs
- 57. [ICON] keep straight forward at power [POWER]% for [TIME]secs
- 58. [ICON] keep straight backward at power [POWER]% for [TIME]secs
- 59. [image_4] turn left [ICON] [ANGLE] degrees until done
- 60. [image_5] turn right[ICON] [ANGLE] degrees until done
- 61. [ICON] [DIRECTION] at power [POWER] %
- 62. [ICON] left wheel turns at power [LEFT_POWER] % and right wheel at power [RIGHT_POWER] %
- 63. [ICON] stop moving
- 64. [ICON] button [BUTTONS] is pressed?
- 65. [ICON] when Codey connected to Rocky
- 66. [ICON] gear potentiometer value
- 67. [ICON] loudness
- 68. [ICON] ambient light intensity
- 69. [ICON] battery level
- 70. [ICON] shaken?
- 71. [ICON] shaking strength
- 72. [ICON] Codey[DIRECTION] tilted?
- 73. [ICON] Codey positioned as[ORIENTATE]?
- 74. [ICON] roll angle°
- 75. [ICON] pitch angle°
- 76. [ICON] rotation angle around x
- 77. [ICON] rotation angle around y
- 78. [ICON] rotation angle around z
- 79. [ICON] reset the [AXIS] rotation angle°
- 80. [ICON] timer
- 81. [ICON] reset timer
- 82. [ICON] obstacles ahead?
- 83. [ICON] the color detected is [COLOR]?
- 84. [ICON] [RGB]color value detected
- 85. [ICON] color sensor ambient light intensity
- 86. [ICON] color sensor reflected light intensity
- 87. [ICON] color sensor reflected infrared light intensity
- 88. [ICON] color sensor grey-scale value
- 89. [ICON] send IR message [STRING]
- 90. [ICON] IR message received
- 91. [ICON] record home appliances remote signal 3 secs
- 92. [ICON] send home appliances remote signal
- 93. when Codey starts up
- 94. when button [BUTTONS] is pressed
- 95. when Codey is shaking
- 96. when Codey is [DIRECTION]tilted
- 97. when [MENU_LIST] > [SOUNDVOLUME]
- 98. when light intensity < [BRIGHTNESS]
Introduction
Codey Rocky combines the hardware and software, enabling children to learn about the basics of programming through playing and creating. Integrated with over 10 programmable electronic modules, Codey Rocky is fun to play with a few lines of code. You can use mBlock 5 to unleash your imagination and creativity. Programming is as easy as building blocks with mBlock 5. You can also write Python in mBlock 5 to have your Codey Rocky do more amazing things.
Codey: robot controller
Rocky: robot chassis
The following shows the function modules of Codey and Rocky.
Start to Program with mBlock 5
Open mBlock 5. Connect Codey to your computer by using a USB cable. (For the mBlock 5 App, follow the on-screen instructions.)
Press the power button to turn on Codey.
Select Codey and click Connect. From the pop-up Connect Device window, click Connect.
Codey is connected to mBlock 5.Choose the program execution mode.
Upload mode: In the Upload mode, you need to upload the compiled program to the device. After being successfully uploaded, the program can still run properly on the device when the device is disconnected from mBlock 5.
Live mode:In the Live mode, you can view the program execution effect in real time, which facilitates the commissioning of the program. In this mode, you must keep the device connected to mBlock 5. If they are disconnected, the program cannot be executed.
- Start to have fun with programming!
Extensions
mBlock 5 provides multiple extensions for Codey Rocky, including IoT, Bluetooth controller, and Neuron. By adding extensions, you can use more functions of Codey Rocky.
The following takes the IoT extension as an example to describe how to add an extension.
1. Select Codey and click + in the Blocks area.
From the pop-up Extension Center page, click + Add to add IoT blocks.
Go back to Edit Page, you can find the IoT category in the Blocks area.
For how to use the IoT blocks, visit http://docs.makeblock.com/codeyrocky/en/tutorials/iot.html.
FAQ and More Information
For FAQs, more cases, and further help, see the Codey Rocky online help at http://docs.makeblock.com/codeyrocky/en/.
1. look up

Displays the look up expression
How to Use
You can drag this block to the Scripts area and use it directly. Codey’s screen displays the look up expression when the script is executed.
Example
When you press the space key, Codey’s screen displays the look up expression and then displays the default expression.
For more details about how to use the emotion blocks, see the example project at http://docs.makeblock.com/codeyrocky/en/tutorials/emotion-blocks.html#have-some-fun.
2. [ICON] show image [PANEL] for [TIME] secs

Displays the specified image on Codey’s screen for the specified period of time
How to Use
You can click the image or time to define the one you want. The following is the default settings of the block.
Example
After you press button A, Codey’s screen displays the first image for one second, the second one for half a second, and the third one for one second. Then, the screen goes off.
3. [ICON] show image [PANEL]

Displays the specified image on Codey’s screen
How to Use
You can click the image to define the one you want. The following is the default setting of the block.
Example
When you press the space key, Codey’s screen keeps displaying the image.
4. look down

Displays the look down expression
How to Use
You can drag this block to the Scripts area and use it directly. Codey’s screen displays the look down expression when the script is executed.
Example
When you press the space key, Codey’s screen displays the look down expression and then displays the default expression.
For more details about how to use the emotion blocks, see the example project at http://docs.makeblock.com/codeyrocky/en/tutorials/emotion-blocks.html#have-some-fun.
5. look left

Displays the look left expression
How to Use
You can drag this block to the Scripts area and use it directly. Codey’s screen displays the look left expression when the script is executed.
Example
When you press the space key, Codey’s screen displays the look left expression and then displays the default expression.
For more details about how to use the emotion blocks, see the example project at http://docs.makeblock.com/codeyrocky/en/tutorials/emotion-blocks.html#have-some-fun.
6. look right

Displays the look right expression
How to Use
You can drag this block to the Scripts area and use it directly. Codey’s screen displays the look right expression when the script is executed.
Example
When you press the space key, Codey’s screen displays the look right expression and then displays the default expression.
For more details about how to use the emotion blocks, see the example project at http://docs.makeblock.com/codeyrocky/en/tutorials/emotion-blocks.html#have-some-fun.
7. look around

Displays the look around expression
How to Use
You can drag this block to the Scripts area and use it directly. Codey’s screen displays the look around expression when the script is executed.
Example
When you press the space key, Codey’s screen displays the look around expression and then displays the default expression. If you have put Codey on Rcoky, Rocky turns left and right with the expression.
For more details about how to use the emotion blocks, see the example project at http://docs.makeblock.com/codeyrocky/en/tutorials/emotion-blocks.html#have-some-fun.
8. blink

Displays the blink expression
How to Use
You can drag this block to the Scripts area and use it directly. Codey’s screen displays the blink expression when the script is executed.
Example
When you press the space key, Codey’s screen displays the blink expression and then displays the default expression.
For more details about how to use the emotion blocks, see the example project at http://docs.makeblock.com/codeyrocky/en/tutorials/emotion-blocks.html#have-some-fun.
9. smile

Displays the smile expression
How to Use
You can drag this block to the Scripts area and use it directly. Codey’s screen displays the smile expression when the script is executed.
Example
When you press the space key, Codey’s screen displays the smile expression and then displays the default expression. If you have put Codey on Rcoky, Rocky swings left and right with the expression.
For more details about how to use the emotion blocks, see the example project at http://docs.makeblock.com/codeyrocky/en/tutorials/emotion-blocks.html#have-some-fun.
10. yeah

Displays the cheering (yeah) expression
How to Use
You can drag this block to the Scripts area and use it directly. Codey’s screen displays the cheering (yeah) expression when the script is executed.
Example
When you press the space key, Codey’s screen displays the cheering (yeah) expression and then displays the default expression. If you have put Codey on Rcoky, Rocky turns around with the expression.
For more details about how to use the emotion blocks, see the example project at http://docs.makeblock.com/codeyrocky/en/tutorials/emotion-blocks.html#have-some-fun.
11. naughty

Displays the nauthty expression
How to Use
You can drag this block to the Scripts area and use it directly. Codey’s screen displays the naughty expression when the script is executed.
Example
When you press the space key, Codey’s screen displays the naughty expression and then displays the default expression. If you have put Codey on Rcoky, Rocky moves with the expression.
For more details about how to use the emotion blocks, see the example project at http://docs.makeblock.com/codeyrocky/en/tutorials/emotion-blocks.html#have-some-fun.
12. proud

Displays the proud expression
How to Use
You can drag this block to the Scripts area and use it directly. Codey’s screen displays the pround expression when the script is executed.
Example
When you press the space key, Codey’s screen displays the pround expression and then displays the default expression. If you have put Codey on Rcoky, Rocky moves with the expression.
For more details about how to use the emotion blocks, see the example project at http://docs.makeblock.com/codeyrocky/en/tutorials/emotion-blocks.html#have-some-fun.
13. yummy

Displays the yummy expression
How to Use
You can drag this block to the Scripts area and use it directly. Codey’s screen displays the yummy expression when the script is executed.
Example
When you press the space key, Codey’s screen displays the yummy expression and then displays the default expression. If you have put Codey on Rcoky, Rocky moves with the expression.
For more details about how to use the emotion blocks, see the example project at http://docs.makeblock.com/codeyrocky/en/tutorials/emotion-blocks.html#have-some-fun.
14. uh_oh

Displays the uh_oh expression
How to Use
You can drag this block to the Scripts area and use it directly. Codey’s screen displays the uh_oh expression when the script is executed.
Example
When you press the space key, Codey’s screen displays the uh_oh expression and then displays the default expression. If you have put Codey on Rcoky, Rocky moves with the expression.
For more details about how to use the emotion blocks, see the example project at http://docs.makeblock.com/codeyrocky/en/tutorials/emotion-blocks.html#have-some-fun.
15. wow

Displays the wow expression
How to Use
You can drag this block to the Scripts area and use it directly. Codey’s screen displays the wow expression when the script is executed.
Example
When you press the space key, Codey’s screen displays the wow expression and then displays the default expression. If you have put Codey on Rcoky, Rocky moves with the expression.
For more details about how to use the emotion blocks, see the example project at http://docs.makeblock.com/codeyrocky/en/tutorials/emotion-blocks.html#have-some-fun.
16. hurt

Displays the hurt expression
How to Use
You can drag this block to the Scripts area and use it directly. Codey’s screen displays the hurt expression when the script is executed.
Example
When you press the space key, Codey’s screen displays the hurt expression and then displays the default expression. If you have put Codey on Rcoky, Rocky moves with the expression.
For more details about how to use the emotion blocks, see the example project at http://docs.makeblock.com/codeyrocky/en/tutorials/emotion-blocks.html#have-some-fun.
17. sad

Displays the sad expression
How to Use
You can drag this block to the Scripts area and use it directly. Codey’s screen displays the sad expression when the script is executed.
Example
When you press the space key, Codey’s screen displays the sad expression and then displays the default expression. If you have put Codey on Rcoky, Rocky moves with the expression.
For more details about how to use the emotion blocks, see the example project at http://docs.makeblock.com/codeyrocky/en/tutorials/emotion-blocks.html#have-some-fun.
18. angry

Displays the angry expression
How to Use
You can drag this block to the Scripts area and use it directly. Codey’s screen displays the angry expression when the script is executed.
Example
When you press the space key, Codey’s screen displays the angry expression and then displays the default expression. If you have put Codey on Rcoky, Rocky moves with the expression.
For more details about how to use the emotion blocks, see the example project at http://docs.makeblock.com/codeyrocky/en/tutorials/emotion-blocks.html#have-some-fun.
19. hello

Displays the greeting (hello) expression
How to Use
You can drag this block to the Scripts area and use it directly. Codey’s screen displays the greeting (hello) expression when the script is executed.
Example
When you press the space key, Codey’s screen displays the greeting (hello) expression and then displays the default expression. If you have put Codey on Rcoky, Rocky moves with the expression.
For more details about how to use the emotion blocks, see the example project at http://docs.makeblock.com/codeyrocky/en/tutorials/emotion-blocks.html#have-some-fun.
20. sprint

Displays the sprint expression
How to Use
You can drag this block to the Scripts area and use it directly. Codey’s screen displays the sprint expression when the script is executed.
Example
When you press the space key, Codey’s screen displays the sprint expression and then displays the default expression. If you have put Codey on Rcoky, Rocky moves with the expression.
For more details about how to use the emotion blocks, see the example project at http://docs.makeblock.com/codeyrocky/en/tutorials/emotion-blocks.html#have-some-fun.
21. scared

Displays the startle expression
How to Use
You can drag this block to the Scripts area and use it directly. Codey’s screen displays the startle expression when the script is executed.
Example
When you press the space key, Codey’s screen displays the startle expression and then displays the default expression. If you have put Codey on Rcoky, Rocky moves with the expression.
For more details about how to use the emotion blocks, see the example project at http://docs.makeblock.com/codeyrocky/en/tutorials/emotion-blocks.html#have-some-fun.
22. shiver

Displays the shiver expression
How to Use
You can drag this block to the Scripts area and use it directly. Codey’s screen displays the shiver expression when the script is executed.
Example
When you press the space key, Codey’s screen displays the shiver expression and then displays the default expression. If you have put Codey on Rcoky, Rocky moves with the expression.
For more details about how to use the emotion blocks, see the example project at http://docs.makeblock.com/codeyrocky/en/tutorials/emotion-blocks.html#have-some-fun.
23. dizzy

Displays the dizzy expression
How to Use
You can drag this block to the Scripts area and use it directly. Codey’s screen displays the dizzy expression when the script is executed.
Example
When you press the space key, Codey’s screen displays the dizzy expression and keeps it.
For more details about how to use the emotion blocks, see the example project at http://docs.makeblock.com/codeyrocky/en/tutorials/emotion-blocks.html#have-some-fun.
24. yawn

Displays the yawn expression
How to Use
You can drag this block to the Scripts area and use it directly. Codey’s screen displays the yawn expression when the script is executed.
Example
When you press the space key, Codey’s screen displays the yawn expression and keeps it.
For more details about how to use the emotion blocks, see the example project at http://docs.makeblock.com/codeyrocky/en/tutorials/emotion-blocks.html#have-some-fun.
25. sleep

Displays the sleep expression
How to Use
You can drag this block to the Scripts area and use it directly. Codey’s screen displays the sleep expression when the script is executed.
Example
When you press the space key, Codey’s screen displays the sleep expression and keeps it.
For more details about how to use the emotion blocks, see the example project at http://docs.makeblock.com/codeyrocky/en/tutorials/emotion-blocks.html#have-some-fun.
26. wake

Displays the wake expression
How to Use
You can drag this block to the Scripts area and use it directly. Codey’s screen displays the wake expression when the script is executed.
Example
When you press the space key, Codey’s screen displays the wake expression and then displays the default expression.
For more details about how to use the emotion blocks, see the example project at http://docs.makeblock.com/codeyrocky/en/tutorials/emotion-blocks.html#have-some-fun.
27. yes

Displays the approving (yes) expression
How to Use
You can drag this block to the Scripts area and use it directly. Codey’s screen displays the approving (yes) expression when the script is executed.
Example
When you press the space key, Codey’s screen displays the approving (yes) expression and then displays the default expression. If you have put Codey on Rocky, Rocky moves with the expression.
For more details about how to use the emotion blocks, see the example project at http://docs.makeblock.com/codeyrocky/en/tutorials/emotion-blocks.html#have-some-fun.
28. no

Displays the disapproving (no) expression
How to Use
You can drag this block to the Scripts area and use it directly. Codey’s screen displays the disapproving (no) expression when the script is executed.
Example
When you press the space key, Codey’s screen displays the disapproving (no) expression and then displays the default expression. If you have put Codey on Rocky, Rocky moves with the expression.
For more details about how to use the emotion blocks, see the example project at http://docs.makeblock.com/codeyrocky/en/tutorials/emotion-blocks.html#have-some-fun.
29. [ICON] show image [PANEL] at the x: [AXIS-X] y: [AXIS-Y]

Displays the specified image in the specified position of Codey’s screen
How to Use
You can click the image or coordinates to define the one you want. The following is the default setting of the block.
Note: Codey’s screen is a matrix panel of 8 (0–7) × 16 (0–15) points. The value of x indicates the number of horizontal offset points. A positive value indicate right offset, and a negative one indicates left offset. The value of y indicates the number of vertical offset points. A positive value indicates downward offset, and a negative one indicates upward offset.
For example, if the image is designed as follows:
when you use the block , setting the x and y values, the image is displayed in the following position on the display panel:
Setting range of x: –15 – +15
Setting range of y: –7 – +7
Alternatively, you can put reporter blocks into the block, for example:
Example
After you press the space key, Codey’s screen keeps displaying the specified image that is displaced horizontally to the right by two points and vertically up by one point.
30. [ICON] turn off screen

Turns off Codey’s screen
How to Use
You can drag this block to the Scripts area and use it directly. Codey’s screen is turned off when the script is executed.
Example
After you press the space key, Codey’s screen displays the specified image and goes off one second later.
31. [ICON] show [STRING]

Displays the specified Latin characters, numbers, or symbols on Codey’s screen
How to Use
You can click the default characters to define what is to be displayed. The following is the default setting of the block.
Example
After you press the space key, Codey’s screen keeps displaying 12:00.
32. [ICON] show [STRING] until scroll done

Displays the specified Latin characters, numbers, or symbols in scrolling mode on Codey’s screen
How to Use
You can click the default characters to define what is to be displayed. The following is the default setting of the block.
Example
When you press the space key, Codey’s screen displays morning in scrolling mode and stops scrolling after all the characters have been displayed.
33. [ICON] show [STRING] at x: [X] y: [Y]

Displays the specified Latin characters, numbers, or symbols in the specified position of Codey’s screen
How to Use
You can click the image and coordinates to define the ones you want. The following is the default setting of the block.
Note: Codey’s screen is a matrix panel of 8 (0–7) × 16 (0–15) points. The value of x indicates the number of horizontal offset points. A positive value indicate right offset, and a negative one indicates left offset. The value of y indicates the number of vertical offset points. A positive value indicates downward offset, and a negative one indicates upward offset.
Alternatively, you can put reporter blocks into the block, for example:
Example
When you press the space key, Codey’s screen keeps displaying hello that is displaced horizontally to the right by one point and vertically down by one point.
34. [ICON] light up x: [X] y: [Y]

Lights up the specified point (x,y) on Codey’s screen
How to Use
You can click the coordinates to define the point you want. The following is the default setting of the block.
Codey’s screen is a matrix panel of 8 (0–7) × 16 (0–15) points, with the origin in the upper left corner.
Setting range of x: 0–15
Setting range of y: 0–7
Example
When you press the space key, the point (3,3) on Codey’s screen is lit up.
35. [ICON] light off x: [X] y: [Y]

Turns off the specified point (x,y) on Codey’s screen
How to Use
You can click the coordinates to define the point you want. The following is the default setting of the block.
Codey’s screen is a matrix panel of 8 (0–7) × 16 (0–15) points, with the origin in the upper left corner.
Setting range of x: 0–15
Setting range of y: 0–7
Example
When you press the space key, the point (3,3) on Codey’s screen is lit up and goes off one second later.
36. [ICON] switch between light-up and light-off x: [X] y: [Y]

Changes the state of the specified point (x,y) on Codey’s screen
How to Use
You can click the coordinates to define the point you want. The following is the default setting of the block.
Codey’s screen is a matrix panel of 8 (0–7) × 16 (0–15) points, with the origin in the upper left corner.
Setting range of x: 0–15
Setting range of y: 0–7
Example
When you press the space key, the point (3,3) on Codey’s screen is lit up; when you press the space key again, the point (3,3) goes off.
37. [ICON] x: [X] y: [Y] is it lighted up?

Determines whether the specified point (x,y) on Codey’s screen is lit up
How to Use
You can click the coordinates to define the point you want. The following is the default setting of the block.
Codey’s screen is a matrix panel of 8 (0–7) × 16 (0–15) points, with the origin in the upper left corner.
Setting range of x: 0–15
Setting range of y: 0–7
Note: This is a Boolean block that contains a condition. Use it in combination with another block that requires a condition.
Example
When you press button A, the points (3,3) and (5,5) on Codey’s screen are lit up; one second later, the point (3,3) goes off.
38. [ICON] RGB LED lights up [COLOR] for [TIME] secs

Lights up the RGB LED of Codey in the specified color for the specified period of time
How to Use
The following shows the position of Codey’s RGB LED indicator.
You can click the color and time to define the ones you want. The following is the default settings of the block.
Alternatively, you can put a reporter block of the numeric type into the block, for example:
Example
When you press button A, the RGB LED indicator under the screen on Codey is lit up in blue and goes off in two seconds.
39. [ICON] RGB LED lights up [COLOR]

Lights up the RGB LED of Codey in the specified color
How to Use
The following shows the position of Codey’s RGB LED indicator.
You can click the color to define the one you want. The following is the default setting of the block.
Example
When you press button A, the RGB LED indicator under the screen on Codey is lit up in red.
40. [ICON] set the indicator [RGB]with color value [VALUE]

Lights up the RGB LED of Codey in the specified color
How to Use
The following shows the position of Codey’s RGB LED indicator.
You can click the color and value to define the ones you want. The following is the default settings of the block.
Note: The color value range is 0 to 255.
Alternatively, you can put a reporter block of the numeric type into the block, for example:
Example
When you press button A, the RGB LED indicator under the screen on Codey is lit up in yellow.
41. [ICON] RGB LED lights off

Turns off the RGB LED of Codey
How to Use
The following shows the position of Codey’s RGB LED indicator.
You can drag this block the Scripts area and use it directly. The RGB LED of Codey goes off when the script is executed.
Example
When you press button A, the RGB LED indicator under the screen on Codey is lit up in yellow and goes off in three seconds.
42. [ICON] set Rocky’s light with color [COLORLIST]

Lights up the RGB LED of Rocky in the specified color.
How to Use
The following shows the position of Rocky’s RGB LED indicator.
You can click the color to define the one you want. This block provides seven color options, namely red, green, blue, yellow, cyan, purple, and white. The following is the default settings of the block.
Example
When you press button A, the RGB LED indicator of Rocky is lit up in red.
43. [ICON] Rocky lights off

Turns off the RGB LED of Rocky
How to Use
The following shows the position of Rocky’s RGB LED indicator.
You can drag this block to the Scripts area and use it directly. The RGB LED of Rocky goes off when the script is executed.
Example
When you press button A, the RGB LED of Rocky is lit up in red and goes off in three seconds.
44. [ICON] play sound [SOUNDLIST]

Plays the specified sound with Codey’s speaker
How to Use
You can click the drop-down list box to select a sound. The default sound is hello.
Example
When you press button A, Codey plays the sound hello.
45. [ICON] play sound [SOUNDLIST] until done

Plays the specified sound with Codey’s speaker and waits until the playing ends
How to Use
You can click the drop-down list box to select a sound. The default sound is hello.
Example
When you press button A, Codey plays the sound hello and waits until the playing is finished.
46. [ICON] stop all sounds

Stops the sound playing of Codey’s speaker
How to Use
You can drag this block to the Scripts area and use it directly. Codey stops playing any sound when this script is executed.
Example
When you press button A, Codey plays the sound hello 10 times and then stops the playing.
47. [ICON] play note [SOUNDNOTE] for [SOUNDBEAT] beats

Plays the specified note for the specified number of beats
How to Use
You can click the drop-down list box to select a note, and click the number of beats to set the one you want. The following shows the default settings of this block.
Example
When you press button A, Codey plays the note C4 for 0.25 beats.
48. [ICON] rest for [TIME] beats

Stops the sound playing of Codey’s speaker and waits the specified number of beats
How to Use
You can click the number of beats to define the one you want. The following shows the default setting of this block.
Example
When you press button A, Codey plays the note C4 five times, each time for 0.25 beats; waits 0.25 beats; and then plays the note G4 five times, each time for 0.25 beats.
49. [ICON] play sound at frequency of [HZ] HZ for [TIME] secs

Plays a sound with the specified frequency through Codey’s speaker for the specified period of time
How to Use
You can click the frequency and time to define the ones you want. The following shows the default settings of this block.
Note: The setting of sound frequency in this block ranges from 20 to 20,000.
Example
When you press button A, Codey plays a sound with the frequency of 700 Hz for one second.
50. [ICON] change volume by [VOLUME]

Changes the volume of Codey’s speaker
How to Use
You can click the value to modify it. A negative value indicates that the volume is to be decreased, and a positive value indicates that the volume is to be increased. The following shows the default setting of this block.
Example
When you press button A, Codey plays the sound hello and, two seconds later, plays the sound again at an obvious lower volume.
51. [ICON] set volume to [VOLUME] %

Sets the volume of Codey’s speaker in percentage
How to Use
You can click the value to modify it. The following shows the default setting of this block.
Example
When you press button A, Codey plays the sound hello and, two seconds later, plays the sound again at an obvious lower volume.
52. [ICON] volume

Reports the current volume of Cody’s speaker
How to Use
This is a reporter block that must be used in combination with another block requiring data. It cannot be used independently.
Example
When you press button A, Codey’s screen displays the current volume of the speaker.
53. [ICON] move forward at power [POWER] % for [TIME] secs

Moves Codey Rocky forward at the specified power for the specified period of time
How to Use
The speed of Codey Rocky is in positive correlation to the absolute value of the power. A greater absolute value of power indicates a higher speed.
You can click the power and time to define the ones you want. The following shows the default settings of this block.
Note:
Setting range of the power: –100–+100, where an negative value indicates moving reversely
Setting range of the time: 0–∞, in seconds
Example
When you press button A, Codey Rocky moves forward at the power of 50% for one second and then stops moving.
54. [ICON] move backward at power [POWER] % for [TIME] secs

Moves Codey Rocky backward at the specified power for the specified period of time
How to Use
The speed of Codey Rocky is in positive correlation to the absolute value of the power. A greater absolute value of power indicates a higher speed.
You can click the power and time to define the ones you want. The following shows the default settings of this block.
Note:
Setting range of the power: –100–+100, where an negative value indicates moving reversely
Setting range of the time: 0–∞, in seconds
Example
When you press button A, Codey Rocky moves backward at the power of 50% for one second and then stops moving.
55. [ICON] turn left at power [POWER] % for [TIME] secs

Turns Codey Rocky left at the specified power for the specified period of time
How to Use
The speed of Codey Rocky is in positive correlation to the absolute value of the power. A greater absolute value of power indicates a higher speed.
You can click the power and time to define the ones you want. The following shows the default settings of this block.
Note:
Setting range of the power: –100–+100, where an negative value indicates moving reversely
Setting range of the time: 0–∞, in seconds
Example
When you press button A, Codey Rocky turns left at the power of 50% for one second and then stops moving.
56. [ICON] turn right at power [POWER] % for [TIME] secs

Turns Codey Rocky right at the specified power for the specified period of time
How to Use
The speed of Codey Rocky is in positive correlation to the absolute value of the power. A greater absolute value of power indicates a higher speed.
You can click the power and time to define the ones you want. The following shows the default settings of this block.
Note:
Setting range of the power: –100–+100, where an negative value indicates moving reversely
Setting range of the time: 0–∞, in seconds
Example
When you press button A, Codey Rocky turns right at the power of 50% for one second and then stops moving.
57. [ICON] keep straight forward at power [POWER]% for [TIME]secs

Moves Codey Rocky forward in the same direction at the specified power for the specified period of time
How to Use
A gyroscope is used to calibrate the moving track of Codey Rocky.
The speed of Codey Rocky is in positive correlation to the absolute value of the power. A greater absolute value of power indicates a higher speed.
You can click the power and time to define the ones you want. The following shows the default settings of this block.
Note:
Setting range of the power: –100–+100, where an negative value indicates moving reversely
Setting range of the time: 0–∞, in seconds
Example
When you press button A, Codey Rocky moves forward straightly at the power of 50% for one second and then stops moving.
58. [ICON] keep straight backward at power [POWER]% for [TIME]secs

Moves Codey Rocky backward in the same direction at the specified power for the specified period of time
How to Use
A gyroscope is used to calibrate the moving track of Codey Rocky.
The speed of Codey Rocky is in positive correlation to the absolute value of the power. A greater absolute value of power indicates a higher speed.
You can click the power and time to define the ones you want. The following shows the default settings of this block.
Note:
Setting range of the power: –100–+100, where an negative value indicates moving reversely
Setting range of the time: 0–∞, in seconds
Example
When you press button A, Codey Rocky moves backward straightly at the power of 50% for one second and then stops moving.
59. [image_4] turn left [ICON] [ANGLE] degrees until done

Turns Codey Rocky left the specified degrees and waits until the turning ends
How to Use
You can click the degree to define the one you want. The following shows the default setting of this block.
Example
When you press button A, Codey Rocky turns left 15 degrees, and then moves forward at the power of 50% for one seond.
60. [image_5] turn right[ICON] [ANGLE] degrees until done

Turns Codey Rocky right the specified degrees and waits until the turning ends
How to Use
You can click the degree to define the one you want. The following shows the default setting of this block.
Example
When you press button A, Codey Rocky turns right 15 degrees, and then moves forward at the power of 50% for one seond.
61. [ICON] [DIRECTION] at power [POWER] %

Makes Codey Rocky move forward or backward, turn left or right at the specified power
How to Use
The speed of Codey Rocky is in positive correlation to the absolute value of the power. A greater absolute value of power indicates a higher speed.
You can click the drop-down list box to define the motion of Codey Rocky and click the power to set it. The following shows the default settings of this block.
Example
When you press button A, Codey Rocky keeps moving forward at the power of 50%.
62. [ICON] left wheel turns at power [LEFT_POWER] % and right wheel at power [RIGHT_POWER] %

Makes the right and left wheels (tracks) of Codey Rocky move at the specified power
How to Use
The speed of Codey Rocky is in positive correlation to the absolute value of the power. A greater absolute value of power indicates a higher speed.
You can click the power to define the power of the left and right wheels of Codey Rocky separately. The following shows the default settings of this block.
Example
When you press button A, both the left and right wheels of Codey Rocky moves forward at the power of 50%.
63. [ICON] stop moving

Stops the motion of Codey Rocky
How to Use
You can drag this block to the Scripts area and use it directly. Codey Rocky stops moving when the script is executed.
Example
When you press button A, Codey Rocky moves forward at the power of 50%, and stops moving in one second.
64. [ICON] button [BUTTONS] is pressed?

Determines whether the specified button on Codey is pressed
How to Use
Codey provides three programmable buttons, namely A, B, and C, and it can detect whether a button is pressed. Accordingly, three button options are provides.
Click to select button A, B, or C. The following shows the default setting of the block.
Note: This is a Boolean block that contains a condition. Use it in combination with another block that requires a condition.
Example
After you turn on Codey, its screen displays yes if you press button A.
65. [ICON] when Codey connected to Rocky

Determines whether Codey is connected to Rocky
How to Use
You can connect Codey to Rocky through the magnetic Pogo Pin connector. After being connected to Rocky, Codey can control the motion of Rocky or obtain data from Rocky’s sensors.
Note: This is a Boolean block that contains a condition. Use it in combination with another block that requires a condition.
Example
After you turn on Codey, its screen displays yes if it is put on Rocky. In this case, take it away from Rocky and restart it. Its screen display no.
66. [ICON] gear potentiometer value

Reports the position value of Codey’s gear potentiometer
How to Use
Codey’s gear potentiometer is on the left side. It is an input device that you can toggle to control values. By porgramming, you can use the gear potentiometer to control the volume of Codey and the brightness of indicators.
Position value range: 0–100, rounded to the nearest integer
You can select the check box on the left of this block to see the position value on the stage.
Note: This is a reporter block that must be used in combination with another block requiring data.
Example
After pressing the space key, toggle the gear potentiometer. When the position value of the gear pitentiometer is 50, the volume of Codey’s speaker is set to 50%.
67. [ICON] loudness

Reports the loudness detected by Codey’s sound sensor
How to Use
The preceding figure shows the position of Codey’s sound sensor. It is used to measure the volume of sounds in the surrounding environment.
A greater value indicates a louder sound.
Apart from sounds, blowing and vibration can also lead to change in values.
Loudness range: 0–100, rounded to the nearest tenth
You can select the check box on the left of this block to see the loudness on the stage.
Note: This is a reporter block that must be used in combination with another block requiring data.
Example
When you press button A, Codey’s screen displays the loudness of the sound detected by its sound sensor.
68. [ICON] ambient light intensity

Reports the light intensity detected by Codey’s light sensor
How to Use
The preceding figure shows the position of Codey’s light sensor. It is used to detect the intensity of the ambient light. A greater value indicates a higher intensity.
The detection range is shown as follows.
Light intensity range: 0–100, rounded to the nearest tenth
You can select the check box on the left of this block to view the ambient light intensity on the stage.
Note: This is a reporter block that must be used in combination with another block requiring data. It cannot be used independently.
Example
When you press button A, Codey’s screen displays the light intensity detected by its light sensor.
69. [ICON] battery level

Reports Codey’s battery level
How to Use
Codey can detect its battery level.
Battery level range range: 0–100, rounded to the nearest ten
You can select the check box on the left of this block to view the battery level on the stage.
Note: This is a reporter block that must be used in combination with another block requiring data. It cannot be used independently.
Example
When you press button A, Codey’s screen displays its current battery level.
70. [ICON] shaken?

Determines whether Codey is shaken
How to Use
Codey can detect whether it is shaken with its built-in gyroscope and acceleration meter.
Note: This is a Boolean block that contains a condition. Use it in combination with another block that requires a condition.
Example
When you press button A, Codey’s screen displays yes if you shake it, and displays no if you do not shake it.
71. [ICON] shaking strength

Reports the strength Codey is shaken
How to Use
Codey can detect whether it is shaken with its built-in gyroscope and acceleration meter and obtain the strength value.
Strength range: 0–100, rounded to the nearest integer
You can select the check box on the left of this block to view the strength value on the stage.
Note: This is a reporter block that must be used in combination with another block requiring data. It cannot be used independently.
Example
When you press button A, Codey’s screen displays the strength it is shaken.
72. [ICON] Codey[DIRECTION] tilted?

Determines whether Codey is tilted to the specified direction
How to Use
Codey can detect whether it is tilted to a direction with its built-in gyroscope and acceleration meter.
This block provides four direction options, namely left, right, ears up, and ears down. Codey is considered tilted when the tilting angle exceeds 15 degrees. You can click the drop-down list box to select a direction.
Note: This is a Boolean block that contains a condition. Use it in combination with another block that requires a condition.
Example
After you turn on Codey, its screen displays yes if you tilt it more than 15 degrees to the left, and displays no if you do not tilt it.
73. [ICON] Codey positioned as[ORIENTATE]?

Determines whether Codey is positioned in the specified posture
How to Use
With its built-in gyroscope and acceleration meter, Codey can detect whether it is placed with the specified posture.
This block provides three posture options, namely face up, face down, and stand on desk. Click the drop-down list box to select one.
Note: This is a Boolean block that contains a condition. Use it in combination with another block that requires a condition.
Example
After you turn on Codey, its screen displays yes if you put Codey face up, and displays no if you put it in another posture.
74. [ICON] roll angle°

Reports the rolling angle of Codey
How to Use
Codey can detect its rolling angle with its built-in gyroscope and acceleration meter. Rolling angle is defined as follows:
Rolling angle range: -90–+90 degrees, rounded to the nearest integer; a positive value indicates right-tilted, and a negative value indicates left-tilted; the value 0 is displayed if the tilting range is exceeded.
Note: This is a reporter block that must be used in combination with another block requiring data. It cannot be used independently.
Example
When you turn on Codey, Codey’s screen displays the rolling angle.
75. [ICON] pitch angle°

Reports the pitch angle of Codey
How to Use
Codey can detect its pitch angle with its built-in gyroscope and acceleration meter. Pitch angle is defined as follows:
Pitch angle range: -180–+180 degrees, rounded to the nearest integer; a positive value indicates ears up, and a negative value indicates ears down; the value 0 is displayed if the pitch angle range is exceeded.
Note: This is a reporter block that must be used in combination with another block requiring data. It cannot be used independently.
Example
When you turn on Codey, Codey’s screen displays the pitch angle.
76. [ICON] rotation angle around x

Reports the rotation angle of Codey around the x axis
How to Use
Codey can detect the angle it rotates by the x, y, or z axis. The x, y, and z axes are defined as follows:
Note: This is a reporter block that must be used in combination with another block requiring data. It cannot be used independently.
Example
When you turn on Codey, Codey’s screen displays the rotation angle of Codey around the x axis.
77. [ICON] rotation angle around y

Reports the rotation angle of Codey around the y axis.
How to Use
Codey can detect the angle it rotates by the x, y, or z axis. The x, y, and z axes are defined as follows:
Note: This is a reporter block that must be used in combination with another block requiring data. It cannot be used independently.
Example
When you turn on Codey, Codey’s screen displays the rotation angle of Codey around the y axis.
78. [ICON] rotation angle around z

Reports the rotation angle of Codey around the z axis
How to Use
Codey can detect the angle it rotates by the x, y, or z axis. The x, y, and z axes are defined as follows:
Note: This is a reporter block that must be used in combination with another block requiring data. It cannot be used independently.
Example
When you turn on Codey, Codey’s screen displays the rotation angle of Codey around the z axis.
79. [ICON] reset the [AXIS] rotation angle°

Resets the rotation angle of Codey around the specified axis(axes)
How to Use
Codey can detect the angle it rotates by the x, y, or z axis. The x, y, and z axes are defined as follows:
This block privides four axis options, namely the x, y, z, and all axes. You can click the drop-down list box to select one. The default setting is all axes.
Example
When you turn on Codey, the rotation angles of Codey around all axes are reset.
80. [ICON] timer

Reports the count value of the timer
How to Use
The timer starts to count from 0 each time Codey is powered on. This block reports the duration Codey runs this time.
This is a reporter block that must be used in combination with another block requiring data. It cannot be used independently.
Example
When you press button A, Codey’s screen displays the duration Codey runs this time.
81. [ICON] reset timer

Resets the timer of Codey to Zero
How to Use
The timer of Codey starts to count from zero each time Codey is powered on.
You can use this block to reset the timer, making it start to count from zero again.
Example
When you press button A, the timer of Codey is reset and starts to count from zero again.
82. [ICON] obstacles ahead?

Determines whether Rocky detects an object in front of it
How to Use
As shown in the preceding figure, the IR transmitter and receiver modules in the IR color sensor of Rocky can be used to detect whether an object stands in front of Rocky.
To use this block, ensure that you toggle the IR color sensor to face forward.
Note: This is a Boolean block that contains a condition. Use it in combination with another block that requires a condition.
Example
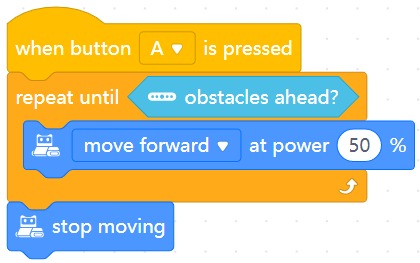
After you press button A, Codey Rocky moves forward at the power of 50%, and stops moving when it detects an object in front of it.
83. [ICON] the color detected is [COLOR]?

Determines whether Rocky detects the specified color
How to Use
As shown in the preceding figure, the light sensor module in the IR color sensor of Rocky can be used to detect colors.
The accuracy of color detection can be affected by the lights and the distance. The accuracy is higher when the color sensor is sensing an item that’s about 1.5 cm away.
This block provides eight color options. You can click the drop-down list box to select one. The following shows the default setting of this block.
Note: This is a Boolean block that contains a condition. Use it in combination with another block that requires a condition.
Example
After you press button A, Rocky’s RGB LED is lit up in red if it detects the color red.
84. [ICON] [RGB]color value detected

Reports the value of the specified color detected by Rocky’s IR color sensor
How to Use
As shown in the preceding figure, the light sensor module in the IR color sensor of Rocky can be used to detect colors.
The accuracy of color detection can be affected by the lights and the distance. The accuracy is higher when the color sensor is sensing an item that’s about 1.5 cm away.
This block provides three color options, namely red, green, and blue. You can click the drop-down list box to select one. The following shows the default setting of this block.
Note: This is a reporter block that must be used in combination with another block requiring data. It cannot be used independently.
Example
When you press button A, Rocky detects colors, and displays the value of the color red if red is detected.
85. [ICON] color sensor ambient light intensity

Reports the intensity of the ambient light detected by Rocky’s IR color sensor
How to Use
As shown in the preceding figure, the light sensor module in the IR color sensor of Rocky can be used to detect the intensity of the ambient light.
Light intensity range: 0–100, rounded to the nearest tenth. The value is set to 100 if the actual intensity exceeds 100.
Note: This is a reporter block that must be used in combination with another block requiring data. It cannot be used independently.
Example
When you press button A, Codey’s screen displays the intensity of the ambient light detected by Rocky’s light sensor module.
86. [ICON] color sensor reflected light intensity

Reports the intensity of the light reflected by the object detected by Rocky
How to Use
With the RGB LED, light sensor, and fill light modules (as shown in the preceding figure), Rocky can emit blue light and detect the intensity of the reflected blue light. This function is used mainly for line following.
Note: This is a reporter block that must be used in combination with another block requiring data. It cannot be used independently.
Example
When you press button A, Codey’s screen displays the intensity of the light reflected by the object detected by Rocky.
87. [ICON] color sensor reflected infrared light intensity

Reports the intensity of the infrared light reflected by the object in front of Rocky
How to Use
With the IR transmitter and receiver modules (as shown in the preceding figure), Rocky can emit infrared light and detect the intensity of the reflected infrared light. This function is used mainly for ranging.
Note: This is a reporter block that must be used in combination with another block requiring data. It cannot be used independently.
Example
When you press button A, Codey’s screen displays the intensity of the infrared light reflected by the object in front of Rocky.
88. [ICON] color sensor grey-scale value

Reports the grey-scale value of the surface of the object detected by Rocky
How to Use
With the RGB LED, light sensor, and fill light modules (as shown in the preceding figure), Rocky can detect the grey-scale value of object surfaces. This function is used mainly for line following. The grey-scale value is contrary to the intensity of the reflected blue light. When the intensity of the reflected blue light is high, the grey-scale value is small.
Note: This is a reporter block that must be used in combination with another block requiring data. It cannot be used independently.
Example
When you press button A, Codey’s screen displays the grey-scale value of the surface of the object detected by Rocky.
89. [ICON] send IR message [STRING]

Sends the specified IR message
How to Use
IR transmitters (as shown in the preceding figure) of Codey can send IR messages to IR receivers.
Click to modify the IR message.
Alternatively, you can put a reporter block in this block, for example:
Example
When you press button A, Codey sends the IR message A.
90. [ICON] IR message received

Reports the received IR message
How to Use
The IR receivers (as shown in the preceding figure) of Codey can receive IR messages sent by IR transmitters.
This is a reporter block that must be used in combination with another block requiring data. It cannot be used independently.
Example
When you press button A, Codey’s screen displays the IR message received.
91. [ICON] record home appliances remote signal 3 secs

Records the IR signals transmitted by a home appliance remote control for three seconds
How to Use
The IR recievers (as shown in the preceding figure) of Codey can record the remote control signals of a home appliance.
You can drag this block the Scripts area and use it directly.
Example
Note: Ensure that a home appliance remote control is transmitting IR signals.
When you press button A, Codey records the IR signals transmitted by the home appliance remote control for three seconds.
92. [ICON] send home appliances remote signal

Sends the recorded IR signals of the home appliance remote control
How to Use
IR transmitters (as shown in the preceding figure) of Codey can send the recorded IR signals that were transmitted by a remote control a home appliance before.
You can drag this block the Scripts area and use it directly.
Example
Note: Ensure that you have recorded IR signals.
When you press button A, Codey sends the recorded remote control signals of the home appliance.
93. when Codey starts up

Starts to execute the subsequent block(s) when Codey is turned on
How to Use
This is a hat block that activates a script. It is placed on top of other blocks.
This block can be used only in the Upload mode.
Example
Upload the program to Codey and then turn it off. Codey’s screen displays the image when you turn on it again.
94. when button [BUTTONS] is pressed

Starts to execute the subsequent block(s) when the specified button is pressed
How to Use
This is a hat block that activates a script. It is placed on top of other blocks.
This block provides four button options. You can click the drop-down list box to select one. The following shows the default setting of this block.
Example
When you press button A, Codey’s screen displays the specified image.
95. when Codey is shaking

Starts to execute the subsequent block(s) when Codey is shaken
How to Use
This is a hat block that activates a script. It is placed on top of other blocks.
Example
When you shake Codey, Codey’s screen displays the dizzy image.
96. when Codey is [DIRECTION]tilted

Starts to execute the subsequent block(s) when Codey is tilted in the specified direction
How to Use
This is a hat block that activates a script. It is placed on top of other blocks.
This block provides four direction options. You can click the drop-down list box to select one. The following shows the default setting of this block.
Example
When you tilt Codey to the left, Codey’s screen displays the text left.
97. when [MENU_LIST] > [SOUNDVOLUME]

Starts to execute the subsequent block(s) when the value of the specified parameter is greater than the specified value
How to Use
This is a hat block that activates a script. It is placed on top of other blocks.
This block provides two parameter options. You can click the drop-down list box to select one. You can click the value to be compared to define the one you want. The following shows the default setting of this block.
Example
When the loudness detected by Codey’s sound sensor is greater than 10, Codey’s screen displays the value of the loudness.
98. when light intensity < [BRIGHTNESS]

Starts to execute the subsequent block(s) when the intensity of the ambient light is lower than the specified value
How to Use
This is a hat block that activates a script. It is placed on top of other blocks.
You can click the value to be compared to define the one you want. The following shows the default setting of this block.
Example
When the detected intensity of the ambient light is lower than 5, Codey’s RGB LED is lit up in red.

若有收获,就点个赞吧
0 人点赞
