1、安装、使用
(1)安装
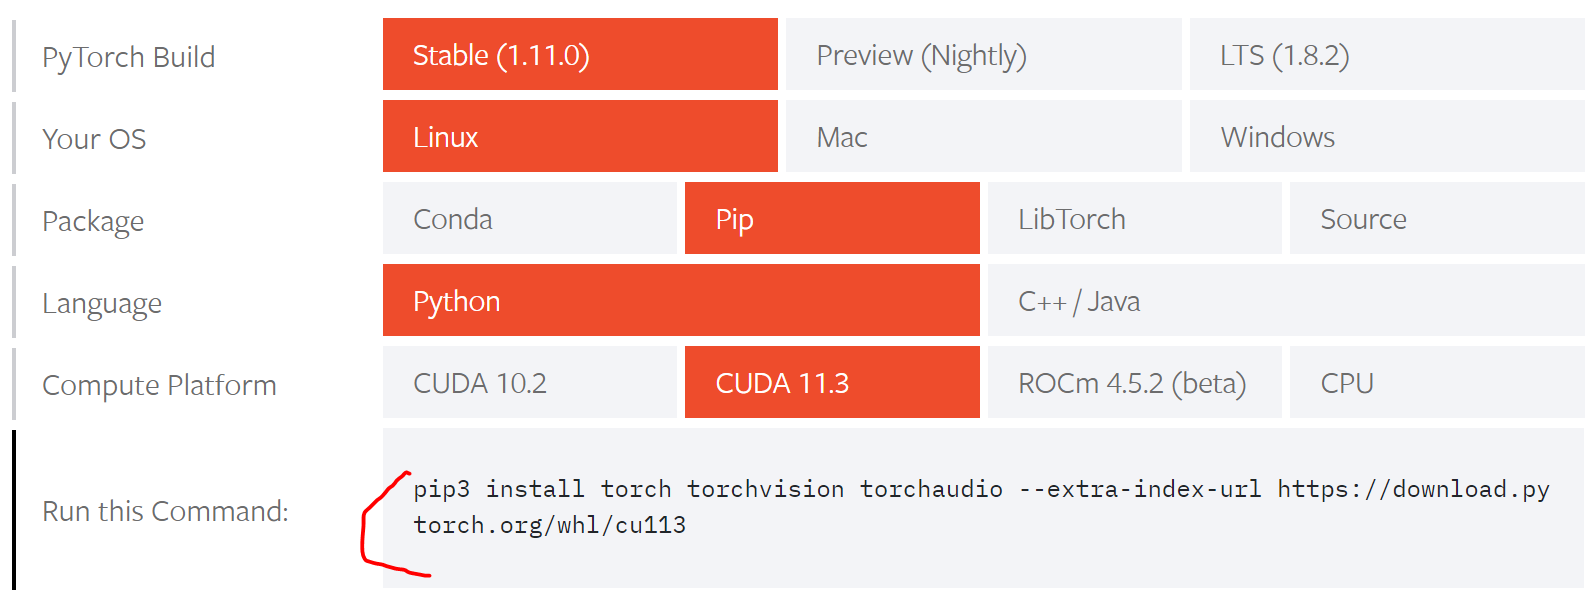
- 选择与自己机器相匹配的平台进行安装
- It is recommended that you use Python 3.6, 3.7 or 3.8.
- 参考:https://pytorch.org/get-started/locally/
pip3 install torch torchvision torchaudio --extra-index-url https://download.pytorch.org/whl/cu113
(2)使用测试
import torchx = torch.rand(5, 3)print(x)"""tensor([[0.3380, 0.3845, 0.3217],[0.8337, 0.9050, 0.2650],[0.2979, 0.7141, 0.9069],[0.1449, 0.1132, 0.1375],[0.4675, 0.3947, 0.1426]])"""# jy: 判断是否为 GPU 环境对应的 torch 版本is_gpu = torch.cuda.is_available()print(is_gpu)
2、基本介绍
- PyTorch is an open source machine learning framework.
- Most machine learning workflows involve working with data, creating models, optimizing model parameters, and saving the trained models. This tutorial introduces you to a complete ML workflow implemented in PyTorch, with links to learn more about each of these concepts.
We’ll use the FashionMNIST dataset to train a neural network that predicts if an input image belongs to one of the following classes: T-shirt/top, Trouser, Pullover, Dress, Coat, Sandal, Shirt, Sneaker, Bag, or Ankle boot.
This section runs through the API for common tasks in machine learning.
(1)Working with data
PyTorch has two primitives to work with data:
torch.utils.data.DataLoaderandtorch.utils.data.Dataset.Datasetstores the samples and their corresponding labelsDataLoaderwraps an iterable around theDatasettorch.utils.data:https://pytorch.org/docs/stable/data.html
- PyTorch offers domain-specific libraries such as TorchText, TorchVision, and TorchAudio, all of which include datasets. For this tutorial, we will be using a TorchVision dataset.
- TorchText:https://pytorch.org/text/stable/index.html
- TorchVision:https://pytorch.org/vision/stable/index.html
- TorchAudio:https://pytorch.org/audio/stable/index.html
- The
torchvision.datasetsmodule containsDatasetobjects for many real-world vision data like CIFAR, COCO. In this tutorial, we use the FashionMNIST dataset. Every TorchVisionDatasetincludes two arguments:transformandtarget_transformto modify the samples and labels respectively.torchvision.datasets:https://pytorch.org/vision/stable/datasets.html
- We pass the
Datasetas an argument toDataLoader. This wraps an iterable over our dataset, and supports automatic batching, sampling, shuffling and multiprocess data loading. Here we define a batch size of 64, i.e. each element in the dataloader iterable will return a batch of 64 features and labels. ```python import torch from torch import nn from torch.utils.data import DataLoader from torchvision import datasets from torchvision.transforms import ToTensor
Download training data from open datasets.
training_data = datasets.FashionMNIST( root=”data”, train=True, download=True, transform=ToTensor(), )
Download test data from open datasets.
test_data = datasets.FashionMNIST( root=”data”, train=False, download=True, transform=ToTensor(), )
batch_size = 64
Create data loaders.
train_dataloader = DataLoader(training_data, batch_size=batch_size) test_dataloader = DataLoader(test_data, batch_size=batch_size)
for X, y in test_dataloader: print(f”Shape of X [N, C, H, W]: {X.shape}”) print(f”Shape of y: {y.shape} {y.dtype}”) break
<a name="yql4Y"></a>## (2)Creating Models- To define a neural network in PyTorch, we create a class that inherits from `nn.Module`. We define the layers of the network in the `__init__` function and specify how data will pass through the network in the `forward` function. To accelerate operations in the neural network, we move it to the GPU if available.- `nn.Module`:[https://pytorch.org/docs/stable/generated/torch.nn.Module.html](https://pytorch.org/docs/stable/generated/torch.nn.Module.html)```python# Get cpu or gpu device for training.device = "cuda" if torch.cuda.is_available() else "cpu"print(f"Using {device} device")# Define modelclass NeuralNetwork(nn.Module):def __init__(self):super(NeuralNetwork, self).__init__()self.flatten = nn.Flatten()self.linear_relu_stack = nn.Sequential(nn.Linear(28*28, 512),nn.ReLU(),nn.Linear(512, 512),nn.ReLU(),nn.Linear(512, 10))def forward(self, x):x = self.flatten(x)logits = self.linear_relu_stack(x)return logitsmodel = NeuralNetwork().to(device)print(model)
(3)Optimizing the Model Parameters
To train a model, we need a loss function and an optimizer.
- loss function:https://pytorch.org/docs/stable/nn.html#loss-functions
- optimizer:https://pytorch.org/docs/stable/optim.html
loss_fn = nn.CrossEntropyLoss()optimizer = torch.optim.SGD(model.parameters(), lr=1e-3)
In a single training loop, the model makes predictions on the training dataset (fed to it in batches), and backpropagates the prediction error to adjust the model’s parameters.
def train(dataloader, model, loss_fn, optimizer):size = len(dataloader.dataset)model.train()for batch, (X, y) in enumerate(dataloader):X, y = X.to(device), y.to(device)# Compute prediction errorpred = model(X)loss = loss_fn(pred, y)# Backpropagationoptimizer.zero_grad()loss.backward()optimizer.step()if batch % 100 == 0:loss, current = loss.item(), batch * len(X)print(f"loss: {loss:>7f} [{current:>5d}/{size:>5d}]")
We also check the model’s performance against the test dataset to ensure it is learning.
def test(dataloader, model, loss_fn):size = len(dataloader.dataset)num_batches = len(dataloader)model.eval()test_loss, correct = 0, 0with torch.no_grad():for X, y in dataloader:X, y = X.to(device), y.to(device)pred = model(X)test_loss += loss_fn(pred, y).item()correct += (pred.argmax(1) == y).type(torch.float).sum().item()test_loss /= num_batchescorrect /= sizeprint(f"Test Error: \n Accuracy: {(100*correct):>0.1f}%,Avg loss: {test_loss:>8f} \n")
The training process is conducted over several iterations (epochs). During each epoch, the model learns parameters to make better predictions. We print the model’s accuracy and loss at each epoch; we’d like to see the accuracy increase and the loss decrease with every epoch.
epochs = 5for t in range(epochs):print(f"Epoch {t+1}\n-------------------------------")train(train_dataloader, model, loss_fn, optimizer)test(test_dataloader, model, loss_fn)print("Done!")
(4)Saving Models
A common way to save a model is to serialize the internal state dictionary (containing the model parameters).
torch.save(model.state_dict(), "model.pth")print("Saved PyTorch Model State to model.pth")
(5)Loading Models
The process for loading a model includes re-creating the model structure and loading the state dictionary into it. When the model is loaded, it can be used to make predictions. ```python model = NeuralNetwork() model.load_state_dict(torch.load(“model.pth”))
classes = [ “T-shirt/top”, “Trouser”, “Pullover”, “Dress”, “Coat”, “Sandal”, “Shirt”, “Sneaker”, “Bag”, “Ankle boot”, ]
model.eval() x, y = test_data[0][0], test_data[0][1] with torch.no_grad(): pred = model(x) predicted, actual = classes[pred[0].argmax(0)], classes[y] print(f’Predicted: “{predicted}”, Actual: “{actual}”‘)
<a name="rE3gv"></a># 9、问题汇总<a name="B8WGD"></a>## (1)使用 torch 报错:no kernel image is available- RuntimeError: CUDA error: no kernel image is available for execution on the device```pythonimport torchprint(torch.cuda.is_available()) # Truea = torch.Tensor([1,2])a = a.cuda()print(a)
- 原因:torch 安装的各依赖版本不兼容,更新 torch 相关版本即可:
conda uninstall *torch* cudatoolkitpip3 install torch==1.10.2+cu113 torchvision==0.11.3+cu113 torchaudio==0.10.2+cu113 -f https://download.pytorch.org/whl/cu113/torch_stable.html

若有收获,就点个赞吧
0 人点赞
