xfs提供了xfsdump和xfsrestore工具,协助备份xfs文件系统中的数据。xfsdump按inode顺序备份一个xfs文件系统
在CentOS7中,xfs格式作为默认文件系统,不再使用以前的ext,但仍然支持ext4。xfs专为大数据产生,每个文件系统最大可以支持8eb,单个文件可以支持16tb,不仅数据量大,而且扩展性高。还可以通过xfsdump和xfsrestore来备份和恢复。原始备份数据方法:cp
与传统的UNIX文件系统不同,xfs不需要备份前卸载;对使用中的xfs文件系统做备份就可以保证镜像的一致性。xfs的备份和恢复的过程是可以被中断然后继续的,无需冻结文件系统。xfsdump甚至特功了高性能的多线程备份操作——它把一次dump拆分成多个数据流,每个数据流可以被发往不同的目的地
首先了解一下xfsdump的备份级别有以下两种:0,代表完整备份;1~9,代表增量备份。默认为0(即完全备份)。
1、虚拟机添加硬盘
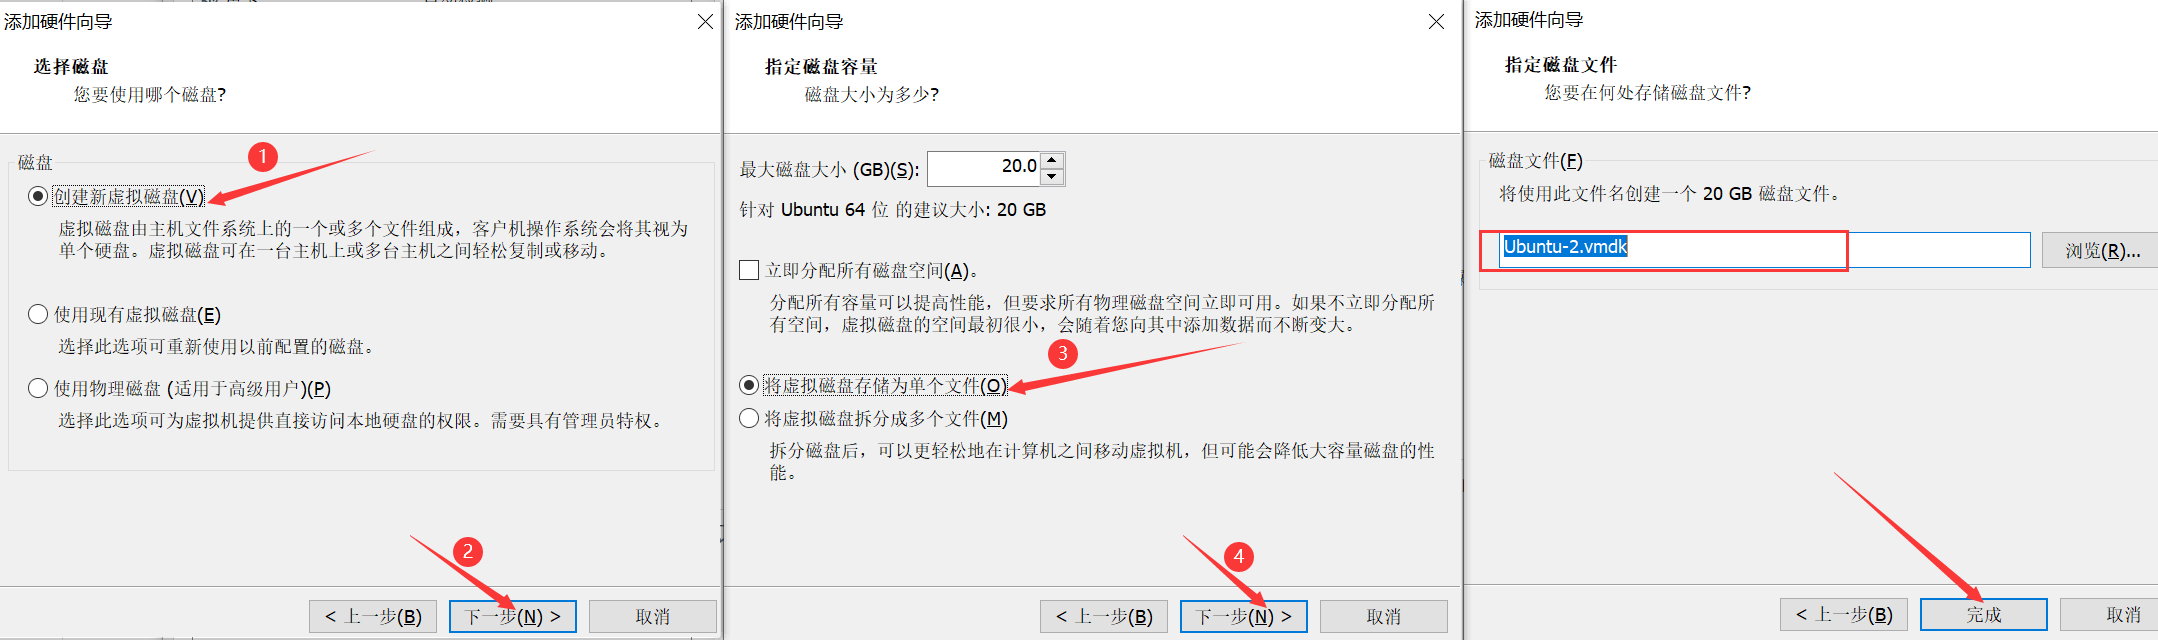
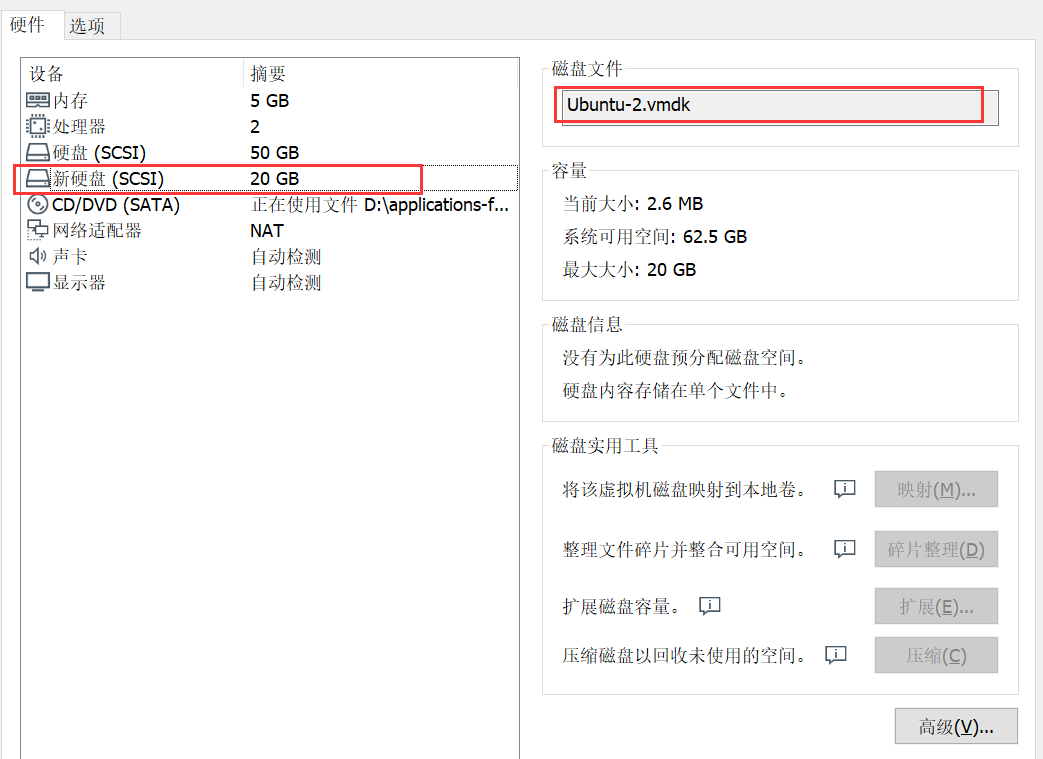
- 以上操作相当于生产中将新的硬盘接到主板上
2、新硬盘分区-格式化-挂载到一个系统目录
SCSI和SATA硬盘在Linux通常也是表示为/devIsd*,比如sda、sdb、ad ..sda是第一块硬盘,sdb是第二块….以此类推!
fdisk /dev/sdb #分区硬盘命令(输入 m 获取帮助):n #创建一个新的分区Select (default p): p #创建一个主分区(e表示创建扩展分区,主分区最多只能创建4个)Last扇区,+扇区or+size{K,M,G] (2048-41943039,默认为41943039):+1G # 指定分区大小命令(输入m 获取帮助):p # 打印分区表,看一下分好没的命令(输入m获取帮助): w # 保存# ls /dev/sdb* 看到/dev/sdb /dev/sdb1,这里sdb1表示用了一个分区# mkfs.xfs /dev/sdb1 # 格式化分区mkfs.xfs格式化等xfs文件系统,如果格式化成ext4,那就mkfs.ext4# mkdir /sdb1 # 创建挂载点# mount /dev/sdb1 /sdb1 # 挂载
1、分区实例
root@k8s-node-1:~# fdisk /dev/sdbWelcome to fdisk (util-linux 2.34).Changes will remain in memory only, until you decide to write them.Be careful before using the write command.Device does not contain a recognized partition table.Created a new DOS disklabel with disk identifier 0x985e44eb.Command (m for help): n # 创建一个新分区Partition typep primary (0 primary, 0 extended, 4 free)e extended (container for logical partitions)Select (default p): p # 创建主分区Partition number (1-4, default 1): 1 # 类似磁盘号First sector (2048-41943039, default 2048): 2048 # 磁盘起始位置大小Last sector, +/-sectors or +/-size{K,M,G,T,P} (2048-41943039, default 41943039): +1G # 磁盘大小Created a new partition 1 of type 'Linux' and of size 1 GiB.Command (m for help): p # 查看分区信息Disk /dev/sdb: 20 GiB, 21474836480 bytes, 41943040 sectorsDisk model: VMware Virtual SUnits: sectors of 1 * 512 = 512 bytesSector size (logical/physical): 512 bytes / 512 bytesI/O size (minimum/optimal): 512 bytes / 512 bytesDisklabel type: dosDisk identifier: 0x985e44ebDevice Boot Start End Sectors Size Id Type/dev/sdb1 2048 2099199 2097152 1G 83 LinuxCommand (m for help): w # 同步磁盘The partition table has been altered.Calling ioctl() to re-read partition table.Syncing disks.# 格式化分区mkfs.xfs格式化等xfs文件系统,如果格式化成ext4,那就mkfs.ext4root@k8s-node-1:~# mkfs.xfs /dev/sdb1meta-data=/dev/sdb1 isize=512 agcount=4, agsize=65536 blks= sectsz=512 attr=2, projid32bit=1= crc=1 finobt=1, sparse=1, rmapbt=0= reflink=1data = bsize=4096 blocks=262144, imaxpct=25= sunit=0 swidth=0 blksnaming =version 2 bsize=4096 ascii-ci=0, ftype=1log =internal log bsize=4096 blocks=2560, version=2= sectsz=512 sunit=0 blks, lazy-count=1realtime =none extsz=4096 blocks=0, rtextents=0root@k8s-node-1:~# mkdir /sdb1 # 创建挂载点root@k8s-node-1:~# mount /dev/sdb1 /sdb1/ # 挂载
2、在新硬盘的新分区下创建文件,用于测试备份
cd /sdb1mkdir testtouch test/atouch test/b
3、分3步实现整个分区备份
- 如果发现xfsdump命令找不到:
yum -y install xfsdump
基本实现格式: xfsdump -f 备份存放位置 **<font style="color:#E8323C;">要备份的分区挂载路径或设备文件</font>**
注意:备份的路径最后不能以“/”结尾
a、# xfsdump -f /opt/dump_sdb1 /dev/sdb1
b、->dump_sdb1_1 指定备份会话标签
c、->sdb1_1 指定设备标签,就是对要备份的设备做一个描述
root@k8s-node-1:/opt# xfsdump -f /opt/dump_sdb1 /dev/sdb1 # 备份xfsdump: using file dump (drive_simple) strategyxfsdump: version 3.1.6 (dump format 3.0) - type ^C for status and control============================= dump label dialog ==============================please enter label for this dump session (timeout in 300 sec)-> dump_sdb1session label entered: "dump_sdb1" # 指定备份会话标签--------------------------------- end dialog ---------------------------------xfsdump: level 0 dump of k8s-node-1:/sdb1xfsdump: dump date: Wed Dec 15 09:55:28 2021xfsdump: session id: cd67628e-0d28-4b80-84df-4405353df5e0xfsdump: session label: "dump_sdb1"xfsdump: ino map phase 1: constructing initial dump listxfsdump: ino map phase 2: skipping (no pruning necessary)xfsdump: ino map phase 3: skipping (only one dump stream)xfsdump: ino map construction completexfsdump: estimated dump size: 29952 bytesxfsdump: /var/lib/xfsdump/inventory created============================= media label dialog =============================please enter label for media in drive 0 (timeout in 300 sec)-> sdb1_1media label entered: "sdb1_1" # 指定设备标签,就是对要备份的设备做一个描述--------------------------------- end dialog ---------------------------------xfsdump: creating dump session media file 0 (media 0, file 0)xfsdump: dumping ino mapxfsdump: dumping directoriesxfsdump: dumping non-directory filesxfsdump: ending media filexfsdump: media file size 23032 bytesxfsdump: dump size (non-dir files) : 1088 bytesxfsdump: dump complete: 180 seconds elapsedxfsdump: Dump Summary:xfsdump: stream 0 /opt/dump_sdb1 OK (success)xfsdump: Dump Status: SUCCESSroot@k8s-node-1:/opt#
4、上面的三步合并为1步
xfsdump -f /opt/dump_sdb1_2 /sdb1 -L dump_sdb1_2 -M sdb1_2
5、指定只备份分区中的某个目录/文件
加参数: -s文件路径对指定的文件/目录进行备份,
-s后面的路径写的是相对路径(目录分区的挂载目录做相对的跟)
基本实现格式: xfsdump f dump_path -s 要备份的文件或目录的相对位置 备份文件所在的分区 L 备份会话标签 -M 设备标签
#文件xfsdump -f /opt/dump_sdb1_test_a -s test/a.txt /sdb1 -L dumpF_sdb1_test_a -M sdb1_test_a#目录xfsdump -f /opt/dump_sdb1_test2 -s test2 /sdb1 -L dumpD_sdb1_test2 -M sdb1_test2
6、查看备份信息与内容
备份成功,可以在/var/lib/xfsdump/inventory目录下看到生成的档案信息
xfsdump -I # (大写字母i)
7、可以删除或者修改一下已经备份了的文件或目录
8、文件系统恢复(可以还原到任意地方)
语法格式: xfsrestore -f 指定备份文件的位置 指定把存备份文件恢复到的目标路径
xfsrestore -f /opt/dump_sdb1_1 /sdb1
恢复单个文件或目录如下
# 恢复分区xfsrestore -f /opt/dump_sdb1_2 /sdb1#恢复文件xfsrestore -f /opt/dump_sdb1_test_a -s test/a.txt /sdb1#恢复目录xfsrestore -f /opt/dump_sdb1_test2 -s test2 /sdb1
注意事项:
使用xfsdump时,请注意下面下面的几个限制:
1、xfsdump不支持没有挂载的文件系统备份!所以只能备份已挂载的!
2、xfsdump 必须使用root的权限才能操作
3、xfsdump只能备份XFS文件系统
4、xfsdump备份下来的数据只能让xfsrestore解析
3、增量备份和恢复数据
# 环境准备rm -rf /sdb1/*touch /sdb1/a.txt
1、备份
第一次完全备份
# 完全备份后添加一些数据xfsdump -f /opt/test-full /sdb1 -L test-full -M media0
第1次增量备份
- -l 指定增量备份次数
# 第1次增量备份后添加一些数据xfsdump -l 1 -f /opt/test-back1 /sdb1 -L test-bak1 -M media0
第2次增量备份
xfsdump -l 2 -f /opt/test-back2 /sdb1 -L test-bak2 -M media0
2、恢复
rm -rf /sdb1/*
首先恢复完全备份的数据
xfsrestore -f /opt/test-full /sdb1/
恢复第一次增量备份数据
xfsrestore -f /opt/test-back1 /sdb1/
恢复第二次增量备份数据
xfsrestore -f /opt/test-back2 /sdb1/

若有收获,就点个赞吧
0 人点赞
