7.0 思维导图
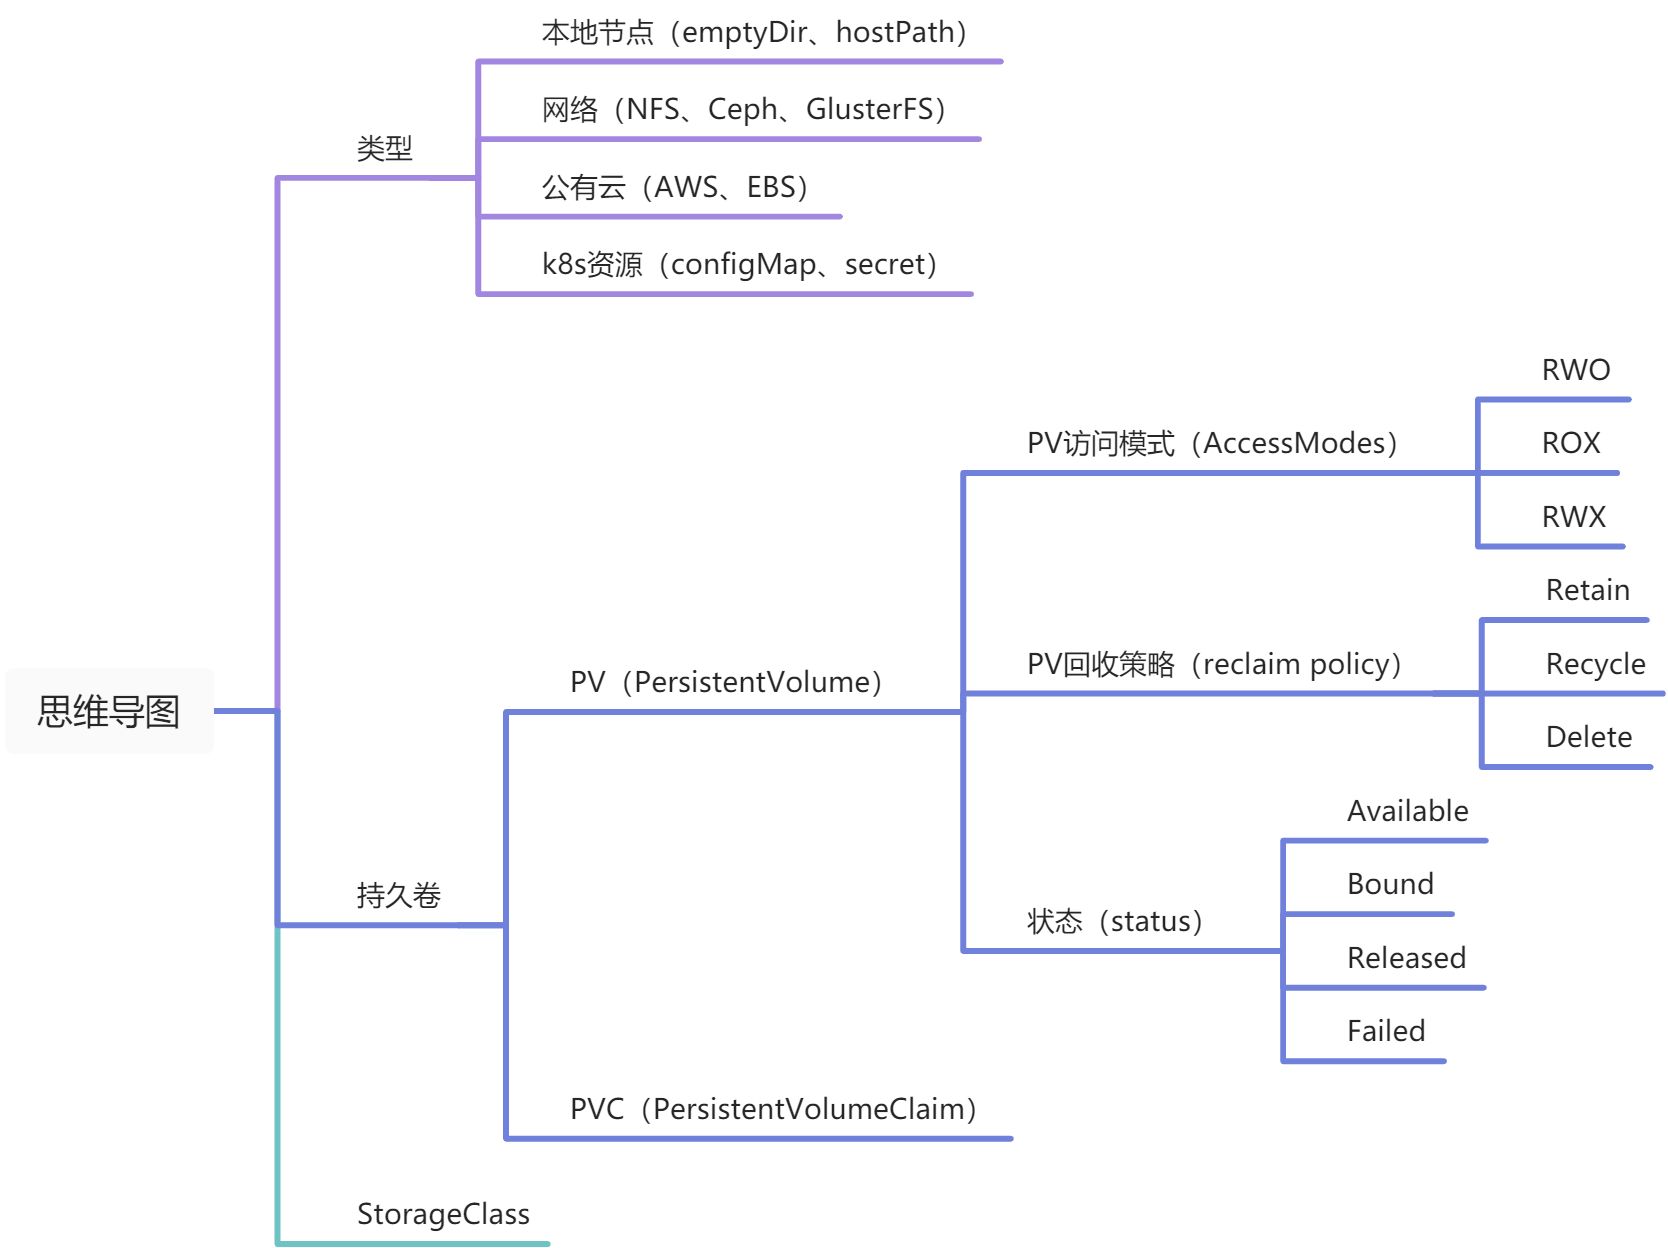
7.1 k8s存储类型
emptyDir
- Pod中容器之间数据共享,临时存储卷
案例:
cat emptyDir-pod.yamlapiVersion: v1kind: Podmetadata:labels:run: ed-podname: ed-podspec:containers:- image: nginxname: ed-podvolumeMounts:- mountPath: /cachename: cache-volumevolumes:- name: cache-volumeemptyDir: {}
hostPath
- 映射主机目录或文件到容器中
cat hP-pod.yamlapiVersion: v1kind: Podmetadata:labels:run: hp-podname: hp-podspec:containers:- image: nginxname: hp-podvolumeMounts:- mountPath: /cachename: cache-volumevolumes:- name: cache-volumehostPath:path: /tmptype: Directory
NFS
https://www.yuque.com/docs/share/9e24efba-f47b-438b-946b-a6565ec50fe6?# 《16、文件服务器》
# yum install nfs-utils -y# vi /etc/exports/nfs/kubernetes *(rw,no_root_squash)# mkdir -p /nfs/kubernetes# systemctl start nfs# systemctl enable nfsmount -t nfs 192.168.6.22:/nfs/kubernetes /tmp/test
- no_root_squash:这个选项表示 NFS 服务器不会将来自客户端的 root 用户请求映射为匿名用户或非特权用户。默认情况下,NFS 会将来自客户端的 root 用户请求映射为匿名用户(root_squash),这是为了安全考虑。但是,如果你信任客户端,并且希望 root 用户能够像在本地文件系统上那样进行完全访问,你可以使用 no_root_squash 选项
cat nfs.yamlapiVersion: v1kind: Podmetadata:labels:run: nfs-podname: nfs-podspec:containers:- image: nginxname: nfs-podvolumeMounts:- mountPath: /cachename: nfs-client-rootvolumes:- name: nfs-client-rootnfs:server: 192.168.6.22path: /nfs/kubernetes
PV、PVC
cat pvc-pod.yamlapiVersion: v1kind: Podmetadata:labels:run: pvc-podname: pvc-podspec:containers:- image: nginxname: pvc-podvolumeMounts:- mountPath: /cachename: www-pvcvolumes:- name: www-pvcpersistentVolumeClaim:claimName: mypvc001---cat pvc.yamlapiVersion: v1kind: PersistentVolumeClaimmetadata:name: mypvc001spec:accessModes:- ReadWriteManyresources:requests:storage: 2Gi
cat pv.yamlapiVersion: v1kind: PersistentVolumemetadata:name: pv001spec:capacity:storage: 2GiaccessModes:- ReadWriteManypersistentVolumeReclaimPolicy: Retainnfs:server: 192.168.6.22path: /nfs/kubernetes/pv001
- 通过volumeName字段来关联静态的pv(可以通过
<font style="color:rgb(223, 48, 121);background-color:rgb(13, 13, 13);">storageClassName:</font><font style="color:rgb(0, 166, 125);background-color:rgb(13, 13, 13);">""</font>指定为空来防止PVC自动关联到默认的存储类上)
apiVersion: v1kind: PersistentVolumeClaimmetadata:name: my-pvcspec:volumeName: pv001accessModes:- ReadWriteManystorageClassName: "" # 这里指定了空的存储类,防止 PVC 自动关联到默认的存储类上resources:requests:storage: 2Gi
storageClass
- 动态供给pv
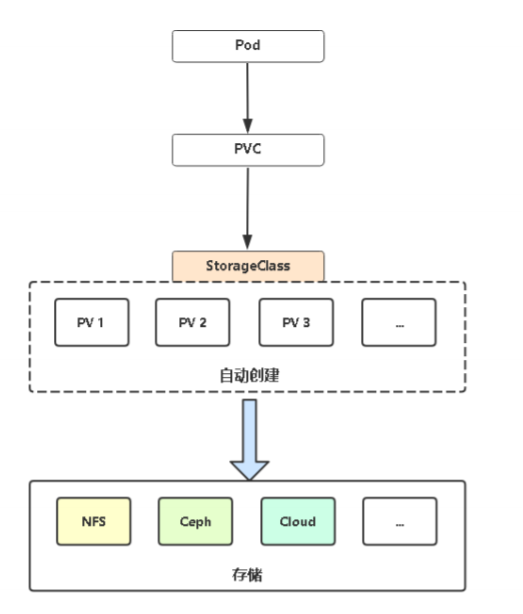
K8s默认不支持NFS动态供给,需要单独部署社区开发的插件。
项目地址:https://github.com/kubernetes-sigs/nfs-subdir-external-provisioner
部署storageClass
# 部署:cd deploykubectl apply -f rbac.yaml # 授权访问apiserverkubectl apply -f deployment.yaml # 部署插件,需修改里面NFS服务器地址与共享目录kubectl apply -f class.yaml # 创建存储类kubectl get sc # 查看存储类# 如果需要修改为默认的存储类(其中local是sc名称)kubectl patch sc local -p '{"metadata": {"annotations": {"storageclass.beta.kubernetes.io/is-default-class": "true"}}}'
cat rbac.yamlapiVersion: v1kind: ServiceAccountmetadata:name: nfs-client-provisioner# replace with namespace where provisioner is deployednamespace: default---kind: ClusterRoleapiVersion: rbac.authorization.k8s.io/v1metadata:name: nfs-client-provisioner-runnerrules:- apiGroups: [""]resources: ["persistentvolumes"]verbs: ["get", "list", "watch", "create", "delete"]- apiGroups: [""]resources: ["persistentvolumeclaims"]verbs: ["get", "list", "watch", "update"]- apiGroups: ["storage.k8s.io"]resources: ["storageclasses"]verbs: ["get", "list", "watch"]- apiGroups: [""]resources: ["events"]verbs: ["create", "update", "patch"]---kind: ClusterRoleBindingapiVersion: rbac.authorization.k8s.io/v1metadata:name: run-nfs-client-provisionersubjects:- kind: ServiceAccountname: nfs-client-provisioner# replace with namespace where provisioner is deployednamespace: defaultroleRef:kind: ClusterRolename: nfs-client-provisioner-runnerapiGroup: rbac.authorization.k8s.io---kind: RoleapiVersion: rbac.authorization.k8s.io/v1metadata:name: leader-locking-nfs-client-provisioner# replace with namespace where provisioner is deployednamespace: defaultrules:- apiGroups: [""]resources: ["endpoints"]verbs: ["get", "list", "watch", "create", "update", "patch"]---kind: RoleBindingapiVersion: rbac.authorization.k8s.io/v1metadata:name: leader-locking-nfs-client-provisioner# replace with namespace where provisioner is deployednamespace: defaultsubjects:- kind: ServiceAccountname: nfs-client-provisioner# replace with namespace where provisioner is deployednamespace: defaultroleRef:kind: Rolename: leader-locking-nfs-client-provisionerapiGroup: rbac.authorization.k8s.io
cat deployment.yamlapiVersion: apps/v1kind: Deploymentmetadata:name: nfs-client-provisionerlabels:app: nfs-client-provisioner# replace with namespace where provisioner is deployednamespace: defaultspec:replicas: 1strategy:type: Recreateselector:matchLabels:app: nfs-client-provisionertemplate:metadata:labels:app: nfs-client-provisionerspec:serviceAccountName: nfs-client-provisionercontainers:- name: nfs-client-provisionerimage: lizhenliang/nfs-subdir-external-provisioner:v4.0.1volumeMounts:- name: nfs-client-rootmountPath: /persistentvolumesenv:- name: PROVISIONER_NAMEvalue: k8s-sigs.io/nfs-subdir-external-provisioner- name: NFS_SERVERvalue: 192.168.6.22 # nfs服务地址- name: NFS_PATHvalue: /nfs/kubernetes # 可挂载路径volumes:- name: nfs-client-rootnfs:server: 192.168.6.22 # nfs服务地址path: /nfs/kubernetes # 可挂载路径
- 这里的nfs路径必须要是777权限,其他权限会报错:
I0329 10:20:33.637376 1 event.go:278] Event(v1.ObjectReference{Kind:”PersistentVolumeClaim”, Namespace:”default”, Name:”mypvc-sc”, UID:”2651dc3c-e1b2-468e-a549-cc4ee799b1e3”, APIVersion:”v1”, ResourceVersion:”17446”, FieldPath:””}): type: ‘Warning’ reason: ‘ProvisioningFailed’ failed to provision volume with StorageClass “managed-nfs-storage”: unable to create directory to provision new pv: mkdir /persistentvolumes/default-mypvc-sc-pvc-2651dc3c-e1b2-468e-a549-cc4ee799b1e3: permission denied
cat class.yamlapiVersion: storage.k8s.io/v1kind: StorageClassmetadata:name: managed-nfs-storageprovisioner: k8s-sigs.io/nfs-subdir-external-provisioner # or choose another name, must match deployment's env PROVISIONER_NAME'parameters:archiveOnDelete: "false"
问题处理
Mounting command: mount
Mounting arguments: -t nfs 10.27.0.30:/kube/nfs/kubernetes-mysql /app/kubelet/pods/50c30d8b-c52b-4c94-a26f-0a1f35e7398c/volumes/kubernetes.io~nfs/nfs-client-root
Output: mount: /app/kubelet/pods/50c30d8b-c52b-4c94-a26f-0a1f35e7398c/volumes/kubernetes.io~nfs/nfs-client-root: bad option; for several filesystems (e.g. nfs, cifs) you might need a /sbin/mount.
helper program.
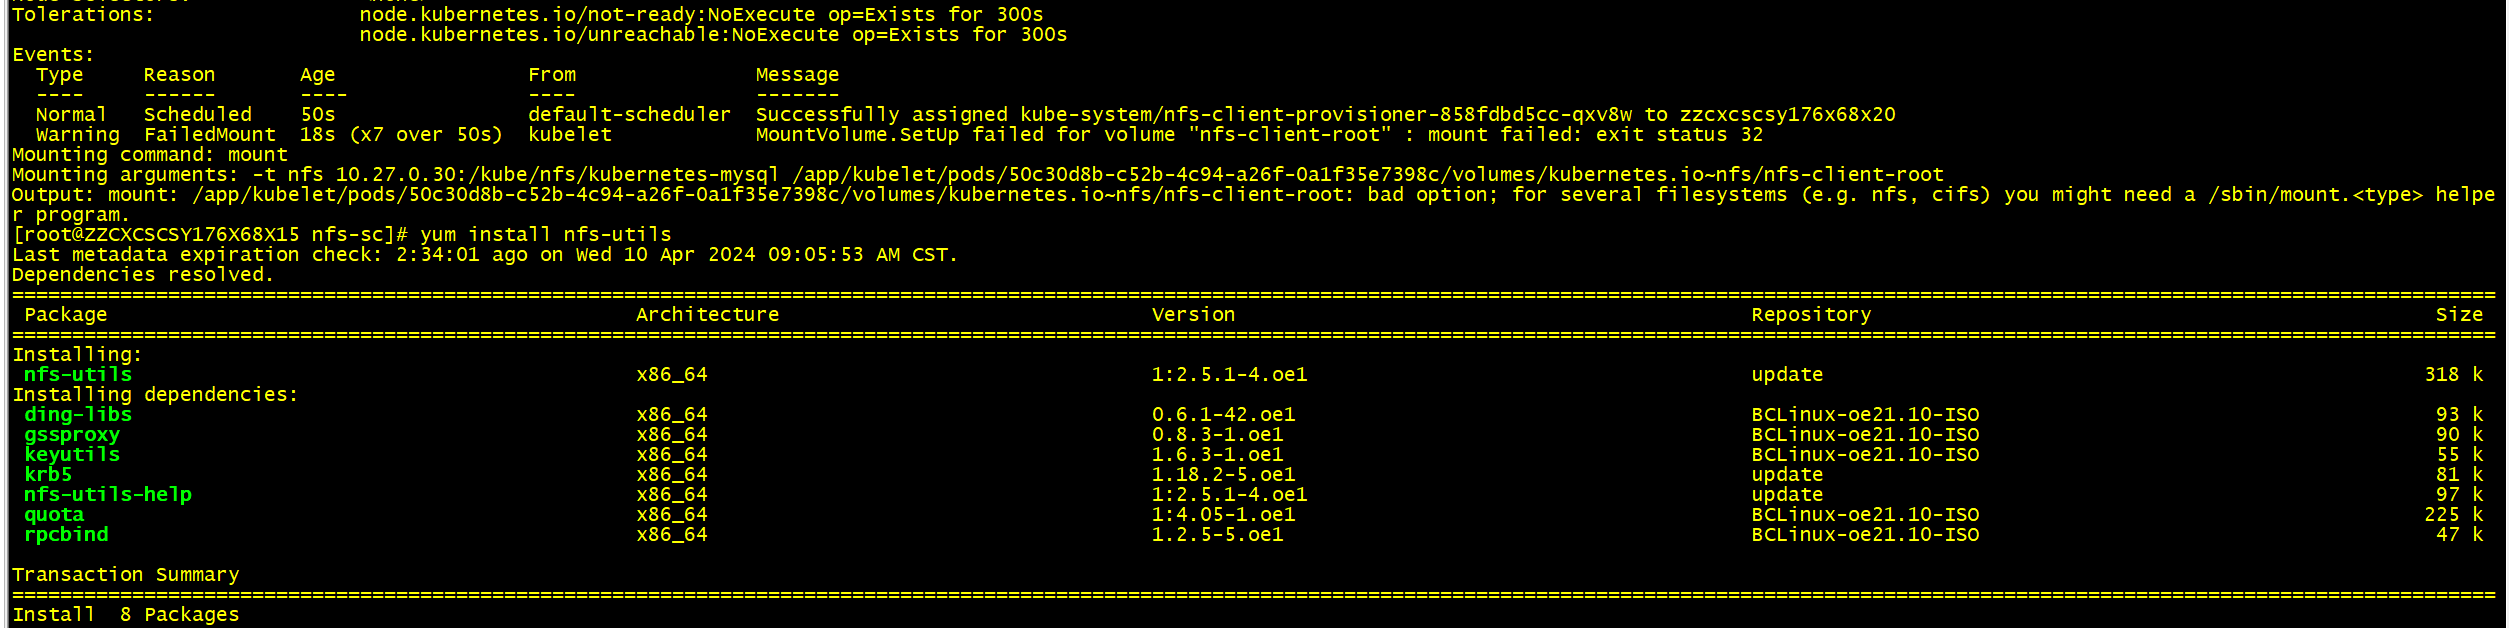
- 节点没有部署nfs客户端
yum install nfs-utils
测试
- nfs目录中创建文件夹:
- -
cat pvc-sc-pod.yamlapiVersion: v1kind: Podmetadata:labels:run: sc-podname: sc-podspec:containers:- image: nginxname: sc-podvolumeMounts:- mountPath: /cachename: www-scvolumes:- name: www-scpersistentVolumeClaim:claimName: mypvc-sc
cat pvc-sc.yamlapiVersion: v1kind: PersistentVolumeClaimmetadata:name: mypvc-scspec:storageClassName: managed-nfs-storageaccessModes:- ReadWriteManyresources:requests:storage: 5Gi
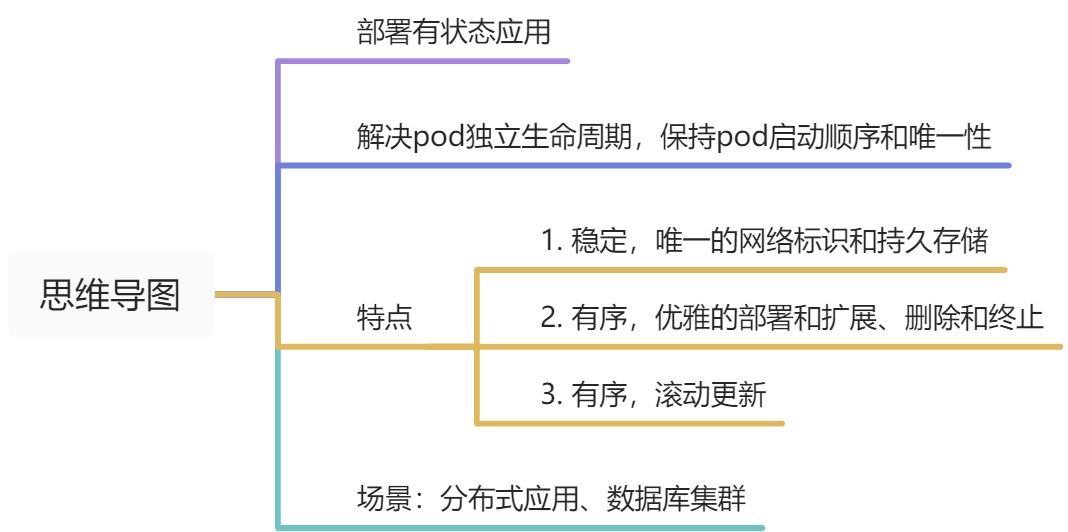
7.2 StatefulSet
测试
- 前提:已部署storageClass
cat web.yamlapiVersion: v1kind: Servicemetadata:name: nginxlabels:app: nginxnamespace: yyyspec:ports:- port: 80name: webclusterIP: Noneselector:app: nginx---apiVersion: apps/v1kind: StatefulSetmetadata:name: webnamespace: yyyspec:serviceName: "nginx"replicas: 2selector:matchLabels:app: nginxtemplate:metadata:labels:app: nginxspec:containers:- name: nginximage: nginxports:- containerPort: 80name: webvolumeMounts:- name: wwwmountPath: /usr/share/nginx/htmlvolumeClaimTemplates:- metadata:name: wwwspec:storageClassName: managed-nfs-storageaccessModes: [ "ReadWriteOnce" ]resources:requests:storage: 1Gi
- 唯一的网络标识
<font style="color:#F5222D;">for i in 0 1; do kubectl -n yyy exec "web-$i" -- sh -c 'hostname'; done</font>
<font style="color:#F5222D;">for i in 0 1; do kubectl -n yyy exec "web-$i" -- sh -c 'hostname -i'; done</font>
- 检查他们在集群内部的 DNS 地址
k run -i --tty --image=busybox:1.28.4 dns-test --restart=Never --rm -n yyyIf you don't see a command prompt, try pressing enter./ # nslookup web-0Server: 10.96.0.10Address 1: 10.96.0.10 kube-dns.kube-system.svc.cluster.localnslookup: can't resolve 'web-0'/ # nslookup web-0.nginxServer: 10.96.0.10Address 1: 10.96.0.10 kube-dns.kube-system.svc.cluster.localName: web-0.nginxAddress 1: 10.244.169.133 web-0.nginx.yyy.svc.cluster.local/ # nslookup web-1.nginxServer: 10.96.0.10Address 1: 10.96.0.10 kube-dns.kube-system.svc.cluster.localName: web-1.nginxAddress 1: 10.244.36.123 web-1.nginx.yyy.svc.cluster.local
删除sts并查看他们新建的信息
<font style="color:#F5222D;">watch -n 1 kubectl -n yyy get pod,sts</font>kubectl -n yyy delete pods -l app=nginx
你会发现IP改变了??
不要在其他应用中使用statefulset的pod的IP地址(很重要)
使用主机名提供服务
for i in 0 1; do kubectl -n yyy exec "web-$i" -- sh -c 'echo "$(hostname)" > /usr/share/nginx/html/index.html'; donefor i in 0 1; do kubectl -n yyy exec -i -t "web-$i" -- curl http://localhost/; done
持久化存储
删除pod,等重新创建并ready后再次使用上面的curl命令还是会得到主机名;
虽然 **web-0 和 web-1 被重新调度了,但它们仍然继续监听各自的主机名,因为和它们的 PersistentVolumeClaim 相关联的 PersistentVolume 被重新挂载到了各自的 volumeMount 上。 不管 web-0 和 web-1** 被调度到了哪个节点上,它们的 PersistentVolumes 将会被挂载到合适的挂载点上。
statefulset伸缩
- 两个终端
扩容
$ kubectl get pod -n yyy -w -l app=nginxNAME READY STATUS RESTARTS AGEweb-0 1/1 Running 1 18hweb-1 1/1 Running 1 18hweb-2 0/1 Pending 0 0sweb-2 0/1 Pending 0 0sweb-2 0/1 Pending 0 2sweb-2 0/1 ContainerCreating 0 2sweb-2 0/1 ContainerCreating 0 3sweb-2 1/1 Running 0 20sweb-3 0/1 Pending 0 0sweb-3 0/1 Pending 0 0sweb-3 0/1 Pending 0 2sweb-3 0/1 ContainerCreating 0 2sweb-3 0/1 ContainerCreating 0 3sweb-3 1/1 Running 0 20sweb-4 0/1 Pending 0 0sweb-4 0/1 Pending 0 0sweb-4 0/1 Pending 0 2sweb-4 0/1 ContainerCreating 0 2sweb-4 0/1 ContainerCreating 0 3sweb-4 1/1 Running 0 20s
$ kubectl -n yyy scale sts web --replicas=5
缩容
$ kubectl -n yyy get pod -w -l app=nginxNAME READY STATUS RESTARTS AGEweb-0 1/1 Running 1 18hweb-1 1/1 Running 1 18hweb-2 1/1 Running 0 5m30sweb-3 1/1 Running 0 5m10sweb-4 1/1 Running 0 4m50sweb-4 1/1 Terminating 0 7m10sweb-4 1/1 Terminating 0 7m11sweb-4 0/1 Terminating 0 7m12sweb-4 0/1 Terminating 0 7m22sweb-4 0/1 Terminating 0 7m22sweb-3 1/1 Terminating 0 7m42sweb-3 1/1 Terminating 0 7m42sweb-3 0/1 Terminating 0 7m43sweb-3 0/1 Terminating 0 7m46sweb-3 0/1 Terminating 0 7m46s
$ kubectl -n yyy patch sts web -p '{"spec":{"replicas":3}}'$ kubectl -n yyy get pvc -l app=nginx$ kubectl get pv -l app=nginx
- 顺序终止:控制器会按照与 Pod 序号索引相反的顺序每次删除一个 Pod。在删除下一个 Pod 前会等待上一个被完全关闭。
- 五个 PersistentVolumeClaims 和五个 PersistentVolumes 仍然存在。 查看 Pod 的 稳定存储,我们发现当删除 StatefulSet 的 Pod 时,挂载到 StatefulSet 的 Pod 的 PersistentVolumes 不会被删除。
更新(升级)
更新策略由 StatefulSet API Object 的spec.updateStrategy 字段决定。这个特性能够用来更新一个 StatefulSet 中的 Pod 的 container images,resource requests,以及 limits,labels 和 annotations。 RollingUpdate滚动更新是 StatefulSets 默认策略。
kubectl edit sts web -n yyy# 或者kubectl patch sts web --type='json' -p='[{"op": "replace", "path": "/spec/template/containers/0/image/", "value": "nginx:1.17"}]'
$ k get po -w -l app=nginx -n yyyNAME READY STATUS RESTARTS AGEweb-0 1/1 Running 1 18hweb-1 1/1 Running 1 18hweb-2 1/1 Running 0 29mweb-2 1/1 Terminating 0 30mweb-2 1/1 Terminating 0 30mweb-2 0/1 Terminating 0 30mweb-2 0/1 Terminating 0 30mweb-2 0/1 Terminating 0 30mweb-2 0/1 Pending 0 0sweb-2 0/1 Pending 0 0sweb-2 0/1 ContainerCreating 0 0sweb-2 0/1 ContainerCreating 0 0sweb-2 1/1 Running 0 18sweb-1 1/1 Terminating 1 18hweb-1 1/1 Terminating 1 18hweb-1 0/1 Terminating 1 18hweb-1 0/1 Terminating 1 18hweb-1 0/1 Terminating 1 18hweb-1 0/1 Pending 0 0sweb-1 0/1 Pending 0 0sweb-1 0/1 ContainerCreating 0 0sweb-1 0/1 ContainerCreating 0 0sweb-1 1/1 Running 0 22sweb-0 1/1 Terminating 1 18hweb-0 1/1 Terminating 1 18hweb-0 0/1 Terminating 1 18hweb-0 0/1 Terminating 1 18hweb-0 0/1 Terminating 1 18hweb-0 0/1 Pending 0 0sweb-0 0/1 Pending 0 0sweb-0 0/1 ContainerCreating 0 0sweb-0 0/1 ContainerCreating 0 1sweb-0 1/1 Running 0 18s
查看镜像
for p in 0 1 2; do kubectl -n yyy get pod "web-$p" --template '{{range $i, $c := .spec.containers}}{{$c.image}}{{end}}'; echo; done$ kubectl rollout status sts/web -n yyypartitioned roll out complete: 3 new pods have been updated...
7.3 configMap
用程序配置
用configmap数据有两种方式:
- 变量注入
- 数据卷挂载
k create configmap myconfigmap --from-literal=admin=weblogic --from-literal=password=welcome1 -o yaml --dry-run=client > myconfigmap.yamlcat myconfigmap.yamlapiVersion: v1data:admin: weblogicpassword: welcome1kind: ConfigMapmetadata:name: myconfigmap
cat mycm-pod.yamlapiVersion: v1kind: Podmetadata:labels:run: mycm-podname: mycm-podspec:containers:- image: nginxname: mycm-podenv:- name: USERNAMEvalueFrom:configMapKeyRef:name: myconfigmapkey: admin- name: PASSWORDvalueFrom:configMapKeyRef:name: myconfigmapkey: password
7.4 Secret
k create secret generic mysecret --from-literal=username=root --from-literal=password=gsdx_123 -o yaml --dry-run=client > mysecret.yamlcat mysecret.yamlapiVersion: v1data:password: Z3NkeF8xMjM=username: cm9vdA==kind: Secretmetadata:name: mysecret
cat mysecret-pod.yamlapiVersion: v1kind: Podmetadata:labels:run: mysecret-podname: mysecret-podspec:containers:- image: nginxname: mycm-podenv:- name: USERNAMEvalueFrom:secretKeyRef:name: mysecretkey: root- name: PASSWORDvalueFrom:secretKeyRef:name: mysecretkey: password
- 自己排查错误

若有收获,就点个赞吧
0 人点赞
