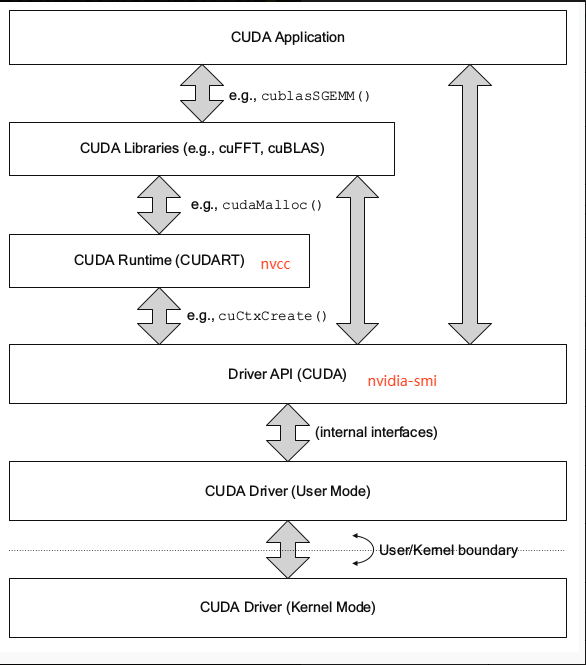
概述
- CUDA Driver是与GPU沟通的驱动级别底层API - 对DriverAPI的理解,有利于理解后续的RuntimeAPI - CUDA Driver随显卡驱动发布,与cudatoolkit分开看 - CUDA Driver对应于 cuda.h和libcuda.so文件- 主要知识点是Context的管理机制,以及CUDA系列接口的开发习惯(错误检查方法),还有内存模型 |
 |
|---|---|
:::info cuda.h 是cudatoolkit中的文件,而libcuda.so是驱动安装到系统中的。 :::
- DriverAPI是理解cudaRuntime中上下文的关键
- 只需要做到理解
context便可,知道他的存在就行 - 当初因为对driver api的理解不够,造成上层调试时难以发现的问题耽误一周时间
- 对于越底层的api,做一些了解,有利于高层遇到问题后排查原因
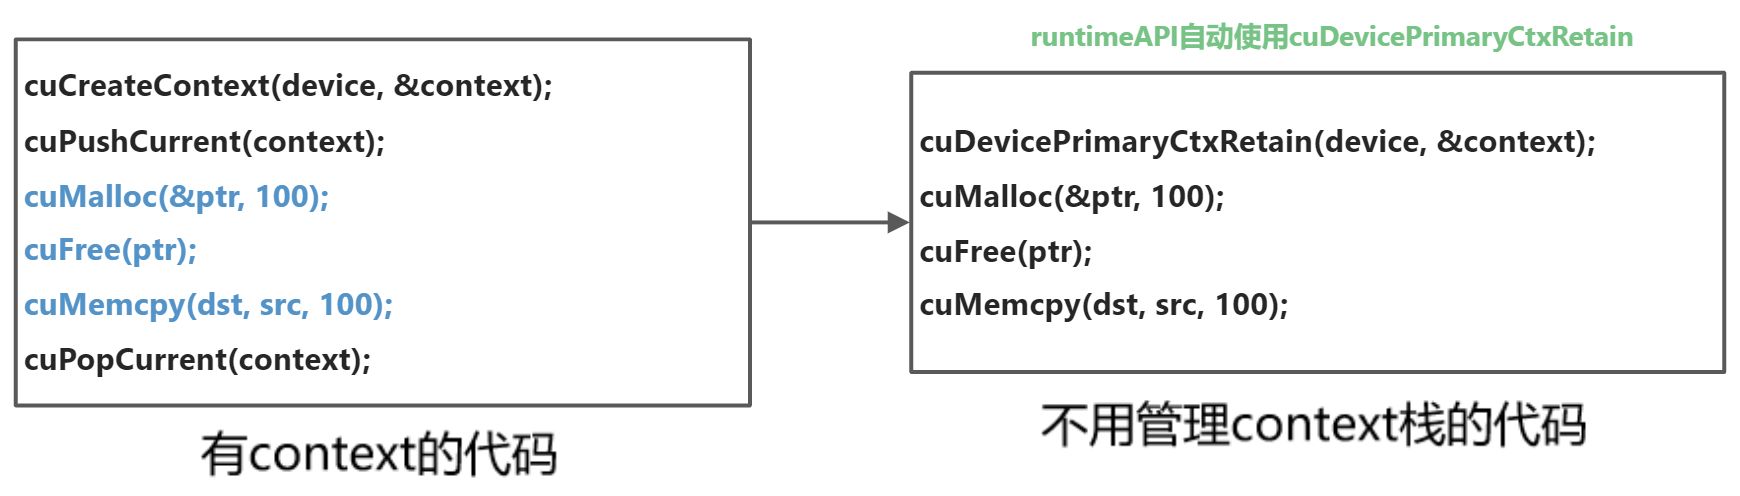
关于context,有两种:
- 手动管理的context,
cuCtxCreate(手动管理,以堆栈方式push/pop) - 自动管理的context,
**cuDevicePrimaryCtxRetain**(自动管理,runtime api以此为基础) | 关于内存,有两大类:
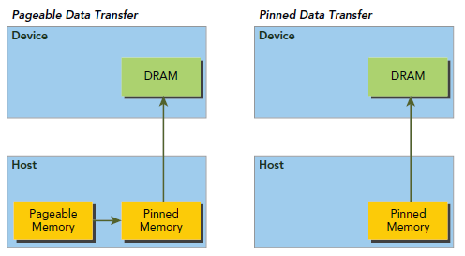
1. CPU内存,称之为Host Memory
1. Pageable Memory:可分页内存
1. Page-Locked Memory:页锁定内存
2. GPU内存,称之为Device Memory
1. Global Memory:全局内存
1. Shared Memory:共享内存
1. 其他多种内存
| |
| —- | —- |
|
| —- | —- |
trtpy中关于cuda driver api下载,对应于系列名称:cuda-driver-api
- 获取代码:
trtpy get-series cuda-driver-api 查询系列清单:
trtpy series-detail cuda-driver-api初始化和检查的理解,CUDA错误检查习惯
01.
cuInit- 驱动初始化cuInit的意义是,初始化驱动API,如果不执行,则所有API都将返回错误,全局执行一次即可;- 没有对应的
cuDestroy,不需要释放,程序销毁自动释放;如果退出后执行释放内存的函数后,会发生错误。 ```cpp
// CUDA驱动头文件cuda.h
include
include // 因为要使用printf
include
int main() {
/*cuInit(int flags), 这里的flags目前必须给0;对于cuda的所有函数,必须先调用cuInit,否则其他API都会返回CUDA_ERROR_NOT_INITIALIZEDhttps://docs.nvidia.com/cuda/archive/11.2.0/cuda-driver-api/group__CUDA__INITIALIZE.html*/CUresult code = cuInit(0); // CUresult 类型:用于接收一些可能的错误代码if (code != CUresult::CUDA_SUCCESS){const char *err_message = nullptr;cuGetErrorString(code, &err_message); // 获取错误代码的字符串描述// cuGetErrorName (code, &err_message); // 也可以直接获取错误代码的字符串printf("Initialize failed. code = %d, message = %s\n", code, err_message);return -1;}/*测试获取当前cuda驱动的版本显卡、CUDA、CUDA Toolkit1. 显卡驱动版本,比如:Driver Version: 460.842. CUDA驱动版本:比如:CUDA Version: 11.23. CUDA Toolkit版本:比如自行下载时选择的10.2、11.2等;这与前两个不是一回事, CUDA Toolkit的每个版本都需要最低版本的CUDA驱动程序三者版本之间有依赖关系, 可参照https://docs.nvidia.com/cuda/cuda-toolkit-release-notes/index.htmlnvidia-smi显示的是显卡驱动版本和此驱动最高支持的CUDA驱动版本*/int driver_version = 0;code = cuDriverGetVersion(&driver_version); // 获取驱动版本printf("CUDA Driver version is %d\n", driver_version); // 若driver_version为11020指的是11.2// 测试获取当前设备信息char device_name[100]; // char 数组CUdevice device = 0;code = cuDeviceGetName(device_name, sizeof(device_name), device); // 获取设备名称、型号如:Tesla V100-SXM2-32GB // 数组名device_name当作指针printf("Device %d name is %s\n", device, device_name);return 0;
}
<a name="fW2KE"></a>
### 02. 返回值检查

- 正确友好的检查cuda函数的返回值,有利于程序的组织结构
- 使得代码可读性更好,错误更容易发现
```cpp

// CUDA驱动头文件cuda.h
#include <cuda.h>

#include <stdio.h>
#include <string.h>

// 使用有参宏定义检查cuda driver是否被正常初始化, 并定位程序出错的文件名、行数和错误信息
// 宏定义中带do...while循环可保证程序的正确性
#define checkDriver(op)    \
    do{                    \
        auto code = (op);  \
        if(code != CUresult::CUDA_SUCCESS){     \
            const char* err_name = nullptr;     \
            const char* err_message = nullptr;  \
            cuGetErrorName(code, &err_name);    \
            cuGetErrorString(code, &err_message);   \
            printf("%s:%d  %s failed. \n  code = %s, message = %s\n", __FILE__, __LINE__, #op, err_name, err_message);   \
            return -1;   \
        }                \
    }while(0)

int main(){

    //检查cuda driver的初始化。虽然不初始化或错误初始化某些API不会报错(不信你试试),但安全起见调用任何API前务必检查cuda driver初始化
    cuInit(2); // 正确的初始化应该给flag = 0
    checkDriver(cuInit(0));

    // 测试获取当前cuda驱动的版本
    int driver_version = 0;
    checkDriver(cuDriverGetVersion(&driver_version));
    printf("Driver version is %d\n", driver_version);

    // 测试获取当前设备信息
    char device_name[100];
    CUdevice device = 0;
    checkDriver(cuDeviceGetName(device_name, sizeof(device_name), device));
    printf("Device %d name is %s\n", device, device_name);
    return 0;
}
checkDriver宏定义,不美观且繁琐,可读性差,且return为-1,如果函数调用返回的不是整数时,程序就会报错。推荐版本实现如下:
// CUDA驱动头文件cuda.h
#include <cuda.h>

#include <stdio.h>
#include <string.h>

// 很明显,这种代码封装方式,更加的便于使用
//宏定义 #define <宏名>(<参数表>) <宏体>
#define checkDriver(op) __check_cuda_driver((op), #op, __FILE__, __LINE__)

bool __check_cuda_driver(CUresult code, const char *op, const char *file, int line)
{

    if (code != CUresult::CUDA_SUCCESS)
    {
        const char *err_name = nullptr;
        const char *err_message = nullptr;
        cuGetErrorName(code, &err_name);
        cuGetErrorString(code, &err_message);
        printf("%s:%d  %s failed. \n  code = %s, message = %s\n", file, line, op, err_name, err_message);
        return false;
    }
    return true;
}

int main()
{

    // 检查cuda driver的初始化
    // 实际调用的是__check_cuda_driver这个函数
    checkDriver(cuInit(0));

    // 测试获取当前cuda驱动的版本
    int driver_version = 0;
    if (!checkDriver(cuDriverGetVersion(&driver_version)))
    {
        return -1;
    }
    printf("Driver version is %d\n", driver_version);

    // 测试获取当前设备信息
    char device_name[100];
    CUdevice device = 0;
    checkDriver(cuDeviceGetName(device_name, sizeof(device_name), device));
    printf("Device %d name is %s\n", device, device_name);
    return 0;
}
03. 上下文管理设置,以及其作用
CUcontext
- context是一种上下文,关联对GPU的所有操作
- context与一块显卡关联,一个显卡可以被多个context关联,所以发送给GPU的请求,都要经过Context处理。
- 每个线程都有一个栈结构储存context,栈顶是当前使用的context,对应有push、pop函数操作context的栈,所有api都以当前context(栈顶)为操作目标
- 如果执行任何操作你都需要传递一个device决定送到哪个设备执行,超麻烦的的😮

- 由于高频操作,是一个线程基本固定访问一个显卡不变,且只使用一个context,很少会用到多context
- CreateContext、PushCurrent、PopCurrent这种多context管理就显得麻烦,还得再简单
- 因此推出了cuDevicePrimaryCtxRetain,为设备关联主context,分配、释放、设置、栈都不用你管
- primaryContext:给我设备id,给你context并设置好,此时一个显卡对应一个primary context
- 不同线程,只要设备id一样,primary context就一样。context是线程安全的
// CUDA驱动头文件cuda.h
#include <cuda.h> // include <> 和 "" 的区别
#include <stdio.h> // include <> : 标准库文件
#include <string.h> // include "" : 自定义文件 详细情况请查看 readme.md -> 5
#define checkDriver(op) __check_cuda_driver((op), #op, __FILE__, __LINE__)
bool __check_cuda_driver(CUresult code, const char *op, const char *file, int line)
{
if (code != CUresult::CUDA_SUCCESS)
{ // 如果 成功获取CUDA情况下的返回值 与我们给定的值(0)不相等, 即条件成立, 返回值为flase
const char *err_name = nullptr; // 定义了一个字符串常量的空指针
const char *err_message = nullptr;
cuGetErrorName(code, &err_name);
cuGetErrorString(code, &err_message);
printf("%s:%d %s failed. \n code = %s, message = %s\n", file, line, op, err_name, err_message); //打印错误信息
return false;
}
return true;
}
int main()
{
// 检查cuda driver的初始化
checkDriver(cuInit(0));
// 为设备创建上下文
CUcontext ctxA = nullptr; // CUcontext 其实是 struct CUctx_st*(是一个指向结构体CUctx_st的指针)
CUcontext ctxB = nullptr;
CUdevice device = 0;
checkDriver(cuCtxCreate(&ctxA, CU_CTX_SCHED_AUTO, device)); // 这一步相当于告知要某一块设备上的某块地方创建 ctxA 管理数据。输入参数 参考 https://www.cs.cmu.edu/afs/cs/academic/class/15668-s11/www/cuda-doc/html/group__CUDA__CTX_g65dc0012348bc84810e2103a40d8e2cf.html
checkDriver(cuCtxCreate(&ctxB, CU_CTX_SCHED_AUTO, device)); // 参考 1.ctx-stack.jpg
printf("ctxA = %p\n", ctxA);
printf("ctxB = %p\n", ctxB);
/*
contexts 栈:
ctxB -- top <--- current_context
ctxA
...
*/
// 获取当前上下文信息
CUcontext current_context = nullptr;
checkDriver(cuCtxGetCurrent(¤t_context)); // 这个时候current_context 就是上面创建的context
printf("current_context = %p\n", current_context);
// 可以使用上下文堆栈对设备管理多个上下文
// 压入当前context
checkDriver(cuCtxPushCurrent(ctxA)); // 将这个 ctxA 压入CPU调用的thread上。专门用一个thread以栈的方式来管理多个contexts的切换
checkDriver(cuCtxGetCurrent(¤t_context)); // 获取current_context (即栈顶的context)
printf("after pushing, current_context = %p\n", current_context);
/*
contexts 栈:
ctxA -- top <--- current_context
ctxB
...
*/
// 弹出当前context
CUcontext popped_ctx = nullptr;
checkDriver(cuCtxPopCurrent(&popped_ctx)); // 将当前的context pop掉,并用popped_ctx承接它pop出来的context
checkDriver(cuCtxGetCurrent(¤t_context)); // 获取current_context(栈顶的)
printf("after poping, popped_ctx = %p\n", popped_ctx); // 弹出的是ctxA
printf("after poping, current_context = %p\n", current_context); // current_context是ctxB
checkDriver(cuCtxDestroy(ctxA));
checkDriver(cuCtxDestroy(ctxB));
// 更推荐使用cuDevicePrimaryCtxRetain获取与设备关联的context
// 注意这个重点,以后的runtime也是基于此, 自动为设备只关联一个context
checkDriver(cuDevicePrimaryCtxRetain(&ctxA, device)); // 在 device 上指定一个新地址对ctxA进行管理
printf("ctxA = %p\n", ctxA);
checkDriver(cuDevicePrimaryCtxRelease(device));
return 0;
}
04. memory
// CUDA驱动头文件cuda.h
#include <cuda.h>

#include <stdio.h>
#include <string.h>

#define checkDriver(op) __check_cuda_driver((op), #op, __FILE__, __LINE__)

bool __check_cuda_driver(CUresult code, const char *op, const char *file, int line)
{

    if (code != CUresult::CUDA_SUCCESS)
    {
        const char *err_name = nullptr;
        const char *err_message = nullptr;
        cuGetErrorName(code, &err_name);
        cuGetErrorString(code, &err_message);
        printf("%s:%d  %s failed. \n  code = %s, message = %s\n", file, line, op, err_name, err_message);
        return false;
    }
    return true;
}

int main()
{

    // 检查cuda driver的初始化
    checkDriver(cuInit(0));

    // 创建上下文
    CUcontext context = nullptr;
    CUdevice device = 0;
    checkDriver(cuCtxCreate(&context, CU_CTX_SCHED_AUTO, device));
    printf("context = %p\n", context);

    // 输入device prt向设备要一个100 byte的线性内存,并返回地址
    CUdeviceptr device_memory_pointer = 0;
    checkDriver(cuMemAlloc(&device_memory_pointer, 100)); // 注意这是指向device的pointer,
    printf("device_memory_pointer = %p\n", device_memory_pointer);

    // 输入二级指针向host要一个100 byte的锁页内存,专供设备访问。参考 2.cuMemAllocHost.jpg 讲解视频:https://v.douyin.com/NrYL5KB/
    float *host_page_locked_memory = nullptr;
    checkDriver(cuMemAllocHost((void **)&host_page_locked_memory, 100));
    printf("host_page_locked_memory = %p\n", host_page_locked_memory);

    // 向page-locked memory 里放数据(仍在CPU上),可以让GPU可快速读取
    host_page_locked_memory[0] = 123;
    printf("host_page_locked_memory[0] = %f\n", host_page_locked_memory[0]);
    /*
        记住这一点
        host page locked memory 声明的时候为float*型,可以直接转换为device ptr,这才可以送给cuda核函数(利用DMA(Direct Memory Access)技术)
        初始化内存的值: cuMemsetD32 ( CUdeviceptr dstDevice, unsigned int  ui, size_t N )
        初始化值必须是无符号整型,因此需要将new_value进行数据转换:
        但不能直接写为:(int)value,必须写为*(int*)&new_value, 我们来分解一下这条语句的作用:
        1. &new_value获取float new_value的地址
        (int*)将地址从float * 转换为int*以避免64位架构上的精度损失
        *(int*)取消引用地址,最后获取引用的int值
     */

    float new_value = 555;
    checkDriver(cuMemsetD32((CUdeviceptr)host_page_locked_memory, *(int *)&new_value, 1)); //??? cuMemset用来干嘛?
    printf("host_page_locked_memory[0] = %f\n", host_page_locked_memory[0]);

    // 释放内存
    checkDriver(cuMemFreeHost(host_page_locked_memory));
    return 0;
}

若有收获,就点个赞吧
0 人点赞
