版本
代码
项目代码部分
@SpringBootApplicationpublic class SpringbootUploadApplication {public static void main(String[] args) {SpringApplication.run(SpringbootUploadApplication.class, args);}}
源码部分
/**注释翻译:一,springboot项目的启动接口,二,官方认为的启动步骤有4个:1.根据路径来创建容器2.将命令行参数收集,然后注册到spring属性3.刷新容器,加载所有单例对象4.触发所有CommandLineRunner实现类三,扩展点:1.先new SpringApplication2.然后自定义应用设置3.最后再run四,怎么注册组件到spring容器1.@Configuration(常用)2.AnnotatedBeanDefinitionReader3.XmlBeanDefinitionReader和GroovyBeanDefinitionReader4.ClassPathBeanDefinitionScanner(常用)五,配置属性spring.main.sources =#要包括在ApplicationContext中的Sources(类名,包名或XML资源位置)。spring.main.web-application-type =#在Web环境中运行应用程序(默认情况下自动检测)。spring.main.banner-mode=off=#设置banner*/public class SpringApplication {//1.静态启动public static ConfigurableApplicationContext run(Class<?> primarySource, String... args) {return run(new Class<?>[] { primarySource }, args);}//2.new对象,设置属性,调用run方法public static ConfigurableApplicationContext run(Class<?>[] primarySources, String[] args) {//步骤1. 初始化SpringApplication实例return new SpringApplication(primarySources).run(args);}//2.1设置属性public SpringApplication(ResourceLoader resourceLoader, Class<?>... primarySources) {this.resourceLoader = resourceLoader;Assert.notNull(primarySources, "PrimarySources must not be null");this.primarySources = new LinkedHashSet<>(Arrays.asList(primarySources));this.webApplicationType = WebApplicationType.deduceFromClasspath();this.bootstrappers = new ArrayList<>(getSpringFactoriesInstances(Bootstrapper.class));setInitializers((Collection) getSpringFactoriesInstances(ApplicationContextInitializer.class));setListeners((Collection) getSpringFactoriesInstances(ApplicationListener.class));this.mainApplicationClass = deduceMainApplicationClass();}//2.2run方法public ConfigurableApplicationContext run(String... args) {StopWatch stopWatch = new StopWatch();stopWatch.start();DefaultBootstrapContext bootstrapContext = createBootstrapContext();ConfigurableApplicationContext context = null;configureHeadlessProperty();////步骤2.发布Spring启动事件SpringApplicationRunListeners listeners = getRunListeners(args);listeners.starting(bootstrapContext, this.mainApplicationClass);try {//步骤3. 封装命令行参数DefaultApplicationArgumentsApplicationArguments applicationArguments = new DefaultApplicationArguments(args);//步骤4. prepareEnvironment()准备环境ConfigurableEnvironment environment = prepareEnvironment(listeners, bootstrapContext, applicationArguments);configureIgnoreBeanInfo(environment);//步骤5: printBanner()打印BannerBanner printedBanner = printBanner(environment);//步骤6: createApplicationContext()创建应用上下文context = createApplicationContext();context.setApplicationStartup(this.applicationStartup);//步骤8: prepareContext()准备应用上下文prepareContext(bootstrapContext, context, environment, listeners, applicationArguments, printedBanner);//步骤9: refreshContext()刷新应用上下文refreshContext(context);//步骤10: 启动完成, 发布ApplicationStartedEvent, ApplicationReadyEvent事件afterRefresh(context, applicationArguments);stopWatch.stop();if (this.logStartupInfo) {new StartupInfoLogger(this.mainApplicationClass).logStarted(getApplicationLog(), stopWatch);}//发布ApplicationStartedEventlisteners.started(context);callRunners(context, applicationArguments);}catch (Throwable ex) {handleRunFailure(context, ex, listeners);throw new IllegalStateException(ex);}try {//发布ApplicationReadyEvent事件listeners.running(context);}catch (Throwable ex) {handleRunFailure(context, ex, null);throw new IllegalStateException(ex);}return context;}}
注解部分
springboot中的类SPI扩展机制
在springboot的自动装配过程中,最终会加载META-INF/spring.factories文件,而加载的过程是由SpringFactoriesLoader加载的。从CLASSPATH下的每个Jar包中搜寻所有META-INF/spring.factories配置文件,然后将解析properties文件,找到指定名称的配置后返回。需要注意的是,其实这里不仅仅是会去ClassPath路径下查找,会扫描所有路径下的Jar包,只不过这个文件只会在Classpath下的jar包中
代码
@SpringBootConfiguration@EnableAutoConfiguration@ComponentScan(excludeFilters = { @Filter(type = FilterType.CUSTOM, classes = TypeExcludeFilter.class),@Filter(type = FilterType.CUSTOM, classes = AutoConfigurationExcludeFilter.class) })public @interface SpringBootApplication@AutoConfigurationPackage@Import(AutoConfigurationImportSelector.class)public @interface EnableAutoConfiguration
重点看这个类AutoConfigurationImportSelector
public class AutoConfigurationImportSelector implements DeferredImportSelector, BeanClassLoaderAware,ResourceLoaderAware, BeanFactoryAware, EnvironmentAware, Ordered {@Overridepublic String[] selectImports(AnnotationMetadata annotationMetadata) {if (!isEnabled(annotationMetadata)) {return NO_IMPORTS;}AutoConfigurationEntry autoConfigurationEntry = getAutoConfigurationEntry(annotationMetadata);return StringUtils.toStringArray(autoConfigurationEntry.getConfigurations());}protected AutoConfigurationEntry getAutoConfigurationEntry(AnnotationMetadata annotationMetadata) {if (!isEnabled(annotationMetadata)) {return EMPTY_ENTRY;}AnnotationAttributes attributes = getAttributes(annotationMetadata);List<String> configurations = getCandidateConfigurations(annotationMetadata, attributes);configurations = removeDuplicates(configurations);Set<String> exclusions = getExclusions(annotationMetadata, attributes);checkExcludedClasses(configurations, exclusions);configurations.removeAll(exclusions);configurations = getConfigurationClassFilter().filter(configurations);fireAutoConfigurationImportEvents(configurations, exclusions);return new AutoConfigurationEntry(configurations, exclusions);}protected List<String> getCandidateConfigurations(AnnotationMetadata metadata, AnnotationAttributes attributes) {List<String> configurations = SpringFactoriesLoader.loadFactoryNames(getSpringFactoriesLoaderFactoryClass(),getBeanClassLoader());Assert.notEmpty(configurations, "No auto configuration classes found in META-INF/spring.factories. If you "+ "are using a custom packaging, make sure that file is correct.");return configurations;}}
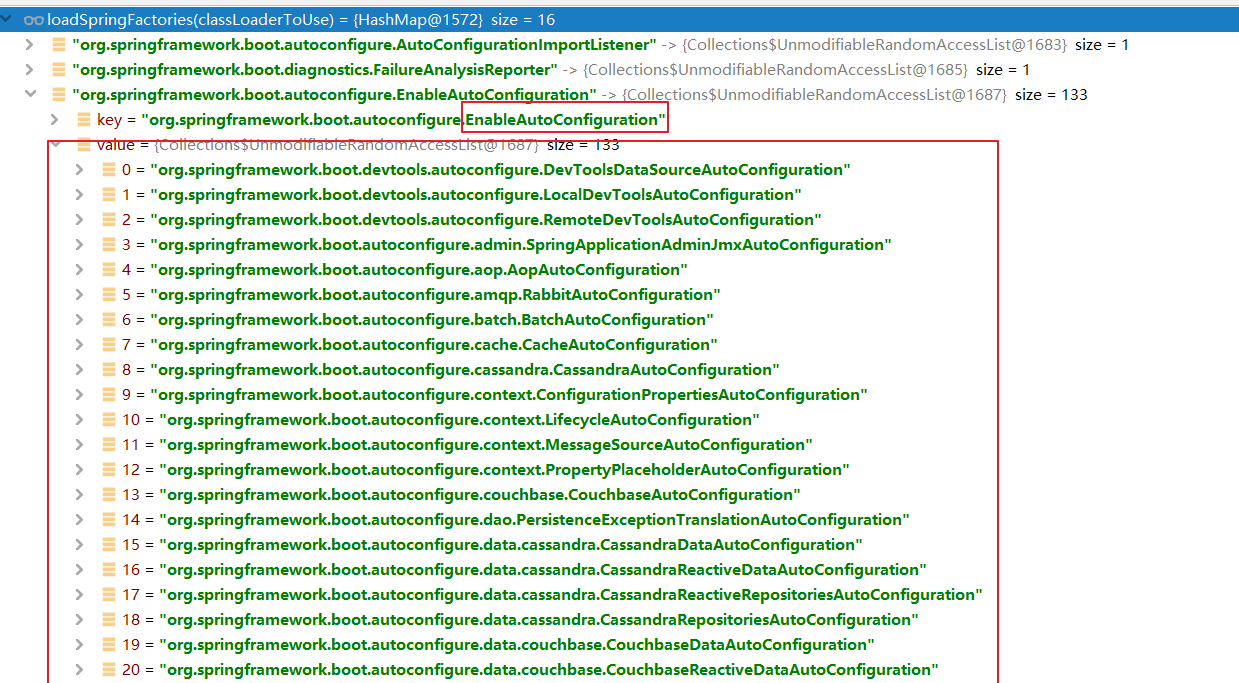
从这边META-INF/spring.factories找到很多自动配置类
public final class SpringFactoriesLoader {/*** The location to look for factories.* <p>Can be present in multiple JAR files.*/public static final String FACTORIES_RESOURCE_LOCATION = "META-INF/spring.factories";//缓存static final Map<ClassLoader, Map<String, List<String>>> cache = new ConcurrentReferenceHashMap<>();//Load the fully qualified class names of factory implementations of the given type from "META-INF/spring.factories", using the given class loader.//As of Spring Framework 5.3, if a particular implementation class name is discovered more than once for the given factory type, duplicates will be ignoredpublic static List<String> loadFactoryNames(Class<?> factoryType, @Nullable ClassLoader classLoader) {ClassLoader classLoaderToUse = classLoader;if (classLoaderToUse == null) {classLoaderToUse = SpringFactoriesLoader.class.getClassLoader();}String factoryTypeName = factoryType.getName();return loadSpringFactories(classLoaderToUse).getOrDefault(factoryTypeName, Collections.emptyList());}private static Map<String, List<String>> loadSpringFactories(ClassLoader classLoader) {Map<String, List<String>> result = cache.get(classLoader);if (result != null) {return result;}result = new HashMap<>();try {Enumeration<URL> urls = classLoader.getResources(FACTORIES_RESOURCE_LOCATION);while (urls.hasMoreElements()) {URL url = urls.nextElement();UrlResource resource = new UrlResource(url);Properties properties = PropertiesLoaderUtils.loadProperties(resource);for (Map.Entry<?, ?> entry : properties.entrySet()) {String factoryTypeName = ((String) entry.getKey()).trim();String[] factoryImplementationNames =StringUtils.commaDelimitedListToStringArray((String) entry.getValue());for (String factoryImplementationName : factoryImplementationNames) {result.computeIfAbsent(factoryTypeName, key -> new ArrayList<>()).add(factoryImplementationName.trim());}}}// Replace all lists with unmodifiable lists containing unique elementsresult.replaceAll((factoryType, implementations) -> implementations.stream().distinct().collect(Collectors.collectingAndThen(Collectors.toList(), Collections::unmodifiableList)));cache.put(classLoader, result);}catch (IOException ex) {throw new IllegalArgumentException("Unable to load factories from location [" +FACTORIES_RESOURCE_LOCATION + "]", ex);}return result;}}
流程初探
- 初始化SpringApplication实例
- 通过加载各个Web类型的容器类,判断当前模块web类型
- 加载Application初始化器
- 加载Application监听器
- 找到启动类
- 发布启动事件ApplicationStartingEvent
- 封装命令行参数
- DefaultApplicationArguments
- prepareEnvironment()准备环境
- 获取或者创建环境
- 配置环境
- 发布环境准备事件
- Application绑定环境
- 环境转换
- 将环境依附到PropertySources
- 打印banner
- 实例化上下文AnnotationConfigServletWebServerApplicationContext
- 实例化IOC容器DefaultListableBeanFactory
- AnnotatedBeanDefinitionReader读取bean定义,处理逻辑
- 异常上报
- 改到了spring.factories中的org.springframework.boot.SpringBootExceptionReporter=org.springframework.boot.diagnostics.FailureAnalyzers
- 准备应用上下文prepareContext()
- 统一ApplicationContext和Application使用的environment
- 后置处理ApplicationContext
- 执行Initializers
- 发布contextPrepared事件
- 打印启动和profile日志
- 注册单例bean
- 加载启动类
- 发布contextLoaded事件
- 刷新应用上下文refreshContext()
- 更新刷新状态
- 处理beanFactory的后置处理器
- ConfigurationClassPostProcessor处理器, 处理模块中@Configuration注解 扫描加载BeanDefinition
- onRefresh()方法中, 实例化了TomcatWebServer
- finishRefresh()中, 实例化了所有bean
- 发布启动完成事件(ApplicationStartedEvent, ApplicationReadyEvent)
- 发布成功事件
- 发布失败事件
第九步初始化上下文继续深入
https://www.zhihu.com/question/48427693/answer/691483076
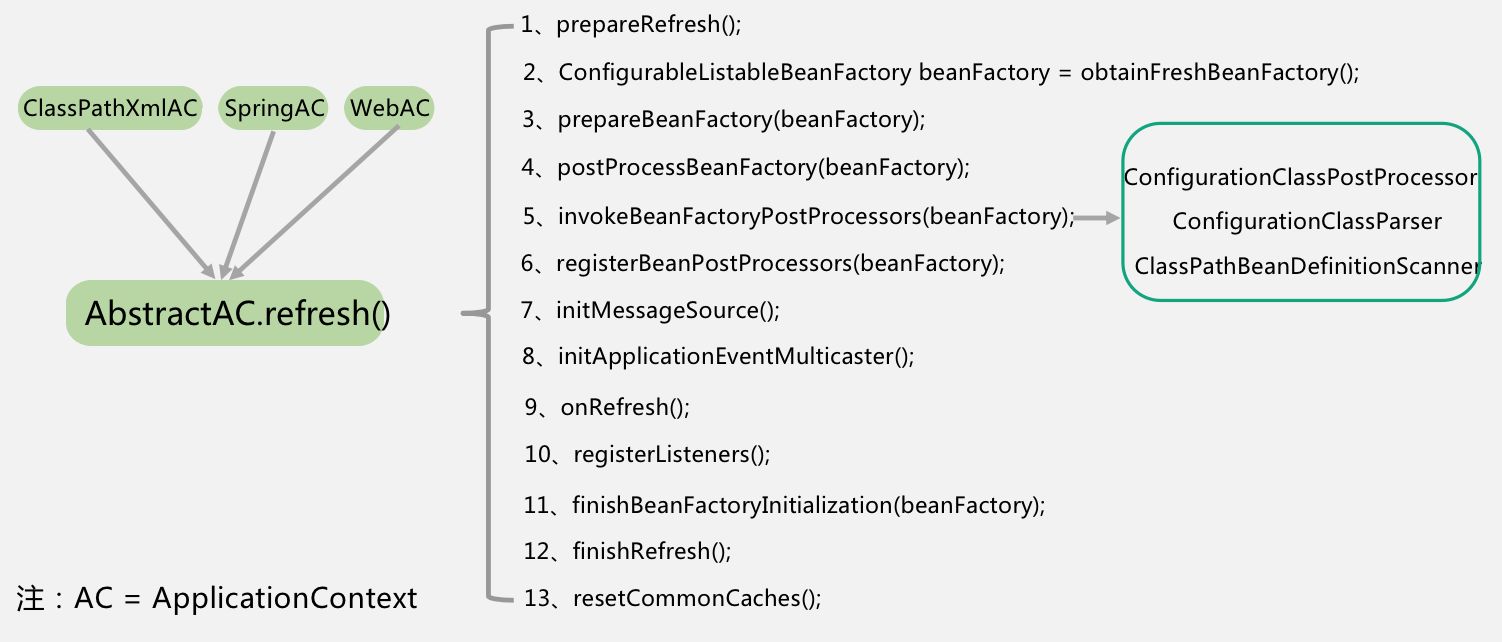
refresh方法中,操作共分13步:
第1步:对刷新进行准备,包括设置开始时间、设置激活状态、初始化context环境中的占位符,这个动作根据子类的需求由子类来执行,然后验证是否缺失必要的properties;
第2步:刷新并获得内部的bean factory;
第3步:对bean factory进行准备工作,比如设置类加载器和后置处理器、配置不进行自动装配的类型、注册默认的环境bean;
第4步:为context的子类提供后置处理bean factory的扩展能力。如果子类想在bean定义加载完成后,开始初始化上下文之前做一些特殊逻辑,可以复写这个方法;
第5步,执行context中注册的bean factory后缀处理器;
注:这里有两种后置处理器,一种是可以注册bean的后缀处理器,另一种是针对bean factory进行处理的后置处理器。执行的顺序是,先按优先级执行可注册bean的处理器,在按优先级执行针对beanfactory的处理器。
对springboot来说,这一步会进行注解bean definition的解析。流程如右面小框中所示,由ConfigurationClassPostProcessor触发、由ClassPathBeanDefinitionScanner解析并注册到bean factory。
第6步:按优先级顺序在beanfactory中注册bean的后缀处理器,bean后置处理器可以在bean初始化前、后执行处理;
第7步:初始化消息源,消息源用来支持消息的国际化;
第8步:初始化应用事件广播器。事件广播器用来向applicationListener通知各种应用产生的事件,是一个标准的观察者模式;
第9步,是留给子类的扩展步骤,用来让特定的context子类初始化其他的bean;
第10步,把实现了ApplicationListener的bean注册到事件广播器,并对广播器中的早期未广播事件进行通知;
第11步,冻结所有bean描述信息的修改,实例化非延迟加载的单例bean;
第12步,完成上下文的刷新工作,调用LifecycleProcessor的onFresh()方法以及发布ContextRefreshedEvent事件;
第13步:在finally中,执行第十三步,重置公共的缓存,比如ReflectionUtils中的缓存、AnnotationUtils中的缓存等等;
具体代码
public abstract class AbstractApplicationContext extends DefaultResourceLoader implements ConfigurableApplicationContext {@Overridepublic void refresh() throws BeansException, IllegalStateException {synchronized (this.startupShutdownMonitor) {StartupStep contextRefresh = this.applicationStartup.start("spring.context.refresh");// Prepare this context for refreshing.prepareRefresh();// Tell the subclass to refresh the internal bean factory.ConfigurableListableBeanFactory beanFactory = obtainFreshBeanFactory();// Prepare the bean factory for use in this context.prepareBeanFactory(beanFactory);try {// Allows post-processing of the bean factory in context subclasses.postProcessBeanFactory(beanFactory);StartupStep beanPostProcess = this.applicationStartup.start("spring.context.beans.post-process");// Invoke factory processors registered as beans in the context.invokeBeanFactoryPostProcessors(beanFactory);// Register bean processors that intercept bean creation.registerBeanPostProcessors(beanFactory);beanPostProcess.end();// Initialize message source for this context.initMessageSource();// Initialize event multicaster for this context.initApplicationEventMulticaster();// Initialize other special beans in specific context subclasses.onRefresh();// Check for listener beans and register them.registerListeners();// Instantiate all remaining (non-lazy-init) singletons.finishBeanFactoryInitialization(beanFactory);// Last step: publish corresponding event.finishRefresh();}catch (BeansException ex) {if (logger.isWarnEnabled()) {logger.warn("Exception encountered during context initialization - " +"cancelling refresh attempt: " + ex);}// Destroy already created singletons to avoid dangling resources.destroyBeans();// Reset 'active' flag.cancelRefresh(ex);// Propagate exception to caller.throw ex;}finally {// Reset common introspection caches in Spring's core, since we// might not ever need metadata for singleton beans anymore...resetCommonCaches();contextRefresh.end();}}}
Spring中bean的生命周期
**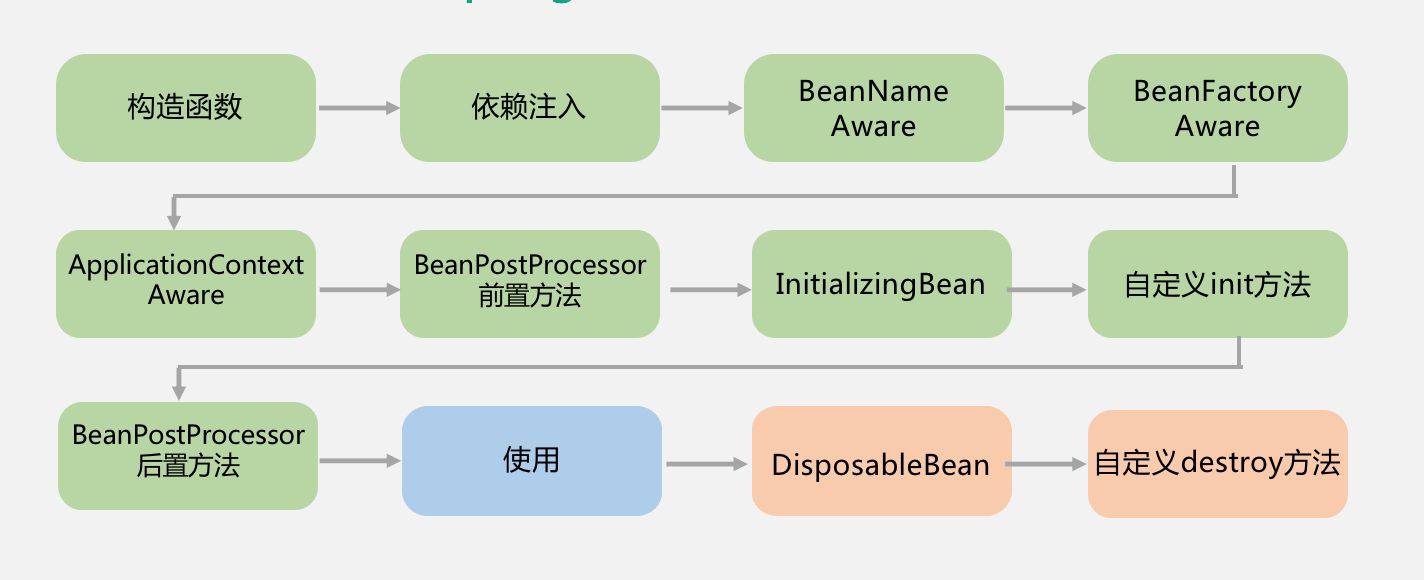
第1步:调用bean的构造方法创建bean;
第2步:通过反射调用setter方法进行属性的依赖注入;
第3步:如果实现BeanNameAware接口的话,会设置bean的name;
第4步:如果实现了BeanFactoryAware,会把bean factory设置给bean;
第5步:如果实现了ApplicationContextAware,会给bean设置ApplictionContext;
第6步:如果实现了BeanPostProcessor接口,则执行前置处理方法;
第7步:实现了InitializingBean接口的话,执行afterPropertiesSet方法;
第8步:执行自定义的init方法;
第9步:执行BeanPostProcessor接口的后置处理方法。
Spring扩展接口
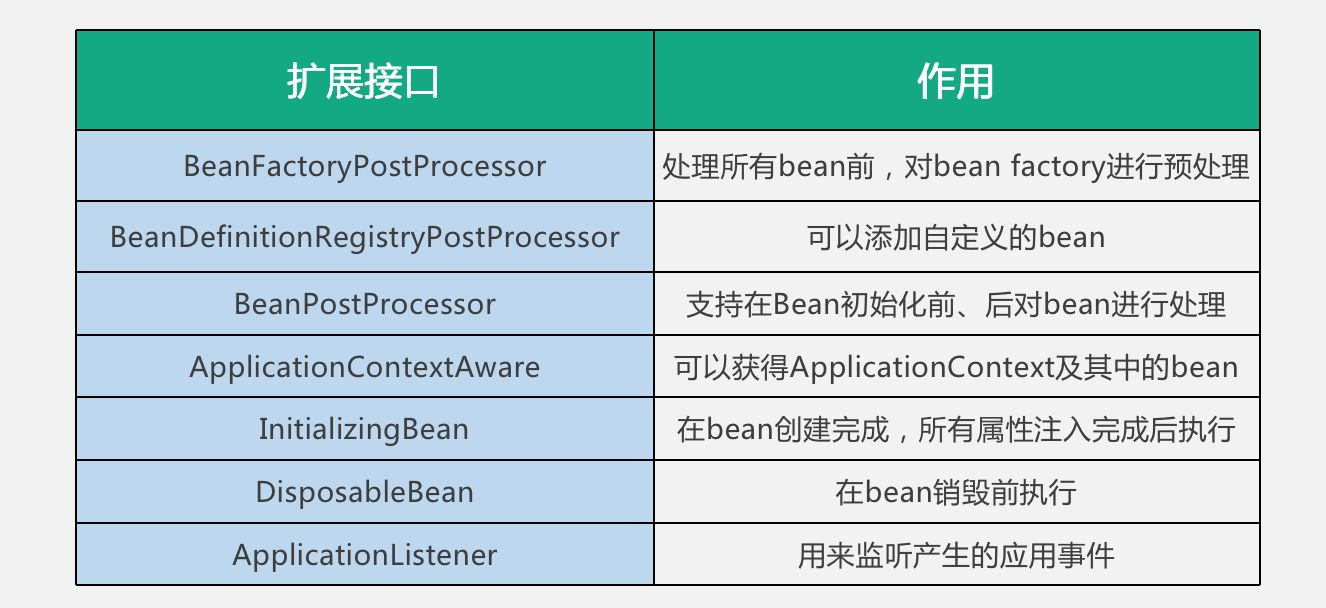
1.BeanFactoryPostProcessor
是beanFactory后置处理器,支持在bean factory标准初始化完成后,对bean factory进行一些额外处理。在讲context初始化流程时介绍过,这时所有的bean的描述信息已经加载完毕,但是还没有进行bean初始化。例如前面提到的PropertyPlaceholderConfigurer,就是在这个扩展点上对bean属性中的占位符进行替换。
2.BeanDefinitionRegistryPostProcessor
它扩展自BeanFactoryPostProcessor,在执行BeanFactoryPostProcessor的功能前,提供了可以添加bean definition的能力,允许在初始化一般bean前,注册额外的bean。例如可以在这里根据bean的scope创建一个新的代理bean。
3.BeanPostProcessor
提供了在bean初始化之前和之后插入自定义逻辑的能力。与BeanFactoryPostProcessor的区别是处理的对象不同,BeanFactoryPostProcessor是对beanfactory进行处理,BeanPostProcessor是对bean进行处理。
注:上面这三个扩展点,可以通过实现Ordered和PriorityOrdered接口来指定执行顺序。实现PriorityOrdered接口的processor会先于实现Ordered接口的执行。
4.ApplicationContextAware
可以获得ApplicationContext及其中的bean,当需要在代码中动态获取bean时,可以通过实现这个接口来实现。
5.InitializingBean
可以在bean初始化完成,所有属性设置完成后执行特定逻辑,例如对自动装配对属性进行验证等等。
6.DisposableBean
用于在bean被销毁前执行特定的逻辑,例如做一些回收工作等。
7.ApplicationListener**
用来监听spring的标准应用事件或者自定义事件。

若有收获,就点个赞吧
0 人点赞
